Python作业:直方图、均衡化、高斯滤波

Python直方图、均衡化、高斯滤波
- 测试原图
- 直方图
- 基本原理
- matplotlib库绘制直方图
- RGB三通道直方图
- 直方图均衡化
- 基本原理
- PCV库完成直方图均衡化
- 高斯滤波
- 基本原理
opencv高斯滤波实现
(免费学习推荐:python视频教程)
测试原图


直方图
基本原理
什么是直方图:图像的直方图描述图像的灰度级和对应灰度级在图像中出现的次数(频率)的关系,通过直方图可以进行图像分割、检索、分类等操作
matplotlib库的hist函数:hist函数能够帮助绘制直方图。它的参数很多,这里用到前两个参数:x、bins。x参数表示一个像素的一维数组,如果是一维以上的数组可以使用flatten方法展平成一维,一般来说读入一幅图片都是一个二维的矩阵,都需要进行展平的操作。bins参数表示要显示直方图的柱数
假设有一个二维数组img=[[159,120,130],[100,84,92],[168,150,212]]。其数字表示图像的像素值,展平后img=[159,120,130,100,84,92,168,150,212],使用hist函数绘制出的直方图如下图。横轴表示像素值,纵轴表示该像素值出现的频率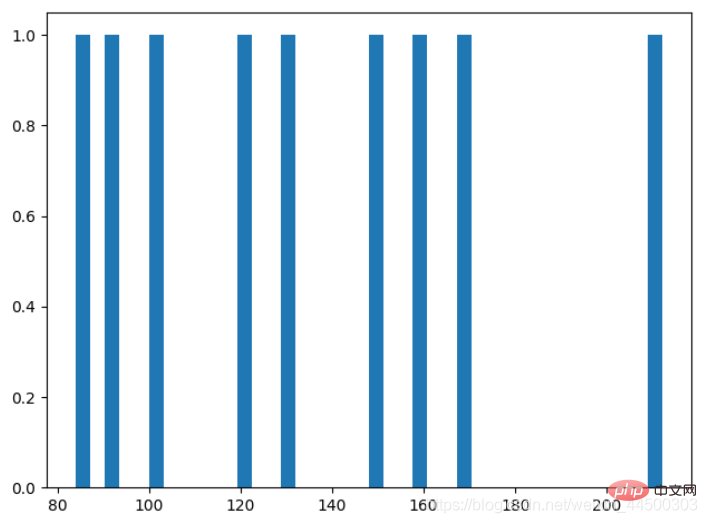
opencv提供的cv2.calcHist()绘制直方图:calcHist函数需要传入读取的图片image;图像的通道channels,如果是灰度图像channels=0,如果分别是r、g、b通道,则传入0、1、2。
matplotlib库绘制直方图
课本代码
from PIL import Imagefrom pylab import *# 解决中文乱码plt.rcParams['font.sans-serif'] = 'SimHei'plt.rcParams['axes.unicode_minus'] = False#im = array(Image.open('headimage.jpeg').convert('L')) # 打开图像,并转成灰度图像print(im)figure()subplot(121)gray()contour(im, origin='image') #画图axis('equal') # 自动调整比例axis('off') # 去除x y轴上的刻度title(u'图像轮廓')subplot(122)# flatten()函数可以执行展平操作,返回一个一维数组hist(im.flatten(), 128)print(im.flatten())title(u'图像直方图')plt.xlim([0,260])plt.ylim([0,11000])show()运行结果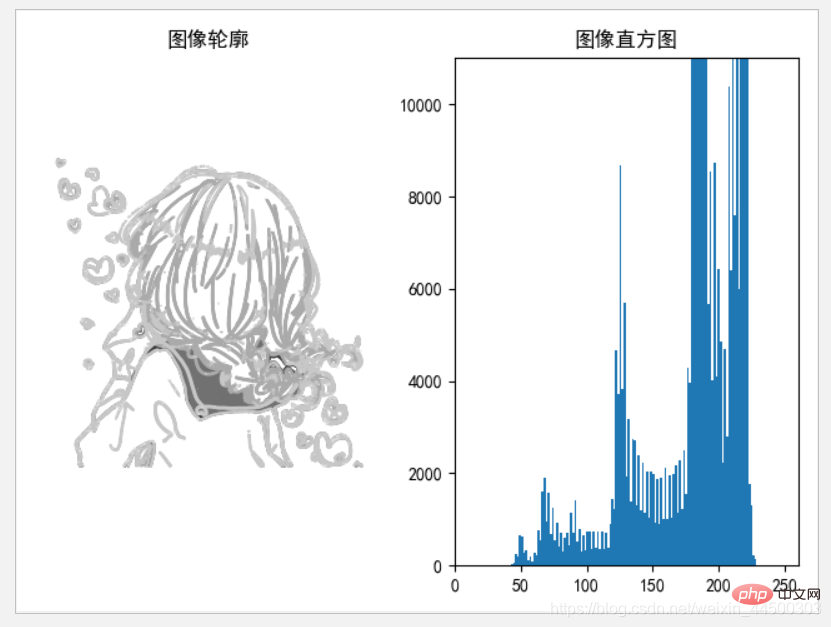
RGB三通道直方图
代码实现
import cv2from matplotlib import pyplot as plt
img = cv2.imread('headimage.jpeg',1)color = ('b','g','r')for i,col in enumerate(color):
    histr = cv2.calcHist([img],[i],None,[256],[0,256])
    plt.plot(histr,color = col)
plt.xlim([0,256])plt.show()运行结果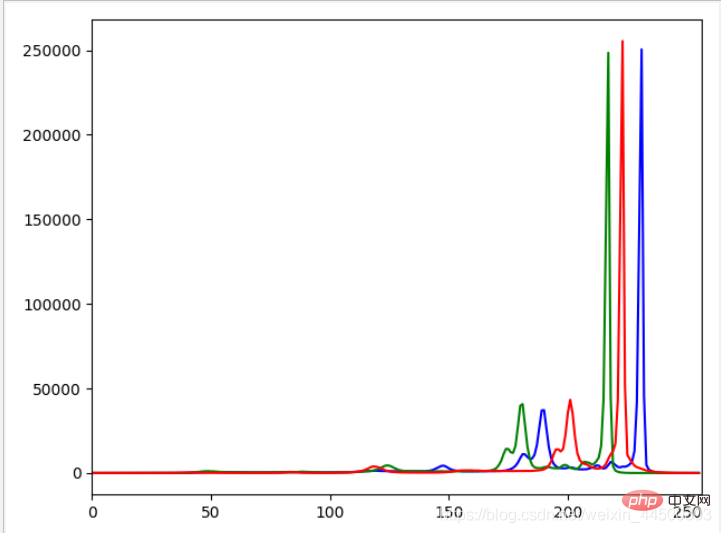
直方图均衡化
基本原理
什么是直方图均衡化:直方图均衡化是利用图像的直方图对对比度进行调整,是图像增强的一种方法。从图片直观上看,均衡化后的图片对比度更强,更加清晰,特征更加明显;从直方图上看,均衡化后的图片的直方图灰度值出现的频率更加均匀。
如何均衡化直方图:
- 直方图均衡化首先要读取一张图片img,并计算该图片的直方图的值imhist(可以使用histogram函数)。
- 得到直方图的值后需要计算该直方图的累计直方图cdf(cdf[i]等于imhist[0]到imhist[i]的总和,可以使用cumsum函数直接得到)。
- 最后就是进行直方图的均衡化,对于图片第i行第j列的像素值img[i, j],利用公式 img[i, j] = cdf[ img[i,j] ] / (m*n)*255进行计算,得到均衡化后的像素值,然后再计算均衡化后的图片的直方图,就得到均衡化后的直方图
使用PCV库的histeq函数均衡化:传入图像im,返回均衡化后的直方图和累计直方图cdf。
PCV库完成直方图均衡化
课本代码
# -*- coding: utf-8 -*-from PIL import Imagefrom pylab import *from PCV.tools import imtools# 添加中文字体支持from matplotlib.font_manager import FontProperties
font = FontProperties(fname=r"c:\windows\fonts\SimSun.ttc", size=14)im = array(Image.open('tire.jpg').convert('L')) # 打开图像,并转成灰度图像im2, cdf = imtools.histeq(im)figure()subplot(2, 2, 1)axis('off')gray()title(u'原始图像', fontproperties=font)imshow(im)subplot(2, 2, 2)axis('off')title(u'直方图均衡化后的图像', fontproperties=font)imshow(im2)subplot(2, 2, 3)axis('off')title(u'原始直方图', fontproperties=font)hist(im.flatten(), 128, density=True)subplot(2, 2, 4)axis('off')title(u'均衡化后的直方图', fontproperties=font)hist(im2.flatten(), 128, density=True)show()运行结果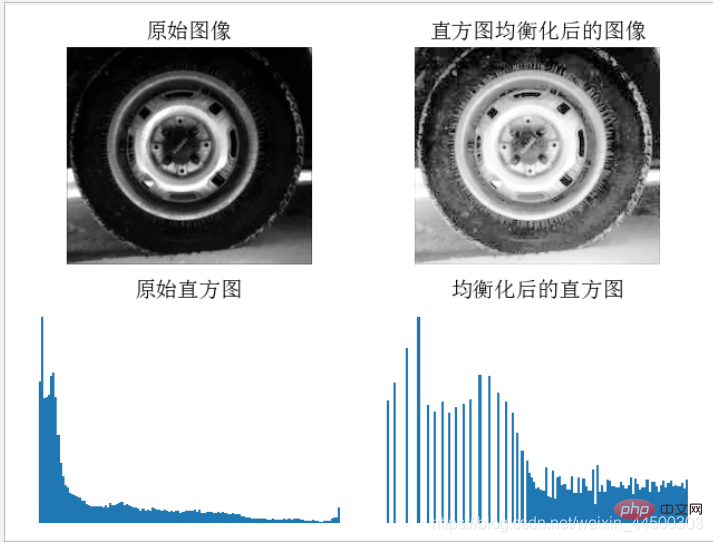
通过运行结果可以得到,因为原图像整体较暗(黑),是的原图像的直方图在低像素上出现的频率较高,高像素的频率低。通过直方图均衡化后,图像整体变亮,观察直方图发现低像素的频率有所降低,而高像素的频率升高,使得图像有了更明显的对比度
高斯滤波
基本原理
什么是高斯滤波:高斯滤波是一种线性平滑滤波,它将正太分布用于图像处理,适用于消除高斯噪声,能够对图片进行模糊处理,使图像变得平滑,使图片产生模糊的效果。
高斯滤波原理:高斯滤波是用户指定一个模板,然后通过这个模板对图像进行卷积,所进行的卷积操作就是将模板中心周围的像素值进行加权平均后替换模板中心的像素值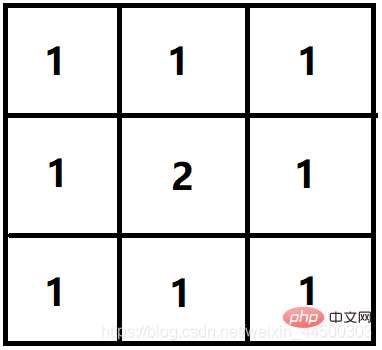
opencv高斯滤波实现
代码实现
import cv2import matplotlib.pyplot as plt

im=cv2.imread("tire.jpg")# 高斯滤波img_Guassian = cv2.GaussianBlur(im,(5,5),0)plt.subplot(121)plt.imshow(im)plt.subplot(122)plt.imshow(img_Guassian)plt.show()运行结果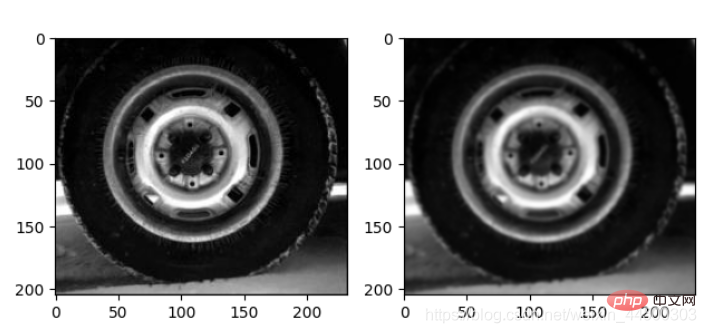
从运行结果中可以看出,经过高斯滤波后的图像变得模糊了,边缘变得没有那么明显,图像变得平滑
相关免费学习推荐:python教程(视频)
Atas ialah kandungan terperinci Python作业:直方图、均衡化、高斯滤波. Untuk maklumat lanjut, sila ikut artikel berkaitan lain di laman web China PHP!

Alat AI Hot

Undresser.AI Undress
Apl berkuasa AI untuk mencipta foto bogel yang realistik

AI Clothes Remover
Alat AI dalam talian untuk mengeluarkan pakaian daripada foto.

Undress AI Tool
Gambar buka pakaian secara percuma

Clothoff.io
Penyingkiran pakaian AI

Video Face Swap
Tukar muka dalam mana-mana video dengan mudah menggunakan alat tukar muka AI percuma kami!

Artikel Panas

Alat panas

Notepad++7.3.1
Editor kod yang mudah digunakan dan percuma

SublimeText3 versi Cina
Versi Cina, sangat mudah digunakan

Hantar Studio 13.0.1
Persekitaran pembangunan bersepadu PHP yang berkuasa

Dreamweaver CS6
Alat pembangunan web visual

SublimeText3 versi Mac
Perisian penyuntingan kod peringkat Tuhan (SublimeText3)

Topik panas
 PHP dan Python: Paradigma yang berbeza dijelaskan
Apr 18, 2025 am 12:26 AM
PHP terutamanya pengaturcaraan prosedur, tetapi juga menyokong pengaturcaraan berorientasikan objek (OOP); Python menyokong pelbagai paradigma, termasuk pengaturcaraan OOP, fungsional dan prosedur. PHP sesuai untuk pembangunan web, dan Python sesuai untuk pelbagai aplikasi seperti analisis data dan pembelajaran mesin.
 Memilih antara php dan python: panduan
Apr 18, 2025 am 12:24 AM
PHP sesuai untuk pembangunan web dan prototaip pesat, dan Python sesuai untuk sains data dan pembelajaran mesin. 1.Php digunakan untuk pembangunan web dinamik, dengan sintaks mudah dan sesuai untuk pembangunan pesat. 2. Python mempunyai sintaks ringkas, sesuai untuk pelbagai bidang, dan mempunyai ekosistem perpustakaan yang kuat.
 Python vs JavaScript: Keluk Pembelajaran dan Kemudahan Penggunaan
Apr 16, 2025 am 12:12 AM
Python lebih sesuai untuk pemula, dengan lengkung pembelajaran yang lancar dan sintaks ringkas; JavaScript sesuai untuk pembangunan front-end, dengan lengkung pembelajaran yang curam dan sintaks yang fleksibel. 1. Sintaks Python adalah intuitif dan sesuai untuk sains data dan pembangunan back-end. 2. JavaScript adalah fleksibel dan digunakan secara meluas dalam pengaturcaraan depan dan pelayan.
 Boleh kod vs dijalankan di Windows 8
Apr 15, 2025 pm 07:24 PM
Kod VS boleh dijalankan pada Windows 8, tetapi pengalaman mungkin tidak hebat. Mula -mula pastikan sistem telah dikemas kini ke patch terkini, kemudian muat turun pakej pemasangan kod VS yang sepadan dengan seni bina sistem dan pasangnya seperti yang diminta. Selepas pemasangan, sedar bahawa beberapa sambungan mungkin tidak sesuai dengan Windows 8 dan perlu mencari sambungan alternatif atau menggunakan sistem Windows yang lebih baru dalam mesin maya. Pasang sambungan yang diperlukan untuk memeriksa sama ada ia berfungsi dengan betul. Walaupun kod VS boleh dilaksanakan pada Windows 8, disyorkan untuk menaik taraf ke sistem Windows yang lebih baru untuk pengalaman dan keselamatan pembangunan yang lebih baik.
 Adakah sambungan vscode berniat jahat?
Apr 15, 2025 pm 07:57 PM
Sambungan kod VS menimbulkan risiko yang berniat jahat, seperti menyembunyikan kod jahat, mengeksploitasi kelemahan, dan melancap sebagai sambungan yang sah. Kaedah untuk mengenal pasti sambungan yang berniat jahat termasuk: memeriksa penerbit, membaca komen, memeriksa kod, dan memasang dengan berhati -hati. Langkah -langkah keselamatan juga termasuk: kesedaran keselamatan, tabiat yang baik, kemas kini tetap dan perisian antivirus.
 Bolehkah kod studio visual digunakan dalam python
Apr 15, 2025 pm 08:18 PM
Kod VS boleh digunakan untuk menulis Python dan menyediakan banyak ciri yang menjadikannya alat yang ideal untuk membangunkan aplikasi python. Ia membolehkan pengguna untuk: memasang sambungan python untuk mendapatkan fungsi seperti penyempurnaan kod, penonjolan sintaks, dan debugging. Gunakan debugger untuk mengesan kod langkah demi langkah, cari dan selesaikan kesilapan. Mengintegrasikan Git untuk Kawalan Versi. Gunakan alat pemformatan kod untuk mengekalkan konsistensi kod. Gunakan alat linting untuk melihat masalah yang berpotensi lebih awal.
 PHP dan Python: menyelam mendalam ke dalam sejarah mereka
Apr 18, 2025 am 12:25 AM
PHP berasal pada tahun 1994 dan dibangunkan oleh Rasmuslerdorf. Ia pada asalnya digunakan untuk mengesan pelawat laman web dan secara beransur-ansur berkembang menjadi bahasa skrip sisi pelayan dan digunakan secara meluas dalam pembangunan web. Python telah dibangunkan oleh Guidovan Rossum pada akhir 1980 -an dan pertama kali dikeluarkan pada tahun 1991. Ia menekankan kebolehbacaan dan kesederhanaan kod, dan sesuai untuk pengkomputeran saintifik, analisis data dan bidang lain.
 Cara menjalankan program di terminal vscode
Apr 15, 2025 pm 06:42 PM
Dalam kod VS, anda boleh menjalankan program di terminal melalui langkah -langkah berikut: Sediakan kod dan buka terminal bersepadu untuk memastikan bahawa direktori kod selaras dengan direktori kerja terminal. Pilih arahan Run mengikut bahasa pengaturcaraan (seperti python python your_file_name.py) untuk memeriksa sama ada ia berjalan dengan jayanya dan menyelesaikan kesilapan. Gunakan debugger untuk meningkatkan kecekapan debug.


