Angular10如何配置webpack打包?方法介绍
本篇文章给大家介绍一下Angular10 配置 webpack 打包的方法。有一定的参考价值,有需要的朋友可以参考一下,希望对大家有所帮助。

对于 Angular 项目,推荐使用 angular-cli 创建打包项目 Angular 会默认帮我们配置。
但是有特殊的需求时就显然不是很灵活,比如想分割一些较大的打包文件、分析每个打包文件组成,自定义webpack一些参数的时候就发现无从下手。
对许多项目的常见依赖项是日期库moment.js 。 这包括使用语言环境的功能,但是,它大大增加了整体捆绑软件的大小。这些都是需要我们优化的地方。
一、ngx-build-plus 建立额外配置
这里推荐一个工具库ngx-build-plus,不需要改很多东西就能在现有项目进行集成。接下来教大家如何使用,具体详情可以去github上找文档。虽然官方文档上只标注到了可用版本为9,但是Angular10也是可以使用的。
1. 使用CLI创建一个新的Angular项目
2. 添加ngx-build-plus: ng add ngx-build-plus
注意:如果要将其添加到projects文件夹中的特定子项目,请使用--project开关指向它:ng add ngx-build-plus --project getting-started
备注:这一步通过NPM安装包,在Angular >= 7 and CLI >= 7版本中,让您的项目使用自定义生成器的更新您的angular.jsonng serve和ng build。但是6版本中可能会出现安装不成功,这时候请直接yarn add ngx-build-plus --dev,然后angular.json文件中更改以下两处地方:
 "build": {
   - "builder": "@angular-devkit/build-angular:browser"
   + "builder": "ngx-build-plus:build"
   ...
 },
 "serve": {
  - "builder": "@angular-devkit/build-angular:dev-server"
   + "builder": "ngx-build-plus:dev-server"
   ...
}相关教程推荐:《angular教程》
3. 创建文件webpack.partial.js并添加到(子)项目的根目录:
  const webpack = require('webpack');

  module.exports = {
      plugins: [
          new webpack.DefinePlugin({
              "VERSION": JSON.stringify("4711")
          })
      ]
}4. 在您的 app.component.ts中使用全局变量VERSION:
  import { Component } from '@angular/core';

  declare const VERSION: string;

  @Component({
      selector: 'app-root',
      templateUrl: './app.component.html',
      styleUrls: ['./app.component.css']
  })
  export class AppComponent {
      title = 'Version: ' + VERSION;
}5. 使用--extra-webpack-config指向部分Webpack配置的开关启动应用程序:
ng serve --extra-webpack-config webpack.partial.js -o
如果您的项目是基于CLI的子项目,请也使用该--project开关:
ng serve --project getting-started -o --extra-webpack-config webpack.partial.js
提示:考虑为此命令创建一个npm脚本。
6. 确保显示了您的webpack配置所提供的版本。
 有打印结果显示就表示你的项目已经启用了
webpack.partial.js文件中的配置,下面就是在webpack.partial.js中补充我们需要的功能了,笔者主要集中在了两大块。
- 添加BundleAnalyzerPlugin,分析打包文件
- 第三方库模块分离 - optimization + splitChunks,分割较大的文件
下面分别描述
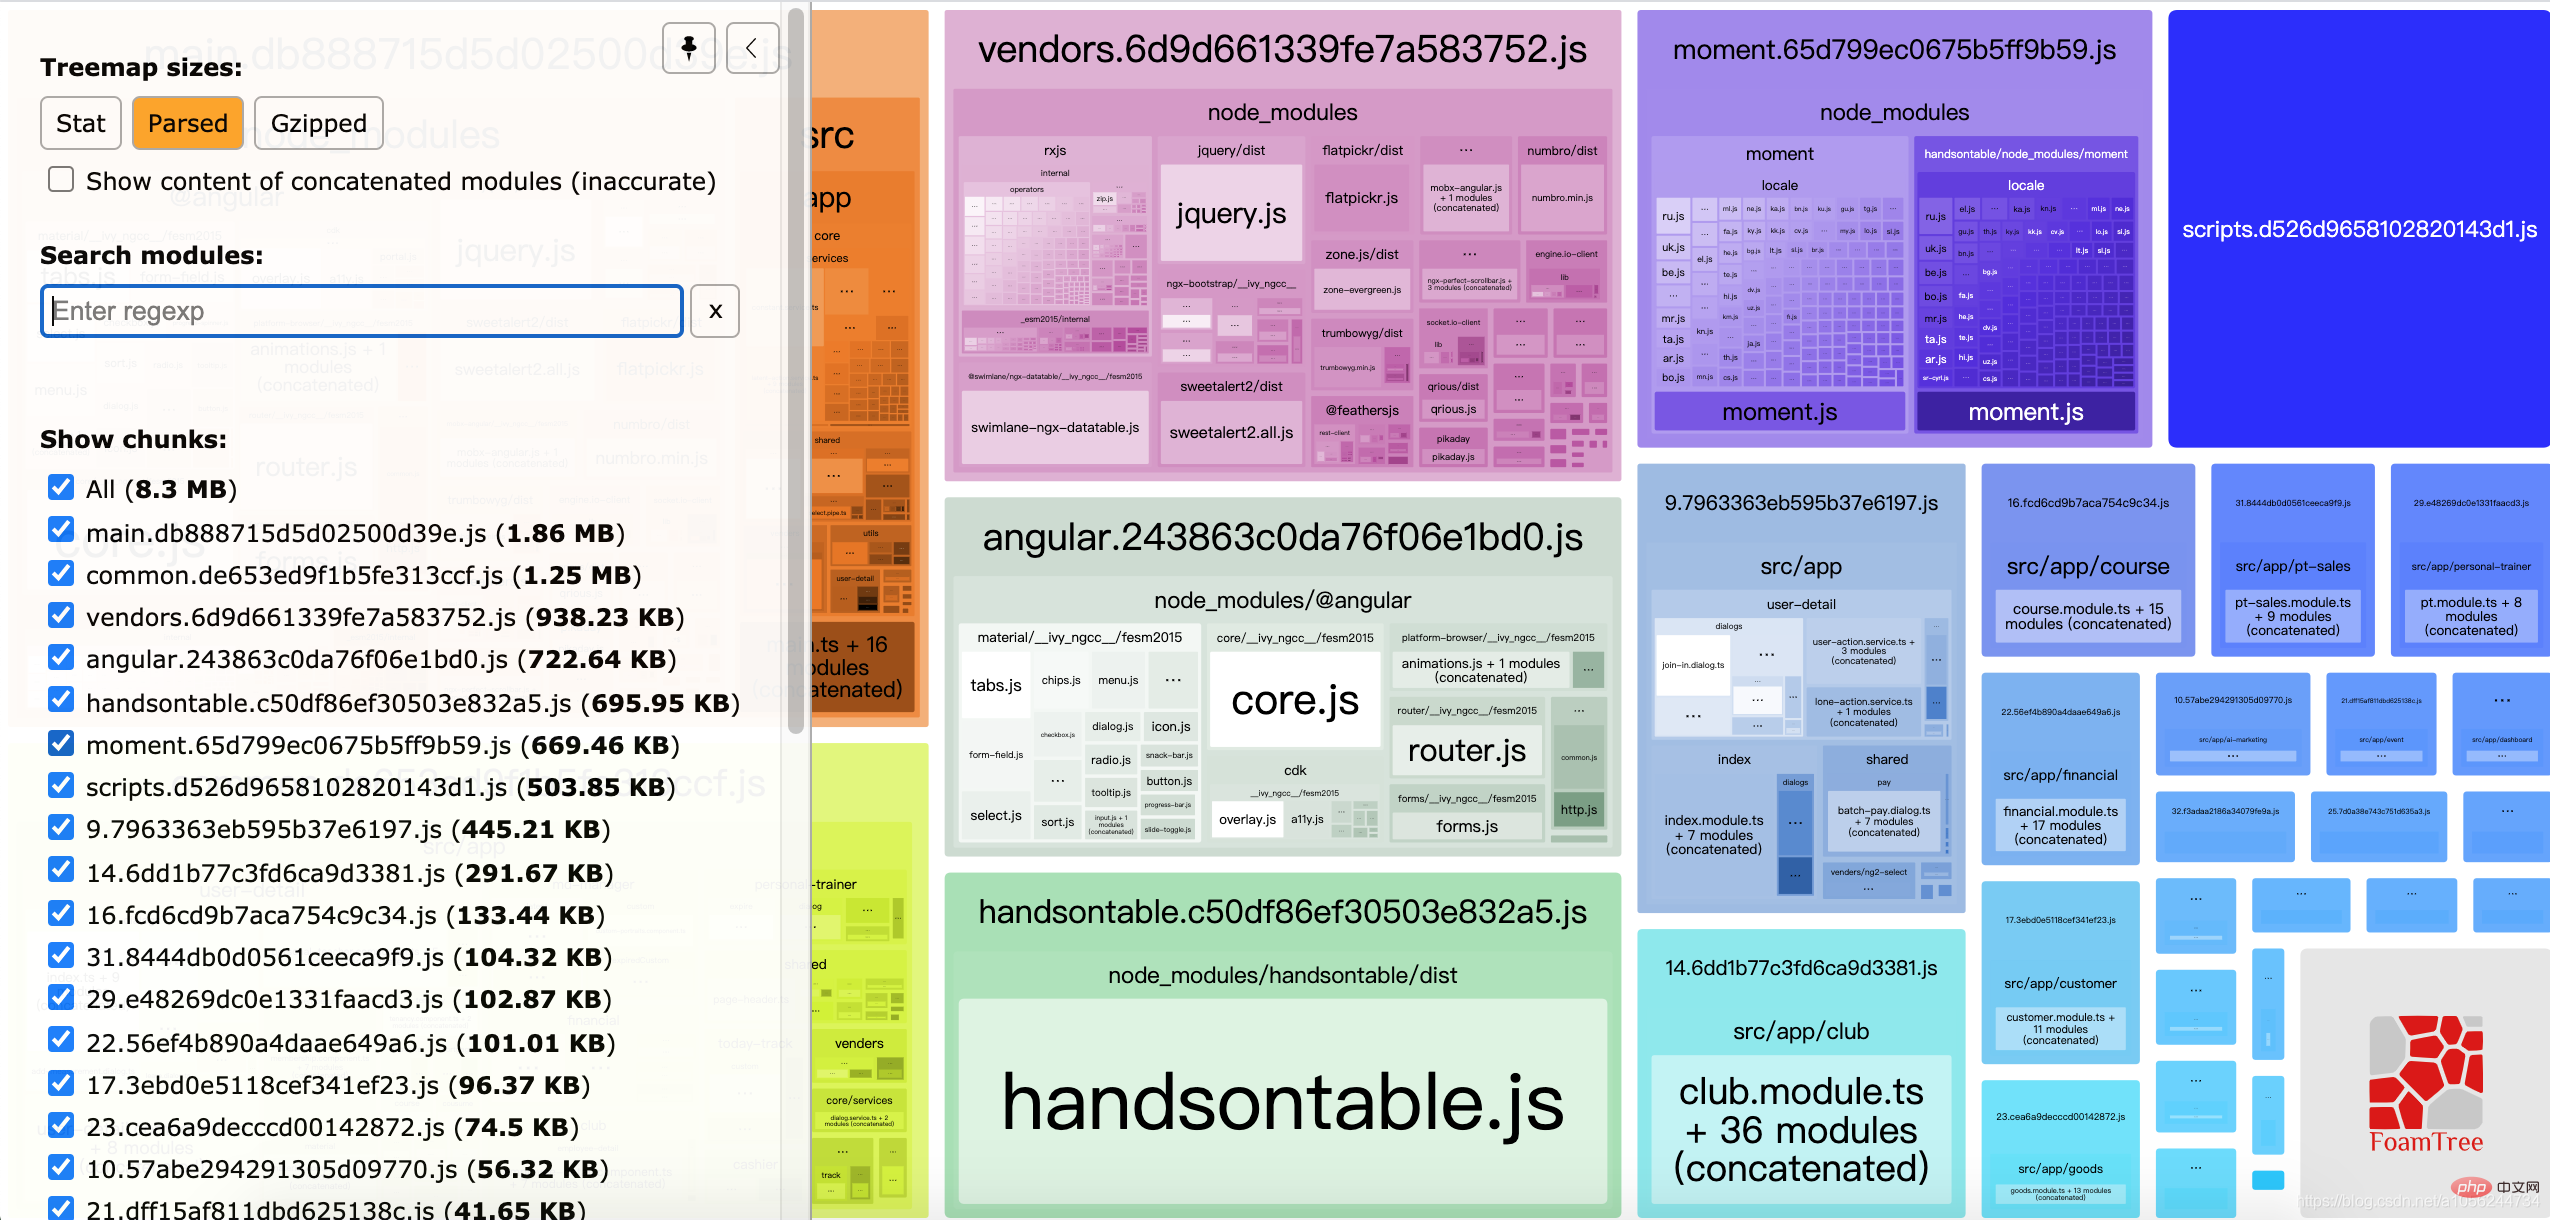
二、webpack-bundle-analyzer 打包文件分析工具
1.安装
$ yarn add webpack-bundle-analyzer --dev
2.配置
在webpack.partial.js中的module.exports = webpackConfig这句话的上面增加
const BundleAnalyzerPlugin = require('webpack-bundle-analyzer').BundleAnalyzerPlugin
module.exports = {
  plugins: [
    new BundleAnalyzerPlugin({
      analyzerMode: 'static',
    }),
    new webpack.DefinePlugin({
      "VERSION": JSON.stringify("4711")
    })
  ]
}3.运行
启动服务:
生产环境查看:npm run build --report 或 正常build 即可启动查看器
开发环境查看:webpack -p --progress 或启动正常devServer服务即可启动查看器!
4.结果

5.该插件默认配置
new BundleAnalyzerPlugin({
      // openAnalyzer: true,
      // reportFilename: path.join(__dirname, 'report.html')
      //  可以是`server`,`static`或`disabled`。
      //  在`server`模式下,分析器将启动HTTP服务器来显示软件包报告。
      //  在“静态”模式下,会生成带有报告的单个HTML文件。
      //  在`disabled`模式下,你可以使用这个插件来将`generateStatsFile`设置为`true`来生成Webpack Stats JSON文件。
      analyzerMode: 'static',
      //  将在“服务器”模式下使用的主机启动HTTP服务器。
      // analyzerHost: '127.0.0.1',
      //  将在“服务器”模式下使用的端口启动HTTP服务器。
      // analyzerPort: 8888,
      //  路径捆绑,将在`static`模式下生成的报告文件。
      //  相对于捆绑输出目录。
      // reportFilename: 'report.html',
      //  模块大小默认显示在报告中。
      //  应该是`stat`,`parsed`或者`gzip`中的一个。
      //  有关更多信息,请参见“定义”一节。
      // defaultSizes: 'parsed',
      //  在默认浏览器中自动打开报告
      // openAnalyzer: true,
      //  如果为true,则Webpack Stats JSON文件将在bundle输出目录中生成
      // generateStatsFile: false,
      //  如果`generateStatsFile`为`true`,将会生成Webpack Stats JSON文件的名字。
      //  相对于捆绑输出目录。
      // statsFilename: 'stats.json',
      //  stats.toJson()方法的选项。
      //  例如,您可以使用`source:false`选项排除统计文件中模块的来源。
      //  在这里查看更多选项:https:  //github.com/webpack/webpack/blob/webpack-1/lib/Stats.js#L21
      // statsOptions: null,
      // logLevel: 'info' // 日志级别。可以是'信息','警告','错误'或'沉默'。
}),模块功能:能够查看到你的文件打包压缩后中真正的内容,找出那些模块组成最大的大小,找到错误的模块,优化它!最好的事情是它支持缩小捆绑!它解析它们以获得实际大小的捆绑模块。它也显示他们的gzipped大小!
三、使用webpack把第三方库模块分离 - optimization + splitChunks
在 webpack4.x 中,我们使用 optimization.splitChunks 来分离公用的代码块。SplitChunks插件简单的来说就是Webpack中一个提取或分离代码的插件,主要作用是提取公共代码,防止代码被重复打包,拆分过大的js文件,合并零散的js文件。
这里说的分离,当然只是针对一些第三方库(一般来自 node_modules),以及我们自己定义的工具库(或公用方法)。
不知如何下手?首先,我们来看官网给的一份
1. 默认配置:
splitChunks: {
    chunks: "async",
    minSize: 30000,
    minChunks: 1,
    maxAsyncRequests: 5,
    maxInitialRequests: 3,
    automaticNameDelimiter: '~',
    name: true,
    cacheGroups: {
        vendors: {
            test: /[\\/]node_modules[\\/]/,
            priority: -10
        },
    default: {
            minChunks: 2,
            priority: -20,
            reuseExistingChunk: true
        }
    }
}接着,我们再来看下它们的含义:
-
chunks: 该属性值的数据类型可以是 字符串 或者 函数。如果是字符串,那它的值可能为 initial | async | all 三者之一。默认值的数据类型为 字符串,默认值为 async,但推荐用 all。它表示将哪种类型的模块分离成新文件。字符串参数值的作用分别如下:
- initial:表示对异步引入的模块不处理
- async:表示只处理异步模块
- all:无论同步还是异步,都会处理
minSize: 该属性值的数据类型为数字。它表示将引用模块分离成新代码文件的最小体积,默认为 30000,单位为字节,即 30K(指min+gzip之前的体积)。这里的 30K 应该是最佳实践,因为如果引用模块小于 30K 就分离成一个新代码文件,那页面打开时,势必会多增加一个请求。
maxSize: 把提取出来的模块打包生成的文件大小不能超过maxSize值,如果超过了,要对其进行分割并打包生成新的文件。单位为字节,默认为0,表示不限制大小。
minChunks: 该属性值的数据类型为数字。它表示将引用模块如不同文件引用了多少次,才能分离生成新代码文件。默认值为 1
maxAsyncRequests: 该属性值的数据类型为数字,默认值为 5。它表示按需加载最大的并行请求数,针对异步。
maxInitialRequests: 该属性值的数据类型为数字,默认值为 3。它表示单个入口文件最大的并行请求数,针对同步。
automaticNameDelimiter: 该属性值的数据类型为字符串,默认值为。它表示分离后生成新代码文件名称的链接符,比如说 app1.js 和 app2.js 都引用了 utils.js 这个工具库,那么,最后打包后分离生成的公用文件名可能是 xxapp1~app2.js 这样的,即以 ~ 符号连接。
name: 该属性值的数据类型可以是 布尔值 或者 函数(返回值为字符串),其中布尔值得为 true,此时,分离文件后生成的文件名将基于 cacheGroups 和 automaticNameDelimiter。如果设置为 false,则不会进行模块分离。
cacheGroups: 该属性值的数据类型为对象,它的值可以继承 splitChunks.* 中的内容。如果 cacheGroups存在与 splitChunks.* 同名的属性,则 cacheGroups 的属性值则直接覆盖 splitChunks.* 中设置的值。
test: 该属性值的数据类型可以为 字符串 或 正则表达式,它规定了哪些文件目录的模块可以被分离生成新文件。
priority: 该属性值的数据类型可以为数字,默认值为 0。它表示打包分离文件的优先
reuseExistingChunk: 该属性值的数据类型可以为布尔值。它表示针对已经分离的模块,不再重新分离。
2.分离第三方库
要将第三方库分离出来,我们需要调整配置文件,设置 chunks: 'all',即表示让所有加载类型的模块在某些条件下都能打包。
3.分离工具函数
打包中,我们发现,工具函数模块(utils)的源码被分别打包到了两个文件中,这显然是不对。之所以出现这种情况,是因为我们设置了 minSize: 30000,即分离成独立文件的最小体积为 30K,而这里的 工具函数(utils.js)只有几KB,所以,没被分离成单独的文件。
4.第三方库合并打包并重命名
有的时候,我们希望将所有来自 node_modules 的第三方库都打包到同一个文件中。显然,上面的打包配置并没有满足这个条件。并且,我们还希望可以对打包后的文件名进行重命名。
要完成,只需要在 cacheGroups 设置 name 属性即可。这里,笔者还把项目中使用到的moment、handsontable、angular库单独分离出来了。
// webpack.config.js
module.exports = {
  optimization: {
    splitChunks: {
      chunks: 'all',
      minSize: 30000,
      maxSize: 0,
      minChunks: 1,
      maxAsyncRequests: 5,
      maxInitialRequests: 3,
      automaticNameDelimiter: '~',
      name: true,
      cacheGroups: {
        moment: {
          name: 'moment',
          test: /[\\/]node_modules[\\/]moment[\\/]/,
          priority: -6						// 两个cacheGroup.priority相同时,先定义的会先命中
        },
        handsontable: {
          name: 'handsontable',
          test: /[\\/]node_modules[\\/]handsontable[\\/]/,
          priority: -7
        },
        angular: {
          name: 'angular',
          test: /[\\/]node_modules[\\/]@angular[\\/]/,
          priority: -9
        },
       vendors: {
          name: 'vendors',
          test: /[\\/]node_modules[\\/]/,
          priority: -10
        },
        default: {
          name: 'default',
          minChunks: 2,
          priority: -20,
          reuseExistingChunk: true
        }
      }
    }
  }
}5.SplitChunks插件配置选项
-
chunks选项,决定要提取那些模块。默认是
async:只提取异步加载的模块出来打包到一个文件中。 异步加载的模块:通过import('xxx')或require(['xxx'],() =>{})加载的模块。initial:提取同步加载和异步加载模块,如果xxx在项目中异步加载了,也同步加载了,那么xxx这个模块会被提取两次,分别打包到不同的文件中。 同步加载的模块:通过import xxx或require('xxx')加载的模块。all:不管异步加载还是同步加载的模块都提取出来,打包到一个文件中。 minSize选项:规定被提取的模块在压缩前的大小最小值,单位为字节,默认为30000,只有超过了30000字节才会被提取。maxSize选项:把提取出来的模块打包生成的文件大小不能超过maxSize值,如果超过了,要对其进行分割并打包生成新的文件。单位为字节,默认为0,表示不限制大小。minChunks选项:表示要被提取的模块最小被引用次数,引用次数超过或等于minChunks值,才能被提取。maxAsyncRequests选项:最大的按需(异步)加载次数,默认为 6。maxInitialRequests选项:打包后的入口文件加载时,还能同时加载js文件的数量(包括入口文件),默认为4。-
先说一下优先级
maxInitialRequests/maxAsyncRequests<maxSize<minSize。 automaticNameDelimiter选项:打包生成的js文件名的分割符,默认为~。name选项:打包生成js文件的名称。cacheGroups选项,核心重点,配置提取模块的方案。里面每一项代表一个提取模块的方案。下面是cacheGroups每项中特有的选项,其余选项和外面一致,若cacheGroups每项中有,就按配置的,没有就使用外面配置的。test选项:用来匹配要提取的模块的资源路径或名称。值是正则或函数。priority选项:方案的优先级,值越大表示提取模块时优先采用此方案。默认值为0。reuseExistingChunk选项:true/false。为true时,如果当前要提取的模块,在已经在打包生成的js文件中存在,则将重用该模块,而不是把当前要提取的模块打包生成新的js文件。enforce选项:true/false。为true时,忽略minSize,minChunks,maxAsyncRequests和maxInitialRequests外面选项
四、HtmlWebpackPlugin
HtmlWebpackPlugin简化了HTML文件的创建,以便为你的webpack包提供服务。这对于在文件名中包含每次会随着编译而发生变化哈希的 webpack bundle 尤其有用。 你可以让插件为你生成一个HTML文件,这个插件有两个重要作用。
- 创建HTML页面文件到你的输出目录
- 将webpack打包后的chunk自动引入到这个HTML中
1.安装
npm install --save-dev html-webpack-plugin
使用yarn
yarn add --dev html-webpack-plugin
2.基本用法
该插件将为你生成一个 HTML5 文件, 其中包括使用 script 标签的 body 中的所有 webpack 包。 只需添加插件到你的 webpack 配置如下:
const HtmlWebpackPlugin = require('html-webpack-plugin')
const path = require('path')

module.exports = {
  plugins: [
    new webpack.DefinePlugin({
      "VERSION": JSON.stringify("4711")
    }),
    new HtmlWebpackPlugin({
      filename: 'index.html',												 // 根据模板文件生成的html的文件名
      template: path.join(__dirname, 'src/index.html'),
      chunksSortMode: 'manual',
      chunks: ['styles', 'runtime', 'polyfills', 'scripts', 'vendors', 'main']
    })
  ]
}这将会产生一个包含以下内容的文件 dist/index.html:
<!doctype html>
<html>
<head>
  <meta charset="utf-8">
  <meta http-equiv="Pragma" content="no-cache"/>
  <meta http-equiv="Cache-Control" content="no-cache, no-store, must-revalidate"/>
  <meta http-equiv="Expires" content="0"/>
  <meta name="viewport" content="width=device-width,initial-scale=1">
  <meta name="renderer" content="webkit">
  <meta name="force-rendering" content="webkit">
  <meta http-equiv="X-UA-Compatible" content="IE=edge,chrome=1"/>
  <title>test</title>
  <base href="/">
  <link rel="icon" type="image/png" href="favicon.png">
  <link href="styles.bf72314ba2e0c15c73f2.css" rel="stylesheet">
</head>
<body>
<app-root></app-root>
<div id="preloader">
  <div>
    <div class="loader loader--glisteningWindow"></div>
  </div>
</div>
<script src="runtime.fe0efdd131eb00c21b3a.js"></script>
<script src="vendors.6d9d661339fe7a583752.js"></script>
<script src="polyfills.5cb77843a9758f0097e1.js"></script>
<script src="scripts.d526d9658102820143d1.js"></script>
<script src="moment.65d799ec0675b5ff9b59.js"></script>
<script src="handsontable.c50df86ef38503e832a5.js"></script>
<script src="main.db888715d5d02500d39e.js"></script>
</body>
</html></p>
<p>如果你有多个 webpack 入口点, 他们都会在生成的HTML文件中的 <code>script</code> 标签内。</p>
<p>需要注意的是,默认angular-cli打包生成的入口文件也被配置成了index.html,所以我们需要更改<code>angular.jaon</code>文件中的配置。并且,由于Angular单页面应用的入口文件为<code>main.ts</code> 所以!chunks配置中,main 一定一定要放在最后,否则运行会出错,笔者因为没有放在最后找了一晚上的bug~~</p>
<p><img src="/static/imghw/default1.png" data-src="https://img.php.cn/upload/image/998/783/134/1618194694682438.png" class="lazy" title="1618194694682438.png" alt="2.png"></p>
<p>改为:</p>
<p><img src="/static/imghw/default1.png" data-src="https://img.php.cn/upload/image/267/684/755/1618194704270838.png" class="lazy" title="1618194704270838.png" alt="3.png"></p>
<h3 id="strong-HtmlWebpackPlugin插件配置选项-strong"><strong>3.HtmlWebpackPlugin插件配置选项</strong></h3>
<p>您可以将配置选项的哈希值传递给<code>html-webpack-plugin</code>。允许的值如下:</p>
<table>
<thead><tr class="firstRow">
<th>名称</th>
<th>类型</th>
<th>默认</th>
<th>描述</th>
</tr></thead>
<tbody>
<tr>
<td><strong><code>title</code></strong></td>
<td><code>{String}</code></td>
<td><code>Webpack App</code></td>
<td>用于生成的HTML文档的标题</td>
</tr>
<tr>
<td><strong><code>filename</code></strong></td>
<td><code>{String}</code></td>
<td><code>'index.html'</code></td>
<td>将HTML写入的文件。默认为<code>index.html</code>。您可以在这里指定一个子目录(如:<code>assets/admin.html</code>)</td>
</tr>
<tr>
<td><strong><code>template</code></strong></td>
<td><code>{String}</code></td>
<td>``</td>
<td>
<code>webpack</code>模板的相对或绝对路径。默认情况下,它将使用(<code>src/index.ejs</code>如果存在)。请参阅<a href="https://github.com/jantimon/html-webpack-plugin/blob/master/docs/template-option.md" target="_blank" rel="nofollow noopener noreferrer">文档</a>以了解详细信息</td>
</tr>
<tr>
<td><strong><code>templateContent</code></strong></td>
<td><code>{string、Function、false}</code></td>
<td>false</td>
<td>可用于代替<code>template</code>提供内联模板-请阅读“<a href="https://github.com/jantimon/html-webpack-plugin#writing-your-own-templates" target="_blank" rel="nofollow noopener noreferrer">编写自己的模板”</a>部分</td>
</tr>
<tr>
<td><strong><code>templateParameters</code></strong></td>
<td><code>{Boolean、Object、Function}</code></td>
<td><code>false</code></td>
<td>允许覆盖模板中使用的参数-请参见<a href="https://github.com/jantimon/html-webpack-plugin/tree/master/examples/template-parameters" target="_blank" rel="nofollow noopener noreferrer">示例</a>
</td>
</tr>
<tr>
<td><strong><code>inject</code></strong></td>
<td><code>{Boolean、String}</code></td>
<td><code>true</code></td>
<td>`true</td>
</tr>
<tr>
<td><strong><code>publicPath</code></strong></td>
<td><code>{String、'auto'}</code></td>
<td><code>'auto'</code></td>
<td>用于脚本和链接标签的publicPath</td>
</tr>
<tr>
<td><strong><code>scriptLoading</code></strong></td>
<td><code>{'blocking'、'defer'}</code></td>
<td><code>'blocking'</code></td>
<td>现代浏览器支持非阻塞javascript加载(<code>'defer'</code>),以提高页面启动性能。</td>
</tr>
<tr>
<td><strong><code>favicon</code></strong></td>
<td><code>{String}</code></td>
<td>``</td>
<td>将给定的图标图标路径添加到输出HTML</td>
</tr>
<tr>
<td><strong><code>meta</code></strong></td>
<td><code>{Object}</code></td>
<td><code>{}</code></td>
<td>允许注入<code>meta</code>-tags。例如<code>meta: {viewport: 'width=device-width, initial-scale=1, shrink-to-fit=no'}</code>
</td>
</tr>
<tr>
<td><strong><code>base</code></strong></td>
<td><code>{Object、String、false}</code></td>
<td><code>false</code></td>
<td>注入<a href="https://developer.mozilla.org/en-US/docs/Web/HTML/Element/base" target="_blank" rel="nofollow noopener noreferrer"><code>base</code></a>标签。例如<code>base: "https://example.com/path/page.html</code>
</td>
</tr>
<tr>
<td><strong><code>minify</code></strong></td>
<td><code>{Boolean、Object}</code></td>
<td>
<code>true</code>如果<code>mode</code>是<code>'production'</code>,否则<code>false</code>
</td>
<td>控制是否以及以何种方式最小化输出。有关更多详细信息,请参见下面的<a href="https://github.com/jantimon/html-webpack-plugin#minification" target="_blank" rel="nofollow noopener noreferrer">缩小</a>。</td>
</tr>
<tr>
<td><strong><code>hash</code></strong></td>
<td><code>{Boolean}</code></td>
<td><code>false</code></td>
<td>如果是,<code>true</code>则将唯一的<code>webpack</code>编译哈希值附加到所有包含的脚本和CSS文件中。这对于清除缓存很有用</td>
</tr>
<tr>
<td><strong><code>cache</code></strong></td>
<td><code>{Boolean}</code></td>
<td><code>true</code></td>
<td>仅在文件被更改时发出文件</td>
</tr>
<tr>
<td><strong><code>showErrors</code></strong></td>
<td><code>{Boolean}</code></td>
<td><code>true</code></td>
<td>错误详细信息将写入HTML页面</td>
</tr>
<tr>
<td><strong><code>chunks</code></strong></td>
<td><code>{?}</code></td>
<td><code>?</code></td>
<td>仅允许您添加一些块(例如,仅单元测试块)</td>
</tr>
<tr>
<td><strong><code>chunksSortMode</code></strong></td>
<td><code>{String、Function}</code></td>
<td><code>auto</code></td>
<td>允许控制在将块包含到HTML中之前应如何对其进行排序。允许值为`'none'</td>
</tr>
<tr>
<td><strong><code>excludeChunks</code></strong></td>
<td><code>{Array.<string>}</code></td>
<td>``</td>
<td>允许您跳过一些块(例如,不添加单元测试块)</td>
</tr>
<tr>
<td><strong><code>xhtml</code></strong></td>
<td><code>{Boolean}</code></td>
<td><code>false</code></td>
<td>如果<code>true</code>将<code>link</code>标签呈现为自动关闭(符合XHTML)</td>
</tr>
</tbody>
</table>
<p>最后奉上完整的<code>webpack.partial.js</code></p>
<pre class="brush:php;toolbar:false">const webpack = require('webpack')
const BundleAnalyzerPlugin = require('webpack-bundle-analyzer').BundleAnalyzerPlugin
const HtmlWebpackPlugin = require('html-webpack-plugin')
const path = require('path')

module.exports = {
  externals: {        // 打包除外的文件
    echarts: 'echarts'
  },
  optimization: {
    splitChunks: {
      chunks: "all",
      minSize: 20000,
      minChunks: 1,
      maxAsyncRequests: 5,
      maxInitialRequests: 3,
      automaticNameDelimiter: '~',
      name: true,
      cacheGroups: {
        moment: {
          name: 'moment',
          test: /[\\/]node_modules[\\/]moment[\\/]/,
          priority: -6
        },
        handsontable: {
          name: 'handsontable',
          test: /[\\/]node_modules[\\/]handsontable[\\/]/,
          priority: -7
        },
        angular: {
          name: 'angular',
          test: /[\\/]node_modules[\\/]@angular[\\/]/,
          priority: -9
        },
        vendors: {
          name: 'vendors',
          test: /[\\/]node_modules[\\/]/,
          priority: -10
        },
        default: {
          name: 'default',
          minChunks: 2,
          priority: -20,
          reuseExistingChunk: true
        }
      }
    }
  },
  plugins: [
    new BundleAnalyzerPlugin({
      analyzerMode: 'static',
    }),
    new webpack.DefinePlugin({
      "VERSION": JSON.stringify("4711")
    }),
    new HtmlWebpackPlugin({
      filename: 'index.html',
      template: path.join(__dirname, 'src/index.html'),
      chunksSortMode: 'manual',
      chunks: ['styles', 'runtime', 'polyfills', 'scripts', 'vendors', 'main']      // 限定顺序,main.js必须在最后
    })
  ]
}希望大家打包顺利,项目运行快快滴。
demo地址:
https://github.com/qinqing3761/webpack-build-demo
更多编程相关知识,请访问:编程入门!!
Atas ialah kandungan terperinci Angular10如何配置webpack打包?方法介绍. Untuk maklumat lanjut, sila ikut artikel berkaitan lain di laman web China PHP!

Alat AI Hot

Undresser.AI Undress
Apl berkuasa AI untuk mencipta foto bogel yang realistik

AI Clothes Remover
Alat AI dalam talian untuk mengeluarkan pakaian daripada foto.

Undress AI Tool
Gambar buka pakaian secara percuma

Clothoff.io
Penyingkiran pakaian AI

AI Hentai Generator
Menjana ai hentai secara percuma.

Artikel Panas

Alat panas

Notepad++7.3.1
Editor kod yang mudah digunakan dan percuma

SublimeText3 versi Cina
Versi Cina, sangat mudah digunakan

Hantar Studio 13.0.1
Persekitaran pembangunan bersepadu PHP yang berkuasa

Dreamweaver CS6
Alat pembangunan web visual

SublimeText3 versi Mac
Perisian penyuntingan kod peringkat Tuhan (SublimeText3)

Topik panas
 Tutorial Bermula VUE3: Membungkus dan Membina dengan Webpack
Jun 15, 2023 pm 06:17 PM
Vue ialah rangka kerja JavaScript yang sangat baik yang boleh membantu kami membina aplikasi web yang interaktif dan cekap dengan cepat. Vue3 ialah versi terkini Vue, yang memperkenalkan banyak ciri dan fungsi baharu. Webpack kini merupakan salah satu pembungkus modul JavaScript dan alat binaan yang paling popular, yang boleh membantu kami mengurus pelbagai sumber dalam projek kami. Artikel ini akan memperkenalkan cara menggunakan Webpack untuk membungkus dan membina aplikasi Vue3. 1. Pasang Webpack
 Apakah perbezaan antara vite dan webpack
Jan 11, 2023 pm 02:55 PM
Perbezaan: 1. Kelajuan permulaan pelayan webpack adalah lebih perlahan daripada Vite; kerana Vite tidak perlu dibungkus apabila ia dimulakan, tidak perlu menganalisis kebergantungan modul dan menyusun, jadi kelajuan permulaan adalah sangat pantas. 2. Kemas kini panas Vite lebih pantas daripada pek web; dari segi HRM Vite, apabila kandungan modul tertentu berubah, biarkan pelayar meminta semula modul tersebut. 3. Vite menggunakan esbuild untuk pra-membina kebergantungan, manakala webpack adalah berdasarkan nod. 4. Ekologi Vite tidak sebaik pek web, dan pemuat serta pemalam tidak cukup kaya.
 Cara menggunakan PHP dan webpack untuk pembangunan modular
May 11, 2023 pm 03:52 PM
Dengan pembangunan berterusan teknologi pembangunan web, pemisahan bahagian hadapan dan belakang serta pembangunan modular telah menjadi trend yang meluas. PHP ialah bahasa back-end yang biasa digunakan Apabila melakukan pembangunan modular, kita perlu menggunakan beberapa alat untuk mengurus dan membungkus modul adalah alat pembungkusan modular yang sangat mudah digunakan. Artikel ini akan memperkenalkan cara menggunakan PHP dan webpack untuk pembangunan modular. 1. Apakah pembangunan modular? Pembangunan modular merujuk kepada penguraian program kepada modul bebas yang berbeza Setiap modul mempunyai fungsinya sendiri.
 Apakah fail yang boleh pakej vue webpack?
Dec 20, 2022 pm 07:44 PM
Dalam vue, webpack boleh membungkus js, css, gambar, json dan fail lain ke dalam format yang sesuai untuk kegunaan penyemak imbas dalam webpack, js, css, gambar, json dan jenis fail lain boleh digunakan sebagai modul. Pelbagai sumber modul dalam webpack boleh dibungkus dan digabungkan menjadi satu atau lebih pakej, dan semasa proses pembungkusan, sumber boleh diproses, seperti memampatkan imej, menukar scss kepada css, menukar sintaks ES6 kepada ES5, dsb., yang boleh diiktiraf oleh jenis fail HTML.
 Apakah Webpack? Penjelasan terperinci tentang cara ia berfungsi?
Oct 13, 2022 pm 07:36 PM
Webpack ialah alat pembungkusan modul. Ia mencipta modul untuk kebergantungan yang berbeza dan membungkus semuanya ke dalam fail output yang boleh diurus. Ini amat berguna untuk aplikasi satu halaman (standard de facto untuk aplikasi web hari ini).
 Bagaimanakah webpack menukar modul es6 kepada es5?
Oct 18, 2022 pm 03:48 PM
Kaedah konfigurasi: 1. Gunakan kaedah import untuk meletakkan kod ES6 ke dalam fail kod js yang dibungkus 2. Gunakan alat npm untuk memasang alat pemuat babel, sintaksnya ialah "npm install -D babel-loader @babel/core; @babel/preset- env"; 3. Cipta fail konfigurasi ".babelrc" alat babel dan tetapkan peraturan transcoding; 4. Konfigurasikan peraturan pembungkusan dalam fail webpack.config.js.
 Gunakan Spring Boot dan Webpack untuk membina projek bahagian hadapan dan sistem pemalam
Jun 22, 2023 am 09:13 AM
Memandangkan kerumitan aplikasi web moden terus meningkat, membina sistem kejuruteraan dan pemalam bahagian hadapan yang cemerlang telah menjadi semakin penting. Dengan populariti Spring Boot dan Webpack, mereka telah menjadi gabungan sempurna untuk membina projek bahagian hadapan dan sistem pemalam. SpringBoot ialah rangka kerja Java yang mencipta aplikasi Java dengan keperluan konfigurasi minimum. Ia menyediakan banyak ciri berguna, seperti konfigurasi automatik, supaya pembangun boleh membina dan menggunakan aplikasi web dengan lebih pantas dan lebih mudah. W
 Pembangunan Laravel: Bagaimana untuk mengoptimumkan saiz fail menggunakan Laravel Mix dan Webpack?
Jun 13, 2023 pm 04:44 PM
Pembangunan Laravel: Bagaimana untuk mengoptimumkan saiz fail menggunakan LaravelMix dan Webpack? Laravel ialah rangka kerja PHP yang sangat popular yang menyediakan banyak ciri dan alatan untuk membantu pembangun menjadi lebih produktif apabila membina aplikasi web. Antaranya, LaravelMix dan Webpack ialah dua alatan berkuasa yang boleh membantu anda mengoptimumkan saiz fail dan meningkatkan prestasi. Dalam artikel ini, kami akan memperkenalkan cara menggunakan LaravelMix dan Webpack untuk mengoptimumkan


