一分钟学会用Python的第三方库openpyxl画真散点图
本篇文章给大家详细介绍一下用Python的第三方库openpyxl画真散点图的方法。有一定的参考价值,有需要的朋友可以参考一下,希望对大家有所帮助。

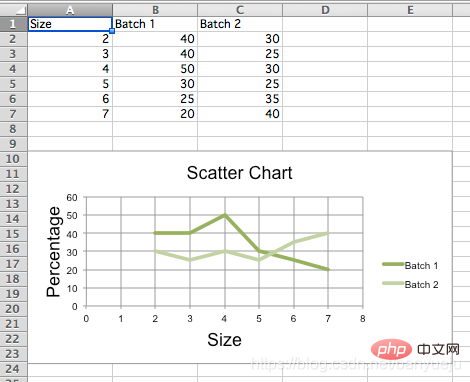
之前在博客上看见不少类似的问题,点进去一看,发现都是完全照抄的官方文档。然而官方文档的demo,画出来并不是我们想要的效果:

说好的散点图,出来却是我们一般定义上的折线图。
直接上代码:
先安装openpyxl第三方库,以Windows为例,在cmd指令窗下发如下命令:
pip install openpyxl
Python代码如下:
"""
__author__ = '伴月雎'
__time__ = '2021/4/21 19:15'
"""
from openpyxl import Workbook
from openpyxl.chart import (
    ScatterChart,
    Reference,
    Series,
)

wb = Workbook()
ws = wb.active
rows = [
    ['Size', 'Batch 1', 'Batch 2'],
    [2, 40, 30],
    [3, 40, 25],
    [4, 50, 30],
    [5, 30, 25],
    [6, 25, 35],
    [7, 20, 40],
]
for row in rows:
    ws.append(row)

chart = ScatterChart()
chart.title = "Scatter Chart"
chart.style = 10
chart.x_axis.title = 'Size'
chart.y_axis.title = 'Percentage'

xvalues = Reference(ws, min_col=1, min_row=2, max_row=7)
for i in range(2, 4):
    values = Reference(ws, min_col=i, min_row=1, max_row=7)
    series = Series(values, xvalues, title_from_data=True)
    chart.series.append(series)
# 第一条散点
s1 = chart.series[0]
# 散点标记类型  'auto', 'dash', 'triangle', 'square', 'picture', 'circle', 'dot', 'plus', 'star', 'diamond', 'x'
s1.marker.symbol = "circle"
s1.marker.graphicalProperties.solidFill = "0000FF"  # Marker filling 设定标记填充的颜色
s1.marker.graphicalProperties.line.solidFill = "0000FF"  # Marker outline 标记轮廓的颜色
s1.graphicalProperties.line.noFill = True  # 关闭连线填充

# 第二条带连线的散点
s2 = chart.series[1]
s2.marker.symbol = "circle"
s2.graphicalProperties.solidFill = "FF0000"
s2.marker.graphicalProperties.line.solidFill = "FF0000"
s2.graphicalProperties.dashStyle = "dash"
s2.graphicalProperties.line.width = 1000  # width in EMUs

ws.add_chart(chart, "A10")
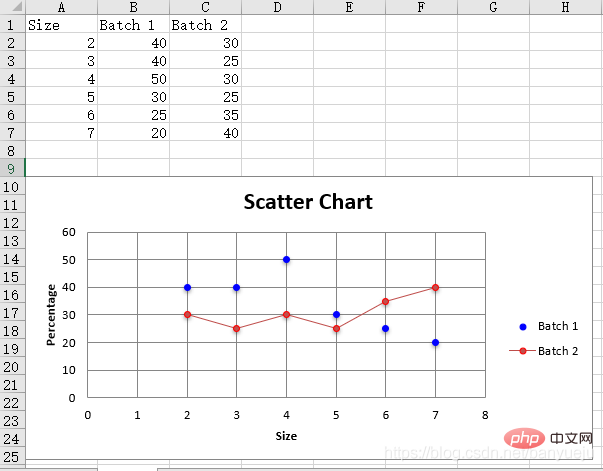
wb.save("scatter.xlsx")效果如下:

大家可以根据自己的需要做相应的扩展:
1.读取自己的Excel表格数据,替换上面代码中手动生成的数据:
        wb = openpyxl.load_workbook('D:\\data.xlsx')  # 填写你的Excel文件路径
ws = workbook['sheet1'] # 填写你的sheet标题再参考上述代码,指定你的xvalues和values(即x轴,y轴)对应的行、列位就OK了。
2.最后修改画图元素的属性值,画出你自己定制化的散点图!
相关免费学习推荐:python视频教程!
Atas ialah kandungan terperinci 一分钟学会用Python的第三方库openpyxl画真散点图. Untuk maklumat lanjut, sila ikut artikel berkaitan lain di laman web China PHP!

Alat AI Hot

Undresser.AI Undress
Apl berkuasa AI untuk mencipta foto bogel yang realistik

AI Clothes Remover
Alat AI dalam talian untuk mengeluarkan pakaian daripada foto.

Undress AI Tool
Gambar buka pakaian secara percuma

Clothoff.io
Penyingkiran pakaian AI

AI Hentai Generator
Menjana ai hentai secara percuma.

Artikel Panas

Alat panas

Notepad++7.3.1
Editor kod yang mudah digunakan dan percuma

SublimeText3 versi Cina
Versi Cina, sangat mudah digunakan

Hantar Studio 13.0.1
Persekitaran pembangunan bersepadu PHP yang berkuasa

Dreamweaver CS6
Alat pembangunan web visual

SublimeText3 versi Mac
Perisian penyuntingan kod peringkat Tuhan (SublimeText3)

Topik panas
 1378
1378
 52
52
 Python: Permainan, GUI, dan banyak lagi
Apr 13, 2025 am 12:14 AM
Python cemerlang dalam permainan dan pembangunan GUI. 1) Pembangunan permainan menggunakan pygame, menyediakan lukisan, audio dan fungsi lain, yang sesuai untuk membuat permainan 2D. 2) Pembangunan GUI boleh memilih tkinter atau pyqt. TKInter adalah mudah dan mudah digunakan, PYQT mempunyai fungsi yang kaya dan sesuai untuk pembangunan profesional.
 PHP dan Python: Membandingkan dua bahasa pengaturcaraan yang popular
Apr 14, 2025 am 12:13 AM
PHP dan Python masing -masing mempunyai kelebihan mereka sendiri, dan memilih mengikut keperluan projek. 1.PHP sesuai untuk pembangunan web, terutamanya untuk pembangunan pesat dan penyelenggaraan laman web. 2. Python sesuai untuk sains data, pembelajaran mesin dan kecerdasan buatan, dengan sintaks ringkas dan sesuai untuk pemula.
 Bagaimana Debian Readdir Bersepadu Dengan Alat Lain
Apr 13, 2025 am 09:42 AM
Fungsi Readdir dalam sistem Debian adalah panggilan sistem yang digunakan untuk membaca kandungan direktori dan sering digunakan dalam pengaturcaraan C. Artikel ini akan menerangkan cara mengintegrasikan Readdir dengan alat lain untuk meningkatkan fungsinya. Kaedah 1: Menggabungkan Program Bahasa C dan Pipeline Pertama, tulis program C untuk memanggil fungsi Readdir dan output hasilnya:#termasuk#termasuk#includeintMain (intargc, char*argv []) {dir*dir; structdirent*entry; if (argc! = 2) {
 Python dan Masa: Memanfaatkan masa belajar anda
Apr 14, 2025 am 12:02 AM
Untuk memaksimumkan kecekapan pembelajaran Python dalam masa yang terhad, anda boleh menggunakan modul, masa, dan modul Python. 1. Modul DateTime digunakan untuk merakam dan merancang masa pembelajaran. 2. Modul Masa membantu menetapkan kajian dan masa rehat. 3. Modul Jadual secara automatik mengatur tugas pembelajaran mingguan.
 Nginx SSL Sijil Tutorial Debian
Apr 13, 2025 am 07:21 AM
Artikel ini akan membimbing anda tentang cara mengemas kini sijil NginxSSL anda pada sistem Debian anda. Langkah 1: Pasang Certbot terlebih dahulu, pastikan sistem anda mempunyai pakej CertBot dan Python3-CertBot-Nginx yang dipasang. Jika tidak dipasang, sila laksanakan arahan berikut: sudoapt-getupdateudoapt-getinstallcertbotpython3-certbot-nginx Langkah 2: Dapatkan dan konfigurasikan sijil Gunakan perintah certbot untuk mendapatkan sijil let'Sencrypt dan konfigurasikan nginx: sudoCertBot-ninx ikuti
 Panduan Pembangunan Plug-In Gitlab di Debian
Apr 13, 2025 am 08:24 AM
Membangunkan plugin Gitlab pada Debian memerlukan beberapa langkah dan pengetahuan tertentu. Berikut adalah panduan asas untuk membantu anda memulakan proses ini. Memasang GitLab terlebih dahulu, anda perlu memasang GitLab pada sistem Debian anda. Anda boleh merujuk kepada manual pemasangan rasmi GitLab. Dapatkan token akses API sebelum melakukan integrasi API, anda perlu mendapatkan token akses API Gitlab terlebih dahulu. Buka papan pemuka Gitlab, cari pilihan "AccessTokens" dalam tetapan pengguna, dan menghasilkan token akses baru. Akan dijana
 Cara mengkonfigurasi pelayan https di debian openssl
Apr 13, 2025 am 11:03 AM
Mengkonfigurasi pelayan HTTPS pada sistem Debian melibatkan beberapa langkah, termasuk memasang perisian yang diperlukan, menghasilkan sijil SSL, dan mengkonfigurasi pelayan web (seperti Apache atau Nginx) untuk menggunakan sijil SSL. Berikut adalah panduan asas, dengan mengandaikan anda menggunakan pelayan Apacheweb. 1. Pasang perisian yang diperlukan terlebih dahulu, pastikan sistem anda terkini dan pasang Apache dan OpenSSL: sudoaptDateSudoaptgradesudoaptinsta
 Perkhidmatan apa yang Apache
Apr 13, 2025 pm 12:06 PM
Apache adalah wira di belakang internet. Ia bukan sahaja pelayan web, tetapi juga platform yang kuat yang menyokong lalu lintas yang besar dan menyediakan kandungan dinamik. Ia memberikan fleksibiliti yang sangat tinggi melalui reka bentuk modular, yang membolehkan pengembangan pelbagai fungsi seperti yang diperlukan. Walau bagaimanapun, modulariti juga membentangkan cabaran konfigurasi dan prestasi yang memerlukan pengurusan yang teliti. Apache sesuai untuk senario pelayan yang memerlukan keperluan yang sangat disesuaikan dan memenuhi keperluan kompleks.


