
Cara memasang php dalam Tencent Cloud: 1. Daftar untuk Tencent Cloud dan sewa pelayan 2. Gunakan putty.exe untuk log masuk dari jauh 3. Pasang perisian seperti aphache dan php dalam pelayan; . Ubah suai Fail konfigurasi yang baik sudah memadai.

Persekitaran pengendalian artikel ini: Sistem CentOS 7.2, PHP versi 7.1.2, komputer DELL G3
Cara memasang php dalam Tencent Cloud?
Tencent Cloud membina persekitaran operasi PHP dari awal
1 Mula-mula, kita perlu mendaftar untuk Tencent Cloud dan menyewa pelayan saya memilih CentOS 7.2 64-bit akan memberikan anda IP awam dan IP intranet hos ini, serta nama pengguna dan kata laluan hos ini.
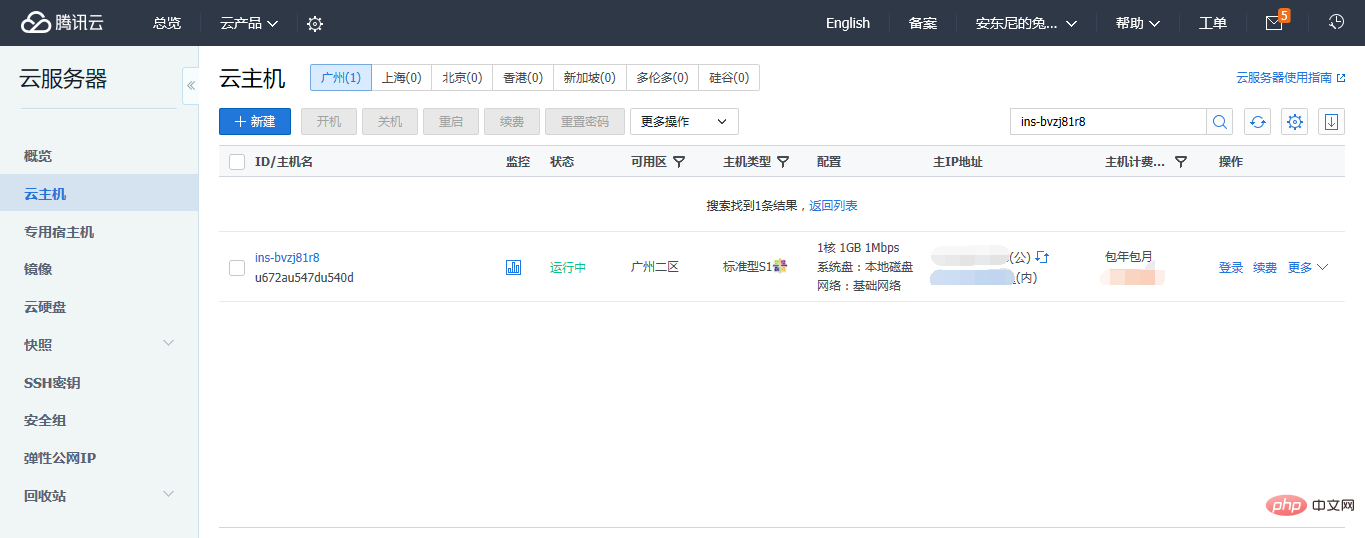
2. Kita boleh menggunakan butang log masuk pada halaman web Tencent Cloud untuk log masuk, atau kita boleh menggunakan putty untuk log masuk. Di bawah ini kami Gunakan dempul untuk operasi jauh.
1. Baidu putty, anda boleh memuat turun putty terkini Muat turun adalah pakej termampat:
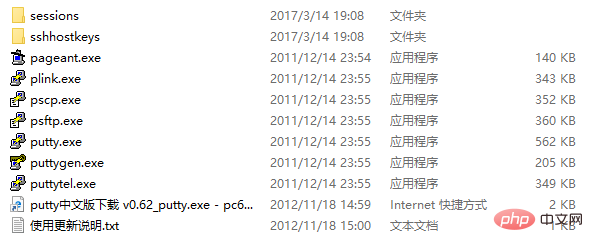
psftp.exe digunakan untuk pemindahan fail. gunakan putty .exe untuk log masuk jauh:
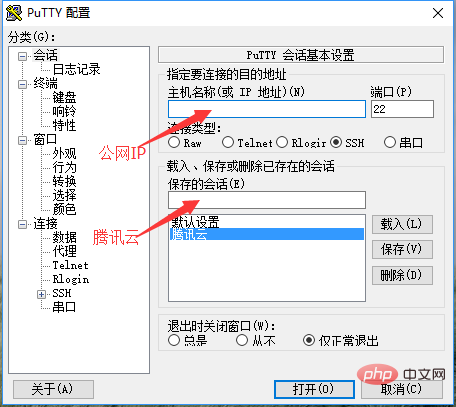
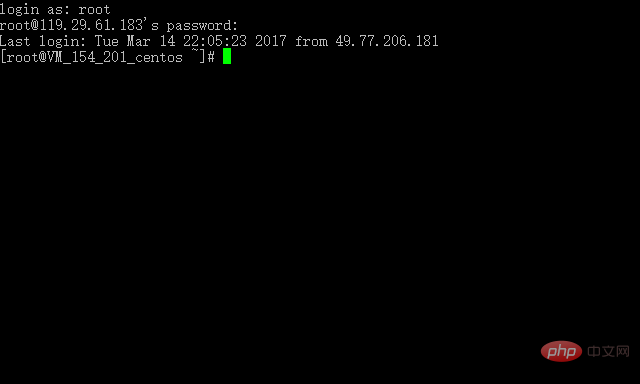
2. Kami menggunakan ssh untuk menyambung dengan lebih selamat, dan port lalai ialah 22. Klik untuk memuatkan Pada masa ini, kami akan digesa untuk memasukkan nama pengguna dan kata laluan Selepas memasukkannya dengan betul, log masuk berjaya!
3. Jika kita memasang aphache, php dan perisian lain dalam pelayan, pasti kita akan terlupa untuk memuat naik fail ke pelayan mudah dan intuitif.
1. Baidu winscp, anda boleh memuat turun versi terkini Selepas pemasangan berjaya, masukkan IP awam, nama pengguna dan kata laluan untuk log masuk dengan jayanya, seperti yang ditunjukkan dalam gambar:
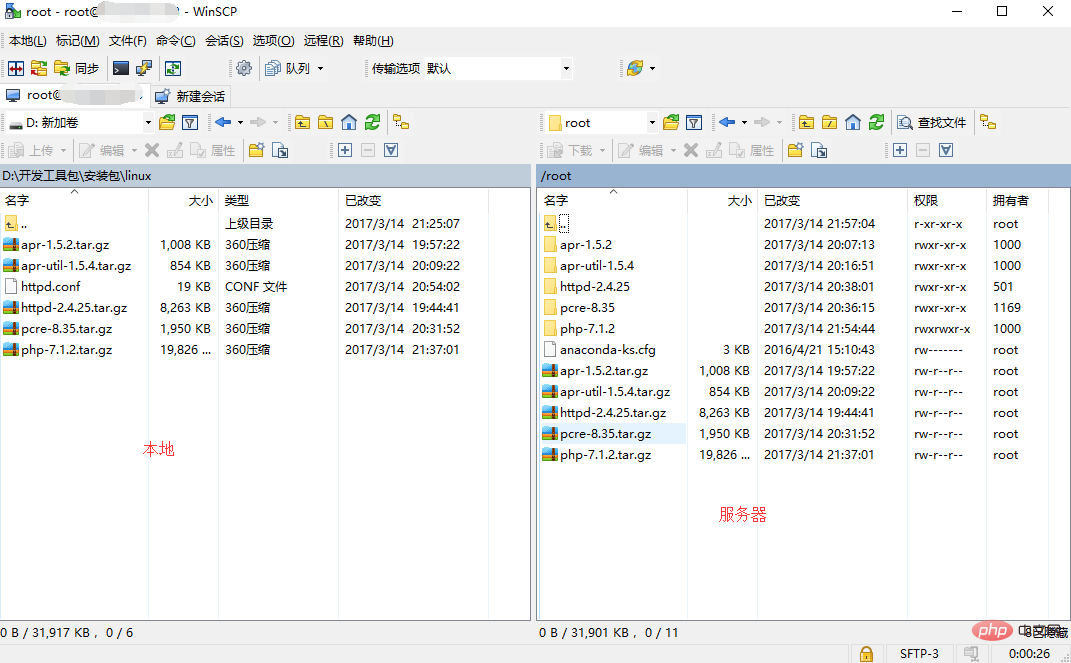
4. Selepas alatan siap, kita boleh mula membina persekitaran kita untuk butiran, sila rujuk http://www.cnblogs.com/lufangtao/archive/2012/12/30. /2839679 html Artikel ini sangat teliti.
1. Mula-mula pasang apache dan muat turun pakej pemasangan linux dari laman web rasmi: http://httpd.apache.org/download.cgi
Sebelum memasang apache, anda perlu memasang APR dan APR-util, prce
alamat muat turun APR dan APR-util: http://apr.apache.org/download.cgi?Preferred=http://mirrors.hust.edu.cn/apache/
alamat muat turun prce: http://jaist.dl.sourceforge.NET/project/pcre/pcre/8.35/pcre-8.35.tar.gz
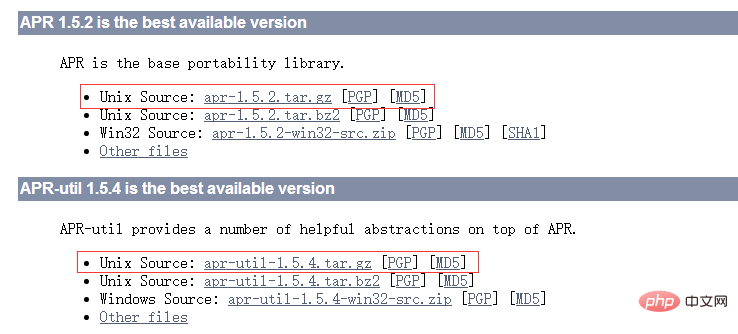
Kami akan Muat turun kesemua empat fail termampat:

2. Selepas memuat naik kesemua empat fail ke pelayan menggunakan winscp, nyahmampat:
tar -zxvf httpd -2.4.25.tar.gz
tar -zxvf apr-1.5.2.tar.gz
tar -zxvf apr-util-1.5.4.tar.gz
tar -zxvf pcre-8.35.tar.gz
3 Pasang Gcc: yum install gcc
Pasang C compiler: yum install gcc-c
4 APR:
Masukkan folder APR yang dinyahmampat: cd apr-1.5.2
Sahkan sebelum pemasangan: ./configure --prefix=/usr/local/apr
Kompilasi : make
Pemasangan: make install
5. Pasang apr-util:
Masukkan folder apr-util yang dinyahmampat: cd apr-util-1.5 .4
Pengesahan prapemasangan: ./confiure --prefix=/usr/local/apr-util --with-apr=/usr/local/apr
Kompilkan: buat
Pemasangan: buat pemasangan
6. Pasang pcre:
Masukkan folder pcre yang dinyahmampat: cd pcre-8.35
Pengesahan sebelum pemasangan: /configure --prefix=/usr /local/pcre
Kompil: buat
Pemasangan: make instal
7. Pasang apache:
Masukkan penyahmampatan Folder apache terakhir: cd httpd- 2.4.25
Pengesahan prapemasangan: ./configure --prefix=/usr/local/apache2 --enable-module=shared --with-apr=/ usr/local/apr/ --with -apr-util=/usr/local/apr-util/ --with-pcre=/usr/local/pcre
Kompil: buat
Pemasangan: buat pasang
8. Mula, mulakan semula dan berhenti Mula-mula beralih ke direktori selepas pemasangan selesai/usr/local/apache2/bin
./apachectl -k mula
./apachectl -k mulakan semula
./apachectl -k stop
9. Fail konfigurasi: (memenuhi konfigurasi paling asas)
#
# This is the main Apache HTTP server configuration file.  It contains the
# configuration directives that give the server its instructions.
# See <URL:http://httpd.apache.org/docs/2.4/> for detailed information.# In particular, see
# <URL:http://httpd.apache.org/docs/2.4/mod/directives.html># for a discussion of each configuration directive.
#
# Do NOT simply read the instructions in here without understanding
# what they do.  They're here only as hints or reminders.  If you are unsure# consult the online docs. You have been warned.
#
# Configuration and logfile names: If the filenames you specify for many
# of the server's control files begin with "/" (or "drive:/" for Win32), the
# server will use that explicit path.  If the filenames do *not* begin
# with "/", the value of ServerRoot is prepended -- so "logs/access_log"# with ServerRoot set to "/usr/local/apache2" will be interpreted by the
# server as "/usr/local/apache2/logs/access_log", whereas "/logs/access_log" # will be interpreted as '/logs/access_log'.

#
# ServerRoot: The top of the directory tree under which the server's# configuration, error, and log files are kept.
#
# Do not add a slash at the end of the directory path.  If you point
# ServerRoot at a non-local disk, be sure to specify a local disk on the
# Mutex directive, if file-based mutexes are used.  If you wish to share the
# same ServerRoot for multiple httpd daemons, you will need to change at
# least PidFile.
#
ServerRoot "/usr/local/apache2"#
# Mutex: Allows you to set the mutex mechanism and mutex file directory
# for inpidual mutexes, or change the global defaults
#
# Uncomment and change the directory if mutexes are file-based and the default# mutex file directory is not on a local disk or is not appropriate for some
# other reason.
#
# Mutex default:logs

#
# Listen: Allows you to bind Apache to specific IP addresses and/or
# ports, instead of the default. See also the <VirtualHost># directive.
#
# Change this to Listen on specific IP addresses as shown below to
# prevent Apache from glomming onto all bound IP addresses.
#
#Listen 12.34.56.78:80Listen 80#
# Dynamic Shared Object (DSO) Support
#
# To be able to use the functionality of a module which was built as a DSO you
# have to place corresponding `LoadModule' lines at this location so the# directives contained in it are actually available _before_ they are used.
# Statically compiled modules (those listed by `httpd -l') do not need# to be loaded here.
#
# Example:
# LoadModule foo_module modules/mod_foo.so
#
LoadModule authn_file_module modules/mod_authn_file.so
#LoadModule authn_dbm_module modules/mod_authn_dbm.so
#LoadModule authn_anon_module modules/mod_authn_anon.so
#LoadModule authn_dbd_module modules/mod_authn_dbd.so
#LoadModule authn_socache_module modules/mod_authn_socache.so
LoadModule authn_core_module modules/mod_authn_core.so
LoadModule authz_host_module modules/mod_authz_host.so
LoadModule authz_groupfile_module modules/mod_authz_groupfile.so
LoadModule authz_user_module modules/mod_authz_user.so
#LoadModule authz_dbm_module modules/mod_authz_dbm.so
#LoadModule authz_owner_module modules/mod_authz_owner.so
#LoadModule authz_dbd_module modules/mod_authz_dbd.so
LoadModule authz_core_module modules/mod_authz_core.so
LoadModule access_compat_module modules/mod_access_compat.so
LoadModule auth_basic_module modules/mod_auth_basic.so
#LoadModule auth_form_module modules/mod_auth_form.so
#LoadModule auth_digest_module modules/mod_auth_digest.so
#LoadModule allowmethods_module modules/mod_allowmethods.so
#LoadModule file_cache_module modules/mod_file_cache.so
#LoadModule cache_module modules/mod_cache.so
#LoadModule cache_disk_module modules/mod_cache_disk.so
#LoadModule cache_socache_module modules/mod_cache_socache.so
#LoadModule socache_shmcb_module modules/mod_socache_shmcb.so
#LoadModule socache_dbm_module modules/mod_socache_dbm.so
#LoadModule socache_memcache_module modules/mod_socache_memcache.so
#LoadModule watchdog_module modules/mod_watchdog.so
#LoadModule macro_module modules/mod_macro.so
#LoadModule dbd_module modules/mod_dbd.so
#LoadModule dumpio_module modules/mod_dumpio.so
#LoadModule buffer_module modules/mod_buffer.so
#LoadModule ratelimit_module modules/mod_ratelimit.so
LoadModule reqtimeout_module modules/mod_reqtimeout.so
#LoadModule ext_filter_module modules/mod_ext_filter.so
#LoadModule request_module modules/mod_request.so
#LoadModule include_module modules/mod_include.so
LoadModule filter_module modules/mod_filter.so
#LoadModule substitute_module modules/mod_substitute.so
#LoadModule sed_module modules/mod_sed.so
LoadModule mime_module modules/mod_mime.so
LoadModule log_config_module modules/mod_log_config.so
#LoadModule log_debug_module modules/mod_log_debug.so
#LoadModule logio_module modules/mod_logio.so
LoadModule env_module modules/mod_env.so
#LoadModule expires_module modules/mod_expires.so
LoadModule headers_module modules/mod_headers.so
#LoadModule unique_id_module modules/mod_unique_id.so
LoadModule setenvif_module modules/mod_setenvif.so
LoadModule version_module modules/mod_version.so
#LoadModule remoteip_module modules/mod_remoteip.so
#LoadModule proxy_module modules/mod_proxy.so
#LoadModule proxy_connect_module modules/mod_proxy_connect.so
#LoadModule proxy_ftp_module modules/mod_proxy_ftp.so
#LoadModule proxy_http_module modules/mod_proxy_http.so
#LoadModule proxy_fcgi_module modules/mod_proxy_fcgi.so
#LoadModule proxy_scgi_module modules/mod_proxy_scgi.so
#LoadModule proxy_fdpass_module modules/mod_proxy_fdpass.so
#LoadModule proxy_wstunnel_module modules/mod_proxy_wstunnel.so
#LoadModule proxy_ajp_module modules/mod_proxy_ajp.so
#LoadModule proxy_balancer_module modules/mod_proxy_balancer.so
#LoadModule proxy_express_module modules/mod_proxy_express.so
#LoadModule proxy_hcheck_module modules/mod_proxy_hcheck.so
#LoadModule session_module modules/mod_session.so
#LoadModule session_cookie_module modules/mod_session_cookie.so
#LoadModule session_dbd_module modules/mod_session_dbd.so
#LoadModule slotmem_shm_module modules/mod_slotmem_shm.so
#LoadModule lbmethod_byrequests_module modules/mod_lbmethod_byrequests.so
#LoadModule lbmethod_bytraffic_module modules/mod_lbmethod_bytraffic.so
#LoadModule lbmethod_bybusyness_module modules/mod_lbmethod_bybusyness.so
#LoadModule lbmethod_heartbeat_module modules/mod_lbmethod_heartbeat.so
LoadModule unixd_module modules/mod_unixd.so
#LoadModule dav_module modules/mod_dav.so
LoadModule status_module modules/mod_status.so
LoadModule autoindex_module modules/mod_autoindex.so
#LoadModule info_module modules/mod_info.so
#LoadModule cgid_module modules/mod_cgid.so
#LoadModule dav_fs_module modules/mod_dav_fs.so
#LoadModule vhost_alias_module modules/mod_vhost_alias.so
#LoadModule negotiation_module modules/mod_negotiation.so
LoadModule dir_module modules/mod_dir.so
#LoadModule actions_module modules/mod_actions.so
#LoadModule speling_module modules/mod_speling.so
#LoadModule userdir_module modules/mod_userdir.so
LoadModule alias_module modules/mod_alias.so
#LoadModule rewrite_module modules/mod_rewrite.so<IfModule unixd_module>#
# If you wish httpd to run as a different user or group, you must run
# httpd as root initially and it will switch.
#
# User/Group: The name (or #number) of the user/group to run httpd as.
# It is usually good practice to create a dedicated user and group for# running httpd, as with most system services.
#
User daemon
Group daemon</IfModule># 'Main' server configuration
#
# The directives in this section set up the values used by the 'main'# server, which responds to any requests that aren't handled by a
# <VirtualHost> definition.  These values also provide defaults for# any <VirtualHost> containers you may define later in the file.
#
# All of these directives may appear inside <VirtualHost> containers,
# in which case these default settings will be overridden for the
# virtual host being defined.
#

#
# ServerAdmin: Your address, where problems with the server should be
# e-mailed.  This address appears on some server-generated pages, such
# as error documents.  e.g. admin@your-domain.com
#
ServerAdmin you@example.com

#
# ServerName gives the name and port that the server uses to identify itself.
# This can often be determined automatically, but we recommend you specify
# it explicitly to prevent problems during startup.
#
# If your host doesn't have a registered DNS name, enter its IP address here.#
ServerName localhost:80#
# Deny access to the entirety of your server's filesystem. You must# explicitly permit access to web content directories in other
# <Directory> blocks below.
#<Directory />
    AllowOverride none
    Require all denied</Directory>#
# Note that from this point forward you must specifically allow
# particular features to be enabled - so if something's not working as# you might expect, make sure that you have specifically enabled it
# below.
#

#
# DocumentRoot: The directory out of which you will serve your
# documents. By default, all requests are taken from this directory, but
# symbolic links and aliases may be used to point to other locations.
#
DocumentRoot "/usr/local/apache2/htdocs"
<Directory "/usr/local/apache2/htdocs">
    #
    # Possible values for the Options directive are "None", "All",
    # or any combination of:
    #   Indexes Includes FollowSymLinks SymLinksifOwnerMatch ExecCGI MultiViews
    #
    # Note that "MultiViews" must be named *explicitly* --- "Options All"
    # doesn't give it to you.    #
    # The Options directive is both complicated and important.  Please see
    # http://httpd.apache.org/docs/2.4/mod/core.html#options
    # for more information.
    #
    Options Indexes FollowSymLinks

    #
    # AllowOverride controls what directives may be placed in .htaccess files.
    # It can be "All", "None", or any combination of the keywords:
    #   AllowOverride FileInfo AuthConfig Limit
    #
    AllowOverride None

    #
    # Controls who can get stuff from this server.
    #
    Require all granted</Directory>#
# DirectoryIndex: sets the file that Apache will serve if a directory
# is requested.
#<IfModule dir_module>
    DirectoryIndex index.html
    DirectoryIndex index.html index.php</IfModule>#
# The following lines prevent .htaccess and .htpasswd files from being
# viewed by Web clients.
#<Files ".ht*">
    Require all denied</Files>#
# ErrorLog: The location of the error log file.
# If you do not specify an ErrorLog directive within a <VirtualHost># container, error messages relating to that virtual host will be
# logged here.  If you *do* define an error logfile for a <VirtualHost># container, that host's errors will be logged there and not here.#
ErrorLog "logs/error_log"#
# LogLevel: Control the number of messages logged to the error_log.
# Possible values include: debug, info, notice, warn, error, crit,
# alert, emerg.
#
LogLevel warn<IfModule log_config_module>
    #
    # The following directives define some format nicknames for use with
    # a CustomLog directive (see below).
    #
    LogFormat "%h %l %u %t \"%r\" %>s %b \"%{Referer}i\" \"%{User-Agent}i\"" combined
    LogFormat "%h %l %u %t \"%r\" %>s %b" common    <IfModule logio_module>
      # You need to enable mod_logio.c to use %I and %O
      LogFormat "%h %l %u %t \"%r\" %>s %b \"%{Referer}i\" \"%{User-Agent}i\" %I %O" combinedio    </IfModule>

    #
    # The location and format of the access logfile (Common Logfile Format).
    # If you do not define any access logfiles within a <VirtualHost>
    # container, they will be logged here.  Contrariwise, if you *do*
    # define per-<VirtualHost> access logfiles, transactions will be
    # logged therein and *not* in this file.
    #
    CustomLog "logs/access_log" common

    #
    # If you prefer a logfile with access, agent, and referer information
    # (Combined Logfile Format) you can use the following directive.
    #
    #CustomLog "logs/access_log" combined</IfModule>

<IfModule alias_module>
    #
    # Redirect: Allows you to tell clients about documents that used to
    # exist in your server's namespace, but do not anymore. The client
    # will make a new request for the document at its new location.
    # Example:
    # Redirect permanent /foo http://www.example.com/bar
    #
    # Alias: Maps web paths into filesystem paths and is used to
    # access content that does not live under the DocumentRoot.
    # Example:
    # Alias /webpath /full/filesystem/path
    #
    # If you include a trailing / on /webpath then the server will
    # require it to be present in the URL.  You will also likely
    # need to provide a <Directory> section to allow access to
    # the filesystem path.

    #
    # ScriptAlias: This controls which directories contain server scripts.
    # ScriptAliases are essentially the same as Aliases, except that
    # documents in the target directory are treated as applications and
    # run by the server when requested rather than as documents sent to the
    # client.  The same rules about trailing "/" apply to ScriptAlias
    # directives as to Alias.
    #
    ScriptAlias /cgi-bin/ "/usr/local/apache2/cgi-bin/"

</IfModule>

<IfModule cgid_module>
    #
    # ScriptSock: On threaded servers, designate the path to the UNIX
    # socket used to communicate with the CGI daemon of mod_cgid.
    #
    #Scriptsock cgisock</IfModule>#
# "/usr/local/apache2/cgi-bin" should be changed to whatever your ScriptAliased
# CGI directory exists, if you have that configured.
#<Directory "/usr/local/apache2/cgi-bin">
    AllowOverride None
    Options None
    Require all granted</Directory>

<IfModule headers_module>
    #
    # Avoid passing HTTP_PROXY environment to CGI's on this or any proxied
    # backend servers which have lingering "httpoxy" defects.
    # 'Proxy' request header is undefined by the IETF, not listed by IANA
    #
    RequestHeader unset Proxy early</IfModule>

<IfModule mime_module>
    #
    # TypesConfig points to the file containing the list of mappings from
    # filename extension to MIME-type.
    #
    TypesConfig conf/mime.types

    #
    # AddType allows you to add to or override the MIME configuration
    # file specified in TypesConfig for specific file types.
    #
    #AddType application/x-gzip .tgz
    #
    # AddEncoding allows you to have certain browsers uncompress
    # information on the fly. Note: Not all browsers support this.
    #
    #AddEncoding x-compress .Z
    #AddEncoding x-gzip .gz .tgz
    #
    # If the AddEncoding directives above are commented-out, then you
    # probably should define those extensions to indicate media types:
    #
    AddType application/x-compress .Z
    AddType application/x-gzip .gz .tgz
    AddType application/x-httpd-php .php
    AddType application/x-httpd-php-source .php5

    #
    # AddHandler allows you to map certain file extensions to "handlers":
    # actions unrelated to filetype. These can be either built into the server
    # or added with the Action directive (see below)
    #
    # To use CGI scripts outside of ScriptAliased directories:
    # (You will also need to add "ExecCGI" to the "Options" directive.)
    #
    #AddHandler cgi-script .cgi

    # For type maps (negotiated resources):
    #AddHandler type-map var

    #
    # Filters allow you to process content before it is sent to the client.
    #
    # To parse .shtml files for server-side includes (SSI):
    # (You will also need to add "Includes" to the "Options" directive.)
    #
    #AddType text/html .shtml
    #AddOutputFilter INCLUDES .shtml</IfModule>#
# The mod_mime_magic module allows the server to use various hints from the
# contents of the file itself to determine its type.  The MIMEMagicFile
# directive tells the module where the hint definitions are located.
#
#MIMEMagicFile conf/magic

#
# Customizable error responses come in three flavors:
# 1) plain text 2) local redirects 3) external redirects
#
# Some examples:
#ErrorDocument 500 "The server made a boo boo."#ErrorDocument 404 /missing.html
#ErrorDocument 404 "/cgi-bin/missing_handler.pl"#ErrorDocument 402 http://www.example.com/subscription_info.html#

#
# MaxRanges: Maximum number of Ranges in a request before
# returning the entire resource, or one of the special
# values 'default', 'none' or 'unlimited'.
# Default setting is to accept 200 Ranges.
#MaxRanges unlimited

#
# EnableMMAP and EnableSendfile: On systems that support it,
# memory-mapping or the sendfile syscall may be used to deliver
# files.  This usually improves server performance, but must
# be turned off when serving from networked-mounted
# filesystems or if support for these functions is otherwise
# broken on your system.
# Defaults: EnableMMAP On, EnableSendfile Off
#
#EnableMMAP off
#EnableSendfile on

# Supplemental configuration
#
# The configuration files in the conf/extra/ directory can be
# included to add extra features or to modify the default configuration of
# the server, or you may simply copy their contents here and change as
# necessary.

# Server-pool management (MPM specific)
#Include conf/extra/httpd-mpm.conf

# Multi-language error messages
#Include conf/extra/httpd-multilang-errordoc.conf

# Fancy directory listings
#Include conf/extra/httpd-autoindex.conf

# Language settings
#Include conf/extra/httpd-languages.conf

# User home directories
#Include conf/extra/httpd-userdir.conf

# Real-time info on requests and configuration
#Include conf/extra/httpd-info.conf

# Virtual hosts
#Include conf/extra/httpd-vhosts.conf

# Local access to the Apache HTTP Server Manual
#Include conf/extra/httpd-manual.conf

# Distributed authoring and versioning (WebDAV)
#Include conf/extra/httpd-dav.conf

# Various default settings
#Include conf/extra/httpd-default.conf

# Configure mod_proxy_html to understand HTML4/XHTML1<IfModule proxy_html_module>Include conf/extra/proxy-html.conf</IfModule># Secure (SSL/TLS) connections
#Include conf/extra/httpd-ssl.conf
#
# Note: The following must must be present to support
#       starting without SSL on platforms with no /dev/random equivalent
#       but a statically compiled-in mod_ssl.
#<IfModule ssl_module>SSLRandomSeed startup builtin
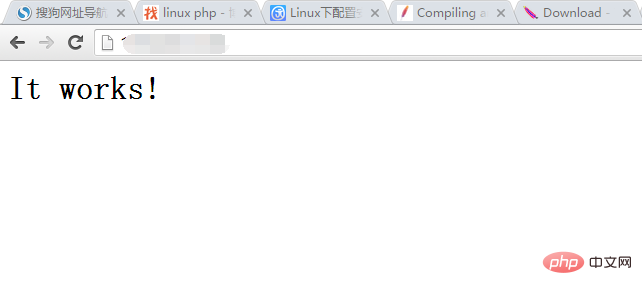
SSLRandomSeed connect builtin</IfModule>Ujian :
Masukkan http://public IP dalam pelayar, paparan adalah seperti berikut, konfigurasi berjaya.
5. Pasang php
1 .php.net/ downloads.php
2、建立目标文件夹mkdir /usr/local/php,等下php安装到该目录下。
3、安装前校验: ./configure --prefix=/usr/local/php --with-apxs2=/usr/local/apache/bin/apxs
可能会提示出现错误:configure: error: xml2-config not found. Please check your libxml2 installation。运行yum install libxml2,然后再运行yum install libxml2-devel安装完毕后,重新运行上面的./configure命令。
4、编译:make
5、编译测试:make test
6、编译安装:make install
7、在apache的htdocs下建立一个php文件test.php,里面的内容如下:
    <?php
phpinfo(); ?>重启apache服务器,在浏览器中输入:http://公网IP/test.php,结果如下:
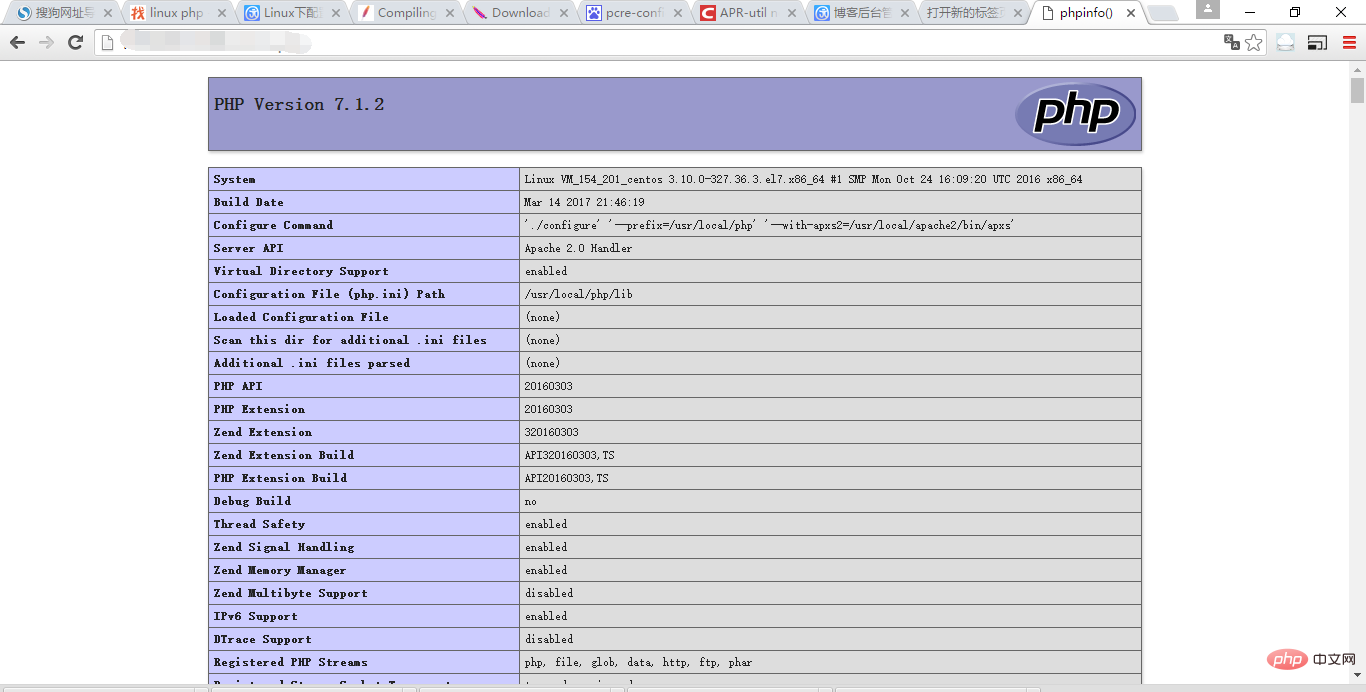
php配置成功!
推荐学习:《PHP视频教程》
Atas ialah kandungan terperinci Bagaimana untuk memasang php dalam Tencent Cloud. Untuk maklumat lanjut, sila ikut artikel berkaitan lain di laman web China PHP!
 Bagaimana untuk membuka fail php
 Bagaimana untuk mengalih keluar beberapa elemen pertama tatasusunan dalam php
 Apa yang perlu dilakukan jika penyahserialisasian php gagal
 Apakah ruang bebas pendaftaran di China?
 Bagaimana untuk menyambungkan php ke pangkalan data mssql
 Bagaimana untuk menyambung php ke pangkalan data mssql
 Bagaimana untuk memuat naik html
 Bagaimana untuk menyelesaikan aksara bercelaru dalam PHP