Cara menggunakan komponen jadual vue3
Jadual Asas
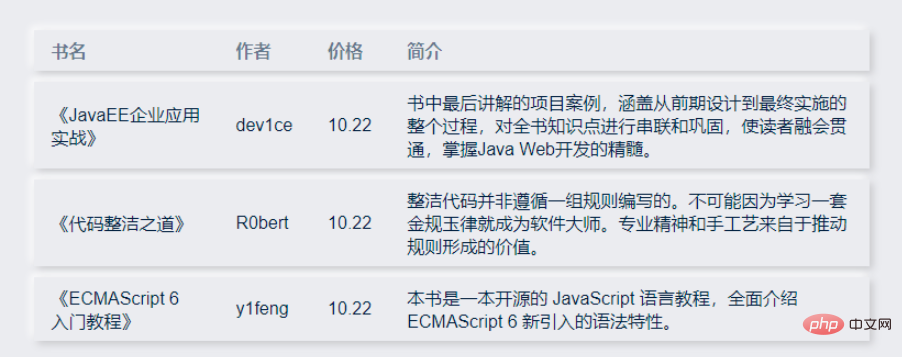
Sebelum membangunkan komponen jadual, fikirkan dahulu jenis API yang hendak digunakan Oleh kerana pengarang menggunakan elemen dalam kerja pengeluaran, gaya beberapa komponen pertama adalah serupa dengan elemen, tetapi Ini masa saya tidak merancang untuk menggunakan gaya elemen saya merancang untuk menukarnya dan memaparkannya secara langsung:
Kami berharap pengguna akan menggunakannya seperti ini:
1 2 3 4 5 6 7 8 9 10 11 12 13 14 15 16 17 18 19 20 21 22 23 24 25 26 27 28 29 30 31 32 33 34 35 36 37 38 39 40 41 42 43 44 45 46 |
|
Tulis kod berikut mengikut ini
1 2 3 4 5 6 7 8 9 10 11 12 13 14 15 16 17 18 19 20 21 22 23 24 25 26 27 28 29 30 31 32 33 34 35 36 37 38 39 40 41 42 43 44 45 46 47 48 49 50 51 52 53 54 55 56 57 58 59 60 61 62 63 64 65 66 67 68 69 70 71 72 73 |
|
Yang terakhir keluar Kesannya ialah:

Kemudian selepas menyedari ini, kita mula melakukan perkara berikut, bermula dengan membetulkan pengepala.
Tajuk meter tetap
Kaedah pertama akan digunakan di sini Jika ia tidak dapat memenuhi keperluan pada masa hadapan, ia akan ditukar kepada kaedah kemudian.
Kesan dan kod adalah seperti berikut:

1 2 3 4 5 6 7 8 9 10 11 12 13 14 15 16 17 18 19 20 21 22 23 24 25 26 27 28 29 30 31 32 33 34 35 36 37 38 39 40 41 42 43 44 45 46 47 48 49 50 51 52 53 54 55 56 57 58 59 60 61 62 63 64 65 66 67 68 69 70 71 72 73 74 75 76 77 78 79 80 81 82 83 84 85 86 87 88 89 |
|
Ketinggian/Ketinggian Cecair
Anda boleh menetapkan ketinggian untuk Jadual. (ketinggian)
Apabila jumlah data berubah secara dinamik, anda boleh menetapkan ketinggian maksimum untuk Jadual. (maxHeight) Menentukan ketinggian maksimum untuk Jadual dengan menetapkan atribut ketinggian maksimum. Pada masa ini, jika ketinggian jadual yang diperlukan lebih besar daripada ketinggian maksimum, bar skrol akan dipaparkan.
Selagi atribut ketinggian atau maxHeight ditakrifkan dalam elemen jadual sanorin, jadual dengan pengepala tetap boleh dilaksanakan tanpa kod tambahan.
Kod adalah seperti berikut:
1 2 3 4 5 6 7 8 9 10 11 12 13 14 15 16 17 18 19 20 21 22 23 24 25 26 27 28 29 30 31 32 33 34 35 36 37 38 39 40 41 42 43 44 45 46 47 48 49 50 51 52 53 54 55 56 57 58 59 60 61 62 63 64 65 66 67 68 69 70 71 72 73 74 75 76 77 78 79 80 81 82 83 84 85 86 87 88 89 90 91 92 93 94 95 96 97 98 99 100 101 |
|
Lebar lajur tersuai
Seterusnya, tambah kawalan lebar, dengan harapan untuk menambah lebar pada objek tatasusunan yang diluluskan dalam lajur, contohnya adalah seperti berikut:
1 2 3 4 5 6 7 8 9 10 11 12 13 14 15 16 17 18 19 20 21 22 |
|
Berharap untuk mencapai kesan berikut
1 Lajur yang mengandungi lebar mempunyai lebar tetap dan tidak berubah dengan lebar pelayar
2 Lajur yang mengandungi minWidth akan mengisi jadual secara automatik lebih besar daripada nilai yang ditetapkan. Baki lebar kurang daripada nilai yang ditetapkan Apabila menetapkan nilai, tetapkan lebar
3. Lajur yang tidak termasuk lebar dan minWidth secara automatik akan mengisi baki lebar jadual
Mengikut. mengikut keperluan kita, kita perlu mengawal paparan lebar setiap lajur secara individu, dan apabila lebar penyemak imbas berubah Kira Semula dan buat semula lajur dengan cepat.
Mula-mula tentukan kaedah untuk mengira lebar yang diperlukan bagi setiap lajur di bawah situasi semasa, dan kemudian ikatkannya pada dom yang diperlukan. Kemudian, setiap kali jadual berubah/lebar penyemak imbas berubah, lebar Jadual boleh ditukar dalam masa nyata.
1 2 3 4 5 6 7 8 9 10 11 |
|
Semua kod:
1 2 3 4 5 6 7 8 9 10 11 12 13 14 15 16 17 18 19 20 21 22 23 24 25 26 27 28 29 30 31 32 33 34 35 36 37 38 39 40 41 42 43 44 45 46 47 48 49 50 51 52 53 54 55 56 57 58 59 60 61 62 63 64 65 66 67 68 69 70 71 72 73 74 75 76 77 78 79 80 81 82 83 84 85 86 87 88 89 90 91 92 93 94 95 96 97 98 99 100 101 102 103 104 105 106 107 108 109 110 111 112 113 114 115 116 117 118 119 120 121 122 123 124 125 126 127 128 129 130 131 132 133 134 135 136 137 138 139 140 141 142 143 144 145 146 147 148 |
|
Dua js yang digunakan di dalamnya, pendikit anti goncang dan pemantauan pendaftaran juga diletakkan di sini
1 2 3 4 5 6 7 8 9 10 11 12 13 14 15 16 17 18 19 20 21 22 23 24 25 26 27 28 29 30 31 32 33 34 35 36 37 38 39 40 41 42 43 44 45 46 47 48 49 50 51 52 53 54 55 |
|
1 2 3 4 5 6 7 8 9 10 11 12 13 14 15 16 17 18 19 20 |
|
Atas ialah kandungan terperinci Cara menggunakan komponen jadual vue3. Untuk maklumat lanjut, sila ikut artikel berkaitan lain di laman web China PHP!

Alat AI Hot

Undresser.AI Undress
Apl berkuasa AI untuk mencipta foto bogel yang realistik

AI Clothes Remover
Alat AI dalam talian untuk mengeluarkan pakaian daripada foto.

Undress AI Tool
Gambar buka pakaian secara percuma

Clothoff.io
Penyingkiran pakaian AI

AI Hentai Generator
Menjana ai hentai secara percuma.

Artikel Panas

Alat panas

Notepad++7.3.1
Editor kod yang mudah digunakan dan percuma

SublimeText3 versi Cina
Versi Cina, sangat mudah digunakan

Hantar Studio 13.0.1
Persekitaran pembangunan bersepadu PHP yang berkuasa

Dreamweaver CS6
Alat pembangunan web visual

SublimeText3 versi Mac
Perisian penyuntingan kod peringkat Tuhan (SublimeText3)

Topik panas
 1382
1382
 52
52
 vue3+vite: Bagaimana untuk menyelesaikan ralat apabila menggunakan memerlukan untuk mengimport imej secara dinamik dalam src
May 21, 2023 pm 03:16 PM
Penggunaan vue3+vite:src memerlukan pengimportan imej secara dinamik dan laporan ralat dan penyelesaian vue3+vite secara dinamik Jika vue3 dibangunkan menggunakan skrip taip, akan terdapat mesej ralat untuk keperluan untuk memperkenalkan imej tidak boleh digunakan :require(' .../assets/test.png') diimport kerana typescript tidak menyokong require, jadi import digunakan Berikut ialah cara menyelesaikannya: gunakan awaitimport
 Cara menggunakan tinymce dalam projek vue3
May 19, 2023 pm 08:40 PM
tinymce ialah pemalam editor teks kaya yang berfungsi sepenuhnya, tetapi memperkenalkan tinymce ke dalam vue tidak selancar seperti pemalam teks kaya Vue yang lain tidak sesuai untuk Vue dan @tinymce/tinymce-vue perlu diperkenalkan. dan Ia adalah pemalam teks kaya asing dan belum melepasi versi Cina Anda perlu memuat turun pakej terjemahan dari tapak web rasminya (anda mungkin perlu memintas tembok api). 1. Pasang kebergantungan yang berkaitan npminstalltinymce-Snpminstall@tinymce/tinymce-vue-S2 Muat turun pakej Cina 3. Perkenalkan pakej kulit dan Cina Buat folder tinymce baharu dalam folder awam projek dan muat turun
 Cara memuat semula sebahagian kandungan halaman dalam Vue3
May 26, 2023 pm 05:31 PM
Untuk mencapai muat semula separa halaman, kami hanya perlu melaksanakan pemaparan semula komponen setempat (dom). Dalam Vue, cara paling mudah untuk mencapai kesan ini ialah menggunakan arahan v-if. Dalam Vue2, selain menggunakan arahan v-if untuk memaparkan semula dom setempat, kami juga boleh mencipta komponen kosong baharu Apabila kami perlu memuat semula halaman setempat, lompat ke halaman komponen kosong ini dan kemudian masuk semula pengawal beforeRouteEnter dalam komponen kosong. Seperti yang ditunjukkan dalam rajah di bawah, cara mengklik butang muat semula dalam Vue3.X untuk memuatkan semula DOM dalam kotak merah dan memaparkan status pemuatan yang sepadan. Memandangkan pengawal dalam komponen dalam sintaks persediaan skrip dalam Vue3.X hanya mempunyai o
 Cara Vue3 menghuraikan penurunan harga dan melaksanakan penyerlahan kod
May 20, 2023 pm 04:16 PM
Vue melaksanakan bahagian hadapan blog dan perlu melaksanakan penghuraian markdown Jika terdapat kod, ia perlu melaksanakan penyerlahan kod. Terdapat banyak pustaka parsing markdown untuk Vue, seperti markdown-it, vue-markdown-loader, marked, vue-markdown, dsb. Perpustakaan ini semuanya sangat serupa. Ditanda digunakan di sini, dan highlight.js digunakan sebagai pustaka penonjolan kod. Langkah-langkah pelaksanaan khusus adalah seperti berikut: 1. Pasang perpustakaan bergantung Buka tetingkap arahan di bawah projek vue dan masukkan arahan berikut npminstallmarked-save//marked untuk menukar markdown ke htmlnpmins.
 Bagaimana untuk menyelesaikan masalah bahawa selepas projek vue3 dibungkus dan diterbitkan ke pelayan, halaman akses dipaparkan kosong
May 17, 2023 am 08:19 AM
Selepas projek vue3 dibungkus dan diterbitkan ke pelayan, halaman akses memaparkan kosong 1. PublicPath dalam fail vue.config.js diproses seperti berikut: const{defineConfig}=require('@vue/cli-service') module.exports=defineConfig({publicPath :process.env.NODE_ENV==='pengeluaran'?'./':'/&
 Bagaimana untuk memilih avatar dan memangkasnya dalam Vue3
May 29, 2023 am 10:22 AM
Kesan terakhir ialah memasang komponen VueCropper yarnaddvue-cropper@next Nilai pemasangan di atas adalah untuk Vue3 Jika ia adalah Vue2 atau anda ingin menggunakan kaedah lain untuk merujuk, sila lawati alamat npm rasminya. Ia juga sangat mudah untuk merujuk dan menggunakannya dalam komponen Anda hanya perlu memperkenalkan komponen yang sepadan dan fail gayanya. Saya tidak merujuknya secara global di sini, tetapi hanya memperkenalkan import{userInfoByRequest}from'../js/api. ' dalam fail komponen saya import{VueCropper}dari'vue-cropper&
 Cara menggunakan vue3+ts+axios+pinia untuk mencapai penyegaran yang tidak masuk akal
May 25, 2023 pm 03:37 PM
vue3+ts+axios+pinia menyedari penyegaran yang tidak masuk akal 1. Mula-mula muat turun aiXos dan pinianpmipinia dalam projek--savenpminstallaxios--save2. AxiosResponse}daripada"axios";importaxiosfrom'axios';import{ElMess
 Cara menggunakan komponen boleh guna semula Vue3
May 20, 2023 pm 07:25 PM
Prakata Sama ada ia adalah vue atau react, apabila kita menghadapi berbilang kod berulang, kita akan memikirkan cara untuk menggunakan semula kod ini, dan bukannya mengisi fail dengan sekumpulan kod berlebihan. Malah, kedua-dua vue dan react boleh mencapai penggunaan semula dengan mengekstrak komponen, tetapi jika anda menemui beberapa serpihan kod kecil dan anda tidak mahu mengekstrak fail lain, sebagai perbandingan, react boleh digunakan dalam yang sama Isytiharkan widget yang sepadan dalam fail , atau laksanakannya melalui fungsi render, seperti: constDemo:FC=({msg})=>{returndemomsgis{msg}}constApp:FC=()=>{return(


