
 Operasi dan penyelenggaraan
Nginx
Bagaimana untuk mengkonfigurasi pelayan Nginx untuk program PHP di bawah sistem Debian
Operasi dan penyelenggaraan
Nginx
Bagaimana untuk mengkonfigurasi pelayan Nginx untuk program PHP di bawah sistem Debian
Bagaimana untuk mengkonfigurasi pelayan Nginx untuk program PHP di bawah sistem Debian

kaedah pemasangan nginx:
1 pemasangan rangkaian apt
Ubah suai senarai sumber
vi /etc/apt/sources.list
#加入以下源
deb http://nginx.org/packages/debian/ squeeze nginx
deb-src http://nginx.org/packages/debian/ squeeze nginx
Kemas kini senarai sumber dan pasang nginx melalui apt< . .
apt-key add nginx_signing.key
apt-get update
apt-get install nginx
Muat turun versi stabil terkini nginx
Nyahzip dan lihat pilihan kompilasi
apt-get install build-essential
apt-get install libpcre3 libpcre3-dev zlib1g zlib1g-dev openssl libssl-dev libssl0.9.8
Lihat parameter konfigurasi pilihan untuk kompilasi (yang berikut hanyalah beberapa item konfigurasi yang biasa digunakan):
--prefix=path Laluan pemasangan lalai nginx, jika tidak dinyatakan. Lalai ialah /usr/local/nginx
--sbin-path=path Laluan ke fail perintah boleh laku nginx Jika tidak dinyatakan, lalai ialah
结果如下图:
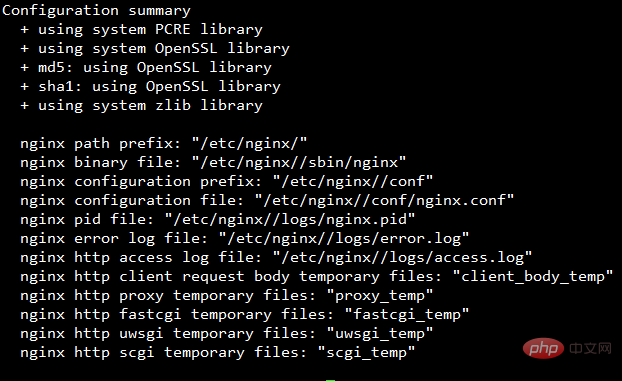
编译并安装
make && make install
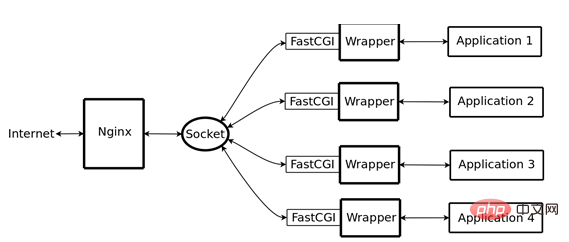
ps:fastcgi回顾
fastcgi是一个可伸缩地、高速地在http server和动态脚本语言间通信的接口。多数流行的http server都支持fastcgi,包括apache、nginx和lighttpd等,同时,fastcgi也被许多脚本语言所支持,其中就有php。fastcgi是从cgi发展改进而来的。传统cgi接口方式的主要缺点是性能很差,因为每次http服务器遇到动态程序时都需要重新启动脚本解析器来执行解析,然后结果被返回给http服务器。这在处理高并发访问时,几乎是不可用的。另外传统的cgi接口方式安全性也很差,现在已经很少被使用了。fastcgi接口方式采用c/s结构,可以将http服务器和脚本解析服务器分开,同时在脚本解析服务器上启动一个或者多个脚本解析守护进程。当http服务器每次遇到动态程序时,可以将其直接交付给fastcgi进程来执行,然后将得到的结果返回给浏览器。这种方式可以让http服务器专一地处理静态请求或者将动态脚本服务器的结果返回给客户端,这在很大程度上提高了整个应用系统的性能。
nginx不支持对外部程序的直接解析,所有的外部程序(包括php)必须通过fastcgi接口来调用。fastcgi接口在linux下是socket,(这个socket可以是文件socket,也可以是ip socket)。为了调用cgi程序,还需要一个fastcgi的wrapper(wrapper可以理解为用于启动另一个程序的程序),这个wrapper绑定在某个固定socket上,如端口或者文件socket。当nginx将cgi请求发送给这个socket的时候,通过fastcgi接口,wrapper接纳到请求,然后派生出一个新的线程,这个线程调用解释器或者外部程序处理脚本并读取返回数据;接着,wrapper再将返回的数据通过fastcgi接口,沿着固定的socket传递给nginx;最后,nginx将返回的数据发送给客户端,这就是nginx+fastcgi的整个运作过程。
php-fpm
php5.3版本源码已经默认支持php-fpm了,但是debian6认为它还没经过广泛的测试,所以在debian6的软件仓库中,虽然php版本为5.3.3,但是却没包含php-fpm,如果不想手工编译安装php的话可以换一个源。
修改源列表
vi /etc/apt/sources.list
deb http://packages.dotdeb.org stable all
deb-src http://packages.dotdeb.org stable all
更新源列表,安装php5-fpm
apt-get update wget http://www.dotdeb.org/dotdeb.gpg
cat dotdeb.gpg | apt-key add -
apt-get install php5-fpm
安装其他常用php5组件
apt-get install php5 php5-cgi php5-cli php5-mysql php5-memcache
启动php-fpm
/etc/init.d/php5-fpm start
这样的话最基本的nginx+php环境就搭建完毕了。
nginx配置文件粗解
nginx的配置文件结构类似下图这样的结构:

配置文件主要参照编译完成后生成的默认配置文件。
主模块的配置选项
user指令设置进程以什么用户运行,在源码编译安装时指定的nginx用户,如果在编译时没有指定,默认是nobody账户,在配置文件中此行处于注释状态, user 指令可以设置两个参数,第一个指定进程所属用户,第二个是可选,指定进程所属组
user nginx nobody;
设置工作进程数,一个工作进程为一个单线程,在cpu密集型环境中,可以设置worker_processes数目为cpu核数
worker_processes 4;
指定nginx错误日志文件的位置,如果要禁止错误日志使用error_log /dev/null,error_log可以存在于不同的字段main、http、server等,文件后面可以指定记录的日志的默认等级。
error_log logs/error.log;
设置pid文件路径,可以使用kill命令发送相关信号
pid logs/nginx.pid;
event模块配置选项,event模块主要控制nginx处理连接的方式
  events {

  #如果在configure时指定的不止一个事件模型,可以通过use告诉nginx要使用哪一个模型:seletc、poll、kqueue、epoll、rtsig、/dev/poll、eventport等

  use epoll;

  #worker_connections和worker_processes可以计算你的理论最大链接数, worker_connections*worker_processes

  worker_connections 1024;

}http模块里面主要是对http服务器相关属性进行设置
 http {

  #可以用include指令包含一些其他文件,支持通配符,可以使用绝对路径,也可以使用相对路径,相对路径以nginx.conf为根据

  include    mime.types;

  #设置默认的mime类型

  default_type application/octet-stream;

  #描述记录日志的格式,在定义格式时可以使用一些变量,各个变了的含义可以从各个模块汇总查找

  log_format main '$remote_addr - $remote_user [$time_local] "$request" '

           '$status $body_bytes_sent "$http_referer" '

           '"$http_user_agent" "$http_x_forwarded_for"';

  #指定访问日志的路径和格式,缓冲区大小

  access_log logs/access.log main;

  #sendfile拷贝文件在内核态完成,更加高效

  sendfile    on;

  #tcp_nopush   on;

  #可以设置两个值,第一个表示客户端与服务器长连接的超时时间,超过这个时间,服务器将关闭连接。第二个值指定的应答头中keep-alive中timeout的值,让浏览器知道什么时候关闭连接。

  keepalive_timeout 65;

  #开启gzip压缩

  gzip on;

  #在三次握手时,发送给客户端应答后的超时时间,目前还没进入连接状态,只完成了两次握手,如果在规定时间没收到应答包,nginx将关闭链接

  send_timeout 30

  server {

     xxx

  }

}server模块嵌在http模块中,主要用来配置虚拟主机
  server {

    #指定server字段中可以被访问到的ip地址及端口

    listen    80;

    #将http请求的主机头与server中的server_name参数进行匹配,并找出第一个结果,如果没有server_name参数匹配上,则第一个出现listen的server将被匹配,多域名用空格分割

    server_name www.nginx.com;

    #设个指令是应答头重的content-type字段使用指定的编码集,off表示不在应答头重添加content-type信息

    charset off;

    #指定www.nginx.com域名的访问日志路径及格式

    access_log logs/host.access.log main;

    #如果在url中没有指定文件,则设置一个默认主页,可以设置多个文件,空格分开,可以在http、server、location中设置

    index index.php index.htm;

    #根据url的不同需求进行配置,可以使用字符串和正则匹配,最确切的匹配被使用,搜索到第一个后会停止

    # ~* 不区分大小写;~ 区分大小写;^~ 禁止在字符串匹配后检查正则;= 在url和location之间精确匹配,匹配完成后不做额外搜索。

    location /i/ {

      #请求到达后的文件根目录,在请求中root会把location匹配的值加到root指定的值后面,请求/i/a.php,则会是/html/i/a.php响应

      root  html;

      #在location中设置index

      index index.html index.htm;

    }

    #为错误代码指定相应的错误界面,可以用在http、server、location字段中。

    error_page 404       /404.html;

    # redirect server error pages to the static page /50x.html

    error_page  500 502 503 504 /50x.html;

    #精确匹配50x.html,真实响应是/html/50x.html

    location = /50x.html {

      root  html;

    }

    # proxy the php scripts to apache listening on 127.0.0.1:80

    location ~ \.php$ {

      proxy_pass  http://127.0.0.1;

    }

    #配置php脚本传至fastcgi

    location ~ \.php$ {

     root      html;

     fastcgi_pass  127.0.0.1:9000;

     fastcgi_index index.php;

     #/scripts是php脚本所在的目录

      fastcgi_param script_filename /scripts$fastcgi_script_name;

      include    fastcgi_params;

    }

    #拒绝访问.htaccess文件

    location ~ /\.ht {

      deny all;

    }

}Atas ialah kandungan terperinci Bagaimana untuk mengkonfigurasi pelayan Nginx untuk program PHP di bawah sistem Debian. Untuk maklumat lanjut, sila ikut artikel berkaitan lain di laman web China PHP!

Alat AI Hot

Undresser.AI Undress
Apl berkuasa AI untuk mencipta foto bogel yang realistik

AI Clothes Remover
Alat AI dalam talian untuk mengeluarkan pakaian daripada foto.

Undress AI Tool
Gambar buka pakaian secara percuma

Clothoff.io
Penyingkiran pakaian AI

Video Face Swap
Tukar muka dalam mana-mana video dengan mudah menggunakan alat tukar muka AI percuma kami!

Artikel Panas
Alat panas

Notepad++7.3.1
Editor kod yang mudah digunakan dan percuma

SublimeText3 versi Cina
Versi Cina, sangat mudah digunakan

Hantar Studio 13.0.1
Persekitaran pembangunan bersepadu PHP yang berkuasa

Dreamweaver CS6
Alat pembangunan web visual

SublimeText3 versi Mac
Perisian penyuntingan kod peringkat Tuhan (SublimeText3)
Topik panas


 Tujuan PHP: Membina Laman Web Dinamik
Apr 15, 2025 am 12:18 AM
Tujuan PHP: Membina Laman Web Dinamik
Apr 15, 2025 am 12:18 AM
PHP digunakan untuk membina laman web dinamik, dan fungsi terasnya termasuk: 1. Menjana kandungan dinamik dan menghasilkan laman web secara real time dengan menyambung dengan pangkalan data; 2. Proses Interaksi Pengguna dan Penyerahan Bentuk, Sahkan Input dan Menanggapi Operasi; 3. Menguruskan sesi dan pengesahan pengguna untuk memberikan pengalaman yang diperibadikan; 4. Mengoptimumkan prestasi dan ikuti amalan terbaik untuk meningkatkan kecekapan dan keselamatan laman web.
 PHP dan Python: Contoh dan perbandingan kod
Apr 15, 2025 am 12:07 AM
PHP dan Python: Contoh dan perbandingan kod
Apr 15, 2025 am 12:07 AM
PHP dan Python mempunyai kelebihan dan kekurangan mereka sendiri, dan pilihannya bergantung kepada keperluan projek dan keutamaan peribadi. 1.PHP sesuai untuk pembangunan pesat dan penyelenggaraan aplikasi web berskala besar. 2. Python menguasai bidang sains data dan pembelajaran mesin.
 PHP: Pengendalian pangkalan data dan logik sisi pelayan
Apr 15, 2025 am 12:15 AM
PHP: Pengendalian pangkalan data dan logik sisi pelayan
Apr 15, 2025 am 12:15 AM
PHP menggunakan sambungan MySQLI dan PDO untuk berinteraksi dalam operasi pangkalan data dan pemprosesan logik sisi pelayan, dan memproses logik sisi pelayan melalui fungsi seperti pengurusan sesi. 1) Gunakan MySQLI atau PDO untuk menyambung ke pangkalan data dan laksanakan pertanyaan SQL. 2) Mengendalikan permintaan HTTP dan status pengguna melalui pengurusan sesi dan fungsi lain. 3) Gunakan urus niaga untuk memastikan atomik operasi pangkalan data. 4) Mencegah suntikan SQL, gunakan pengendalian pengecualian dan sambungan penutup untuk debugging. 5) Mengoptimumkan prestasi melalui pengindeksan dan cache, tulis kod yang sangat mudah dibaca dan lakukan pengendalian ralat.
 PHP dan Python: Paradigma yang berbeza dijelaskan
Apr 18, 2025 am 12:26 AM
PHP dan Python: Paradigma yang berbeza dijelaskan
Apr 18, 2025 am 12:26 AM
PHP terutamanya pengaturcaraan prosedur, tetapi juga menyokong pengaturcaraan berorientasikan objek (OOP); Python menyokong pelbagai paradigma, termasuk pengaturcaraan OOP, fungsional dan prosedur. PHP sesuai untuk pembangunan web, dan Python sesuai untuk pelbagai aplikasi seperti analisis data dan pembelajaran mesin.
 Cara mengkonfigurasi nama domain pelayan awan di nginx
Apr 14, 2025 pm 12:18 PM
Cara mengkonfigurasi nama domain pelayan awan di nginx
Apr 14, 2025 pm 12:18 PM
Cara mengkonfigurasi nama domain Nginx pada pelayan awan: Buat rekod yang menunjuk ke alamat IP awam pelayan awan. Tambah blok hos maya dalam fail konfigurasi Nginx, menyatakan port pendengaran, nama domain, dan direktori akar laman web. Mulakan semula nginx untuk memohon perubahan. Akses konfigurasi ujian nama domain. Nota Lain: Pasang sijil SSL untuk membolehkan HTTPS, pastikan firewall membenarkan trafik port 80, dan tunggu resolusi DNS berkuatkuasa.
 Cara memeriksa sama ada nginx dimulakan
Apr 14, 2025 pm 01:03 PM
Cara memeriksa sama ada nginx dimulakan
Apr 14, 2025 pm 01:03 PM
Bagaimana untuk mengesahkan sama ada nginx dimulakan: 1. Gunakan baris arahan: status sistem sistem nginx (linux/unix), netstat -ano | Findstr 80 (Windows); 2. Periksa sama ada port 80 dibuka; 3. Semak mesej permulaan Nginx dalam log sistem; 4. Gunakan alat pihak ketiga, seperti Nagios, Zabbix, dan Icinga.
 Cara memeriksa nama bekas Docker
Apr 15, 2025 pm 12:21 PM
Cara memeriksa nama bekas Docker
Apr 15, 2025 pm 12:21 PM
Anda boleh menanyakan nama kontena Docker dengan mengikuti langkah -langkah: Senaraikan semua bekas (Docker PS). Tapis senarai kontena (menggunakan arahan grep). Mendapat nama kontena (terletak di lajur "Nama").
 Cara Mengkonfigurasi Nginx di Windows
Apr 14, 2025 pm 12:57 PM
Cara Mengkonfigurasi Nginx di Windows
Apr 14, 2025 pm 12:57 PM
Bagaimana cara mengkonfigurasi nginx di Windows? Pasang Nginx dan buat konfigurasi hos maya. Ubah suai fail konfigurasi utama dan sertakan konfigurasi hos maya. Mulakan atau Muat semula Nginx. Uji konfigurasi dan lihat laman web. Selektif membolehkan SSL dan mengkonfigurasi sijil SSL. Selektif tetapkan firewall untuk membolehkan trafik port 80 dan 443.
