 hujung hadapan web
 View.js
 Apakah perbezaan antara susunan pelaksanaan kitaran hayat dalam vue2 dan vue3
Apakah perbezaan antara susunan pelaksanaan kitaran hayat dalam vue2 dan vue3
Perbezaan antara susunan pelaksanaan kitaran hayat dalam vue2 dan vue3
Perbandingan kitaran hayat
Arahan pelaksanaan dalam vue2
beforeCreate=>created=>beforeMount=>mounted=>beforeUpdate=>updated=>beforeDestroy=>destroyedPerintah pelaksanaan dalam vue3
setup=>onBeforeMount=>onMounted=>onBeforeUpdate=>onUpdated=>onBeforeUnmount=>onUnmounted
Surat menyurat
vue2->vue3
beforeCreate->setupcreated->setup-
->beforeMount-> >onBeforeMount -
-> >mountedonMounted -
->beforeUpdateonBeforeUpdate Persediaan dalam vue3 adalah bersamaan dengan beforeCreate dan dibuat dalam vue2, tetapi pelaksanaannya sebelum sebelumCreate dan dibuat, jadi persediaan tidak boleh menggunakan data dan kaedah dalam data dan kaedah, iaitu, ia tidak boleh kendalikan ini, dan ini dalam persediaan adalah sama dengan tidak ditentukan Dan kerana pembolehubah dan kaedah yang dibuat dalam persediaan akhirnya dikembalikan melalui pemulangan, program dalam persediaan hanya boleh segerak, bukan tak segerak, melainkan pemulangan hanya menerima objek tak segerak, dan objek mengembalikan pembolehubah dan pembolehubah yang ditakrifkan dalam kaedah persediaan, dan kemudian komponen induk menggunakan teg Suspense untuk membalut komponen tak segerak
updatedonUpdatedJika anda ingin menggunakan vue2's beforeDestroy dan dimusnahkan dalam vue3, anda perlu; untuk menukar nama kepada beforeUnmount, unmounted masing-masing Jika vue2 juga digunakan dalam vue3 Cara penulisan, cara penulisan vue3 akan dilaksanakan terlebih dahulu -
Contoh mudah untuk menggambarkan
beforeDestroyonBeforeUnmountKomponen induk App.vue<template> <h2 id="App父级组件">App父级组件</h2> <button @click="childShow = !childShow">切换child子组件的显示</button> <hr /> <child v-if="childShow" /> </template>
Salin selepas log masuk<script lang="ts"> import { defineComponent, reactive, ref } from "vue"; //引入子组件 import child from "./components/child.vue"; export default defineComponent({ name: "App", components: { child, }, setup() { const childShow = ref(true); return { childShow, }; }, }); </script>Salin selepas log masuk<style> * { margin: 0; padding: 0; } </style>Salin selepas log masukKomponen anak child.vue <template> <h3 id="child-nbsp-子级组件">child 子级组件</h3> <h4 id="nbsp-name-nbsp">{{ name }}</h4> <button @click="updateName">更新name</button> </template> <script lang="ts"> import { defineComponent, onBeforeMount, onMounted, onBeforeUpdate, onUpdated, onBeforeUnmount, onUnmounted, ref, } from "vue"; export default defineComponent({ name: "child", //vue2中的生命周期钩子 beforeCreate() { console.log("vue2 中的生命周期 beforeCreate"); }, created() { console.log("vue2 中的生命周期 created"); }, beforeMount() { console.log("vue2 中的生命周期 beforeMount"); }, mounted() { console.log("vue2 中的生命周期 mounted"); }, beforeUpdate() { console.log("vue2 中的生命周期 beforeUpdate"); }, updated() { console.log("vue2 中的生命周期 updated"); }, // vue2中的 beforeDestroy与 destroyed已经改名 无法使用 beforeUnmount() { console.log("vue2 中的生命周期 beforeDestroy(beforeUnmount)"); }, unmounted() { console.log("vue2 中的生命周期 destroyed(unmounted)"); }, setup() { console.log("vue3中的setup"); const name = ref("hhh"); const updateName = () => { name.value += "6……6………6"; }; onBeforeMount(() => { console.log("vue3 中的生命周期 onBeforeMount"); }); onMounted(() => { console.log("vue3 中的生命周期 onMounted"); }); onBeforeUpdate(() => { console.log("vue3 中的生命周期 onBeforeUpdate"); }); onUpdated(() => { console.log("vue3 中的生命周期 onUpdated"); }); onBeforeUnmount(() => { console.log("vue3 中的生命周期 onBeforeUnmount"); }); onUnmounted(() => { console.log("vue3 中的生命周期 onUnmounted"); }); return { name, updateName, }; }, }); </script>Salin selepas log masukberjalan Kesan paparan ialah
destroyedonUnmounted
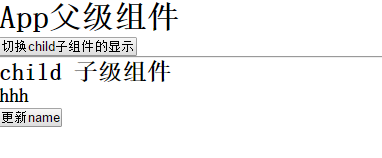
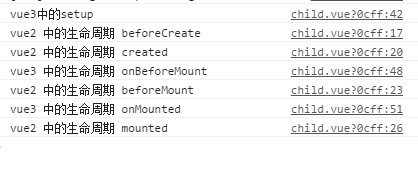 Klik nama kemas kini
- untuk melihat Dalam vue3,
setup- dilaksanakan di hadapan sebelumKemas kini; >
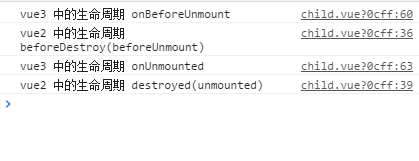
Klik untuk menukar paparan subkomponen kanak-kanak
onBeforeMount onMountedAnda boleh melihatnya
dalam vue3

Kitaran hayat: Apabila membuat contoh vue, ia akan melalui satu siri proses permulaan (proses daripada penciptaan kepada pemusnahan contoh Vue). kitaran hayat vue.
Vue menyediakan pembangun dengan satu siri fungsi panggil balik untuk memudahkan kami menambah logik tersuai Kitaran hayat Vue adalah dari penciptaan kepada pemusnahan, dan kemas kini data pemasangan nod yang penting.onBeforeUpdatefasa penciptaan sebelumBuat, dibuatlekapkan fasa halaman pemaparan sebelumLekapkan, dipasang
onUpdated- peringkat kemas kini sebelumKemas kini, dikemas kini
Jujukan kitaran hayat di bawah satu halaman memaparkan gelombang Kod, lihat susunan pelaksanaan setiap fungsi cangkuk kitaran:
<!DOCTYPE html>
<html lang="en">
<head>
<meta charset="UTF-8">
<meta name="viewport" content="width=device-width, initial-scale=1.0">
<meta http-equiv="X-UA-Compatible" content="ie=edge">
<title>vue生命周期学习</title>
<script src="https://cdn.bootcss.com/vue/2.4.2/vue.js"></script>
</head>
<body>
<div id="app">
<h2 id="message">{{message}}</h2>
</div>
</body>
<script>
var vm = new Vue({
el: '#app',
data: {
message: 'Vue的生命周期'
},
beforeCreate: function() {
console.group('------beforeCreate创建前状态------');
console.log("%c%s", "color:red" , "el : " + this.$el); //undefined
console.log("%c%s", "color:red","data : " + this.$data); //undefined
console.log("%c%s", "color:red","message: " + this.message)
},
created: function() {
console.group('------created创建完毕状态------');
console.log("%c%s", "color:red","el : " + this.$el); //undefined
console.log("%c%s", "color:red","data : " + this.$data); //已被初始化
console.log("%c%s", "color:red","message: " + this.message); //已被初始化
},
beforeMount: function() {
console.group('------beforeMount挂载前状态------');
console.log("%c%s", "color:red","el : " + (this.$el)); //已被初始化
console.log(this.$el);
console.log("%c%s", "color:red","data : " + this.$data); //已被初始化
console.log("%c%s", "color:red","message: " + this.message); //已被初始化
},
mounted: function() {
console.group('------mounted 挂载结束状态------');
console.log("%c%s", "color:red","el : " + this.$el); //已被初始化
console.log(this.$el);
console.log("%c%s", "color:red","data : " + this.$data); //已被初始化
console.log("%c%s", "color:red","message: " + this.message); //已被初始化
},
beforeUpdate: function () {
console.group('beforeUpdate 更新前状态===============》');
console.log("%c%s", "color:red","el : " + this.$el.innerHTML);
console.log(this.$el);
console.log("%c%s", "color:red","data : " + this.$data);
console.log("%c%s", "color:red","message: " + this.message);
},
updated: function () {
console.group('updated 更新完成状态===============》');
console.log("%c%s", "color:red","el : " + this.$el.innerHTML);
console.log(this.$el);
console.log("%c%s", "color:red","data : " + this.$data);
console.log("%c%s", "color:red","message: " + this.message);
},
beforeDestroy: function () {
console.group('beforeDestroy 销毁前状态===============》');
console.log("%c%s", "color:red","el : " + this.$el);
console.log(this.$el);
console.log("%c%s", "color:red","data : " + this.$data);
console.log("%c%s", "color:red","message: " + this.message);
},
destroyed: function () {
console.group('destroyed 销毁完成状态===============》');
console.log("%c%s", "color:red","el : " + this.$el);
console.log(this.$el);
console.log("%c%s", "color:red","data : " + this.$data);
console.log("%c%s", "color:red","message: " + this.message)
}
})
</script>
</html>- (1) Fasa penciptaan: mulakan peristiwa dan amati data
onBeforeUnmount - baharu Vue({}) mencipta objek contoh kosong Objek ini hanya mempunyai fungsi kitaran hayat dan beberapa peristiwa lalai
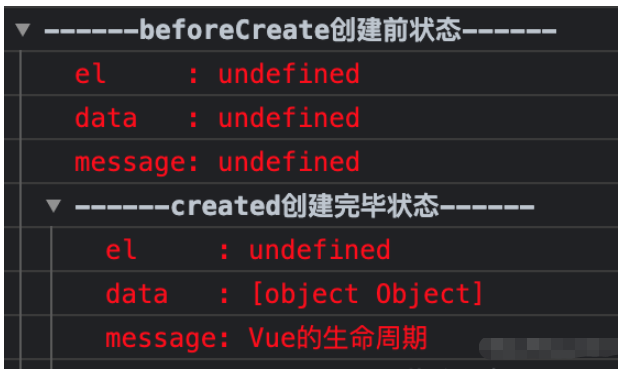
onUnmountedDalam beforeCreate, $el mahupun data tidak dimulakan
pelaksanaan yang dibuat melengkapkan pemulaan data, menukar templat kepada fungsi pemaparan (render) melalui kompilasi dan melaksanakan fungsi pemaparan untuk mendapatkan pepohon nod maya (dalam ingatan)
如果有模板文件,则编译成渲染函数;如果没有,则使用外部 HTML 作为模板进行渲染。综合排名优先级:render函数选项 > template选项 > outer HTML.
(2)挂载阶段
为vue实例添加$el成员,替换挂载的DOM成员
其中在beforeMount时,初始化el和data,但el和data,但el和data,但el还是使用{{message}}进行占位
mounted执行时,将message的值进行渲染
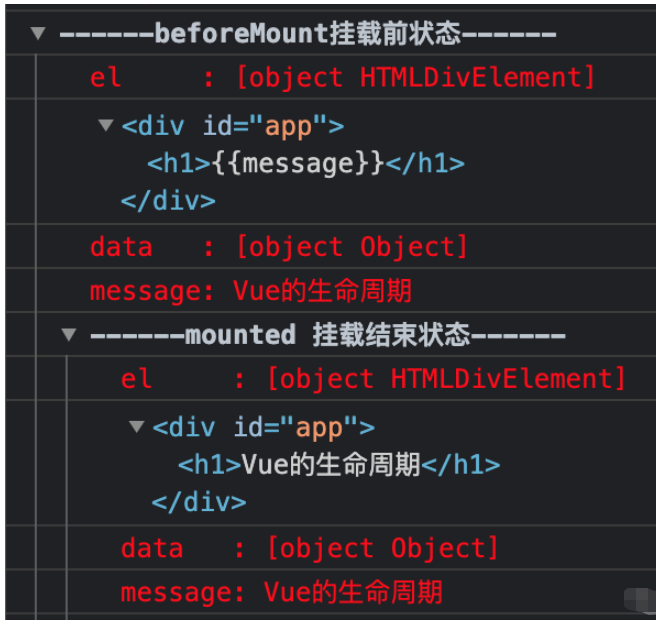
(3)更新阶段:触发对应组件的重新渲染
data 被改变时触发生命周期函数 beforeUpdate 执行,data是最新的,页面还未更新(旧的页面)
根据最新的 data 重新渲染虚拟 DOM,并挂载到页面上,完成 Model 到 View 的更新
updated 执行,此时 data 和页面都是最新的

(4)销毁阶段
beforeDestroy钩子函数在实例销毁之前调用。在这一步,实例仍然完全可用。
destroyed钩子函数在Vue 实例销毁后调用。一旦调用,Vue 实例所绑定的所有内容都将被解绑,包括事件监听器,同时所有子实例都将被销毁。
2、父子、兄弟组件的生命周期顺序
<template>
	<div class="father">
		<component-A class="son_A"></component-A>
		<component-B class="son_B"></component-B>
	</div>
</template>
// script部分同上代码,不多写了。
主要可以从以下几种情况分析:
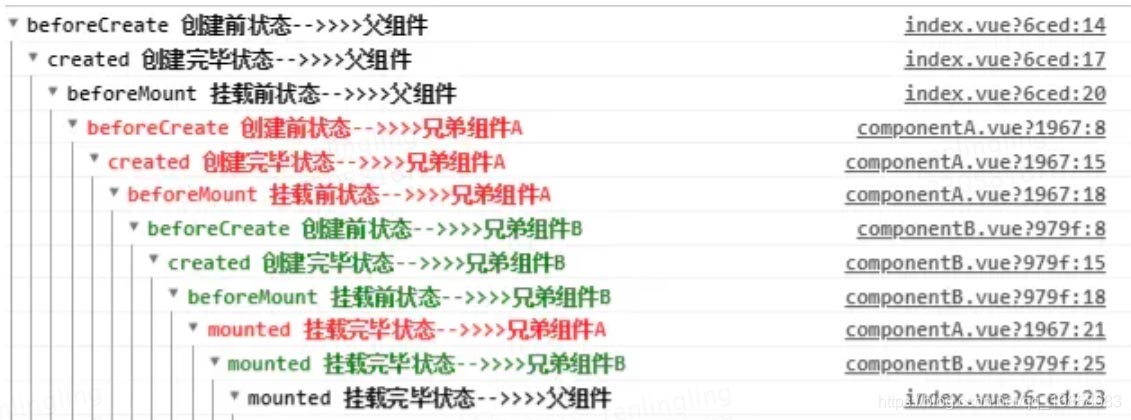
(1)创建过程:
父beforeCreate->父created->父beforeMount->子beforeCreate->子created->子beforeMount->子mounted->父mounted
(2)组件的内部更新:
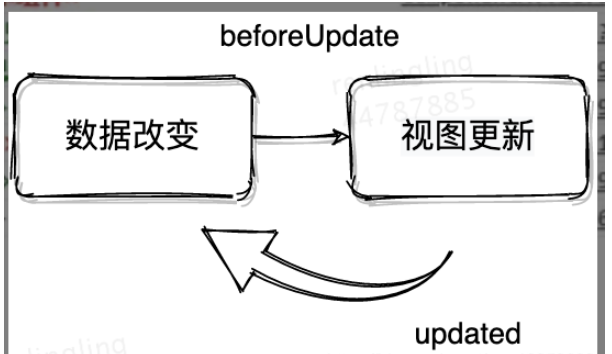
子组件的内部更新过程是:子beforeUpdate->子updated
同理父组件的内部更新过程也是:父beforeUpdate->父updated
(3)组件之间的更新:
当子组件使用emit修改父组件状态时,刚好这个状态又绑定在子组件的props上,更新过程是:父beforeUpdate->子beforeUpdate->子updated->父updated
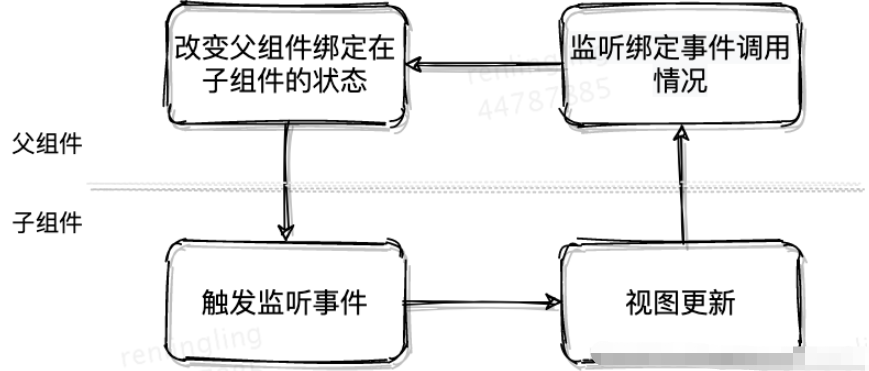
(4)父子组件销毁:
父组件被销毁时子组件也同时被销毁,销毁的钩子过程是:父beforeDestroy->子beforeDestroy->子destroyed->父destroyed

父子组件完整的生命周期图如下所示:
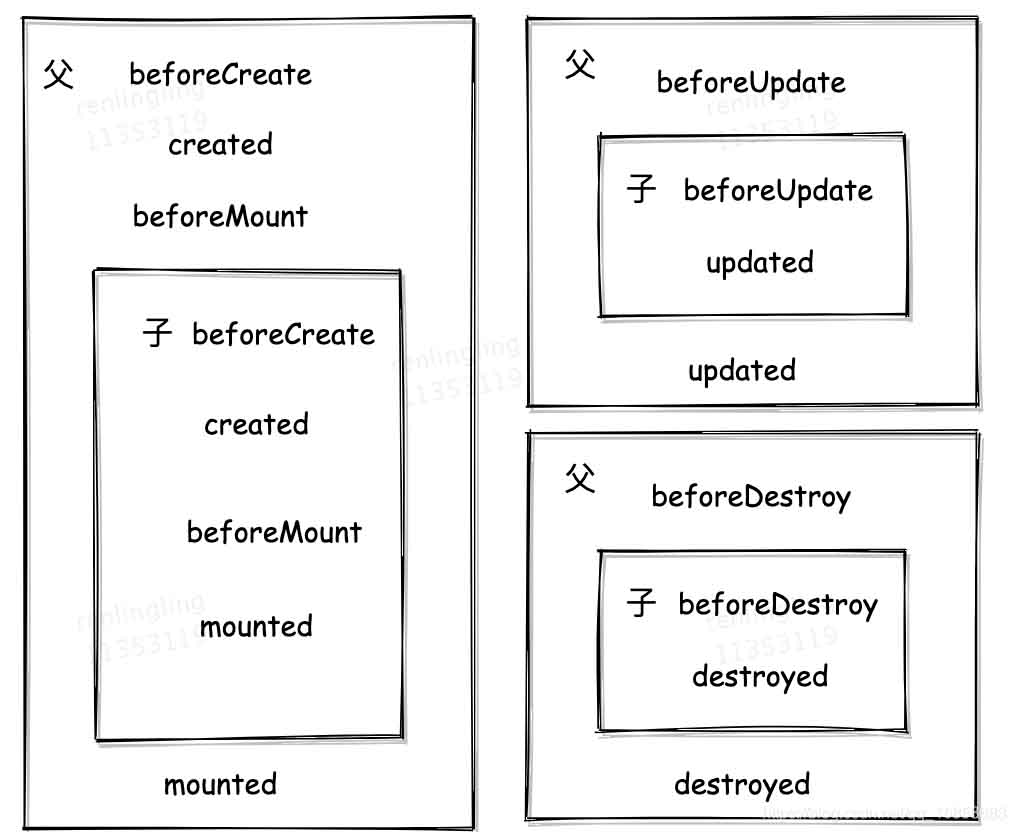
从上图可以看出,在父兄子组件挂载前,各组件的实例已经初始化完成。
子组件挂载完成后,父组件还未挂载。因此,在父组件的mounted钩子中获取API数据时,子组件的mounted钩子无法获取到该数据。
仔细看看父子组件生命周期钩子的执行顺序,会发现created这个钩子是按照从外内顺序执行,所以回显场景的解决方案是:在created中发起请求获取数据,依次在子组件的created中会接收到这个数据。
无论嵌套多少层,Vue父子组件的生命周期钩子执行顺序都是从外到内再从内到外。
3、不同页面跳转时各页面生命周期的执行顺序
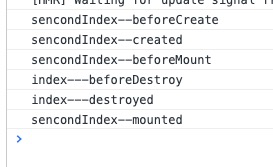
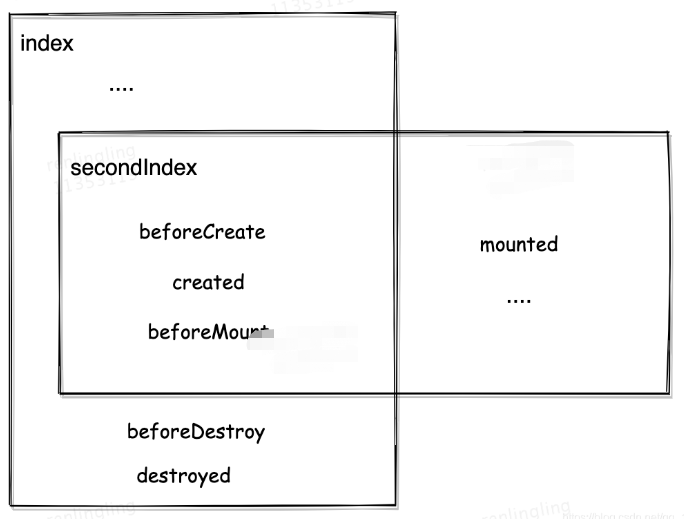
跳转不同页面和part2是相同的原理,从第一个页面(index)跳转到下一个页面(secondIndex)时,回先初始化secondIndex,之后在执行index页面的销毁阶段,最后secondIndex挂载完成.
Atas ialah kandungan terperinci Apakah perbezaan antara susunan pelaksanaan kitaran hayat dalam vue2 dan vue3. Untuk maklumat lanjut, sila ikut artikel berkaitan lain di laman web China PHP!

Alat AI Hot

Undresser.AI Undress
Apl berkuasa AI untuk mencipta foto bogel yang realistik

AI Clothes Remover
Alat AI dalam talian untuk mengeluarkan pakaian daripada foto.

Undress AI Tool
Gambar buka pakaian secara percuma

Clothoff.io
Penyingkiran pakaian AI

Video Face Swap
Tukar muka dalam mana-mana video dengan mudah menggunakan alat tukar muka AI percuma kami!

Artikel Panas

Alat panas

Notepad++7.3.1
Editor kod yang mudah digunakan dan percuma

SublimeText3 versi Cina
Versi Cina, sangat mudah digunakan

Hantar Studio 13.0.1
Persekitaran pembangunan bersepadu PHP yang berkuasa

Dreamweaver CS6
Alat pembangunan web visual

SublimeText3 versi Mac
Perisian penyuntingan kod peringkat Tuhan (SublimeText3)

Topik panas
 Cara menggunakan tinymce dalam projek vue3
May 19, 2023 pm 08:40 PM
tinymce ialah pemalam editor teks kaya yang berfungsi sepenuhnya, tetapi memperkenalkan tinymce ke dalam vue tidak selancar seperti pemalam teks kaya Vue yang lain tidak sesuai untuk Vue dan @tinymce/tinymce-vue perlu diperkenalkan. dan Ia adalah pemalam teks kaya asing dan belum melepasi versi Cina Anda perlu memuat turun pakej terjemahan dari tapak web rasminya (anda mungkin perlu memintas tembok api). 1. Pasang kebergantungan yang berkaitan npminstalltinymce-Snpminstall@tinymce/tinymce-vue-S2 Muat turun pakej Cina 3. Perkenalkan pakej kulit dan Cina Buat folder tinymce baharu dalam folder awam projek dan muat turun
 vue3+vite: Bagaimana untuk menyelesaikan ralat apabila menggunakan memerlukan untuk mengimport imej secara dinamik dalam src
May 21, 2023 pm 03:16 PM
Penggunaan vue3+vite:src memerlukan pengimportan imej secara dinamik dan laporan ralat dan penyelesaian vue3+vite secara dinamik Jika vue3 dibangunkan menggunakan skrip taip, akan terdapat mesej ralat untuk keperluan untuk memperkenalkan imej tidak boleh digunakan :require(' .../assets/test.png') diimport kerana typescript tidak menyokong require, jadi import digunakan Berikut ialah cara menyelesaikannya: gunakan awaitimport
 Cara memuat semula sebahagian kandungan halaman dalam Vue3
May 26, 2023 pm 05:31 PM
Untuk mencapai muat semula separa halaman, kami hanya perlu melaksanakan pemaparan semula komponen setempat (dom). Dalam Vue, cara paling mudah untuk mencapai kesan ini ialah menggunakan arahan v-if. Dalam Vue2, selain menggunakan arahan v-if untuk memaparkan semula dom setempat, kami juga boleh mencipta komponen kosong baharu Apabila kami perlu memuat semula halaman setempat, lompat ke halaman komponen kosong ini dan kemudian masuk semula pengawal beforeRouteEnter dalam komponen kosong. Seperti yang ditunjukkan dalam rajah di bawah, cara mengklik butang muat semula dalam Vue3.X untuk memuatkan semula DOM dalam kotak merah dan memaparkan status pemuatan yang sepadan. Memandangkan pengawal dalam komponen dalam sintaks persediaan skrip dalam Vue3.X hanya mempunyai o
 Cara Vue3 menghuraikan penurunan harga dan melaksanakan penyerlahan kod
May 20, 2023 pm 04:16 PM
Vue melaksanakan bahagian hadapan blog dan perlu melaksanakan penghuraian markdown Jika terdapat kod, ia perlu melaksanakan penyerlahan kod. Terdapat banyak pustaka parsing markdown untuk Vue, seperti markdown-it, vue-markdown-loader, marked, vue-markdown, dsb. Perpustakaan ini semuanya sangat serupa. Ditanda digunakan di sini, dan highlight.js digunakan sebagai pustaka penonjolan kod. Langkah-langkah pelaksanaan khusus adalah seperti berikut: 1. Pasang perpustakaan bergantung Buka tetingkap arahan di bawah projek vue dan masukkan arahan berikut npminstallmarked-save//marked untuk menukar markdown ke htmlnpmins.
 Cara menggunakan vue3+ts+axios+pinia untuk mencapai penyegaran yang tidak masuk akal
May 25, 2023 pm 03:37 PM
vue3+ts+axios+pinia menyedari penyegaran yang tidak masuk akal 1. Mula-mula muat turun aiXos dan pinianpmipinia dalam projek--savenpminstallaxios--save2. AxiosResponse}daripada"axios";importaxiosfrom'axios';import{ElMess
 Cara menggunakan komponen boleh guna semula Vue3
May 20, 2023 pm 07:25 PM
Prakata Sama ada ia adalah vue atau react, apabila kita menghadapi berbilang kod berulang, kita akan memikirkan cara untuk menggunakan semula kod ini, dan bukannya mengisi fail dengan sekumpulan kod berlebihan. Malah, kedua-dua vue dan react boleh mencapai penggunaan semula dengan mengekstrak komponen, tetapi jika anda menemui beberapa serpihan kod kecil dan anda tidak mahu mengekstrak fail lain, sebagai perbandingan, react boleh digunakan dalam yang sama Isytiharkan widget yang sepadan dalam fail , atau laksanakannya melalui fungsi render, seperti: constDemo:FC=({msg})=>{returndemomsgis{msg}}constApp:FC=()=>{return(
 Bagaimana untuk menyelesaikan masalah bahawa selepas projek vue3 dibungkus dan diterbitkan ke pelayan, halaman akses dipaparkan kosong
May 17, 2023 am 08:19 AM
Selepas projek vue3 dibungkus dan diterbitkan ke pelayan, halaman akses memaparkan kosong 1. PublicPath dalam fail vue.config.js diproses seperti berikut: const{defineConfig}=require('@vue/cli-service') module.exports=defineConfig({publicPath :process.env.NODE_ENV==='pengeluaran'?'./':'/&
 Bagaimana untuk memilih avatar dan memangkasnya dalam Vue3
May 29, 2023 am 10:22 AM
Kesan terakhir ialah memasang komponen VueCropper yarnaddvue-cropper@next Nilai pemasangan di atas adalah untuk Vue3 Jika ia adalah Vue2 atau anda ingin menggunakan kaedah lain untuk merujuk, sila lawati alamat npm rasminya. Ia juga sangat mudah untuk merujuk dan menggunakannya dalam komponen Anda hanya perlu memperkenalkan komponen yang sepadan dan fail gayanya. Saya tidak merujuknya secara global di sini, tetapi hanya memperkenalkan import{userInfoByRequest}from'../js/api. ' dalam fail komponen saya import{VueCropper}dari'vue-cropper&


