
 Java
javaTutorial
Cara menggunakan Spring Boot+Vue untuk melaksanakan tolak pemberitahuan Soket
Java
javaTutorial
Cara menggunakan Spring Boot+Vue untuk melaksanakan tolak pemberitahuan Soket
Cara menggunakan Spring Boot+Vue untuk melaksanakan tolak pemberitahuan Soket

Spring Boot side
Langkah pertama ialah memperkenalkan dependencies
Mula-mula kita perlu memperkenalkan dependencies yang diperlukan untuk WebSocket dan dependencies untuk memproses format output
<!--格式转换-->
<!-- https://mvnrepository.com/artifact/com.alibaba/fastjson -->
<dependency>
   <groupId>com.alibaba</groupId>
   <artifactId>fastjson</artifactId>
   <version>1.2.73</version>
</dependency>
<!--WebSocket依赖-->
<dependency>
    <groupId>org.springframework.boot</groupId>
    <artifactId>spring-boot-starter-websocket</artifactId>
</dependency>Langkah kedua , cipta kelas konfigurasi WebSocket
import org.springframework.context.annotation.Bean;
import org.springframework.context.annotation.Configuration;
import org.springframework.web.socket.server.standard.ServerEndpointExporter;

/**
 * @author: tjp
 * @create: 2023-04-03 09:58
 * @Description: WebSocket配置
 */
@Configuration
public class WebSocketConfig {
    @Bean
    public ServerEndpointExporter serverEndpointExporter() {
        return new ServerEndpointExporter();
    }

}Langkah ketiga ialah mencipta perkhidmatan WebSocket
Dalam langkah ini, kami menggunakan userId sebagai pengecam untuk membezakan pengguna yang sepadan dalam sistem. Kami juga boleh melakukan perkara lain berdasarkan ini pada masa hadapan.
import com.alibaba.fastjson.JSON;
import com.alibaba.fastjson.JSONObject;
import com.alibaba.excel.util.StringUtils;
import lombok.extern.slf4j.Slf4j;
import org.springframework.stereotype.Component;

import javax.websocket.*;
import javax.websocket.server.PathParam;
import javax.websocket.server.ServerEndpoint;
import java.io.IOException;
import java.util.HashMap;
import java.util.Iterator;
import java.util.concurrent.ConcurrentHashMap;

/**
 * @author: tjp
 * @create: 2023-04-03 13:55
 * @Description: WebSocket服务
 */

@ServerEndpoint("/websocket/{userId}")
@Slf4j
@Component
public class WebSocketServer {
    /**
     * 静态变量,用来记录当前在线连接数。应该把它设计成线程安全的。
     */
    private static int onlineCount = 0;
    /**
     * concurrent包的线程安全Set,用来存放每个客户端对应的MyWebSocket对象。
     */
    private static ConcurrentHashMap<String, WebSocketServer> webSocketMap = new ConcurrentHashMap<>();
    /**
     * 与某个客户端的连接会话,需要通过它来给客户端发送数据
     */
    private Session session;
    /**
     * 接收userId
     */
    private String userId = "";

    /**
     * 连接建立成功调用的方法
     */
    @OnOpen
    public void onOpen(Session session, @PathParam("userId") String userId) {
        this.session = session;
        this.userId = userId;
        if (webSocketMap.containsKey(userId)) {
            webSocketMap.remove(userId);
            //加入set中
        } else {
            webSocketMap.put(userId, this);
            //加入set中
            addOnlineCount();
            //在线数加1
        }

        log.info("用户连接:" + userId + ",当前在线人数为:" + getOnlineCount());

        try {
            HashMap<Object, Object> map = new HashMap<>();
            map.put("key", "连接成功");
            sendMessage(JSON.toJSONString(map));
        } catch (IOException e) {
            log.error("用户:" + userId + ",网络异常!!!!!!");
        }
    }


    /**
     * 连接关闭调用的方法
     */
    @OnClose
    public void onClose() {
        if (webSocketMap.containsKey(userId)) {
            webSocketMap.remove(userId);
            //从set中删除
            subOnlineCount();
        }
        log.info("用户退出:" + userId + ",当前在线人数为:" + getOnlineCount());
    }

    /**
     * 收到客户端消息后调用的方法
     *
     * @param message 客户端发送过来的消息
     */
    @OnMessage
    public void onMessage(String message, Session session) {
        log.info("用户消息:" + userId + ",报文:" + message);
        //可以群发消息
        //消息保存到数据库、redis
        if (StringUtils.isNotBlank(message)) {
            try {
                //解析发送的报文
                JSONObject jsonObject = JSONObject.parseObject(message);
                //追加发送人(防止串改)
                jsonObject.put("fromUserId", this.userId);
                String fromUserId = jsonObject.getString("fromUserId");
                //传送给对应toUserId用户的websocket
                if (StringUtils.isNotBlank(fromUserId) && webSocketMap.containsKey(fromUserId)) {
                    webSocketMap.get(fromUserId).sendMessage(jsonObject.toJSONString());
                    //自定义-业务处理

//                    DeviceLocalThread.paramData.put(jsonObject.getString("group"),jsonObject.toJSONString());
                } else {
                    log.error("请求的userId:" + fromUserId + "不在该服务器上");
                    //否则不在这个服务器上,发送到mysql或者redis
                }
            } catch (Exception e) {
                e.printStackTrace();
            }
        }
    }

    /**
     * 发生错误时候
     *
     * @param session
     * @param error
     */
    @OnError
    public void onError(Session session, Throwable error) {
        log.error("用户错误:" + this.userId + ",原因:" + error.getMessage());
        error.printStackTrace();
    }

    /**
     * 实现服务器主动推送
     */
    public void sendMessage(String message) throws IOException {
        //加入线程锁
        synchronized (session) {
            try {
                //同步发送信息
                this.session.getBasicRemote().sendText(message);
            } catch (IOException e) {
                log.error("服务器推送失败:" + e.getMessage());
            }
        }
    }


    /**
     * 发送自定义消息
     * */
    /**
     * 发送自定义消息
     *
     * @param message  发送的信息
     * @param toUserId 如果为null默认发送所有
     * @throws IOException
     */
    public static void sendInfo(String message, String toUserId) throws IOException {
        //如果userId为空,向所有群体发送
        if (StringUtils.isEmpty(toUserId)) {
            //向所有用户发送信息
            Iterator<String> itera = webSocketMap.keySet().iterator();
            while (itera.hasNext()) {
                String keys = itera.next();
                WebSocketServer item = webSocketMap.get(keys);
                item.sendMessage(message);
            }
        }
        //如果不为空,则发送指定用户信息
        else if (webSocketMap.containsKey(toUserId)) {
            WebSocketServer item = webSocketMap.get(toUserId);
            item.sendMessage(message);
        } else {
            log.error("请求的userId:" + toUserId + "不在该服务器上");
        }
    }

    public static synchronized int getOnlineCount() {
        return onlineCount;
    }

    public static synchronized void addOnlineCount() {
        WebSocketServer.onlineCount++;
    }

    public static synchronized void subOnlineCount() {
        WebSocketServer.onlineCount--;
    }

    public static synchronized ConcurrentHashMap<String, WebSocketServer> getWebSocketMap() {
        return WebSocketServer.webSocketMap;
    }

}Langkah keempat ialah mencipta Pengawal untuk menghantar ujian
Dapatkan bilangan orang semasa dalam talian
import com.......WebSocketServer;

@ApiOperation(value = "获取当前在线人数")
@GetMapping("/getOnlineCount")
public Integer getOnlineCount() {
    return WebSocketServer.getOnlineCount();
}Tolak mesej kepada pengguna hadapan melalui antara muka
import com.......WebSocketServer;
import org.springframework.web.bind.annotation.GetMapping;
import org.springframework.web.bind.annotation.RequestMapping;
import org.springframework.web.bind.annotation.RestController;
import java.io.IOException;
/**
* @author: tjp
* @create: 2023-04-03 13:57
* @Description: 测试
*/
@RestController
@RequestMapping("/news")
public class NewsController {
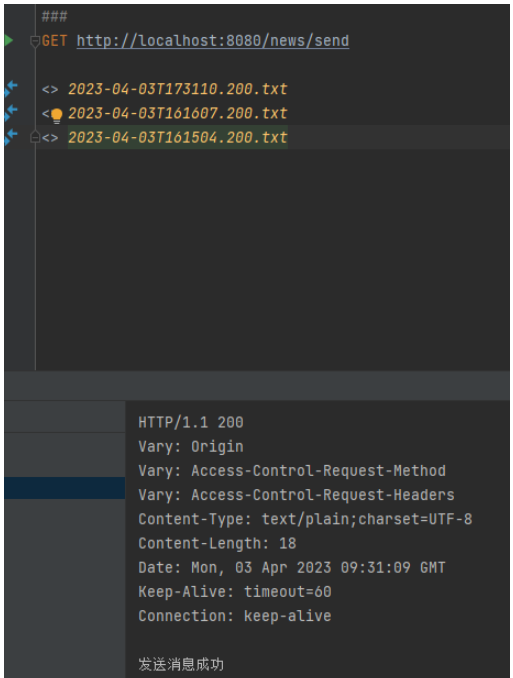
@GetMapping("/send")
public String send() {
try {
WebSocketServer.sendInfo("这是websocket发送过来的消息!", "需要推送的用户的编号");
} catch (IOException e) {
throw new RuntimeException(e);
}
return "发送消息成功";
}
}Vue side
Langkah pertama ialah mencipta kelas alat sambungan
Buat kelas alat websocket.js UserId di sini ialah userId yang digunakan sebagai pengecam
/**
 * @author: tjp
 * @create: 2023-04-03 11:22
 * @Description: Socket客户端
 */
export class WebSocketClient {
  constructor(userId) {
    this.userId = userId;
    this.websocket = null;
    this.timeout = 10000; // 心跳超时时间,单位ms
    this.timeoutObj = null; // 心跳定时器
    this.serverTimeoutObj = null; // 服务器超时定时器
    this.lockReconnect = false; // 避免重复连接
    this.timeoutnum = null; // 重连延迟定时器
  }

  // 初始化WebSocket连接
  initWebSocket() {
    let wsUrl = `ws://127.0.0.1:8080/websocket/${this.userId}`;
    this.websocket = new WebSocket(wsUrl);
    this.websocket.onopen = this.websocketonopen.bind(this);
    this.websocket.onerror = this.websocketonerror.bind(this);
    this.websocket.onmessage = this.setOnmessageMessage.bind(this);
    this.websocket.onclose = this.websocketclose.bind(this);
    // 监听窗口关闭事件,当窗口关闭时,主动去关闭websocket连接,防止连接还没断开就关闭窗口,server端会抛异常。
    window.onbeforeunload = this.websocketclose.bind(this);
  }

  // 启动心跳
  start() {
    console.log('start');
    // 清除延时器
    this.timeoutObj && clearTimeout(this.timeoutObj);
    this.serverTimeoutObj && clearTimeout(this.serverTimeoutObj);
    /*// 向服务器发送心跳消息
    let actions = { "test": "12345" };
    this.websocket && this.websocket.readyState == 1 && this.websocket.send(JSON.stringify(actions));
    // 启动心跳定时器
    this.timeoutObj = setTimeout(() => {
      this.start();
      // 定义一个延时器等待服务器响应,若超时,则关闭连接,重新请求server建立socket连接
      this.serverTimeoutObj = setTimeout(() => {
        this.websocket.close();
      }, this.timeout)
    }, this.timeout)*/
  }

  // 重置心跳
  reset() {
    // 清除时间
    clearTimeout(this.timeoutObj);
    clearTimeout(this.serverTimeoutObj);
    // 重启心跳
    this.start();
  }

  // 重新连接
  reconnect() {
    if (this.lockReconnect) return;
    this.lockReconnect = true;
    // 没连接上会一直重连,设置延迟避免请求过多
    this.timeoutnum && clearTimeout(this.timeoutnum);
    this.timeoutnum = setTimeout(() => {
      this.initWebSocket();
      this.lockReconnect = false;
    }, 5000)
  }

  // 处理收到的消息
  async setOnmessageMessage(event) {
    console.log(event.data, '获得消息');
    // 重置心跳
    // this.reset();
    // 自定义全局监听事件
    window.dispatchEvent(new CustomEvent('onmessageWS', {
      detail: {
        data: event.data
      }
    }))
    // //发现消息进入    开始处理前端触发逻辑
    // if (event.data === 'success' || event.data === 'heartBath') return
  }

  // WebSocket连接成功回调
  websocketonopen() {
    // 开启心跳
    this.start();
    console.log("WebSocket连接成功!!!" + new Date() + "----" + this.websocket.readyState);
    clearInterval(this.otimer);//停止
  }

  // WebSocket连接错误回调
  websocketonerror(e) {
    console.log("WebSocket连接发生错误" + e);
  }

  // WebSocket连接关闭回调
  websocketclose(e) {
    this.websocket.close();
    clearTimeout(this.timeoutObj);
    clearTimeout(this.serverTimeoutObj);
    console.log("websocketcloe关闭连接")
  }

  // 关闭WebSocket连接
  closeWebSocket() {
    this.websocket.close();
    console.log("closeWebSocket关闭连接")
  }

  // 监听窗口关闭事件
  onbeforeunload() {
    this.closeWebSocket();
  }
}Langkah kedua ialah membuat Sambungan
Tetapkan sambungan Soket dalam mana-mana halaman yang anda ingin buat sambungan
Sebagai contoh, selepas pengguna mengklik butang log masuk
Anda boleh menggunakan prototaip di sini untuk mencipta objek sambungan, dan Mulakan sambungan
<script>
import Vue from "vue";
import {WebSocketClient} from "@/utils/websocket";
......
......
methods:{
handleLogin() {
this.$refs.loginForm.validate(valid => {
if (valid) {
this.loading = true
this.$store.dispatch('user/login', this.loginForm).then(() => {
this.$router.push({path: this.redirect || '/'})
this.loading = false
/*-----------在此处放入原型中------------*/
Vue.prototype.$WebSocketClientInstance = new WebSocketClient('t');
Vue.prototype.$WebSocketClientInstance.initWebSocket()
/*-----------------end------------*/
}).catch(() => {
this.loading = false
})
} else {
this.$message({message: '请填写正确格式的用户名或密码', type: 'error'})
return false
}
})
}
}
.....
.....
</script>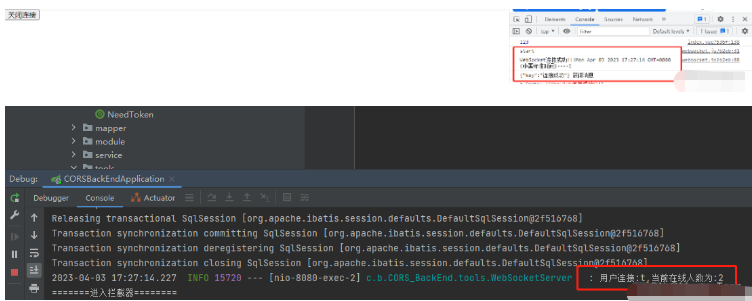
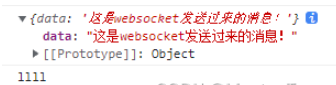
Langkah ketiga ialah mendengar mesej yang dihantar oleh pelayan
Pada halaman yang anda ingin pantau, gunakan pendengar untuk mendengar
<script>
....
....
mounted() {
// 添加socket通知监听
window.addEventListener('onmessageWS', this.getSocketData)
},
methods: {
// 收到消息处理
getSocketData(res) {
console.log(res.detail)
console.log("llll")
},
}
....
....
</script>Pada masa ini, anda boleh menghantarnya melalui antara muka bahagian belakang
Lakukan ujian
Bab Empat langkah, tutup sambungan
Buat butang
<template>
  <div>
    <button @click="closeConnect">关闭连接</button>
  </div>
</template>

<script>
import {WebSocketClient} from "@/utils/websocket";
import Vue from "vue";

export default {
  methods: {
    closeConnect() {
      console.dir(Vue.prototype)
      Vue.prototype.$WebSocketClientInstance.closeWebSocket();
    },
  }
}
</script>
Atas ialah kandungan terperinci Cara menggunakan Spring Boot+Vue untuk melaksanakan tolak pemberitahuan Soket. Untuk maklumat lanjut, sila ikut artikel berkaitan lain di laman web China PHP!

Alat AI Hot

Undresser.AI Undress
Apl berkuasa AI untuk mencipta foto bogel yang realistik

AI Clothes Remover
Alat AI dalam talian untuk mengeluarkan pakaian daripada foto.

Undress AI Tool
Gambar buka pakaian secara percuma

Clothoff.io
Penyingkiran pakaian AI

AI Hentai Generator
Menjana ai hentai secara percuma.

Artikel Panas
Alat panas

Notepad++7.3.1
Editor kod yang mudah digunakan dan percuma

SublimeText3 versi Cina
Versi Cina, sangat mudah digunakan

Hantar Studio 13.0.1
Persekitaran pembangunan bersepadu PHP yang berkuasa

Dreamweaver CS6
Alat pembangunan web visual

SublimeText3 versi Mac
Perisian penyuntingan kod peringkat Tuhan (SublimeText3)
Topik panas
 1377
1377
 52
52

 Cara merujuk fail js dengan vue.js
Apr 07, 2025 pm 11:27 PM
Cara merujuk fail js dengan vue.js
Apr 07, 2025 pm 11:27 PM
Terdapat tiga cara untuk merujuk kepada fail JS dalam vue.js: Secara langsung tentukan jalan menggunakan & lt; skrip & gt; tag ;; import dinamik menggunakan cangkuk kitaran hayat yang dipasang (); dan mengimport melalui Perpustakaan Pengurusan Negeri VUEX.
 Cara Menggunakan Watch di Vue
Apr 07, 2025 pm 11:36 PM
Cara Menggunakan Watch di Vue
Apr 07, 2025 pm 11:36 PM
Pilihan Watch di Vue.js membolehkan pemaju mendengar perubahan dalam data tertentu. Apabila data berubah, tontonkan mencetuskan fungsi panggil balik untuk melakukan paparan kemas kini atau tugas lain. Pilihan konfigurasinya termasuk segera, yang menentukan sama ada untuk melaksanakan panggilan balik dengan serta -merta, dan mendalam, yang menentukan sama ada untuk mendengarkan secara rekursif terhadap objek atau tatasusunan.
 Cara menambah fungsi ke butang untuk vue
Apr 08, 2025 am 08:51 AM
Cara menambah fungsi ke butang untuk vue
Apr 08, 2025 am 08:51 AM
Anda boleh menambah fungsi ke butang VUE dengan mengikat butang dalam templat HTML ke kaedah. Tentukan kaedah dan tulis logik fungsi dalam contoh Vue.
 Cara menggunakan bootstrap di vue
Apr 07, 2025 pm 11:33 PM
Cara menggunakan bootstrap di vue
Apr 07, 2025 pm 11:33 PM
Menggunakan bootstrap dalam vue.js dibahagikan kepada lima langkah: Pasang bootstrap. Import bootstrap di main.js. Gunakan komponen bootstrap secara langsung dalam templat. Pilihan: Gaya tersuai. Pilihan: Gunakan pemalam.
 Cara kembali ke halaman sebelumnya oleh Vue
Apr 07, 2025 pm 11:30 PM
Cara kembali ke halaman sebelumnya oleh Vue
Apr 07, 2025 pm 11:30 PM
Vue.js mempunyai empat kaedah untuk kembali ke halaman sebelumnya: $ router.go (-1) $ router.back () menggunakan & lt; router-link to = & quot;/& quot; Komponen Window.History.Back (), dan pemilihan kaedah bergantung pada tempat kejadian.
 Vue menyedari kesan menatal marquee/teks
Apr 07, 2025 pm 10:51 PM
Vue menyedari kesan menatal marquee/teks
Apr 07, 2025 pm 10:51 PM
Melaksanakan kesan menatal marquee/teks di VUE, menggunakan animasi CSS atau perpustakaan pihak ketiga. Artikel ini memperkenalkan cara menggunakan animasi CSS: Buat teks tatal dan bungkus teks dengan & lt; div & gt;. Tentukan animasi CSS dan tetapkan limpahan: tersembunyi, lebar, dan animasi. Tentukan frasa key, set Transform: TranslateX () pada permulaan dan akhir animasi. Laraskan sifat animasi seperti tempoh, kelajuan tatal, dan arah.
 Apa maksudnya untuk memuatkan vue malas?
Apr 07, 2025 pm 11:54 PM
Apa maksudnya untuk memuatkan vue malas?
Apr 07, 2025 pm 11:54 PM
Dalam vue.js, pemuatan malas membolehkan komponen atau sumber dimuatkan secara dinamik seperti yang diperlukan, mengurangkan masa pemuatan halaman awal dan meningkatkan prestasi. Kaedah pelaksanaan khusus termasuk menggunakan & lt; menyimpan-Alive & gt; dan & lt; komponen adalah & gt; komponen. Harus diingat bahawa pemuatan malas boleh menyebabkan masalah fouc (skrin percikan) dan harus digunakan hanya untuk komponen yang memerlukan pemuatan malas untuk mengelakkan overhead prestasi yang tidak perlu.
 Cara Menanyakan Versi Vue
Apr 07, 2025 pm 11:24 PM
Cara Menanyakan Versi Vue
Apr 07, 2025 pm 11:24 PM
Anda boleh menanyakan versi VUE dengan menggunakan Vue Devtools untuk melihat tab VUE dalam konsol penyemak imbas. Gunakan NPM untuk menjalankan arahan "NPM LIST -G VUE". Cari item VUE dalam objek "Dependencies" fail Package.json. Untuk projek Vue CLI, jalankan perintah "Vue -version". Semak maklumat versi di & lt; skrip & gt; Tag dalam fail HTML yang merujuk kepada fail VUE.
