 Operasi dan penyelenggaraan
 Nginx
Nginx
 Bagaimana Docker menggunakan nginx untuk membina kelompok tomcat
Bagaimana Docker menggunakan nginx untuk membina kelompok tomcat
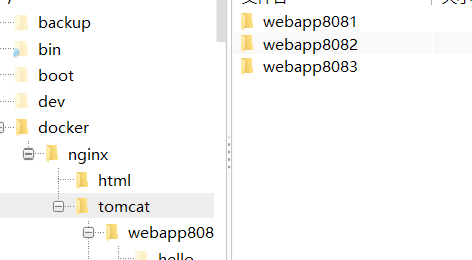
Mula-mula buat folder tomcat untuk memudahkan konfigurasi docker, saya buat terus dalam direktori root Langkah 1: Buat folder: Release folder
mkdir -p /docker/tomcat/webapp8081

mkdir -p /docker/tomcat/webapp8082

mkdir -p /docker/tomcat/webapp8083

docker run -d --name tomcat8081 -p 8081:8080 -v /docker/tomcat/webapp8081:/usr/local/tomcat/webapps/ tomcat
docker run -d --name tomcat8082 -p 8082:8080 -v /docker/tomcat/webapp8082:/usr/local/tomcat/webapps/ tomcat
docker run -d --name tomcat8083 -p 8083:8080 -v /docker/tomcat/webapp8083:/usr/local/tomcat/webapps/ tomcat

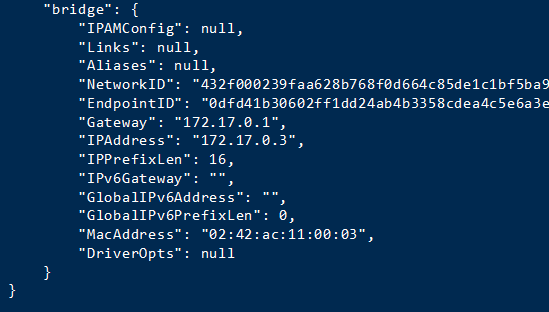
docker inspect tomcat8081
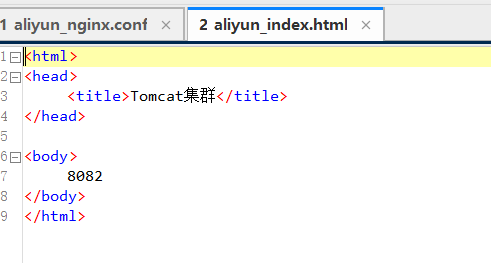
 Langkah 4: Untuk kemudahan ujian, saya tidak akan memuat naik pakej perang di sini, tetapi terus mencipta fail hello/index.html
 Nota: Jika nginx ialah bekas docker, bekas tomact mesti digunakan ip, jika tidak, ia tidak boleh disambungkan
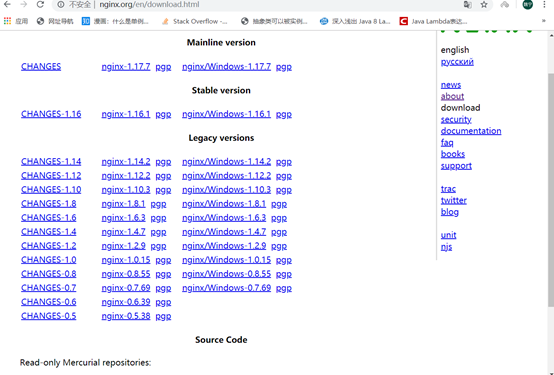
Muat turun versi rasmi nginx dari tapak web rasmi
Tapak web rasmi :
Klik muat turun pada bar navigasi kanan untuk memasuki antara muka muat turun dan pilih versi yang sepadan Untuk memuat turun, saya menggunakan nginx-1.6.2.tar
<. 🎜>Selepas muat turun selesai, letakkan fail dalam folder tersuai, saya letakkan dalam /usr/local /tools/nginx-1.6.2
Gunakan arahan ini untuk menyahmampat nginx: 
Selepas penyahmampatan selesai, I Di sini adalah untuk kembali ke direktori root dan mencipta folder hos dalam direktori root Tujuannya adalah untuk mencipta fail supaya nginx boleh dipasang (anda juga boleh menyesuaikan) tar vxf nginx-1.6.2.tar.gz
mkdir -p /docker/nginx/
vim /docker/nginx/nginx.conf
mkdir -p /docker/nginx/html
#error_log logs/error.log;
#error_log logs/error.log notice;
#error_log logs/error.log info;
#pid logs/nginx.pid;
events {
worker_connections 1024; #最大连接数量
}
http {
include mime.types;
default_type application/octet-stream;
upstream mytomcat{
server 172.17.0.3:8080 weight=10;
# 另外mytomcat 这里名字和下方的名字保持一致 这里需要和你的tomcat ip保持一致
server 172.17.0.4:8080 weight=50;
server 172.17.0.5:8080 weight=10;
}
#log_format main '$remote_addr - $remote_user [$time_local] "$request" '
# '$status $body_bytes_sent "$http_referer" '
# '"$http_user_agent" "$http_x_forwarded_for"';
#access_log logs/access.log main;
sendfile on;
#tcp_nopush on;
#keepalive_timeout 0;
keepalive_timeout 65;
#gzip on;
server {
listen 80;
server_name mytomcat;
#charset koi8-r;
#access_log logs/host.access.log main;
location / {
# root html;
# index index.html index.htm;
proxy_connect_timeout 50;
proxy_read_timeout 10;
proxy_send_timeout 20;
proxy_pass http://mytomcat;
}
#error_page 404 /404.html;
# redirect server error pages to the static page /50x.html
#
error_page 500 502 503 504 /50x.html;
location = /50x.html {
root html;
}
# proxy the php scripts to apache listening on 127.0.0.1:80
#
#location ~ \.php$ {
# proxy_pass http://127.0.0.1;
#}
# pass the php scripts to fastcgi server listening on 127.0.0.1:9000
#
#location ~ \.php$ {
# root html;
# fastcgi_pass 127.0.0.1:9000;
# fastcgi_index index.php;
# fastcgi_param script_filename /scripts$fastcgi_script_name;
# include fastcgi_params;
#}
# deny access to .htaccess files, if apache's document root
# concurs with nginx's one
#
#location ~ /\.ht {
# deny all;
#}
}
# another virtual host using mix of ip-, name-, and port-based configuration
#
#server {
# listen 8000;
# listen somename:8080;
# server_name somename alias another.alias;
# location / {
# root html;
# index index.html index.htm;
# }
#}
# https server
#
#server {
# listen 443 ssl;
# server_name localhost;
# ssl_certificate cert.pem;
# ssl_certificate_key cert.key;
# ssl_session_cache shared:ssl:1m;
# ssl_session_timeout 5m;
# ssl_ciphers high:!anull:!md5;
# ssl_prefer_server_ciphers on;
# location / {
# root html;
# index index.html index.htm;
# }
#}
}Gunakan docker untuk memulakan
Buat dan jalankan bekas81: Ia adalah port untuk akses rangkaian luaran Ini boleh diubah suai mengikut situasi sebenar/docker/ nginx/nginx.conf Fail hos setempat
/etc/. nginx/nginx.conf Direktori dinyahmampat (anda juga boleh membiarkannya tidak berubah)/docker/nginx/html Fail hos tempatan/usr/share/nginx/html Direktori nyahzipdocker run -d --name nginx81 -p 81:80 -v /docker/nginx/nginx.conf:/etc/nginx/nginx.conf -v /docker/nginx/html:/usr/share/nginx/html nginx
Atas ialah kandungan terperinci Bagaimana Docker menggunakan nginx untuk membina kelompok tomcat. Untuk maklumat lanjut, sila ikut artikel berkaitan lain di laman web China PHP!

Alat AI Hot

Undresser.AI Undress
Apl berkuasa AI untuk mencipta foto bogel yang realistik

AI Clothes Remover
Alat AI dalam talian untuk mengeluarkan pakaian daripada foto.

Undress AI Tool
Gambar buka pakaian secara percuma

Clothoff.io
Penyingkiran pakaian AI

AI Hentai Generator
Menjana ai hentai secara percuma.

Artikel Panas

Alat panas

Notepad++7.3.1
Editor kod yang mudah digunakan dan percuma

SublimeText3 versi Cina
Versi Cina, sangat mudah digunakan

Hantar Studio 13.0.1
Persekitaran pembangunan bersepadu PHP yang berkuasa

Dreamweaver CS6
Alat pembangunan web visual

SublimeText3 versi Mac
Perisian penyuntingan kod peringkat Tuhan (SublimeText3)

Topik panas
 1376
1376
 52
52
 PI Node Teaching: Apakah nod pi? Bagaimana cara memasang dan menyediakan nod pi?
Mar 05, 2025 pm 05:57 PM
Penjelasan dan Panduan Pemasangan Terperinci untuk Pinetwork Nodes Artikel ini akan memperkenalkan ekosistem pinetwork secara terperinci - nod pi, peranan utama dalam ekosistem pinetwork, dan menyediakan langkah -langkah lengkap untuk pemasangan dan konfigurasi. Selepas pelancaran Rangkaian Ujian Blockchain Pinetwork, nod PI telah menjadi bahagian penting dari banyak perintis yang aktif mengambil bahagian dalam ujian, bersiap sedia untuk pelepasan rangkaian utama yang akan datang. Jika anda tidak tahu kerja pinet, sila rujuk apa itu picoin? Berapakah harga untuk penyenaraian? Penggunaan PI, perlombongan dan analisis keselamatan. Apa itu Pinetwork? Projek Pinetwork bermula pada tahun 2019 dan memiliki syiling pi cryptocurrency eksklusifnya. Projek ini bertujuan untuk mewujudkan satu yang semua orang boleh mengambil bahagian
 Cara Memasang DeepSeek
Feb 19, 2025 pm 05:48 PM
Terdapat banyak cara untuk memasang DeepSeek, termasuk: Menyusun dari Sumber (untuk pemaju berpengalaman) menggunakan pakej yang dikompilasi (untuk pengguna Windows) menggunakan bekas docker (untuk yang paling mudah, tidak perlu bimbang tentang keserasian) Dokumen rasmi dengan berhati -hati dan menyediakannya sepenuhnya untuk mengelakkan masalah yang tidak perlu.
 Sebarkan aplikasi JavaEE menggunakan Docker Containers
Jun 05, 2024 pm 08:29 PM
Gunakan aplikasi Java EE menggunakan bekas Docker: Cipta Fail Docker untuk mentakrifkan imej, bina imej, jalankan bekas dan petakan port, dan kemudian akses aplikasi dalam penyemak imbas. Contoh aplikasi JavaEE: REST API berinteraksi dengan pangkalan data, boleh diakses pada localhost selepas penggunaan melalui Docker.
 Bagaimana untuk menggunakan PHP CI/CD untuk lelaran dengan cepat?
May 08, 2024 pm 10:15 PM
Jawapan: Gunakan PHPCI/CD untuk mencapai lelaran pantas, termasuk menyediakan saluran paip CI/CD, ujian automatik dan proses penggunaan. Sediakan saluran paip CI/CD: Pilih alat CI/CD, konfigurasikan repositori kod dan tentukan saluran paip binaan. Ujian automatik: Tulis ujian unit dan penyepaduan dan gunakan rangka kerja ujian untuk memudahkan ujian. Kes praktikal: Menggunakan TravisCI: Pasang TravisCI, tentukan saluran paip, dayakan saluran paip dan lihat hasilnya. Laksanakan penyampaian berterusan: pilih alatan pengerahan, tentukan saluran paip pengerahan dan automatik penggunaan. Faedah: Meningkatkan kecekapan pembangunan, mengurangkan ralat dan memendekkan masa penghantaran.
 Cara memasang sambungan Docker dalam vscode Langkah-langkah untuk memasang sambungan Docker dalam vscode
May 09, 2024 pm 03:25 PM
1. Mula-mula, selepas membuka antara muka, klik butang ikon sambungan di sebelah kiri 2. Kemudian, cari lokasi bar carian di halaman sambungan yang dibuka 3. Kemudian, masukkan perkataan Docker dengan tetikus untuk mencari pemalam sambungan 4 . Akhir sekali, pilih pemalam sasaran dan klik kanan Hanya klik butang pasang di sudut bawah
 Akses fail tapak WordPress adalah terhad: Mengapa fail .txt saya tidak boleh diakses melalui nama domain?
Apr 01, 2025 pm 03:00 PM
Akses fail tapak WordPress adalah terhad: Menyelesaikan masalah sebab mengapa fail .txt tidak dapat diakses baru -baru ini. Sebilangan pengguna menghadapi masalah ketika mengkonfigurasi nama domain perniagaan program mini: � ...
 Mengapa ralat berlaku semasa memasang pelanjutan menggunakan PECL dalam persekitaran Docker? Bagaimana menyelesaikannya?
Apr 01, 2025 pm 03:06 PM
Punca dan penyelesaian untuk kesilapan Apabila menggunakan PECL untuk memasang sambungan dalam persekitaran Docker Apabila menggunakan persekitaran Docker, kami sering menemui beberapa sakit kepala ...
 Bagaimana untuk membuat Php5.6 dan Php7 wujud bersama melalui konfigurasi Nginx pada pelayan yang sama?
Apr 01, 2025 pm 03:15 PM
Menjalankan pelbagai versi PHP secara serentak dalam sistem yang sama adalah keperluan umum, terutamanya apabila projek yang berbeza bergantung pada versi PHP yang berlainan. Bagaimana untuk sama ...


