 pembangunan bahagian belakang
 Tutorial Python
 Cara menggunakan Python+PyQt5 untuk mencipta alat pemantauan buatan sendiri
Cara menggunakan Python+PyQt5 untuk mencipta alat pemantauan buatan sendiri
Menggunakan fungsi pemprosesan imej opencv, anda boleh memanggil kamera komputer dengan mudah untuk mencapai kesan pengumpulan imej masa nyata.
Akhir sekali simpan gambar dan jana rekod video sejarah pengawasan.

pip install PyQt5

pip install python-opencv
Jika modul yang berkaitan tidak dipasang, anda boleh memilih kaedah pip di atas untuk memasangnya.
Seterusnya kami mengimport modul python yang diperlukan ke dalam blok kod.
# It's just an alias for the cv2 module.
import cv2 as cv_

# It's importing all the classes from the QtGui module.
from PyQt5.QtGui import *

# It's importing all the classes from the QtCore module.
from PyQt5.QtCore import *

# It's importing all the classes from the QtWidgets module.
from PyQt5.QtWidgets import *

# It's importing the sys module.
import sys

# It's importing the os module.
import os

# It's importing the time module.
import time

# It's importing the traceback module.
import traceback
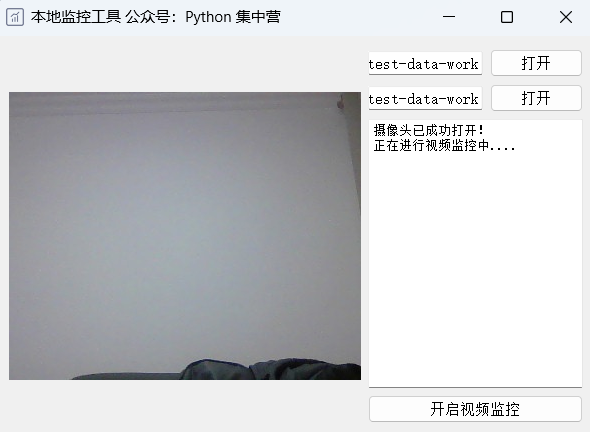
Buat kelas python bernama CameraUI dan bangunkan komponen halaman serta reka letak yang berkaitan dengan alat pemantauan.
Letakkan fungsi slot yang sepadan seperti butang kawalan ke dalam kelas ini.
class CameraUI(QWidget):
    def __init__(self):
        super(CameraUI, self).__init__()
        self.init_ui()

    def init_ui(self):
        self.setWindowTitle('本地监控工具 公众号:Python 集中营')
        self.setWindowIcon(QIcon('ico.png'))
        self.resize(600, 400)

        self.label_view = QLabel()

        self.image_path = QLineEdit()
        self.image_path.setReadOnly(True)
        self.image_path.setPlaceholderText('视频流图片保存地址')

        self.image_path_btn = QPushButton()
        self.image_path_btn.setText('打开')
        self.image_path_btn.clicked.connect(self.image_path_btn_clk)

        self.video_path = QLineEdit()
        self.video_path.setReadOnly(True)
        self.video_path.setPlaceholderText('监控视频保存地址')

        self.video_path_btn = QPushButton()
        self.video_path_btn.setText('打开')
        self.video_path_btn.clicked.connect(self.video_path_btn_clk)

        self.start_listen_btn = QPushButton()
        self.start_listen_btn.setText('开启监控')
        self.start_listen_btn.clicked.connect(self.start_listen_btn_clk)

        self.brower = QTextBrowser()
        self.brower.setReadOnly(True)
        self.brower.setFont(QFont('宋体', 8))
        self.brower.setPlaceholderText('日志处理过程区域...')
        self.brower.ensureCursorVisible()

        hbox = QHBoxLayout()
        vbox_left = QVBoxLayout()
        vbox_right = QVBoxLayout()

        vbox_left.addWidget(self.label_view)
        vbox_right_grid1 = QGridLayout()
        vbox_right_grid1.addWidget(self.image_path, 0, 0, 1, 2)
        vbox_right_grid1.addWidget(self.image_path_btn, 0, 2, 1, 1)
        vbox_right_grid1.addWidget(self.video_path, 1, 0, 1, 2)
        vbox_right_grid1.addWidget(self.video_path_btn, 1, 2, 1, 1)

        vbox_right_grid2 = QGridLayout()
        vbox_right_grid2.addWidget(self.brower, 0, 0, 1, 3)
        vbox_right_grid2.addWidget(self.start_listen_btn, 1, 0, 1, 3)

        vbox_right.addLayout(vbox_right_grid1)
        vbox_right.addLayout(vbox_right_grid2)

        hbox.addLayout(vbox_left)
        hbox.addLayout(vbox_right)

        self.listen_thread = ListenWorkThread(self)
        self.listen_thread.message.connect(self.show_message)
        self.listen_thread.finished.connect(lambda: self.start_listen_btn.setEnabled(True))

        self.setLayout(hbox)

    def show_message(self, text):
        cursor = self.brower.textCursor()
        cursor.movePosition(QTextCursor.End)
        self.brower.append(text)
        self.brower.setTextCursor(cursor)
        self.brower.ensureCursorVisible()

    def image_path_btn_clk(self):
        dir = QFileDialog.getExistingDirectory(self, "选择文件夹", os.getcwd())
        self.image_path.setText(dir)

    def video_path_btn_clk(self):
        dir = QFileDialog.getExistingDirectory(self, "选择文件夹", os.getcwd())
        self.video_path.setText(dir)

    def start_listen_btn_clk(self):
        self.listen_thread.start()
Bangunkan kelas ListenWorkThread dan warisi daripada urutan anak QThread.
Gunakan urutan ini sebagai kelas perniagaan untuk mencapai kesan panggilan kamera tempatan untuk melengkapkan pemantauan.
class ListenWorkThread(QThread):
    message = pyqtSignal(str)
    finished = pyqtSignal(bool)

    def __init__(self, parent=None):
        super(ListenWorkThread, self).__init__(parent)
        self.parent = parent
        self.working = True

    def __del__(self):
        self.working = False

    def run(self):
        try:
            image_path = self.parent.image_path.text()
            video_path = self.parent.video_path.text()
            if image_path.strip() == '' or video_path.strip() == '':
                self.message.emit('相关路径设置不能为空,请检查设置!')
                return
            self.cap = cv_.VideoCapture(0)
            self.cap.set(3, 300)
            self.cap.set(4, 400)
            if self.cap.isOpened():
                self.message.emit('摄像头已成功打开!')
                n = 0
                self.message.emit('正在进行视频 监控中....')
                start_time = time.clock()
                while True:
                    ret, img = self.cap.read()
                    if os.path.exists(os.path.join(image_path, str(n) + '.jpg')):
                        os.remove(os.path.join(image_path, str(n) + '.jpg'))
                    self.save_image(img, str(n), image_path)
                    time.sleep(0.1)
                    pixmap_ = QPixmap(os.path.join(image_path, str(n) + '.jpg'))
                    self.parent.label_view.setPixmap(pixmap_)
                    n = n + 1

            self.finished.emit(True)
        except Exception as e:
            traceback.print_exc()
            self.message.emit('程序运行错误,请检查参数是否设置正确!')
            self.finished.emit(True)

    def save_image(self, image=None, file_name=None, image_path=None):
        if image is not None:
cv_.imwrite(os.path.join(image_path, file_name + '.jpg'), image)Logik di atas bagi keseluruhan sub-utas perniagaan telah dibangunkan, dan kemudian digunakan untuk memanggil fungsi utama modul python.
Tambahkan larian keseluruhan program ke dalam gelung utama.
rreeeeAtas ialah kandungan terperinci Cara menggunakan Python+PyQt5 untuk mencipta alat pemantauan buatan sendiri. Untuk maklumat lanjut, sila ikut artikel berkaitan lain di laman web China PHP!

Alat AI Hot

Undresser.AI Undress
Apl berkuasa AI untuk mencipta foto bogel yang realistik

AI Clothes Remover
Alat AI dalam talian untuk mengeluarkan pakaian daripada foto.

Undress AI Tool
Gambar buka pakaian secara percuma

Clothoff.io
Penyingkiran pakaian AI

Video Face Swap
Tukar muka dalam mana-mana video dengan mudah menggunakan alat tukar muka AI percuma kami!

Artikel Panas

Alat panas

Notepad++7.3.1
Editor kod yang mudah digunakan dan percuma

SublimeText3 versi Cina
Versi Cina, sangat mudah digunakan

Hantar Studio 13.0.1
Persekitaran pembangunan bersepadu PHP yang berkuasa

Dreamweaver CS6
Alat pembangunan web visual

SublimeText3 versi Mac
Perisian penyuntingan kod peringkat Tuhan (SublimeText3)

Topik panas
 1389
1389
 52
52
 Boleh kod vs dijalankan di Windows 8
Apr 15, 2025 pm 07:24 PM
Kod VS boleh dijalankan pada Windows 8, tetapi pengalaman mungkin tidak hebat. Mula -mula pastikan sistem telah dikemas kini ke patch terkini, kemudian muat turun pakej pemasangan kod VS yang sepadan dengan seni bina sistem dan pasangnya seperti yang diminta. Selepas pemasangan, sedar bahawa beberapa sambungan mungkin tidak sesuai dengan Windows 8 dan perlu mencari sambungan alternatif atau menggunakan sistem Windows yang lebih baru dalam mesin maya. Pasang sambungan yang diperlukan untuk memeriksa sama ada ia berfungsi dengan betul. Walaupun kod VS boleh dilaksanakan pada Windows 8, disyorkan untuk menaik taraf ke sistem Windows yang lebih baru untuk pengalaman dan keselamatan pembangunan yang lebih baik.
 Adakah sambungan vscode berniat jahat?
Apr 15, 2025 pm 07:57 PM
Sambungan kod VS menimbulkan risiko yang berniat jahat, seperti menyembunyikan kod jahat, mengeksploitasi kelemahan, dan melancap sebagai sambungan yang sah. Kaedah untuk mengenal pasti sambungan yang berniat jahat termasuk: memeriksa penerbit, membaca komen, memeriksa kod, dan memasang dengan berhati -hati. Langkah -langkah keselamatan juga termasuk: kesedaran keselamatan, tabiat yang baik, kemas kini tetap dan perisian antivirus.
 Cara menjalankan program di terminal vscode
Apr 15, 2025 pm 06:42 PM
Dalam kod VS, anda boleh menjalankan program di terminal melalui langkah -langkah berikut: Sediakan kod dan buka terminal bersepadu untuk memastikan bahawa direktori kod selaras dengan direktori kerja terminal. Pilih arahan Run mengikut bahasa pengaturcaraan (seperti python python your_file_name.py) untuk memeriksa sama ada ia berjalan dengan jayanya dan menyelesaikan kesilapan. Gunakan debugger untuk meningkatkan kecekapan debug.
 Memilih antara php dan python: panduan
Apr 18, 2025 am 12:24 AM
PHP sesuai untuk pembangunan web dan prototaip pesat, dan Python sesuai untuk sains data dan pembelajaran mesin. 1.Php digunakan untuk pembangunan web dinamik, dengan sintaks mudah dan sesuai untuk pembangunan pesat. 2. Python mempunyai sintaks ringkas, sesuai untuk pelbagai bidang, dan mempunyai ekosistem perpustakaan yang kuat.
 PHP dan Python: Paradigma yang berbeza dijelaskan
Apr 18, 2025 am 12:26 AM
PHP terutamanya pengaturcaraan prosedur, tetapi juga menyokong pengaturcaraan berorientasikan objek (OOP); Python menyokong pelbagai paradigma, termasuk pengaturcaraan OOP, fungsional dan prosedur. PHP sesuai untuk pembangunan web, dan Python sesuai untuk pelbagai aplikasi seperti analisis data dan pembelajaran mesin.
 Bolehkah kod studio visual digunakan dalam python
Apr 15, 2025 pm 08:18 PM
Kod VS boleh digunakan untuk menulis Python dan menyediakan banyak ciri yang menjadikannya alat yang ideal untuk membangunkan aplikasi python. Ia membolehkan pengguna untuk: memasang sambungan python untuk mendapatkan fungsi seperti penyempurnaan kod, penonjolan sintaks, dan debugging. Gunakan debugger untuk mengesan kod langkah demi langkah, cari dan selesaikan kesilapan. Mengintegrasikan Git untuk Kawalan Versi. Gunakan alat pemformatan kod untuk mengekalkan konsistensi kod. Gunakan alat linting untuk melihat masalah yang berpotensi lebih awal.
 Boleh vscode digunakan untuk mac
Apr 15, 2025 pm 07:36 PM
VS Kod boleh didapati di Mac. Ia mempunyai sambungan yang kuat, integrasi git, terminal dan debugger, dan juga menawarkan banyak pilihan persediaan. Walau bagaimanapun, untuk projek yang sangat besar atau pembangunan yang sangat profesional, kod VS mungkin mempunyai prestasi atau batasan fungsi.
 Boleh vscode menjalankan ipynb
Apr 15, 2025 pm 07:30 PM
Kunci untuk menjalankan buku nota Jupyter dalam kod VS adalah untuk memastikan bahawa persekitaran Python dikonfigurasi dengan betul, memahami bahawa perintah pelaksanaan kod adalah konsisten dengan susunan sel, dan mengetahui fail besar atau perpustakaan luaran yang boleh menjejaskan prestasi. Fungsi penyempurnaan dan debug yang disediakan oleh kod VS dapat meningkatkan kecekapan pengekodan dan mengurangkan kesilapan.


