Pengimbangan beban empat lapisan vs pengimbangan beban tujuh lapisan
Seringkali dikatakan bahawa pengimbangan beban tujuh lapisan atau pengimbangan beban empat lapisan, sebenarnya, mengikut nama lapisan model rangkaian iso osi Keputusan akhir ialah nginx dipanggil pengimbangan beban tujuh lapisan kerana ia menggunakan protokol http untuk melaksanakan operasi pengimbangan beban pada lapisan aplikasi. Sebagai contoh, lv yang menjalankan operasi pengimbangan beban pada lapisan tcp dipanggil pengimbangan beban lapisan 4. Secara umumnya, terdapat klasifikasi pengimbangan beban berikut:

Sokongan perisian biasa

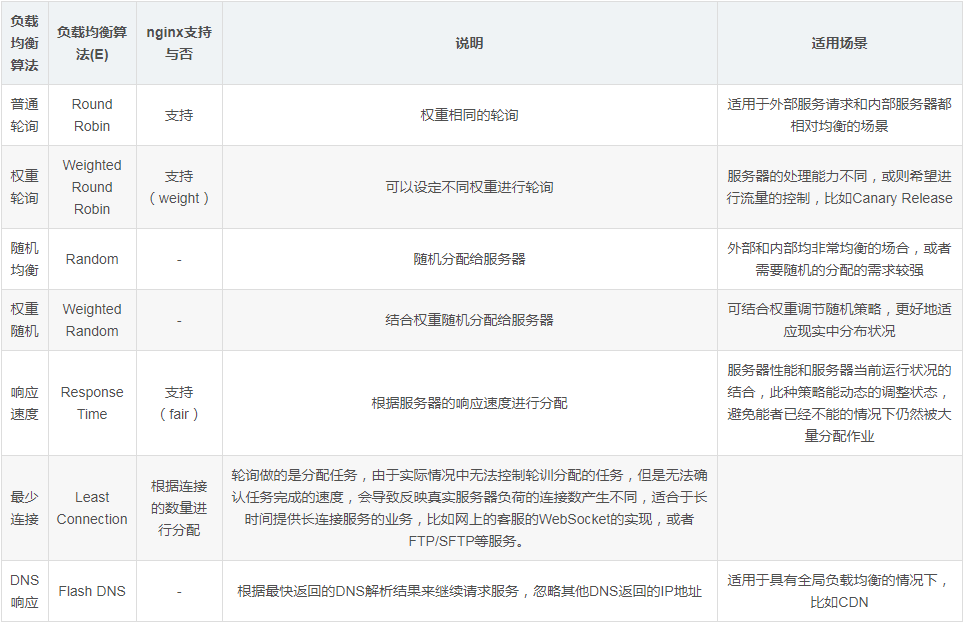
Algoritma pengimbangan beban biasa
Algoritma pengimbangan beban biasa berikut ialah:

Contoh demonstrasi pengimbangan beban : Undian biasa
Seterusnya, gunakan nginx untuk menunjukkan cara melaksanakan pengundian biasa:

Persediaan lebih awal
Mulakan dua perkhidmatan pada dua port 7001/7002 terlebih dahulu untuk memaparkan maklumat yang berbeza Untuk kemudahan demonstrasi, saya menggunakan tornado untuk membuat cermin, dan parameter yang diluluskan semasa memulakan bekas docker adalah berbeza untuk memaparkan perkhidmatan.
[root@kong ~]# docker run -d -p 7001:8080 liumiaocn/tornado:latest python /usr/local/bin/daemon.py "user service 1: 7001"
ddba0abd24524d270a782c3fab907f6a35c0ce514eec3159357bded09022ee57
[root@kong ~]# docker run -d -p 7002:8080 liumiaocn/tornado:latest python /usr/local/bin/daemon.py "user service 1: 7002"
95deadd795e19f675891bfcd44e5ea622c95615a95655d1fd346351eca707951
[root@kong ~]#
[root@kong ~]# curl http://192.168.163.117:7001
hello, service :user service 1: 7001
[root@kong ~]#
[root@kong ~]# curl http://192.168.163.117:7002
hello, service :user service 1: 7002
[root@kong ~]#
Mulakan nginx
[root@kong ~]# docker run -p 9080:80 --name nginx-lb -d nginx
9d53c7e9a45ef93e7848eb3f4e51c2652a49681e83bda6337c89a3cf2f379c74
[root@kong ~]# docker ps |grep nginx-lb
9d53c7e9a45e    nginx           "nginx -g 'daemon ..."  11 seconds ago   up 10 seconds    0.0.0.0:9080->80/tcp                         nginx-lb
[root@kong ~]#
coretan kod nginx
Sediakan coretan kod nginx berikut dan tambahkannya pada /et nginx’s Kaedah
http {
upstream nginx_lb {
  server 192.168.163.117:7001;
  server 192.168.163.117:7002;
}
server {
  listen    80;
  server_name www.liumiao.cn 192.168.163.117;
  location / {
    proxy_pass http://nginx_lb;
  }
}dalam /nginx/conf.d/default.conf untuk mengubah suai default.conf
boleh dicapai dengan memasang vim dalam bekas, atau secara setempat Ubah suai dan kemudian hantarkannya melalui cp docker, atau ubah suai terus dengan sed. Jika anda memasang vim dalam bekas, gunakan kaedah berikut
[root@kong ~]# docker exec -it nginx-lb sh
# apt-get update
...省略
# apt-get install vim
...省略
Sebelum pengubahsuaian
# cat default.conf
server {
  listen    80;
  server_name localhost;
  #charset koi8-r;
  #access_log /var/log/nginx/host.access.log main;
  location / {
    root  /usr/share/nginx/html;
    index index.html index.htm;
  }
  #error_page 404       /404.html;
  # redirect server error pages to the static page /50x.html
  #
  error_page  500 502 503 504 /50x.html;
  location = /50x.html {
    root  /usr/share/nginx/html;
  }
  # proxy the php scripts to apache listening on 127.0.0.1:80
  #
  #location ~ \.php$ {
  #  proxy_pass  http://127.0.0.1;
  #}
  # pass the php scripts to fastcgi server listening on 127.0.0.1:9000
  #
  #location ~ \.php$ {
  #  root      html;
  #  fastcgi_pass  127.0.0.1:9000;
  #  fastcgi_index index.php;
  #  fastcgi_param script_filename /scripts$fastcgi_script_name;
  #  include    fastcgi_params;
  #}
  # deny access to .htaccess files, if apache's document root
  # concurs with nginx's one
  #
  #location ~ /\.ht {
  #  deny all;
  #}
}
#Selepas pengubahsuaian
# cat default.conf
upstream nginx_lb {
  server 192.168.163.117:7001;
  server 192.168.163.117:7002;
}
server {
  listen    80;
  server_name www.liumiao.cn 192.168.163.117;
  #charset koi8-r;
  #access_log /var/log/nginx/host.access.log main;
  location / {
    #root  /usr/share/nginx/html;
    #index index.html index.htm;
    proxy_pass http://nginx_lb;
  }
  #error_page 404       /404.html;
  # redirect server error pages to the static page /50x.html
  #
  error_page  500 502 503 504 /50x.html;
  location = /50x.html {
    root  /usr/share/nginx/html;
  }
  # proxy the php scripts to apache listening on 127.0.0.1:80
  #
  #location ~ \.php$ {
  #  proxy_pass  http://127.0.0.1;
  #}
  # pass the php scripts to fastcgi server listening on 127.0.0.1:9000
  #
  #location ~ \.php$ {
  #  root      html;
  #  fastcgi_pass  127.0.0.1:9000;
  #  fastcgi_index index.php;
  #  fastcgi_param script_filename /scripts$fastcgi_script_name;
  #  include    fastcgi_params;
  #}
  # deny access to .htaccess files, if apache's document root
  # concurs with nginx's one
  #
  #location ~ /\.ht {
  #  deny all;
  #}
}
#Mulakan semula bekas nginx
[root@kong ~]# docker restart nginx-lb
nginx-lb
[root@kong ~]#
Sahkan keputusan
Anda boleh melihat dengan jelas bahawa pengundian dilakukan mengikut urutan:
[root@kong ~]# curl
hello, service :user service 1: 7001
[root@kong ~]# curl
hello, service :user service 1: 7002
[root@ kong ~]# curl
hello, service :user service 1: 7001
[root@kong ~]# curl
hello, service :user service 1: 7002
[root@kong ~]#
Contoh demonstrasi pengimbangan beban: pengundian berat
Atas dasar ini, untuk melaksanakan tinjauan berat, anda hanya perlu menambah berat

Ubah suai lalai.conf
Ubah suai lalai.conf seperti berikut
# cp default.conf default.conf.org
# vi default.conf
# diff default.conf default.conf.org
2,3c2,3
<   server 192.168.163.117:7001 weight=100;
<   server 192.168.163.117:7002 weight=200;
---
>   server 192.168.163.117:7001;
>   server 192.168.163.117:7002;
#
Mulakan semula bekas nginx
[root@kong ~]# docker restart nginx-lb
nginx-lb
[root@kong ~]#
Sahkan keputusan
Anda boleh lihat bahawa keputusan pengundian dijalankan mengikut nisbah 1/3 dan 2/3:
[root @kong ~]# curl
hello, service :user service 1: 7001
[root@kong ~]# curl
hello, service :user service 1: 7002
[root@kong ~] # curl
hello, service :user service 1: 7002
[root@kong ~]#
Atas ialah kandungan terperinci Cara menggunakan nginx untuk pengimbangan beban. Untuk maklumat lanjut, sila ikut artikel berkaitan lain di laman web China PHP!
 nginx mulakan semula
 Penjelasan terperinci tentang konfigurasi nginx
 Penjelasan terperinci tentang konfigurasi nginx
 Apakah perbezaan antara tomcat dan nginx
 Perisian ujian bateri komputer riba manakah yang terbaik?
 fungsi isihan penggunaan python
 Apakah maksud token?
 Perbezaan antara penuding tatasusunan dan tatasusunan penuding


