m=t.Menu(root)
 pembangunan bahagian belakang
 Tutorial Python
 Ajar anda langkah demi langkah cara meniru pengurus tugas menggunakan Python
Ajar anda langkah demi langkah cara meniru pengurus tugas menggunakan Python
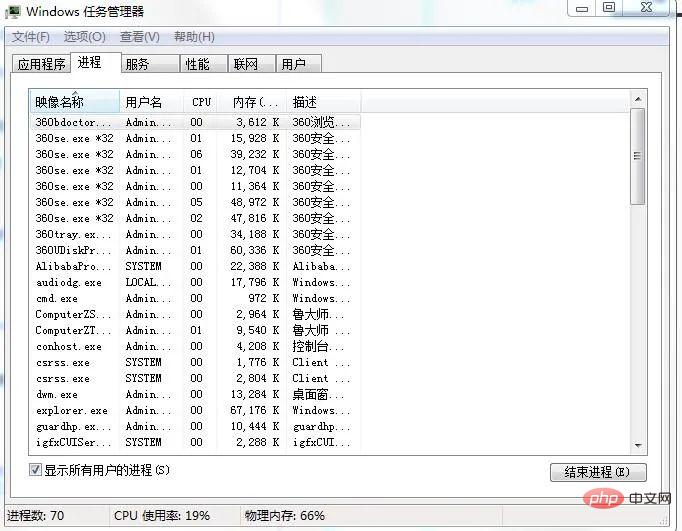
Saya percaya semua orang biasa dengan Pengurus Tugas Ctrl+Alt+Del boleh membukanya, kemudian klik untuk memulakan Pengurus Tugas, atau klik kanan bar tugas-Mulakan Pengurus Tugas untuk memulakan Pengurus Tugas Selepas memulakan, antara muka Seperti berikut:

Anda boleh melihat bahawa ia menyenaraikan beberapa parameter penting, seperti bilangan proses, penggunaan CPU dan memori fizikal Seterusnya, kami akan menyenaraikannya satu demi satu.
1. Penyediaan projek
Editor: sublime text 3
Modul: ps
tkinter: ps
1 , Tulis antara muka utama
Untuk melaksanakan pengurus tugas, mula-mula kita tulis antara muka Di sini kita menggunakan tkinter untuk menulis antara muka:
.
2. Tulis menu bar
Mari kita laksanakan bar menunya dahulu. Modul Menu tkinter digunakan di sini. . menu Dalam konfigurasi antara muka
m=t.Menu(root)
Salin selepas log masuk
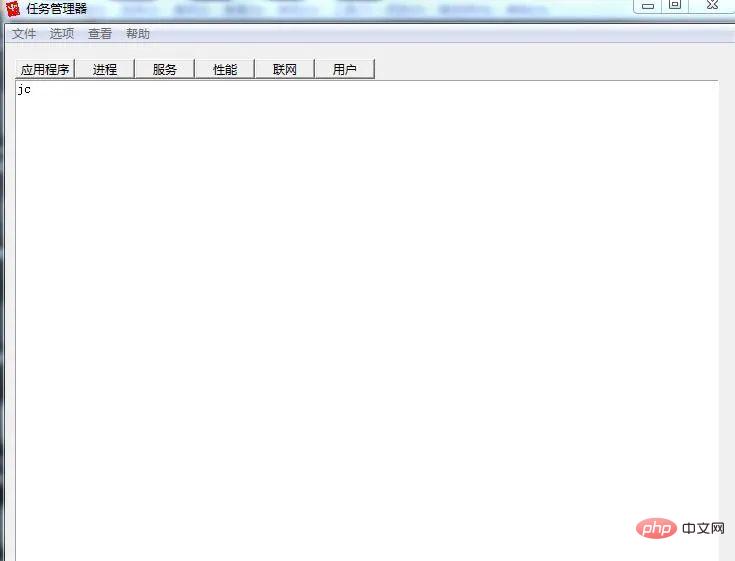
gambar hasil akhir, anda boleh melihat bahawa ia pada asasnya sama dengan pengurus tugas. m=t.Menu(root)
3. Fungsi dalam antara muka
Selepas menulis antara muka, kita harus menambah komponen ke antara muka. tingkap:
1)编写按钮
b1=t.Button(root,text='应用程序',command=yy)
b2=t.Button(root,text='进程',command=jc)
b3=t.Button(root,text='服务',command=fw)
b4=t.Button(root,text='性能',command=xn)
b5=t.Button(root,text='联网',command=lw)
b6=t.Button(root,text='用户',command=yh)


#定位
b1.place(x=10,y=15,height=20,width=60)
b2.place(x=70,y=15,height=20,width=60)
b3.place(x=130,y=15,height=20,width=60)
b4.place(x=190,y=15,height=20,width=60)
b5.place(x=250,y=15,height=20,width=60)
b6.place(x=310,y=15,height=20,width=60)
2)编写多行文本框
text=t.Text(root,width=100,height=40)
text.place(x=10,y=36)
3)编写函数实现简单功能
def yy():
    text.delete(1.0,'end')
    text.insert('insert','yy')
def jc():
    text.delete(1.0,'end')
    text.insert('insert','jc')
def fw():
    text.delete(1.0,'end')
    text.insert('insert','fw')
def xn():
    text.delete(1.0,'end')
    text.insert('insert','xn')
def lw():
    text.delete(1.0,'end')
    text.insert('insert','lw')
def yh():
    text.delete(1.0,'end')
text.insert('insert','yh')这样就实现了不同按钮之间切换不同的界面。
4)编写下面的进程数,CPU使用率,物理内存
我们使用标签来放置这些参数,因为这三项的参数是可变的,所以暂时只写前面名字:
t1=t.Label(text='进程数:')
t2=t.Label(text='CPU 使用率:')
t3=t.Label(text='物理内存:')
t1.place(x=10,y=580,width=120)
t2.place(x=150,y=580,width=120)
t3.place(x=300,y=580,width=120)
5)给多行文本框添加滚动条
我们可以使用模块Scrollbar来实现,安装滚动条之前需要做两件事情:
1.指定该组件的yscrollbarcommand参数为Scrollbar的set()方法
2.指定Scrollbar 的 command 参数为该组件的 yview() 方法
接下来我们实现它:
sb=t.Scrollbar(root)
sb.pack(side='left',fill='y')
text=t.Text(root,width=100,height=40)
text.place(x=10,y=36)
sb.config(command=text.yview) #文本框内容随滚动条滚动
text.config(yscrollcommand=sb.set(0.1,0.3)) #Y轴填充
6)添加状态栏文本标签
t1=t.Label(text='')
t2=t.Label(text='')
t3=t.Label(text='')
(注:这里只是隐藏部件,万不可用destroy销毁部件)
7)实现状态栏标签功能
现在我们来实现这三个标签的内容。想必大家刚刚应该看到了,上面的标签没有设置任何内容,那么这是为什么呢?我们都知道,一旦你把内容添加进去,它就会紧随其后并不会覆盖,所以初始值必须是空,才不至于不能覆盖值。那么我们来看下具体实现过程吧。
def jcs():
  t1.configure(text='进程数:'+str(len(psutil.pids())))
  root.after(3000,jcs)
def cpu():
  pp=str(ceil(psutil.cpu_percent(1)))
  t2.configure(text='CPU 使用率:'+pp+'%')
  root.after(1500,cpu)
def wlnc():
  f= psutil.virtual_memory().free #剩余内存
  t=psutil.virtual_memory().total#总内存
  wl= float(t-f)/float(t) #为使得最后值更精确,必须用float
  t3.configure(text='物理内存:'+str(floor(wl*100))+'%')
  root.after(2000,wlnc)
这里的三个函数就是分别实现上面的三个功能的,最后将它添加到窗口事件即可。
8)功能编写
可以看到这页主要是系统运行的一些应用程序的名字,所以我们可以这样这里我们需要用到模块psutil 来获取系统的关键参数。
1.编写应用程序选项
应用程序选项包含进程号和进程名和进程文件路径,所以可以用psutil进行获取,方法如下:
text.insert('insert','进程号   '+'进程名      '+'  进程文件路径'+'\n')
  for y in psutil.pids():
    a=psutil.Process(y)
    if a.name()=='System Idle Process':
      continue
    else:
text.insert('insert',str(y)+' '+a.name()+' '+a.exe()+'\n\n')这样就可以将这些内容添加进来了。
2.编写进程选项
这里我们可以投机取巧,使用cmd中的tasklist命令,它可以打印出当前系统所有在运行的进程的信息。
mm=os.popen('tasklist')
text.insert('insert',mm.read())
3.编写服务选项
也是使用cmd中的sc 命令,它相当于一个扫描器,可以得到很多有用的信息。
mm=os.popen('sc query type= service')
text.insert('insert',mm.read())
4.编写性能选项
这个内容会比较多点,因为我们要得到比较多的参数和把组件放在多行文本框中,于是增加了一些冗余代码:
l1=t.Label(root,text='开机时间:')  tm=datetime.datetime.fromtimestamp(psutil.boot_time()).strftime("%Y-%m-%d %H:%M:%S")
  l2=t.Label(root,text=str(tm))
  l3=t.Label(root,text='当前时间:')
  l4=t.Label(root,text='')
  dq=time.strftime('%Y-%m-%d %H:%M:%S',time.localtime(time.time()))
  l4.configure(text=str(dq))
  l5=t.Label(root,text='物理内存使用情况(MB):')
  l6=t.Label(root,text='')
  jh=psutil.virtual_memory() #物理内存
  tt=int((jh.total)/1024/1024) #总量
  us=int((jh.used)/1024/1024) #使用量
  fr=int((jh.free)/1024/1024) #剩余量
  l6.configure(text='总量:' + str(tt) +'\n'+'使用:'+str(us) +'\n'+'剩余:'+str(fr))
  l7=t.Label(root,text='交换内存使用情况(MB):')
  l8=t.Label(root,text='')
  hj=psutil.swap_memory() #交换内存
  ht=int((hj.total)/1024/1024)
  hu=int((hj.used)/1024/1024)
  hf=int((hj.free)/1024/1024)
  l8.configure(text='总量:' + str(ht) + '  '+'使用:'+str(hu) +'  '+'剩余:'+str(hf))
  text.window_create('insert',window=l1) #添加组件到多行文本框
  text.window_create('insert',window=l2)
  text.insert('insert','\n\n')
  text.window_create('insert',window=l3)
  text.window_create('insert',window=l4)
  text.insert('insert','\n\n')
  text.window_create('insert',window=l5)
  text.window_create('insert',window=l6)
  text.insert('insert','\n\n')
  text.window_create('insert',window=l7)
text.window_create('insert',window=l8)5.编写联网选项
这里我们只获取网卡的收发流量,因此:
n = psutil.net_io_counters()
r=str(float(n.bytes_recv / 1024 / 1024))+'MB'
s= str(float(n.bytes_sent / 1024 / 1024))+'MB'
text.insert('insert','网卡接收流量: '+str(r)+'\n'+'网卡发送流量:'+str(s)+'\n')
6.编写用户选项
这里我们需要获取当前的用户数:
use='    用户'+'      '+'     状态'+'\n'
text.insert('insert',use)
for y in psutil.users():
  text.insert('2.0',str(y.name)+'  '+'运行中。。。。'+'\n')
这样就完成了任务管理器的编写了。

3. Ringkasan
Melalui pemahaman pengurus tugas, kami telah menyedari beberapa maklumat penting dalam sistem Sebagai contoh, nombor proses boleh diperolehi melalui nama proses, dan nombor proses boleh diperolehi melalui nama proses Mendapatkan nama proses dan menggunakan arahan cmd boleh dikatakan agak mesra pengguna.
Atas ialah kandungan terperinci Ajar anda langkah demi langkah cara meniru pengurus tugas menggunakan Python. Untuk maklumat lanjut, sila ikut artikel berkaitan lain di laman web China PHP!

Alat AI Hot

Undresser.AI Undress
Apl berkuasa AI untuk mencipta foto bogel yang realistik

AI Clothes Remover
Alat AI dalam talian untuk mengeluarkan pakaian daripada foto.

Undress AI Tool
Gambar buka pakaian secara percuma

Clothoff.io
Penyingkiran pakaian AI

AI Hentai Generator
Menjana ai hentai secara percuma.

Artikel Panas

Alat panas

Notepad++7.3.1
Editor kod yang mudah digunakan dan percuma

SublimeText3 versi Cina
Versi Cina, sangat mudah digunakan

Hantar Studio 13.0.1
Persekitaran pembangunan bersepadu PHP yang berkuasa

Dreamweaver CS6
Alat pembangunan web visual

SublimeText3 versi Mac
Perisian penyuntingan kod peringkat Tuhan (SublimeText3)

Topik panas
 1379
1379
 52
52
 PHP dan Python: Contoh dan perbandingan kod
Apr 15, 2025 am 12:07 AM
PHP dan Python mempunyai kelebihan dan kekurangan mereka sendiri, dan pilihannya bergantung kepada keperluan projek dan keutamaan peribadi. 1.PHP sesuai untuk pembangunan pesat dan penyelenggaraan aplikasi web berskala besar. 2. Python menguasai bidang sains data dan pembelajaran mesin.
 Cara Melatih Model Pytorch di CentOs
Apr 14, 2025 pm 03:03 PM
Latihan yang cekap model pytorch pada sistem CentOS memerlukan langkah -langkah, dan artikel ini akan memberikan panduan terperinci. 1. Penyediaan Persekitaran: Pemasangan Python dan Ketergantungan: Sistem CentOS biasanya mempamerkan python, tetapi versi mungkin lebih tua. Adalah disyorkan untuk menggunakan YUM atau DNF untuk memasang Python 3 dan menaik taraf PIP: Sudoyumupdatepython3 (atau SudodnfupdatePython3), pip3install-upgradepip. CUDA dan CUDNN (Percepatan GPU): Jika anda menggunakan Nvidiagpu, anda perlu memasang Cudatool
 Python vs JavaScript: Komuniti, Perpustakaan, dan Sumber
Apr 15, 2025 am 12:16 AM
Python dan JavaScript mempunyai kelebihan dan kekurangan mereka sendiri dari segi komuniti, perpustakaan dan sumber. 1) Komuniti Python mesra dan sesuai untuk pemula, tetapi sumber pembangunan depan tidak kaya dengan JavaScript. 2) Python berkuasa dalam bidang sains data dan perpustakaan pembelajaran mesin, sementara JavaScript lebih baik dalam perpustakaan pembangunan dan kerangka pembangunan depan. 3) Kedua -duanya mempunyai sumber pembelajaran yang kaya, tetapi Python sesuai untuk memulakan dengan dokumen rasmi, sementara JavaScript lebih baik dengan MDNWebDocs. Pilihan harus berdasarkan keperluan projek dan kepentingan peribadi.
 Bagaimana sokongan GPU untuk Pytorch di CentOS
Apr 14, 2025 pm 06:48 PM
Membolehkan pecutan GPU pytorch pada sistem CentOS memerlukan pemasangan cuda, cudnn dan GPU versi pytorch. Langkah-langkah berikut akan membimbing anda melalui proses: Pemasangan CUDA dan CUDNN Tentukan keserasian versi CUDA: Gunakan perintah NVIDIA-SMI untuk melihat versi CUDA yang disokong oleh kad grafik NVIDIA anda. Sebagai contoh, kad grafik MX450 anda boleh menyokong CUDA11.1 atau lebih tinggi. Muat turun dan pasang Cudatoolkit: Lawati laman web rasmi Nvidiacudatoolkit dan muat turun dan pasang versi yang sepadan mengikut versi CUDA tertinggi yang disokong oleh kad grafik anda. Pasang Perpustakaan Cudnn:
 Penjelasan terperinci mengenai Prinsip Docker
Apr 14, 2025 pm 11:57 PM
Docker menggunakan ciri -ciri kernel Linux untuk menyediakan persekitaran berjalan yang cekap dan terpencil. Prinsip kerjanya adalah seperti berikut: 1. Cermin digunakan sebagai templat baca sahaja, yang mengandungi semua yang anda perlukan untuk menjalankan aplikasi; 2. Sistem Fail Kesatuan (Unionfs) menyusun pelbagai sistem fail, hanya menyimpan perbezaan, menjimatkan ruang dan mempercepatkan; 3. Daemon menguruskan cermin dan bekas, dan pelanggan menggunakannya untuk interaksi; 4. Ruang nama dan cgroups melaksanakan pengasingan kontena dan batasan sumber; 5. Pelbagai mod rangkaian menyokong interkoneksi kontena. Hanya dengan memahami konsep -konsep teras ini, anda boleh menggunakan Docker dengan lebih baik.
 Cara Memilih Versi PyTorch Di Bawah Centos
Apr 14, 2025 pm 02:51 PM
Apabila memilih versi pytorch di bawah CentOS, faktor utama berikut perlu dipertimbangkan: 1. Keserasian versi CUDA Sokongan GPU: Jika anda mempunyai NVIDIA GPU dan ingin menggunakan pecutan GPU, anda perlu memilih pytorch yang menyokong versi CUDA yang sepadan. Anda boleh melihat versi CUDA yang disokong dengan menjalankan arahan NVIDIA-SMI. Versi CPU: Jika anda tidak mempunyai GPU atau tidak mahu menggunakan GPU, anda boleh memilih versi CPU PyTorch. 2. Pytorch versi python
 Cara Memasang Nginx di CentOs
Apr 14, 2025 pm 08:06 PM
CentOS Memasang Nginx memerlukan mengikuti langkah-langkah berikut: memasang kebergantungan seperti alat pembangunan, pcre-devel, dan openssl-devel. Muat turun Pakej Kod Sumber Nginx, unzip dan menyusun dan memasangnya, dan tentukan laluan pemasangan sebagai/usr/local/nginx. Buat pengguna Nginx dan kumpulan pengguna dan tetapkan kebenaran. Ubah suai fail konfigurasi nginx.conf, dan konfigurasikan port pendengaran dan nama domain/alamat IP. Mulakan perkhidmatan Nginx. Kesalahan biasa perlu diberi perhatian, seperti isu ketergantungan, konflik pelabuhan, dan kesilapan fail konfigurasi. Pengoptimuman prestasi perlu diselaraskan mengikut keadaan tertentu, seperti menghidupkan cache dan menyesuaikan bilangan proses pekerja.
 Cara Mengendalikan Latihan Pittorch Diagihkan di Centos
Apr 14, 2025 pm 06:36 PM
Latihan yang diedarkan Pytorch pada sistem CentOS memerlukan langkah -langkah berikut: Pemasangan Pytorch: Premisnya ialah Python dan PIP dipasang dalam sistem CentOS. Bergantung pada versi CUDA anda, dapatkan arahan pemasangan yang sesuai dari laman web rasmi Pytorch. Untuk latihan CPU sahaja, anda boleh menggunakan arahan berikut: PipinstallToRchTorchVisionTorchaudio Jika anda memerlukan sokongan GPU, pastikan versi CUDA dan CUDNN yang sama dipasang dan gunakan versi pytorch yang sepadan untuk pemasangan. Konfigurasi Alam Sekitar Teragih: Latihan yang diedarkan biasanya memerlukan pelbagai mesin atau mesin berbilang mesin tunggal. Tempat


