 Tutorial CMS
 WordTekan
 Mengemas kini dan memadamkan siaran dalam aplikasi blog berasaskan React: Bahagian 4
Mengemas kini dan memadamkan siaran dalam aplikasi blog berasaskan React: Bahagian 4
Dalam bahagian sebelumnya siri tutorial ini, anda mempelajari cara melaksanakan fungsi tambah dan tunjukkan siaran. Dalam bahagian siri tutorial tentang mencipta aplikasi blog dalam React ini, anda akan melaksanakan fungsi untuk mengemas kini dan memadam catatan blog.
Mulakan
Mari mulakan pengklonan kod sumber untuk bahagian terakhir siri ini.
https://github.com/royagasthyan/ReactBlogApp-AddPost
Selepas mengklon direktori, navigasi ke direktori projek dan pasang kebergantungan yang diperlukan.
cd ReactBlogApp-AddPost
npm install
Mulakan pelayan Node.js dan aplikasi akan dijalankan di http://localhost:7777/index.html#/.
Buat kemas kini dan padamkan paparan
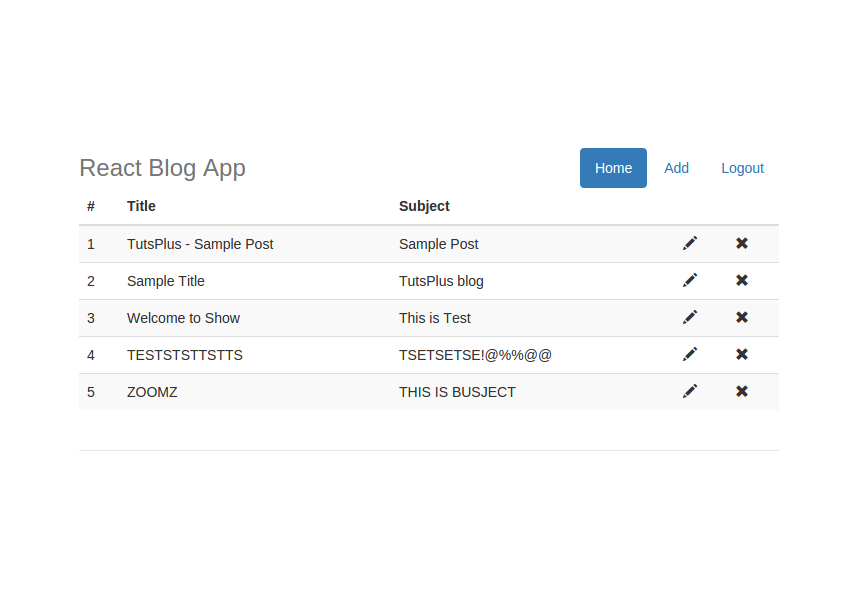
Mari ubah suai senarai catatan blog untuk memaparkan data dalam jadual dengan ikon kemas kini dan padam. Dalam kaedah pemaparan komponen ShowPost, gantikan div sedia ada dengan jadual, seperti yang ditunjukkan dalam kod: ShowPost 组件的 render 方法中,将现有的 div 替换为表格,如代码所示:
<table className="table table-striped">
            <thead>
              <tr>
                <th>#</th>
                <th>Title</th>
                <th>Subject</th>
                <th></th>
                <th></th>
              </tr>
            </thead>
            <tbody>
              {
                this.state.posts.map(function(post,index) {
                   return <tr key={index} >
                            <td>{index+1}</td>
                            <td>{post.title}</td>
                            <td>{post.subject}</td>
                            <td>
                              <span className="glyphicon glyphicon-pencil"></span>
                            </td>
                            <td>
                              <span className="glyphicon glyphicon-remove"></span>
                            </td>
                          </tr>
                }.bind(this))
              }
            </tbody>
</table>
如上面的代码所示,您已修改现有代码以以表格形式显示帖子。您已映射 posts 变量以迭代 posts 集合并动态创建所需的 tr 和 td。
保存以上更改并重新启动服务器。将浏览器指向 http://localhost:7777/home#/,您应该能够以表格格式查看博客文章列表。

实现更新发布功能
要实现更新发布功能,您需要将单击事件附加到编辑图标。修改编辑图标span如图:
<span onClick={this.updatePost.bind(this,post._id)} className="glyphicon glyphicon-pencil"></span>
如上面的代码所示,您已将帖子 ID 作为参数传递给 updatePost 方法。
在 ShowPost 组件内创建一个方法 updatePost 。
updatePost(id){
  hashHistory.push('/addPost/' + id);
}
如上面的代码所示,您已使用已编辑项目的 ID 触发了到添加帖子页面的重定向。在添加帖子页面中,您将获得带有传递的 ID 的博客帖子的详细信息并填充详细信息。
修改路由器以在添加帖子页面中包含可选的 id 参数。
<Route component={AddPost} path="/addPost(/:id)"></Route>
在 AddPost 组件内,创建一个名为 getPostWithId 的方法,以使用 id 获取博客文章的详细信息。在 getPostWithId 方法内,对 app.js 内的 getPostWithId API 进行 AJAX 调用。
getPostWithId(){
  var id = this.props.params.id;
  var self = this;
  axios.post('/getPostWithId', {
    id: id
  })
  .then(function (response) {
    if(response){
      self.setState({title:response.data.title});
      self.setState({subject:response.data.subject});
    }
  })
  .catch(function (error) {
    console.log('error is ',error);
  });
}
通过从 getPostWithId API 方法收到的响应,您已更新状态变量 title 和 subject。
修改 title 和 subject 文本框以显示状态变量的值。
<div className="form-group">
    <input value={this.state.title} type="text" onChange={this.handleTitleChange} className="form-control" id="title" name="title" placeholder="Title" required />
</div>

<div className="form-group">
    <textarea value={this.state.subject} className="form-control" onChange={this.handleSubjectChange} type="textarea" id="subject" placeholder="Subject" maxlength="140" rows="7"></textarea>
</div>
现在,让我们在 app.js 中创建 getPostWithId API,以对 MongoDB 数据库进行数据库调用,以获取具有特定 ID 的帖子详细信息。这是 getPostWithId API 方法:
app.post('/getPostWithId', function(req,res){
  var id = req.body.id;
  post.getPostWithId(id, function(result){
    res.send(result)
  })
})
在 post.js 文件中,创建一个方法 getPostWithId 来查询数据库以获取详细信息。其外观如下:
getPostWithId: function(id, callback){
	MongoClient.connect(url, function(err, db){
		 db.collection('post').findOne({
		 	_id: new mongodb.ObjectID(id)
		 },
		 function(err, result){
			assert.equal(err, null);
	    	if(err == null){
	    		callback(result)
	    	}
	    	else{
	    		callback(false)
	    	}
		});
	})
}
如上面的代码所示,您使用了 findOne API 来获取具有特定 ID 的博客文章的详细信息。
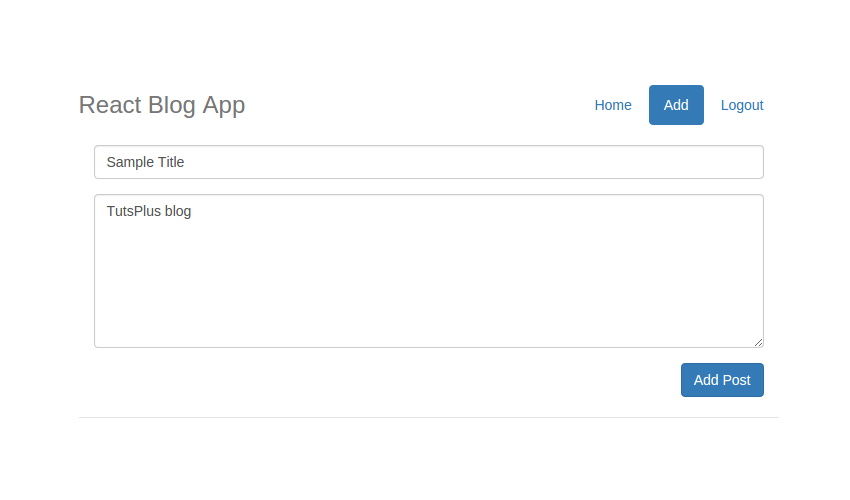
保存以上更改并尝试运行程序。单击主页上的编辑图标,它将重定向到添加帖子页面并填充标题和主题。

现在,要更新博客文章详细信息,您需要检查 id在 app.js 中的 addPost API 方法内。如果是新帖子,则 id 将为 undefined。
修改 AddPost 组件中的 AddPost 方法以包含 id 状态变量。
axios.post('/addPost', {
    title: this.state.title,
    subject: this.state.subject,
    id: this.state.id
})
在 addPost API 方法中,您需要检查 id 参数是否为 undefined 。如果undefined,则表示这是一个新帖子,否则需要调用update方法。 addPost API 方法如下所示:
app.post('/addpost', function (req, res) {
  var title = req.body.title;
  var subject = req.body.subject;
  var id = req.body.id;
  if(id == '' || id == undefined)
    post.addPost(title, subject ,function(result){
      res.send(result);
    });
  }
  else{
    post.updatePost(id, title, subject ,function(result){
      res.send(result);
    });
  }
})
在 post.js 文件中,创建一个名为 updatePost 的方法来更新博客文章详细信息。您将利用 updateOne API 来更新具有特定 id 的博客文章的详细信息。以下是 updatePost
updatePost: function(id, title, subject, callback){
	MongoClient.connect(url, function(err, db) {
	  	db.collection('post').updateOne(
	  		{ "_id": new mongodb.ObjectID(id) },
	  		{ $set:
	  			{ "title" : title,
	  			  "subject" : subject
	  			}
	  		},function(err, result){
			assert.equal(err, null);
	    	if(err == null){
	    		callback(true)
	    	}
	    	else{
	    		callback(false)
	    	}
		});
	});
}
posts untuk mengulangi koleksi catatan dan mencipta tr dan td . 🎜
🎜Simpan perubahan di atas dan mulakan semula pelayan. Halakan pelayar anda ke http://localhost:7777/home#/ dan anda sepatutnya dapat melihat senarai catatan blog dalam format jadual. 🎜
🎜 🎜🎜Laksanakan fungsi keluaran kemas kini🎜
🎜Untuk melaksanakan fungsi penerbitan kemas kini, anda perlu melampirkan acara klik pada ikon edit. Ubah suai ikon edit
 span seperti yang ditunjukkan dalam rajah: 🎜
<span onClick={this.deletePost.bind(this,post._id)} className="glyphicon glyphicon-remove"></span>
updatePost. 🎜
🎜Buat kaedah updatePost dalam komponen ShowPost. 🎜
deletePost(id){

}
this.deletePost = this.deletePost.bind(this);
AddPost, buat kaedah bernama getPostWithId untuk menggunakan id< /code > Dapatkan butiran catatan blog. Dalam kaedah <code class="inline">getPostWithId, lakukan getPostWithId API dalam app.js AJAX panggilan. 🎜
      {
        this.state.posts.map(function(post,index) {
           return
                    {index+1}
                    {post.title}
                    {post.subject}

                      <span onClick={this.updatePost.bind(this,post._id)} className="glyphicon glyphicon-pencil"></span>


                      <span onClick={this.deletePost.bind(this,post._id)} className="glyphicon glyphicon-remove"></span>


        }.bind(this))
      }
getPostWithId, anda telah mengemas kini pembolehubah keadaan title dan subjek. 🎜
🎜Ubah suai kotak teks title dan subjek untuk memaparkan nilai pembolehubah keadaan. 🎜
deletePost(id){
  if(confirm('Are you sure ?')){
    // Delete Post API call will be here !!
  }
}
getPostWithId dalam app.js untuk membuat panggilan pangkalan data ke pangkalan data MongoDB untuk mendapatkan data dengan butiran Pos khusus untuk ID. Ini ialah kaedah API getPostWithId: 🎜
app.post('/deletePost', function(req,res){
  var id = req.body.id;
  post.deletePost(id, function(result){
    res.send(result)
  })
})
post.js, buat kaedah getPostWithId untuk menanyakan pangkalan data untuk mendapatkan butiran. Ia kelihatan seperti ini: 🎜
deletePost: function(id, callback){

	MongoClient.connect(url, function(err, db){
		 db.collection('post').deleteOne({
		 	_id: new mongodb.ObjectID(id)
		 },
		 function(err, result){
			assert.equal(err, null);
	    	console.log("Deleted the post.");
	    	if(err == null){
	    		callback(true)
	    	}
	    	else{
	    		callback(false)
	    	}
		});
	})
}
findOne untuk mendapatkan butiran catatan blog dengan ID tertentu. 🎜
🎜Simpan perubahan di atas dan cuba jalankan program. Klik ikon edit pada halaman utama dan ia akan mengubah hala ke halaman tambah siaran dan mengisi tajuk dan subjek. 🎜
🎜 🎜🎜Kini, untuk mengemas kini butiran catatan blog anda perlu menyemak
 id dalam app.js ="inline">addPost dalam kaedah API. Jika ini adalah siaran baharu, id akan menjadi undefined. 🎜
🎜Ubah suai kaedah AddPost dalam komponen AddPost untuk memasukkan keadaan id pembolehubah. 🎜
deletePost(id){
  if(confirm('Are you sure ?')){
    var self = this;
    axios.post('/deletePost', {
      id: id
    })
    .then(function (response) {

    })
    .catch(function (error) {

    });
  }
}
addPost, anda perlu menyemak sama ada parameter id adalah undefined< /kod > . Jika <code class="inline">undefined, ini bermakna ini adalah siaran baharu, jika tidak kaedah kemas kini perlu dipanggil. Kaedah API addPost adalah seperti berikut: 🎜
getPost(){
  var self = this;
  axios.post('/getPost', {
  })
  .then(function (response) {
    console.log('res is ',response);
    self.setState({posts:response.data})
  })
  .catch(function (error) {
    console.log('error is ',error);
  });
}
post.js, buat kaedah yang dipanggil updatePost untuk mengemas kini butiran catatan blog. Anda akan menggunakan API updateOne untuk mengemas kini butiran catatan blog dengan id tertentu. Begini rupa kaedah updatePost: 🎜
updatePost: function(id, title, subject, callback){
	MongoClient.connect(url, function(err, db) {
	  	db.collection('post').updateOne(
	  		{ "_id": new mongodb.ObjectID(id) },
	  		{ $set:
	  			{ "title" : title,
	  			  "subject" : subject
	  			}
	  		},function(err, result){
			assert.equal(err, null);
	    	if(err == null){
	    		callback(true)
	    	}
	    	else{
	    		callback(false)
	    	}
		});
	});
}
保存以上更改并重新启动服务器。登录应用程序并点击编辑图标。修改现有值并单击按钮更新详细信息。
实现删除帖子功能
要实现删除帖子功能,您需要将点击事件附加到删除图标。修改删除图标跨度如图:
<span onClick={this.deletePost.bind(this,post._id)} className="glyphicon glyphicon-remove"></span>
如上面的代码所示,您已将帖子 ID 作为参数传递给 deletePost 方法。
在 ShowPost 组件中创建一个名为 deletePost 的方法。
deletePost(id){

}
在ShowPost组件构造函数中绑定该方法。
this.deletePost = this.deletePost.bind(this);
要在 map 函数回调中使用 this,您需要将 this 绑定到 map 函数。修改map函数回调如图:
      {
        this.state.posts.map(function(post,index) {
           return
                    {index+1}
                    {post.title}
                    {post.subject}

                      <span onClick={this.updatePost.bind(this,post._id)} className="glyphicon glyphicon-pencil"></span>


                      <span onClick={this.deletePost.bind(this,post._id)} className="glyphicon glyphicon-remove"></span>


        }.bind(this))
      }
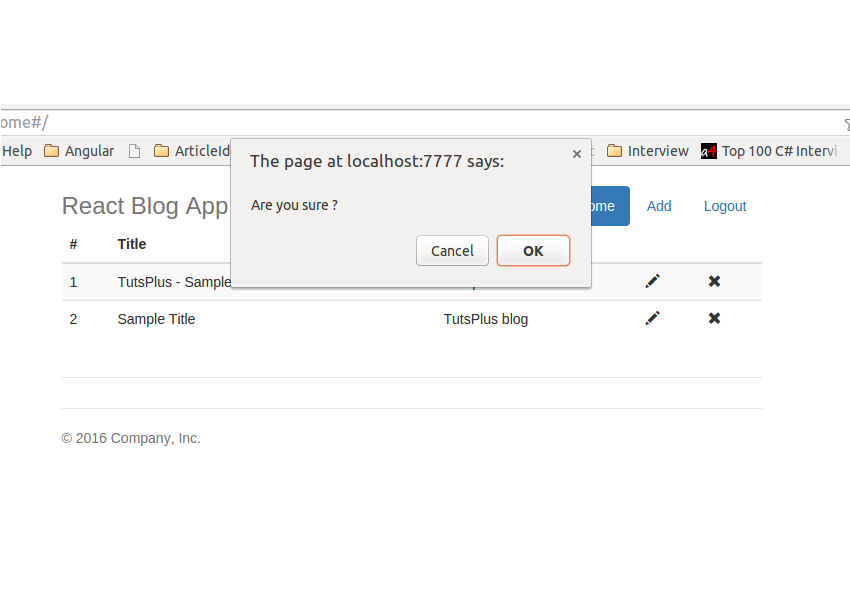
在 deletePost 方法中,在调用删除 API 之前添加确认提示。
deletePost(id){
  if(confirm('Are you sure ?')){
    // Delete Post API call will be here !!
  }
}
现在让我们在 app.js 文件中添加 deletePost API。 API 将从 AJAX 调用中读取帖子 ID 并从 MongoDB 中删除该条目。以下是 deletePost API 的外观:
app.post('/deletePost', function(req,res){
  var id = req.body.id;
  post.deletePost(id, function(result){
    res.send(result)
  })
})
如上面的代码所示,您将调用 post.js 文件中的 deletePost 方法并返回结果。让我们在 post.js 文件中创建 deletePost 方法。
deletePost: function(id, callback){

	MongoClient.connect(url, function(err, db){
		 db.collection('post').deleteOne({
		 	_id: new mongodb.ObjectID(id)
		 },
		 function(err, result){
			assert.equal(err, null);
	    	console.log("Deleted the post.");
	    	if(err == null){
	    		callback(true)
	    	}
	    	else{
	    		callback(false)
	    	}
		});
	})
}
如上面的代码所示,post.js 文件中的 deletePost 方法将使用 MongoClient 连接到MongoDB 中的博客数据库。使用从 AJAX 调用传递的 Id ,它将从数据库中删除该帖子。
更新 home.jsx 文件中 deletePost 方法内的代码,以包含对 deletePost API 的 AJAX 调用 app.js 文件。
deletePost(id){
  if(confirm('Are you sure ?')){
    var self = this;
    axios.post('/deletePost', {
      id: id
    })
    .then(function (response) {

    })
    .catch(function (error) {

    });
  }
}
删除博客文章后,您需要刷新博客文章列表以反映这一点。因此,创建一个名为 getPost 的新方法,并将 componentDidMount 代码移到该函数内。这是 getPost 方法:
getPost(){
  var self = this;
  axios.post('/getPost', {
  })
  .then(function (response) {
    console.log('res is ',response);
    self.setState({posts:response.data})
  })
  .catch(function (error) {
    console.log('error is ',error);
  });
}
修改componentDidMount代码,如图:
componentDidMount(){
  this.getPost();

  document.getElementById('homeHyperlink').className = "active";
  document.getElementById('addHyperLink').className = "";
}
在 deletePost AJAX 调用成功回调内,调用 getPost 方法来更新博客文章列表。
deletePost(id){
  if(confirm('Are you sure ?')){
    var self = this;
    axios.post('/deletePost', {
      id: id
    })
    .then(function (response) {
      self.getPost();
    })
    .catch(function (error) {
      console.log('Error is ',error);
    });
  }
}
保存以上更改并重新启动服务器。尝试添加新的博客文章,然后从网格列表中单击“删除”。系统将提示您一条删除确认消息。单击确定按钮后,该条目将被删除,并且博客文章列表将被更新。

总结
在本教程中,您了解了如何在 React 博客应用程序中实现删除和更新博客文章功能。在本教程系列的下一部分中,您将了解如何为登录用户实现个人资料页面。
请在下面的评论中告诉我们您的想法和建议。本教程的源代码可在 GitHub 上获取。
Atas ialah kandungan terperinci Mengemas kini dan memadamkan siaran dalam aplikasi blog berasaskan React: Bahagian 4. Untuk maklumat lanjut, sila ikut artikel berkaitan lain di laman web China PHP!

Alat AI Hot

Undresser.AI Undress
Apl berkuasa AI untuk mencipta foto bogel yang realistik

AI Clothes Remover
Alat AI dalam talian untuk mengeluarkan pakaian daripada foto.

Undress AI Tool
Gambar buka pakaian secara percuma

Clothoff.io
Penyingkiran pakaian AI

AI Hentai Generator
Menjana ai hentai secara percuma.

Artikel Panas

Alat panas

Notepad++7.3.1
Editor kod yang mudah digunakan dan percuma

SublimeText3 versi Cina
Versi Cina, sangat mudah digunakan

Hantar Studio 13.0.1
Persekitaran pembangunan bersepadu PHP yang berkuasa

Dreamweaver CS6
Alat pembangunan web visual

SublimeText3 versi Mac
Perisian penyuntingan kod peringkat Tuhan (SublimeText3)

Topik panas
 5 IDE terbaik untuk pembangunan WordPress (dan mengapa)
Mar 03, 2025 am 10:53 AM
Memilih persekitaran pembangunan bersepadu yang betul (IDE) untuk pembangunan WordPress Selama sepuluh tahun, saya telah meneroka pelbagai persekitaran pembangunan bersepadu (IDES) untuk pembangunan WordPress. Variasi semata -mata - bebas dari komersial, asas untuk FEA
 Buat plugin WordPress dengan teknik OOP
Mar 06, 2025 am 10:30 AM
Tutorial ini menunjukkan membina plugin WordPress menggunakan prinsip pengaturcaraan berorientasikan objek (OOP), memanfaatkan API Dribbble. Mari kita memperbaiki teks untuk kejelasan dan kesimpulan sambil memelihara makna dan struktur asal. Objek-ori
 Cara Lulus Data dan String PHP ke JavaScript di WordPress
Mar 07, 2025 am 09:28 AM
Amalan terbaik untuk meluluskan data PHP ke JavaScript: Perbandingan WP_LOCALIZE_SCRIPT dan WP_ADD_INLINE_SCRIPT Menyimpan data dalam rentetan statik dalam fail PHP anda adalah amalan yang disyorkan. Sekiranya data ini diperlukan dalam kod JavaScript anda, incorporat
 Cara Menanam dan Melindungi Fail PDF dengan Plugin WordPress
Mar 09, 2025 am 11:08 AM
Panduan ini menunjukkan bagaimana untuk membenamkan dan melindungi fail PDF dalam jawatan WordPress dan halaman menggunakan plugin PDF WordPress. PDFS menawarkan format yang mesra pengguna dan boleh diakses secara universal untuk pelbagai kandungan, dari katalog ke persembahan. Kaedah ini ENS
 Adakah WordPress mudah untuk pemula?
Apr 03, 2025 am 12:02 AM
WordPress mudah untuk pemula bermula. 1. Selepas log masuk ke latar belakang, antara muka pengguna adalah intuitif dan papan pemuka mudah menyediakan semua pautan fungsi yang diperlukan. 2. Operasi asas termasuk mencipta dan mengedit kandungan. Editor WYSIWYG memudahkan penciptaan kandungan. 3. Pemula boleh mengembangkan fungsi laman web melalui pemalam dan tema, dan lengkung pembelajaran wujud tetapi boleh dikuasai melalui amalan.
 Mengapa ada yang menggunakan WordPress?
Apr 02, 2025 pm 02:57 PM
Orang memilih untuk menggunakan WordPress kerana kuasa dan fleksibiliti. 1) WordPress adalah CMS sumber terbuka dengan kemudahan penggunaan dan skalabiliti yang kuat, sesuai untuk pelbagai keperluan laman web. 2) Ia mempunyai tema dan plugin yang kaya, ekosistem yang besar dan sokongan komuniti yang kuat. 3) Prinsip kerja WordPress adalah berdasarkan tema, pemalam dan fungsi teras, dan menggunakan PHP dan MySQL untuk memproses data, dan menyokong pengoptimuman prestasi.


