Tukar tema WordPress anda kepada HTML5
HTML5 memperkenalkan pelbagai ciri baharu yang hebat dan pilihan mudah. Tidak lama lagi ia akan disokong sepenuhnya oleh kebanyakan pelayar yang digunakan hari ini. Akhirnya semua orang perlu menukar tema WordPress mereka daripada XHTML kepada HTML5. Selepas kemas kini Panda Google, tapak web anda memerlukan kod yang lebih jelas dan mudah dibaca untuk mendapat kedudukan yang lebih baik di Google. Saya akan mengajar anda cara menukar tema anda daripada XHTML kepada HTML5. Kami juga akan menjaga 2% pengguna internet yang telah melumpuhkan JavaScript (untuk keserasian ke belakang).
Matlamat kami
Dalam tutorial ini, kami akan menumpukan pada menukar tema WordPress daripada XHTML kepada HTML5. Kami akan membimbing anda melalui perubahan langkah demi langkah melalui fail yang disenaraikan di bawah (fail ini terletak dalam folder tema anda, iaitu wp-content/themes/yourtheme/here! )
- header.php
- index.php
- bar sisi.php:
- footer.php
- single.php(pilihan)
Susun atur HTML5 asas
Mari kita lihat reka letak asas HTML5 yang akan kita bina. HTML5 adalah lebih daripada sekadar jenis dokumen pada permulaan kod. Beberapa elemen yang baru diperkenalkan membantu kami menggayakan dan kod dengan cara yang cekap dengan kurang penanda (ini adalah salah satu sebab mengapa HTML5 lebih baik).
<!DOCTYPE html>
<html lang="en">
<head>
	<title>TITLE | Slogan!</title>
</head>
<body>
	<nav role="navigation"></nav>
<!--Ending header.php-->
<!--Begin  index.php-->
	<section id="content">
		<article role="main">
			<h1>Title of the Article</h1>
			<time datetime="YYYY-MM-DD"></time>
			<p>Some lorem ispum text of your post goes here.</p>
			<p>The article's text ends.</p>
		</article>

		<aside role="sidebar">
			<h2>Some Widget in The Sidebar</h2>
		</aside>
	</section>
<!--Ending index.php-->
<!--begin  footer.php-->
	<footer role="foottext">
		<small>Some Copyright info</small>
	</footer>
</body>
</html>
Kini kita hanya perlu mengetahui header, footer, nav, section dan article > Tempat untuk meletakkan teg HTML5 baharu. Berbeza dengan XHTML berstruktur div, nama teg yang baru diperkenalkan adalah jelas. header、footer、nav、section 和 article 的新 HTML5 标签放在哪里即可。与 div 结构化 XHTML 相比,新引入的标签的名称是不言自明的。
步骤 1 将 header.php 转换为 HTML5
现在我将向您展示XHTML WordPress主题的header.php中常用的代码。
XHTML 主题 header.php
<!DOCTYPE html PUBLIC "-//W3C//DTD XHTML 1.0 Transitional//EN" "https://www.w3.org/TR/xhtml1/DTD/xhtml1-transitional.dtd">
<html xmlns="http://www.w3.org/1999/xhtml">
<head>
<title>My  Blog</title>
<?php wp_head(); ?>
</head>
<body>
<!-- Header  -->
<div class="header">
	<div class="container">
		<h1><a href="<?php bloginfo('url');?>">My Blog is Working Great.</a></h1>
	</div><!-- End  Container -->
</div><!-- End  Header -->


<!-- Navigation Bar Starts -->
<div class="navbar">
	<div class="container">
		<ul class="grid nav_bar">
			<?php wp_list_categories('navs_li='); ?>
	     </ul>
	</div>
</div>
<!-- Navigation Bar Ends -->
<div class="container">
有人必须问我们为什么要做这一切?答案很简单,就是 HTML5 的语义标记。它减少了标记,使其非常易于理解和管理。
HTML5 header.php(转换)
阅读代码,然后按照以下说明将主题的 header.php 转换为 HTML5。
<!doctype html>
<html>
<head>
<title>My Blog</title>
<?php wp_head(); ?>
</head>
<body>
<!-- Header -->
<header>
    <div class="container">
        <h1 class="grid"><a href="<?php bloginfo('url');?>">My Blog is Working Great.</a></h1>
    </div>
</header>
<!-- End Header  -->

<!-- Navigation Bar Starts-->
<nav>
    <div class="navbar">
        <ul class="grid nav_bar">
            <?php wp_list_categories('title_li='); ?>
         </ul>
    </div>
</nav>
<!-- Navigation Bar Ends -->
<section class="container">
正如您所看到的,转换后的代码与 XHTML 代码非常相似。让我们讨论一下这些变化。
-
<!doctype html>– HTML5 有一个非常简单的 doctype,但它包含许多新的语义标签 -
<header>– 标头部分的语义标记 -
<nav>– 我们用一个新的语义标签替换了导航栏的div代码,用于控制 HTML5 中的导航栏。
注意: 有些人在标头中包含 section 标记。关于这一点有很多争论。我个人反对在标头中包含 section 标签,因为它会破坏 HTML5 的美感。当然,您可以在那里使用旧的 div 。
脚本和样式表怎么样?
将 WordPress 主题转换为 HTML5 时,标头中包含的脚本和样式表确实非常简单。在 HTML5 中,我们只使用 <script> 和 <link> 标签。因此,删除 type="text/javascript" - 所有浏览器都会将 <script> 标记视为 JavaScript,除非您明确写入其类型。同样,从样式表的 <link> 标记中删除 type="text/css"。
考虑旧浏览器!
包含 HTML shiv 以支持旧版浏览器。这是一个简单的 JavaScript 文件。 shiv 的一些示例是 Remy Sharp 的 HTML5 脚本或 Modernizr 脚本。让我们使用 Modernizr。
我们需要将脚本从我们的functions.php 文件中排入队列,如下所示:
function html5_scripts()
{
	// Register the Modernizr script
	wp_register_script( 'modernizr', get_template_directory_uri() . '/js/Modernizr-1.6.min.js' );

	// Enqueue Modernizr
	wp_enqueue_script( 'modernizr' );
}
add_action( 'wp_enqueue_scripts', 'html5_scripts', 1 );
提示: 将连续出现的标题标签放入 <hgroup>
注意: 此脚本需要放置在 <?php wp_head(); 内部的最顶部?> 标签,这就是为什么我们给 add_action
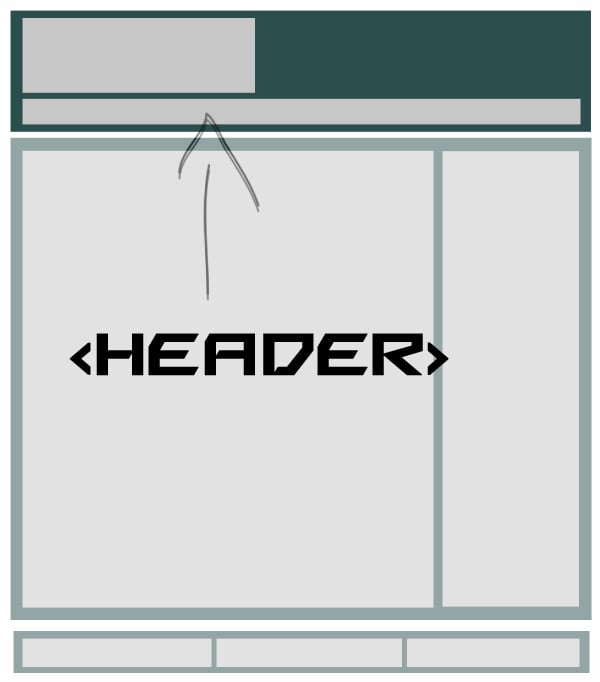 Langkah 1
 Tukar header.php kepada HTML5
Sekarang saya akan menunjukkan kepada anda kod yang biasa digunakan dalam header.php tema WordPress XHTML.
XHTML theme header.php
<div id="container">
<div id="content">
<div id="entries">
<div id="post">...</div>

</div><!--Ending Entries-->
<?php get_sidebar(); ?>
</div><!--Ending content-->
</div><!--Ending container-->
<?php get_footer(); ?>
Salin selepas log masukSalin selepas log masuk
Mesti ada yang bertanya kenapa kita buat semua ni? Jawapannya mudah, ia adalah penanda semantik HTML5. Ia mengurangkan markup menjadikannya sangat mudah untuk difahami dan diurus.
HTML5 header.php (penukaran)
Baca kod dan ikut arahan di bawah untuk menukar header.php tema anda kepada HTML5. <div id="container"> <div id="content"> <div id="entries"> <div id="post">...</div> </div><!--Ending Entries--> <?php get_sidebar(); ?> </div><!--Ending content--> </div><!--Ending container--> <?php get_footer(); ?>
<div id="container">
	<div id="content">
		<section id="entries">
			<article id="post">...</article>
		</section><!--end entries-->
		<?php get_sidebar(); ?>
	</div><!--end content-->
</div><!--end wrap-->
<?php get_footer(); ?>
<!doctype html> – HTML5 mempunyai doctype yang sangat mudah, tetapi ia mengandungi banyak teg semantik baharu
<header> – Penanda semantik untuk bahagian pengepala
<nav> – Kami menggantikan kod div bar navigasi dengan teg semantik baharu untuk mengawal bar navigasi dalam HTML5. 🎜
🎜
🎜🎜Nota: 🎜 🎜Sesetengah orang menyertakan tag section dalam pengepala kerana ia merosakkan estetika HTML5. Sudah tentu, anda boleh menggunakan div lama di sana. 🎜🎜
Bagaimana pula dengan skrip dan helaian gaya?
🎜Apabila menukar tema WordPress kepada HTML5, skrip dan helaian gaya yang disertakan dalam pengepala adalah sangat mudah. Dalam HTML5, kami hanya menggunakan teg<script> dan <link>. Jadi alih keluar type="text/javascript" - semua penyemak imbas akan menganggap teg <script> sebagai JavaScript melainkan anda menulis jenisnya secara eksplisit. Begitu juga, alih keluar type="text/css" daripada teg <link> pada helaian gaya. 🎜
Pertimbangkan pelayar lama!
🎜Mengandungi HTML shiv untuk menyokong pelayar lama. Ini ialah fail JavaScript yang mudah. Beberapa contoh shiv ialah skrip HTML5 Remy Sharp atau skrip Modernizr. Mari gunakan Modernizr. 🎜 🎜Kami perlu memasukkan skrip daripada fail functions.php kami seperti ini: 🎜
<section class="entries">
  <?php if (have_posts()) : while (have_posts()) : the_post();

<article class="post" id="post-<?php the_ID(); ?>">
    <aside class="post_image">
        <?php
        if ( has_post_thumbnail() ) {
            the_post_thumbnail();
        } else { ?>
            <a href="<?php the_permalink() ?>"><img src="<?php bloginfo('template_directory');?>/images/noImage.gif" title="<?php the_title(); ?>" /></a>
        <?php }?>
    </aside>
    <section class="post_content">
        <h1><a href="<?php the_permalink() ?>" rel="bookmark" title="<?php the_title(); ?>"><?php the_title(); ?></a></h1>
        <p><?php echo get_the_excerpt(); ?></p>
        <a href="<?php the_permalink() ?>" rel="bookmark" title="<?php the_title(); ?>" class="read_more ">Read More</a>
    </section>
    <section class="meta">

    <p> <?php the_category(',') ?></p>

    <p><?php the_tags(""); ?></p>

    </section>
</article>
  <?php endwhile; else: ?>
  <p>
    <?php _e('Sorry, no posts matched your criteria.'); ?>
  </p>
  <?php endif; ?>

  <?php posts_nav_link(' ⏼ ', __('« Newer Posts'), __('Older Posts »')); ?>
</section>
<hgroup>🎜🎜
🎜🎜Nota: 🎜 🎜Skrip ini perlu diletakkan di bahagian paling atas di dalam teg <?php wp_head();?>, itulah sebabnya kami memberikan add_action keutamaan adalah 1. 🎜🎜
🎜🎜🎜
🎜
🎜
🎜Langkah 2🎜Tukar index.php kepada HTML5🎜
🎜Common XHTML index.php terdiri daripada tag berikut. Saya akan melalui penukaran langkah demi langkah dan menerangkan keseluruhan proses selepas penukaran. 🎜
🎜🎜NOTA: 🎜 🎜Saya tidak akan menambah keseluruhan kod di sini kerana ia akan membuat siaran lebih panjang tanpa sebab. 🎜🎜
XHTML索引.php
<div id="container">
<div id="content">
<div id="entries">
<div id="post">...</div>

</div><!--Ending Entries-->
<?php get_sidebar(); ?>
</div><!--Ending content-->
</div><!--Ending container-->
<?php get_footer(); ?>
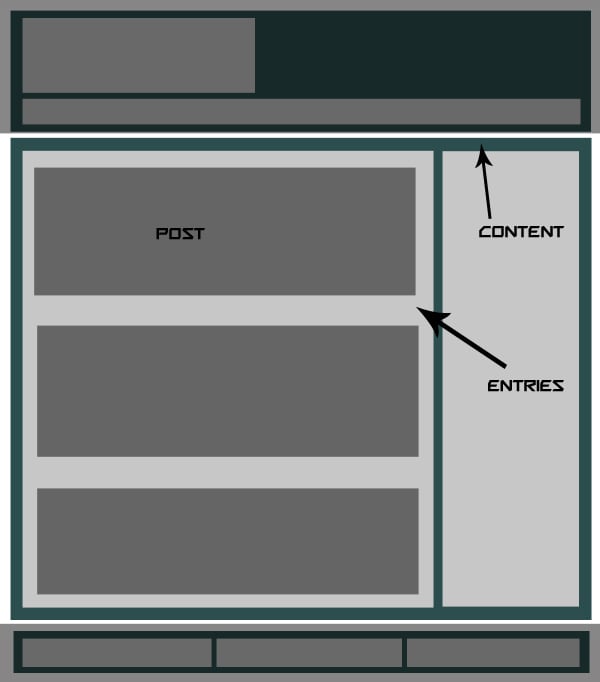

HTML5 index.php(转换)
<div id="container">
	<div id="content">
		<section id="entries">
			<article id="post">...</article>
		</section><!--end entries-->
		<?php get_sidebar(); ?>
	</div><!--end content-->
</div><!--end wrap-->
<?php get_footer(); ?>
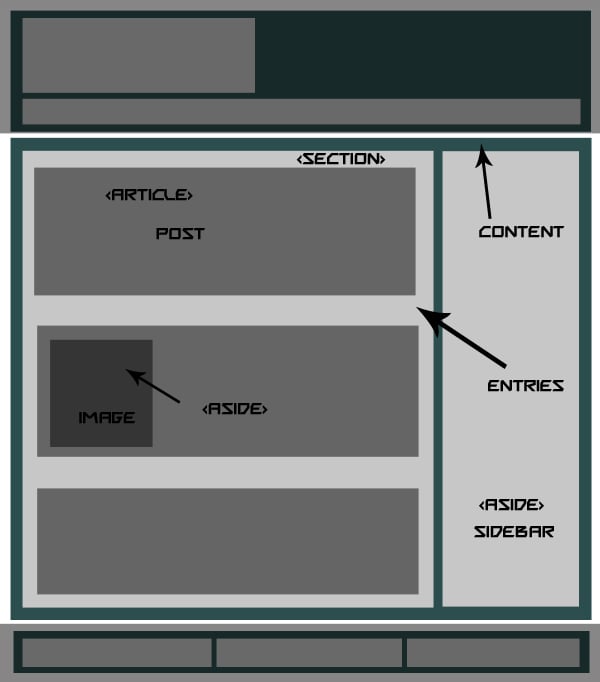
在看我们所做的更改之前,我们必须知道HTML5为我们提供了三个基本的布局建模标签:Section、article和aside。 Section 将替换条目的 div,article 将替换帖子的 div,稍后 aside 将用于我们的侧边栏。
-
<section>– HTML5 有一个名为section的布局标签,用于分隔其中使用的代码块 -
<article>– 帖子部分的语义标签,类似于section -
<aside>– 帖子图像的语义标记,用于将其放在一边和侧边栏 -
面包屑和页面导航– 如果我们的主题有面包屑,那么它们将在div中使用,例如<div class="breadcrumbs">...</div>,对于页面导航,我们将使用<nav id="pgnav"php cngtphpcn...< /nav>

HTML5 中的完整 Index.php
注意: 我粘贴了一个通用的index.php,如下所示,下面是一些转换为 HTML5 的完整代码。
<section class="entries">
  <?php if (have_posts()) : while (have_posts()) : the_post();

<article class="post" id="post-<?php the_ID(); ?>">
    <aside class="post_image">
        <?php
        if ( has_post_thumbnail() ) {
            the_post_thumbnail();
        } else { ?>
            <a href="<?php the_permalink() ?>"><img src="<?php bloginfo('template_directory');?>/images/noImage.gif" title="<?php the_title(); ?>" /></a>
        <?php }?>
    </aside>
    <section class="post_content">
        <h1><a href="<?php the_permalink() ?>" rel="bookmark" title="<?php the_title(); ?>"><?php the_title(); ?></a></h1>
        <p><?php echo get_the_excerpt(); ?></p>
        <a href="<?php the_permalink() ?>" rel="bookmark" title="<?php the_title(); ?>" class="read_more ">Read More</a>
    </section>
    <section class="meta">

    <p> <?php the_category(',') ?></p>

    <p><?php the_tags(""); ?></p>

    </section>
</article>
  <?php endwhile; else: ?>
  <p>
    <?php _e('Sorry, no posts matched your criteria.'); ?>
  </p>
  <?php endif; ?>

  <?php posts_nav_link(' ⏼ ', __('« Newer Posts'), __('Older Posts »')); ?>
</section>
第 3 步 处理 sidebar.php
我们将在侧边栏中使用 <aside> 而不是 div,例如:
XHTML 中的 sidebar.php
<div id="sidebar">...</div>
使用<aside>后变成如下。
HTML5 中的 sidebar.php
<aside id="sidebar">...</aside<
这很简单!


第 4 步 footer.php 编辑
我们将在 footer.php 中使用 <footer> 语义标签而不是简单的 div,例如:
XHTML 中的 footer.php
<div id="footer">
<div id="foot_widgets">...</div>
<div id="copyright">...</div>
</div>
<?php wp_footer(); ?>
</body>
</html>


HTML5 中的 footer.php
<footer id="footer">
<section id="foot_widgets">...</section>
<section id="foot_widgets">...</section>
<section id="foot_widgets">...</section>
<div id="copyright">...</div>
</footer>
<?php wp_footer(); ?>
</body>
</html>
第 5 步处理 single.php
single.php 没有什么特别的变化,所以我只是粘贴更改后的代码,这可能对一些初学者有帮助。我在其中使用了 section 和 article 标签。如果您愿意,您还可以使用 <time> 标签。
XHTML 中的 single.php
<?php get_header(); ?>
<?php if (have_posts()) : while (have_posts()) : the_post(); ?>

<div class="container">
<div class="breadcrumbs"><?php the_breadcrumb(''); ?></div>
    <div class="content">
        <h1><a href="<?php the_permalink() ?>" rel="bookmark" title="<?php the_title(); ?>"><?php the_title(); ?></a></h1>

        <div id="entry-content-single">
          <?php the_content('<p >Read More</p>'); ?>
        </div>
        <div class="meta"> Posted by:
          <?php the_author() ?>
          <?php edit_post_link(__('Edit This')); ?>

          <p><?php the_tags(""); ?></p>
        </div>
        <div class="clearfix"></div>
    </div>

  <!-- End of post -->
</div></div>


<?php get_footer(); ?>


HTML5 中的 single.php
<?php get_header(); ?>
<?php if (have_posts()) : while (have_posts()) : the_post(); ?>

<section class="content">
<div class="breadcrumbs"><?php the_breadcrumb(''); ?></div>
    <article class="box">
        <h1><a href="<?php the_permalink() ?>" rel="bookmark" title="<?php the_title(); ?>"><?php the_title(); ?></a></h1>

        <section id="entry-content-single">
          <?php the_content('<p>Read More</p>'); ?>
        </section>
        <section class="meta"> Posted by:
          <?php the_author() ?>
          <?php edit_post_link(__('Edit This')); ?>

          <p><?php the_tags(""); ?></p>
        </section>
        <div class="clearfix"></div>
    </article>
  <!-- end post -->
</section></div>

<?php get_footer(); ?>
注意: 关于SEO,有些人在帖子标题之前使用 <header class="entry-header"> ,这也是一个很好的做法。
第6步最后是style.css
最终我们关心的是向后兼容性问题。出于对旧版浏览器的安全考虑,HTML5 元素应使用 display: block 样式显示为块。只需将以下代码放在 style.css 的顶部即可:
header, nav, section, article, aside, figure, footer { display: block; }
附加说明
如果您使用嵌入到模板文件中的音频或视频,则必须使用 HTML5 音频和视频元素。可以在下面的备忘单中查看更多标签。每当您添加一些新功能时,请研究一下如何使用其语义标签将其添加到 HTML5 中。
HTML5 资源
- HTML5 备忘单
- HTML5 教程
- HTML5 演示
一些 HTML5 免费主题
- 二十一点
- Yoko
- 15 个主题和框架
现在轮到你了
您要使用 HTML5 吗?您是否已更改为 HTML5?这些更改是否会影响您的 SEO 排名?请在下面的评论中告诉我们!
Atas ialah kandungan terperinci Tukar tema WordPress anda kepada HTML5. Untuk maklumat lanjut, sila ikut artikel berkaitan lain di laman web China PHP!

Alat AI Hot

Undresser.AI Undress
Apl berkuasa AI untuk mencipta foto bogel yang realistik

AI Clothes Remover
Alat AI dalam talian untuk mengeluarkan pakaian daripada foto.

Undress AI Tool
Gambar buka pakaian secara percuma

Clothoff.io
Penyingkiran pakaian AI

Video Face Swap
Tukar muka dalam mana-mana video dengan mudah menggunakan alat tukar muka AI percuma kami!

Artikel Panas

Alat panas

Notepad++7.3.1
Editor kod yang mudah digunakan dan percuma

SublimeText3 versi Cina
Versi Cina, sangat mudah digunakan

Hantar Studio 13.0.1
Persekitaran pembangunan bersepadu PHP yang berkuasa

Dreamweaver CS6
Alat pembangunan web visual

SublimeText3 versi Mac
Perisian penyuntingan kod peringkat Tuhan (SublimeText3)

Topik panas
 1389
1389
 52
52
 Adakah WordPress mudah untuk pemula?
Apr 03, 2025 am 12:02 AM
WordPress mudah untuk pemula bermula. 1. Selepas log masuk ke latar belakang, antara muka pengguna adalah intuitif dan papan pemuka mudah menyediakan semua pautan fungsi yang diperlukan. 2. Operasi asas termasuk mencipta dan mengedit kandungan. Editor WYSIWYG memudahkan penciptaan kandungan. 3. Pemula boleh mengembangkan fungsi laman web melalui pemalam dan tema, dan lengkung pembelajaran wujud tetapi boleh dikuasai melalui amalan.
 Cara Memulakan Blog WordPress: Panduan Langkah demi Langkah untuk Pemula
Apr 17, 2025 am 08:25 AM
Blog adalah platform yang ideal untuk orang ramai untuk menyatakan pendapat, pendapat dan pendapat mereka dalam talian. Ramai pemula bersemangat untuk membina laman web mereka sendiri tetapi teragak -agak untuk bimbang tentang halangan teknikal atau isu kos. Walau bagaimanapun, apabila platform terus berkembang untuk memenuhi keupayaan dan keperluan pemula, kini mula menjadi lebih mudah dari sebelumnya. Artikel ini akan membimbing anda langkah demi langkah bagaimana untuk membina blog WordPress, dari pemilihan tema untuk menggunakan plugin untuk meningkatkan keselamatan dan prestasi, membantu anda membuat laman web anda dengan mudah. Pilih topik dan arah blog Sebelum membeli nama domain atau mendaftarkan tuan rumah, sebaiknya mengenal pasti topik yang anda rancangkan. Laman web peribadi boleh berputar di sekitar perjalanan, memasak, ulasan produk, muzik atau hobi yang mencetuskan minat anda. Memfokuskan pada bidang yang anda benar -benar berminat dapat menggalakkan penulisan berterusan
 Apa yang baik untuk WordPress?
Apr 07, 2025 am 12:06 AM
WordpressisgoodforvirtualyWebprojectduetoitsversatilityasacms.itexcelsin: 1) keramahan pengguna, membolehkan mudah
 Bolehkah saya belajar WordPress dalam 3 hari?
Apr 09, 2025 am 12:16 AM
Boleh belajar WordPress dalam masa tiga hari. 1. Menguasai pengetahuan asas, seperti tema, pemalam, dan lain-lain. 2. Memahami fungsi teras, termasuk prinsip pemasangan dan kerja. 3. Belajar penggunaan asas dan lanjutan melalui contoh. 4. Memahami teknik debugging dan cadangan pengoptimuman prestasi.
 Sekiranya saya menggunakan Wix atau WordPress?
Apr 06, 2025 am 12:11 AM
Wix sesuai untuk pengguna yang tidak mempunyai pengalaman pengaturcaraan, dan WordPress sesuai untuk pengguna yang mahukan lebih banyak keupayaan kawalan dan pengembangan. 1) Wix menyediakan editor drag-and-drop dan templat yang kaya, menjadikannya mudah untuk membina sebuah laman web dengan cepat. 2) Sebagai CMS sumber terbuka, WordPress mempunyai ekosistem komuniti dan plug-in yang besar, menyokong penyesuaian dan pengembangan yang mendalam.
 Berapakah kos WordPress?
Apr 05, 2025 am 12:13 AM
WordPress sendiri adalah percuma, tetapi kos tambahan untuk digunakan: 1. WordPress.com menawarkan pakej dari percuma hingga dibayar, dengan harga dari beberapa dolar sebulan hingga berpuluh -puluh dolar; 2. WordPress.org memerlukan membeli nama domain (10-20 dolar AS setahun) dan perkhidmatan hosting (5-50 dolar AS sebulan); 3. Kebanyakan pemalam dan tema adalah percuma, dan harga berbayar adalah antara berpuluh-puluh dan beratus-ratus dolar; Dengan memilih perkhidmatan hosting yang betul, menggunakan plug-in dan tema yang munasabah, dan mengekalkan dan mengoptimumkan secara teratur, kos WordPress dapat dikawal dan dioptimumkan dengan berkesan.
 Adakah WordPress masih percuma?
Apr 04, 2025 am 12:06 AM
Versi teras WordPress adalah percuma, tetapi yuran lain mungkin ditanggung semasa penggunaan. 1. Nama domain dan perkhidmatan hosting memerlukan pembayaran. 2. Tema lanjutan dan pemalam boleh dikenakan. 3. Perkhidmatan profesional dan ciri -ciri canggih boleh dikenakan.
 Mengapa ada yang menggunakan WordPress?
Apr 02, 2025 pm 02:57 PM
Orang memilih untuk menggunakan WordPress kerana kuasa dan fleksibiliti. 1) WordPress adalah CMS sumber terbuka dengan kemudahan penggunaan dan skalabiliti yang kuat, sesuai untuk pelbagai keperluan laman web. 2) Ia mempunyai tema dan plugin yang kaya, ekosistem yang besar dan sokongan komuniti yang kuat. 3) Prinsip kerja WordPress adalah berdasarkan tema, pemalam dan fungsi teras, dan menggunakan PHP dan MySQL untuk memproses data, dan menyokong pengoptimuman prestasi.


