
 Database
Mysql Tutorial
Detailed explanation of MySQL's master-slave replication, read-write separation, backup and recovery
Database
Mysql Tutorial
Detailed explanation of MySQL's master-slave replication, read-write separation, backup and recovery
Detailed explanation of MySQL's master-slave replication, read-write separation, backup and recovery
1. MySQL master-slave replication
1. Introduction
Why do we use master-slave replication?
Purpose of master-slave replication:
can do real-time backup of the database to ensure data integrity;
can separate reading and writing, the master server only writes, and the slave server only writes Read, which can improve overall performance.
Principle diagram: 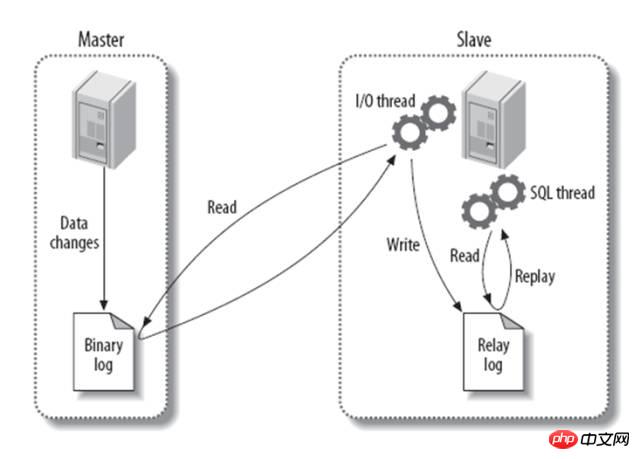
As can be seen from the above figure, synchronization is completed by synchronous reading and writing of log files.
#2. Change the configuration file
Operate the machine for two days, make sure the server-id is different, usually the main server The ID should be smaller than the secondary ID. Be sure to pay attention.
# 3306和3307分别代表2台机器
# 打开log-bin,并使server-id不一样
#vim /data/3306/my.cnf
log-bin = /data/3306/mysql-bin
server-id = 1
#vim /data/3307/my.cnf
log-bin = /data/3307/mysql-bin
server-id = 3
#检查
1、
[root@bogon ~]# egrep "log-bin|server-id" /data/3306/my.cnf
log-bin = /data/3306/mysql-bin
server-id = 1
[root@bogon ~]# egrep "log-bin|server-id" /data/3307/my.cnf
log-bin = /data/3307/mysql-bin
server-id = 3
2、
[root@localhost ~]# mysql -uroot -p -S /data/3306/mysql.sock -e "show variables like 'log_bin';"
Enter password:
+--------+--------+
| Variable_name | Value |
+--------+--------+
| log_bin    | ON |  # ON 为开始开启成功
+--------+--------+
3. Establish an account for slave replication. rep
Usually create a dedicated account for master-slave replication. Do not Forget authorization.
# 主库授权,允许从库来连接我取日志
[root@localhost ~]# mysql -uroot -p -S /data/3306/mysql.sock
Enter password:
# 允许从库192.168.200网段连接,账号rep,密码nick。
mysql> grant replication slave on *.* to 'rep'@'192.168.200.%' identified by 'nick';
Query OK, 0 rows affected (0.00 sec)
mysql> flush privileges;
Query OK, 0 rows affected (0.00 sec)
# 检查创建的rep账号:
mysql> select user,host from mysql.user;
+-----+-------------+
| user | host       |
+-----+--------------+
| root | 127.0.0.1     |
| rep | 192.168.200.%   |
| root | localhost      |
| root | localhost.localdomain |
+-----+------------------+
7  rows in set (0.00 sec)
4. Back up the main database and restore it to the slave database
Back up the existing data in the master database and restore it to the slave database , at this time the data of the two hosts are consistent.
If you have data in advance, you must not forget this.
#1) Lock the main library so that it only has read-only permissions.
mysql> flush table with read lock;
Query OK, 0 rows affected (0.00 sec)
#5.1、5.5锁表命令略有不同。
# 5.1锁表:flush tables with read lock;
# 5.5锁表:flush table with read lock;
2) Remember to back up at this point.
mysql> show master status;
+-------+------+--------+---------+
| File       | Position | Binlog_Do_DB | Binlog_Ignore_DB |
+-------+------+--------+---------+
| mysql-bin.000013 |  410 |       |        |
+-------+------+--------+---------+
1 row in set (0.00 sec)
3) Clone the window and back up the data.
[root@bogon ~]# mysqldump -uroot -p -S /data/3306/mysql.sock -A -B --events --master-data=2|gzip >/opt/rep.sql.gz
Enter password:
参数:  -A:备份所有的
#看rep.sql.gz参数
vim /opt/rep.sql.gz
-- CHANGE MASTER TO MASTER_LOG_FILE='mysql-bin.000013', MASTER_LOG_POS=410;
4) Check the master status; whether the value is normal.
mysql> show master status;
+------+------+---------+-------+
| File      | Position | Binlog_Do_DB | Binlog_Ignore_DB |
+-------+-----+---------+--------+
| mysql-bin.000013 |  410 |      |        |
+--------+----+---------+--------+
1 row in set (0.00 sec)
5)Unlock the library
mysql> unlock tables;
Query OK, 0 rows affected (0.00 sec)
6)Restore to the slave library
[root@bogon ~]# gunzip < /opt/rep.sql.gz | mysql -uroot -p -S /data/3307/mysql.sock
Enter password:
5. Configure the slave library and take effect
Change the connection parameters of the slave library and the main library, and the configuration will take effect. The inspection was successful!
#1) Enter the slave library.
[root@bogon ~]# mysql -uroot -p -S /data/3307/mysql.sock
Enter password:
2) Change the parameters used by the slave server to connect and communicate with the master server.
mysql> CHANGE MASTER TO
   MASTER_HOST='192.168.200.98',
   MASTER_PORT=3306,
   MASTER_USER='rep',
   MASTER_PASSWORD='nick',
   MASTER_LOG_FILE='mysql-bin.000013',
   MASTER_LOG_POS=410;
Query OK, 0 rows affected (0.01 sec)
3) View the changed parameters.
[root@localhost ~]# cd /data/3307/data/
[root@localhost data]# cat master.info
18
mysql-bin.000013
410
192.168.200.98
REP
nick
3306
60
0
0
1800.000
0
4) Effective!
mysql> start slave;
Query OK, 0 rows affected (0.01 sec)
5) Check the following parameters, if they match, it is normal!
mysql> show slave status\G
Relay_Master_Log_File: mysql-bin.000013
       Slave_IO_Running: Yes    #取logo。
      Slave_SQL_Running: Yes    #读relay-bin、logo,写数据。
Seconds_Behind_Master: 0 #落后主库的秒数。6) View relay-bin.logo.
[root@localhost 3307]# cd /data/3307
[root@localhost 3307]# ll
总用量 48
drwxr-xr-x. 9 mysql mysql 4096 10月 29 18:52 data
-rw-r--r--. 1 mysql mysql 1900 10月 29 11:45 my.cnf
-rwx------. 1 root root  1307 10月 20 17:06 mysql
-rw-rw----. 1 mysql mysql   6 10月 29 11:00 mysqld.pid
-rw-r-----. 1 mysql mysql 15090 10月 29 18:49 mysql_nick3307.err
srwxrwxrwx. 1 mysql mysql   0 10月 29 11:00 mysql.sock
-rw-rw----. 1 mysql mysql  150 10月 29 18:49 relay-bin.000001
-rw-rw----. 1 mysql mysql  340 10月 29 18:52 relay-bin.000002
-rw-rw----. 1 mysql mysql  56 10月 29 18:49 relay-bin.index
-rw-rw----. 1 mysql mysql  53 10月 29 18:52 relay-log.info
7) View relay-log.info.
[root@localhost 3307]# cat relay-log.info
/data/3307/relay-bin.000002
340
mysql-bin.000013
497
8) View master.info.
[root@localhost 3307]# cat data/master.info
18
mysql-bin.000013
497
192.168.200.98
rep
nick
3306
60
0
0
1800.000
0
6. Read-write separation
Read-write separation is common in production environments and is also a necessary skill.
Ignore MySQL master-slave replication authorization table synchronization and read-write separation.
[root@bogon 3306]# vim my.cnf
#添加以下四行
replicate-ignore-db = mysql
binlog-ignore-db = mysql
binlog-ignore-db = performance_schema
binlog-ignore-db = information_schema
server-id = 1
1) Method to prevent data from being written to the slave library through the read-only parameter.
#修改配置文件。
vim /data/3307/my.cnf
[mysqld]
read-only
#对用户授权事不能指定有super或all privileges权限。不然没效果。
#创建账户suoning,并刷新权限。
mysql> grant select,insert,update,delete on *.* to 'suoning'@'localhost' identified by '123';
Query OK, 0 rows affected (0.00 sec)
mysql> flush privileges;
Query OK, 0 rows affected (0.00 sec)
#用创建账户登录,并创建库
[root@bogon 3307]# mysql -usuoning -p123 -S /data/3307/mysql.sock
mysql> create user kangkangkang@'192.%' identified by 'old123';
ERROR 1290 (HY000): The MySQL server is running with the --read-only option so it cannot execute this statement
2) Master-slave synchronization failure
A. Last_SQL_Errno: 1007
stop slave;
set global sql_slave_skip_counter = 1;
start slave;
B.忽略
skip-name-resolve    #忽略名字解析
slave-skip-errors = 1032,1062,1007  #忽略故障编号
server-id = 3
3) Open bin-log from the library
vim my.cnf
log-bin = /data/3307/mysql-bin
log-slave-updates      #表示从库记录bin-log
expire_logs_days = 7    #保留7天bin-log。
7. Master downtime
Let’s simulate it. If the host goes down, how can we quickly replace the slave? Minimize losses? Of course, dual-machine hot backup is also a good choice, which will be explained to you in the next section.
In an environment with one master and multiple slaves, if the master goes down, choose one slave to be the master and continue to synchronize with other slaves.
A.查看每个从库的master.info,看谁的更靠前,最新,更大,丢的数据最少。
[root@localhost 3307]# cat /data/3307/data/master.info
mysql-bin.000015
326
B.确保所有relay log全部更新完毕。
在每个从库上执行stop slave io_thread;show processlist;
知道看到Has read all relay log;表示从库更新都执行完毕。
C.登陆mysql -uroot -p -S /data/3307/mysql.sock
stop slave;
reset master;
quit
D.进入到数据库目录,删除master.info relay-log.info
cd /data/3307/data/
rm -f master.info relay-log.info
E. 3307提升为主库
vim /data/3307/my.cnf
开启log-bin = /data/3307/mysql-bin
如存在log-slave-updates,read-only等一定要注释。
/data/3307/mysql restart
F.其它从库操作
stop slave;
change master to master_host ='192.168.200.98';
start slave;
show slave status\G
8. Dual-primary
Use primary-primary premise: the primary key of the table increases automatically.
In the case of dual masters, the ID will be like this. The ID is written to the library M1: 1, 3, 5 and M2: 2, 4, 6 through the program.
[root@localhost 3307]# vim my.cnf [mysqld] auto_increment_increment = 2 auto_increment_offset = 2 [root@localhost 3307]# ./mysql restart [root@localhost 3306]# vim my.cnf [mysqld] auto_increment_increment = 2 auto_increment_offset = 1 log-bin = /data/3306/mysql-bin log-slave-updates [root@localhost 3306]# ./mysql restart [root@localhost 3306]# mysqldump -uroot -pnick -S /data/3307/mysql.sock -A -B --master-data=1 -x --events > /opt/3307bak.sql [root@localhost 3306]# mysql -uroot -pnick -S /data/3306/mysql.sock < /opt/3307bak.sql mysql> CHANGE MASTER TO MASTER_HOST='192.168.200.98', MASTER_PORT=3307, MASTER_USER='rep', MASTER_PASSWORD='nick'; mysql> start slave; Query OK, 0 rows affected (0.00 sec) mysql> show slave status \G
2. MySQL backup and recovery
1. Back up a single database
The most basic backup of a single database.
1>语法:mysqldump –u 用户名 –p 数据库名> 备份的数据库名 2>备份nick_defailt数据库,查看内容。 [root@localhost ~]# mysqldump -uroot -p -B nick_defailt >/opt/mysql_nick_defailt.bak Enter password: [root@localhost ~]# egrep -v "#|\*|--|^$" /opt/mysql_nick_defailt.bak DROP TABLE IF EXISTS `oldsuo`; CREATE TABLE `oldsuo` ( `id` int(4) NOT NULL, `name` char(20) NOT NULL, `age` tinyint(2) NOT NULL DEFAULT '0', `dept` varchar(16) DEFAULT NULL ) ENGINE=MyISAM DEFAULT CHARSET=latin1; LOCK TABLES `oldsuo` WRITE; INSERT INTO `oldsuo` VALUES (2,'ç´¢å®',0,NULL),(3,'索尼',0,NULL),(4,'底底',0,NULL); UNLOCK TABLES; DROP TABLE IF EXISTS `student`; CREATE TABLE `student` ( `qq` varchar(15) DEFAULT NULL, `id` int(4) NOT NULL AUTO_INCREMENT, `name` char(20) NOT NULL, `suo` int(4) DEFAULT NULL, `age` tinyint(2) NOT NULL DEFAULT '0', `dept` varchar(16) DEFAULT NULL, `sex` char(4) DEFAULT NULL, PRIMARY KEY (`id`), KEY `index_name` (`name`) ) ENGINE=MyISAM AUTO_INCREMENT=8 DEFAULT CHARSET=latin1; LOCK TABLES `student` WRITE; INSERT INTO `student` VALUES (NULL,2,'oldsuo',NULL,0,NULL,NULL),(NULL,3,'kangknag',NULL,0,NULL,NULL),(NULL,4,'kangkang',NULL,0,NULL,NULL),(NULL,5,'oldsuo',NULL,0,NULL,NULL),(NULL,6,'kangknag',NULL,0,NULL,NULL),(NULL,7,'kangkang',NULL,0,NULL,NULL); UNLOCK TABLES; 3>启用压缩备份数据库 [root@localhost~]#mysqldump -uroot -p -B nick_defailt|gzip>/opt/mysql_nick_defailt.bak.gz Enter password: [root@localhost ~]# ll /opt/ 总用量 28 -rw-r--r--. 1 root root 2109 10月 24 16:36 data_bak.sq2 -rw-r--r--. 1 root root 2109 10月 24 16:36 data_bak.sql -rw-r--r--. 1 root root 1002 10月 27 11:55 mysql_nick_defailt.bak -rw-r--r--. 1 root root 1002 10月 27 11:56 mysql_nick_defailt.bak.gz -rw-r--r--. 1 root root 3201 10月 27 11:46 mysql_nick_defailt_B.bak drwxr-xr-x. 2 root root 4096 11月 22 2013 rh -rw-r--r--. 1 root root 1396 10月 24 16:11 student_bak.sql 4>恢复nick_defailt数据库 [root@localhost ~]# mysql -uroot -p nick_defailt </opt/mysql_nick_defailt.bak Enter password: #加-B恢复方法 [root@localhost ~]# mysql -uroot -p </opt/mysql_nick_defailt_B.bak Enter password: 5>总结 1、备份用-B参数。增加use db,和create database的信息。 2、用gzip对备份的数据压缩。
2. Back up multiple databases
What about backing up multiple databases?
#多个数据库名中间加空格
[root@localhost ~]# mysqldump -uroot -p -B nick_defailt oldsuo oldsuo_1|gzip>/opt/mul.sql.gz
Enter password:
3. Back up single and multiple tables
What should I do if I back up single and multiple tables?
1>语法:mysqldump -u 用户名 -p 数据库名 表名 > 备份的文件名
[root@localhost ~]# mysqldump -uroot -p nick_defailt student >/opt/mysql_nick_defailt_student.bak
Enter password:
2>语法:mysqldump -u 用户名 -p 数据库名 表名1 表名2 > 备份的文件名
[root@localhost ~]# mysqldump -uroot -p nick_defailt student oldsuo >/opt/mysql_nick_defailt.bak
Enter password:
4. Parameters of mysqldump
Key parameters of mysqldump
-B指定多个库,增加建库语句和use语句。
--compact去掉注释,适合调试输出,生产不用。
-A 备份所有库。
-F刷新binlog日志。
--master-data 增加binlog日志文件名及对应的位置点。
-x,--lock-all-tables
-l,--locktables
-d 只备份表结构
-t 只备份数据
--single-transaction 适合innodb事务数据库备份。
5. Add Volume recovery
The important thing is coming. The production environment generally uses incremental backup and recovery; the so-called incremental means to continue to add data on the basis of the original data, without having to add it again every time. save time and energy.
A:增量恢复必备条件:
1.开启MySQL数据库log-bin参数记录binlog日志。
[root@localhost 3306]# grep log-bin /data/3306/my.cnf
log-bin = /data/3306/mysql-bin
2.存在数据库全备。
B:生产环境 mysqldump备份命令:
# 进行数据库全备,(生产环境还通过定时任务每日凌晨执行)
mysqldump -uroot -pnick -S /data/3306/mysql.sock --default-character-set=gbk --single-transaction -F -B nick |gzip >/server/backup/mysql_$(date +%F).sql.gz
# innodb引擎备份
mysqldump -u$MYUSER -p$MYPASS -S $MYSOCK -F --single-transaction -A -B |gzip >$DATA_FILE
# myisam引擎备份
mysqldump -u$MYUSER -p$MYPASS -S $MYSOCK -F -A -B --lock-all-tables |gzip >$DATA_FILE
C:恢复:
# 通过防火墙禁止web等应用向主库写数据或者锁表。让主库暂时停止更新,然后再进行恢复。
# 误操作删除nick库!
1.检查全备及binlog日志
[root@localhost 3306]# cd /server/backup/
[root@localhost backup]# gzip -d mysql_2015-10-31.sql.gz
[root@localhost backup]# vim mysql_2015-10-31.sql
[root@localhost backup]# grep -i "change" mysql_2015-10-31.sql
2. Immediately refresh and back up the binlog
[root@localhost 3306]# mysqladmin -uroot -pnick -S /data/3306/mysql.sock flush-logs
[root@localhost 3306]# cp /data/3306/mysql-bin.000030 /server/backup/
#误操作log-bin,倒数第二
[root@localhost backup]# mysqlbinlog -d nick mysql-bin.000030 >bin.sql  #导出为.sql格式。
[root@localhost backup]# vim bin.sql
找到语句drop database nick删除!!!(误操作语句)
3.Restore
[root@localhost backup]# mysql -uroot -pnick -S /data/3306/mysql.sock <mysql_2015-10-31.sql    #恢复之前的数据库全备
[root@localhost backup]# mysql -uroot -pnick -S /data/3306/mysql.sock nick < bin.sql
#恢复删除误操作语言的bin-log。
# 搞定!!!
The above is the entire content of this article. I hope that the content of this article can bring some help to everyone's study or work.
The above is the detailed content of Detailed explanation of MySQL's master-slave replication, read-write separation, backup and recovery. For more information, please follow other related articles on the PHP Chinese website!

Hot AI Tools

Undresser.AI Undress
AI-powered app for creating realistic nude photos

AI Clothes Remover
Online AI tool for removing clothes from photos.

Undress AI Tool
Undress images for free

Clothoff.io
AI clothes remover

Video Face Swap
Swap faces in any video effortlessly with our completely free AI face swap tool!

Hot Article
Hot Tools

Notepad++7.3.1
Easy-to-use and free code editor

SublimeText3 Chinese version
Chinese version, very easy to use

Zend Studio 13.0.1
Powerful PHP integrated development environment

Dreamweaver CS6
Visual web development tools

SublimeText3 Mac version
God-level code editing software (SublimeText3)
Hot Topics


 MySQL's Role: Databases in Web Applications
Apr 17, 2025 am 12:23 AM
MySQL's Role: Databases in Web Applications
Apr 17, 2025 am 12:23 AM
The main role of MySQL in web applications is to store and manage data. 1.MySQL efficiently processes user information, product catalogs, transaction records and other data. 2. Through SQL query, developers can extract information from the database to generate dynamic content. 3.MySQL works based on the client-server model to ensure acceptable query speed.
 How to start mysql by docker
Apr 15, 2025 pm 12:09 PM
How to start mysql by docker
Apr 15, 2025 pm 12:09 PM
The process of starting MySQL in Docker consists of the following steps: Pull the MySQL image to create and start the container, set the root user password, and map the port verification connection Create the database and the user grants all permissions to the database
 Laravel Introduction Example
Apr 18, 2025 pm 12:45 PM
Laravel Introduction Example
Apr 18, 2025 pm 12:45 PM
Laravel is a PHP framework for easy building of web applications. It provides a range of powerful features including: Installation: Install the Laravel CLI globally with Composer and create applications in the project directory. Routing: Define the relationship between the URL and the handler in routes/web.php. View: Create a view in resources/views to render the application's interface. Database Integration: Provides out-of-the-box integration with databases such as MySQL and uses migration to create and modify tables. Model and Controller: The model represents the database entity and the controller processes HTTP requests.
 Solve database connection problem: a practical case of using minii/db library
Apr 18, 2025 am 07:09 AM
Solve database connection problem: a practical case of using minii/db library
Apr 18, 2025 am 07:09 AM
I encountered a tricky problem when developing a small application: the need to quickly integrate a lightweight database operation library. After trying multiple libraries, I found that they either have too much functionality or are not very compatible. Eventually, I found minii/db, a simplified version based on Yii2 that solved my problem perfectly.
 How to install mysql in centos7
Apr 14, 2025 pm 08:30 PM
How to install mysql in centos7
Apr 14, 2025 pm 08:30 PM
The key to installing MySQL elegantly is to add the official MySQL repository. The specific steps are as follows: Download the MySQL official GPG key to prevent phishing attacks. Add MySQL repository file: rpm -Uvh https://dev.mysql.com/get/mysql80-community-release-el7-3.noarch.rpm Update yum repository cache: yum update installation MySQL: yum install mysql-server startup MySQL service: systemctl start mysqld set up booting
 Laravel framework installation method
Apr 18, 2025 pm 12:54 PM
Laravel framework installation method
Apr 18, 2025 pm 12:54 PM
Article summary: This article provides detailed step-by-step instructions to guide readers on how to easily install the Laravel framework. Laravel is a powerful PHP framework that speeds up the development process of web applications. This tutorial covers the installation process from system requirements to configuring databases and setting up routing. By following these steps, readers can quickly and efficiently lay a solid foundation for their Laravel project.
 MySQL and phpMyAdmin: Core Features and Functions
Apr 22, 2025 am 12:12 AM
MySQL and phpMyAdmin: Core Features and Functions
Apr 22, 2025 am 12:12 AM
MySQL and phpMyAdmin are powerful database management tools. 1) MySQL is used to create databases and tables, and to execute DML and SQL queries. 2) phpMyAdmin provides an intuitive interface for database management, table structure management, data operations and user permission management.
 Centos install mysql
Apr 14, 2025 pm 08:09 PM
Centos install mysql
Apr 14, 2025 pm 08:09 PM
Installing MySQL on CentOS involves the following steps: Adding the appropriate MySQL yum source. Execute the yum install mysql-server command to install the MySQL server. Use the mysql_secure_installation command to make security settings, such as setting the root user password. Customize the MySQL configuration file as needed. Tune MySQL parameters and optimize databases for performance.
