This article mainly introduces the graphic tutorial on the installation and configuration method of mysql 5.7.18 under CentOS 7 in detail. It has certain reference value. Interested friends can refer to
to introduce how to install and configure it. Install MySQL 5.7.18 under Linux
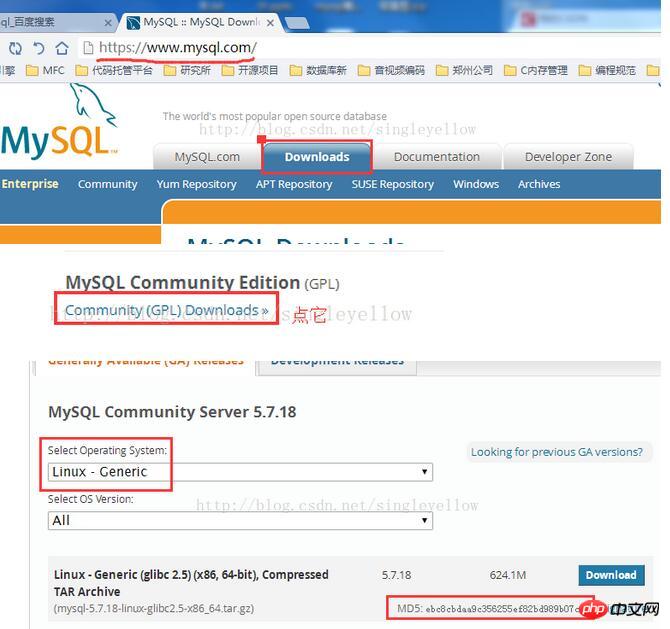
1. Download MySQL: official website www.mysql.com/, click Downlosas, scroll to the bottom of the page, download the community version, click all the way, select General Linux, download For the 64-bit one, pay attention to check the MD5
value.

2. Install the key steps, directly post the command
[cpp] view plain copy 在CODE上查看代码片派生到我的代码片
[root@CentOS MySQL]# tar -xzvf mysql-5.7.17-linux-glibc2.5-x86_64.tar.gz -C /usr/local
[root@CentOS MySQL]# cd /usr/local
[root@CentOS local]# mv mysql-5.7.17-linux-glibc2.5-x86_64 mysql
[root@CentOS local]# cd mysql
[root@CentOS mysql]# mkdir data
[root@CentOS mysql]# groupadd mysql
[root@CentOS mysql]# useradd -r -g mysql -s/bin/false mysql
[root@CentOS mysql]# chown -R mysql:mysql ./
[root@CentOS mysql]# bin/mysqld --initialize --user=mysql --basedir=/usr/local/mysql --datadir=/usr/local/mysql/data
2017-02-23T07:43:03.404885Z 0 [Warning] TIMESTAMP with implicit DEFAULT value is deprecated. Please use --explicit_defaults_for_timestamp server option (see documentation for more details).
2017-02-

23T07:43:04.442174Z 0 [Warning] InnoDB: New log files created, LSN=45790
2017-02-23T07:43:04.588507Z 0 [Warning] InnoDB: Creating foreign key constraint system tables.
2017-02-23T07:43:04.646721Z 0 [Warning] No

existing UUID has been found, so we assume that this is the first time that this server has been started. Generating a new UUID: b5c8e226-f99b-11e6-beb5-b7c1a1e39029.
2017-02-23T07:43:04.671492Z 0 [Warning]

Gtid table is not ready to be used. Table 'mysql.gtid_executed' cannot be opened.
2017-02-23T07:43:04.672338Z 1 [Note] A temporary password is generated for root@localhost: I%e=s+lfx9ko
[root@CentOS mysql]#

bin/mysql_ssl_rsa_setup --datadir=/usr/local/mysql/data
Generating a 2048 bit RSA private key
.....................................+++
..............................+++
writing new private key to 'ca-key.pem'
-----
Generating a 2048 bit RSA private key
.........................................+++
.........................+++
writing new private key to 'server-key.pem'
-----
Generating a 2048 bit RSA private key
..................................................+++
...................................................................................................................................................................................................+++
writing

new private key to 'client-key.pem'
-----
[root@CentOS mysql]# cd support-files
[root@CentOS support-files]# cp my-default.cnf /etc/my.cnf
[root@CentOS support-files]# gedit /etc/my.cnf
[root@CentOS support-files]# cp mysql.server /etc/init.d/mysqld
[root@CentOS support-files]# service mysqld start
Starting MySQL.Logging to '/usr/local/mysql/data/CentOS.cn.err'.
. SUCCESS!
[root@CentOS support-files]# ps aux |grep mysql
root  18279 0.0 0.0 11764 1576 pts/0 S 17:34 0:00 /bin/sh

/usr/local/mysql/bin/mysqld_safe --datadir=/usr/local/mysql/data --pid-file=/usr/local/mysql/data/CentOS.cn.pid
mysql  18449 1.9 9.5 1182688 177940 pts/0 Sl 17:34 0:00 /usr/local/mysql/bin/mysqld --

basedir=/usr/local/mysql --datadir=/usr/local/mysql/data --plugin-dir=/usr/local/mysql/lib/plugin --user=mysql --log-error=/usr/local/mysql/data/CentOS.cn.err --pid-file=/usr/local/mysql/data/CentOS.cn.pid

--socket=/tmp/mysql.sock --port=3306

[root@CentOS support-files]#
Explain line by line:
Extract the compressed package to In the /usr/local directory, MySQL is installed in this directory.
Switch to /usr/local and rename the unzipped folder to mysql.
Create a data folder in the mysql directory to store MySQL data.
Add user group mysql.
Add the user name mysql to the mysql group.
Modify the owner and group of the mysql directory.
Initialize MySQL in two steps:
The first step, bin/mysqld Pay attention to the parameters given later, one of them will generate a temporary password, save it , which will be used to log in to the database later;
The second step, bin/mysql_ssl_rsa_setup, looks like a database security process, pay attention to the parameters given later.
Switch to the support-files directory.
Copy my-default.cnf to /etc/my.cnf. Note that CentOS7 comes with a my.cnf file, so overwrite it.
Edit the file and only modify lines 18, 19, 20, and 22 as follows
Copy the mysql.server file to /etc/init.d/mysqld is mainly responsible for the startup of MySQL.
Start the mysqld process.
Query the mysql process. There are two: /mysql/bin/mysqld_safe, /mysql/bin/mysqld
##3. Subsequent configuration:
set password for 'root'@localhost=password('xxxxxx');
chkconfig --add mysqld #增加mysqld服务
chkconfig --list    #列出所有的系统服务
chkconfig --level 35 mysqld on
#设定mysqld在等级3和5为开机运行服务
The above is the detailed content of Graphical tutorial on the installation and configuration method of mysql 5.7.18 under CentOS 7. For more information, please follow other related articles on the PHP Chinese website!


