composer require phpmailer/phpmailer
2. Encapsulate the mail service class in ThinkPHP
I encapsulate it in the extension directory extend/Mail.php In the file, the content is as follows:
<?php
/**
* 邮件服务类
*/
class Mail extends \PHPMailer
{
function __construct()
{
date_default_timezone_set('PRC'); // 默认时区设置
$this->CharSet = config('mail.charset'); // 邮件编码设置
$this->isSMTP(); // 启用SMTP服务
$this->SMTPDebug = config('mail.smtp_debug'); // Debug模式级别
$this->Debugoutput = config('mail.debug_output'); // Debug输出类型
$this->Host = config('mail.host'); // SMTP服务器地址
$this->Port = config('mail.port'); // 端口号
$this->SMTPAuth = config('mail.smtp_auth'); // SMTP登录认证
$this->SMTPSecure = config('mail.smtp_secure'); // SMTP安全协议
$this->Username = config('mail.username'); // SMTP登录邮箱
$this->Password = config('mail.password'); // SMTP登录密码
$this->setFrom(config('mail.from'), config('mail.from_name')); // 发件人邮箱和名称
$this->addReplyTo(config('mail.reply_to'), config('mail.reply_to_name')); // 回复邮箱和名称
}
/**
* 发送邮件
* @param [type] $toMail 收件人地址
* @param [type] $toName 收件人名称
* @param [type] $subject 邮件主题
* @param [type] $content 邮件内容,支持html
* @param [type] $attachment 附件列表。文件路径或路径数组
* @return [type] 成功返回true,失败返回错误消息
*/
function sendMail($toMail, $toName, $subject, $content, $attachment = null)
{
$this->addAddress($toMail, $toName);
$this->Subject = $subject;
$this->msgHTML($content);
if($attachment) { // 添加附件
if(is_string($attachment)){
is_file($attachment) && $this->AddAttachment($attachment);
}
else if(is_array($attachment)){
foreach ($attachment as $file) {
is_file($file) && $this->AddAttachment($file);
}
}
}
if(!$this->send()){ // 发送
return $this->ErrorInfo;
}
else{
return true;
}
}
}Note: If you send an attachment, it is recommended to use the English path. Chinese paths may cause attachments to fail to be sent and emails received without attachments.
I put some of the configuration parameters required above in the extension configuration directory application/extra/mail.php file. The content is as follows:
<?php /** * 邮件服务相关配置 */ return [ 'charset' => 'utf-8', // 邮件编码 'smtp_debug' => 0, // Debug模式。0: 关闭,1: 客户端消息,2: 客户端和服务器消息,3: 2和连接状态,4: 更详细 'debug_output' => 'html', // Debug输出类型。`echo`(默认),`html`,或`error_log` 'host' => 'smtp.126.com', // SMTP服务器地址 'port' => 465, // 端口号。默认25 'smtp_auth' => true, // 启用SMTP认证 'smtp_secure' => 'ssl', // 启用安全协议。''(默认),'ssl'或'tls',留空不启用 'username' => 'yourname@example.com', // SMTP登录邮箱 'password' => 'yourpassword', // SMTP登录密码。126邮箱使用客户端授权码,QQ邮箱用独立密码 'from' => 'from@example.com', // 发件人邮箱 'from_name' => 'name', // 发件人名称 'reply_to' => '', // 回复邮箱的地址。留空取发件人邮箱 'reply_to_name' => '', // 回复邮箱人名称。留空取发件人名称 ];
Note: Generally, the default port is 25. If the security protocol ssl is used, the port number is usually 465 or 587. For example, 126 mailbox. It is recommended to use a secure protocol, because Alibaba Cloud servers prohibit port 25 of non-secure protocols.
3. Test
In the method in the controller, add the test code:
public function mail()
{
$mail = new \Mail;
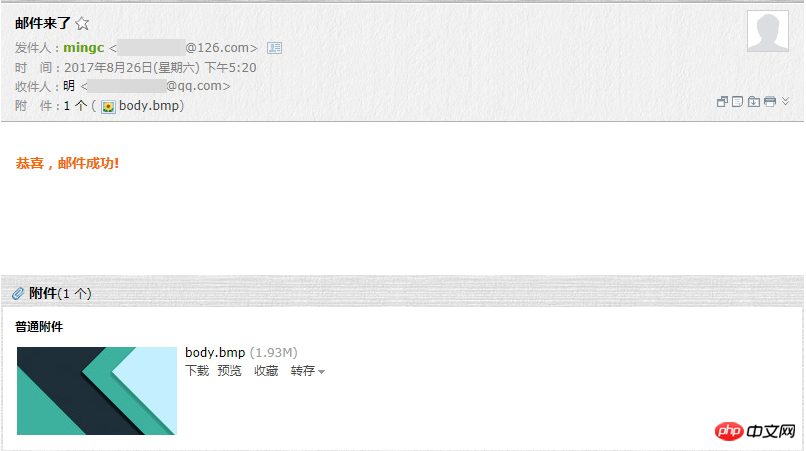
$ok = $mail->sendMail('xxxxxxxxx@qq.com', 'mingc', '邮件来了', '<p style="color: #f60; font-weight: 700;">恭喜,邮件成功!</p>', 'C:/Users/Administrator/Desktop/body.bmp');
var_dump($ok);
}Here I use 126 email, security protocol ssl, port number 465, sending html content, test successful:

The above is the detailed content of How to send emails using ThinkPHP5. For more information, please follow other related articles on the PHP Chinese website!


