

Writing APP interface (API) in laravel

This article mainly introduces the relevant information about making APP interface (API) based on laravel. Friends in need can refer to it. I hope to be helpful.
Preliminary preparation
Foreword, why and what to do
My surname is Bai, and I am a novice in programming. However, since I came into contact with the wonderful thing of programming in my freshman year, I have been completely immersed in the world of programming.
No, I have started to mess with APPs recently. It is said that it is really easy to develop an APP now. It can be completed with only JavaScript and a little HTML+css technology. But the backend of the APP is different. After developing an APP and want to read some data into it, we have to develop a backend.
The laravel framework is my favorite PHP framework, bar none. Last year I used laravel to write my personal website, but the roughness made me blush. Okay, let’s not go into details, let’s go directly to the topic - install laravel first!
Basic environment configuration
For specific steps, please refer to the document directly. Laravel5.2 installation
My own environment is win10 Wampsrver2.5 is installed above, but it is worth paying attention to. If you use wampsrver2.5, these places need to be changed. Regarding this, please read my notes and click to preview
Tools: sublime
Browser: chrome (plug-in postman to be used)
About API
API (Application Programming Interface, Application Programming Interface) are predefined functions that provide applications and developers with the ability to access a set of routines based on certain software or hardware without accessing the source code, or Understand the details of the inner workings.
It should be noted that API has its specific purpose, and we should know what it does. What should be entered when accessing the API. What should you get after accessing the API.
When we start designing the API, we should pay attention to these 8 points
The content here is excerpted from the master's blog
The subsequent development plan will revolve around this. (Really great summary)
1.Restful design principles
2.API naming
3.API security
4.API return data
5.Pictures Processing
6. Returned prompt information
7. Online API test document
8. When the app starts, call an initialization API to obtain the necessary information
Use laravel development API
Just when I was worried about whether to start learning from scratch, I found this plug-in dingo/api, so let’s install it now!
First of all, it must be downloaded correctly
Add the following content to the newly installed laravel composer.json
Then open cmd and execute
composer update
In config/app.php Add
App\Providers\OAuthServiceProvider::class,
Dingo\Api\Provider\LaravelServiceProvider::class,
LucaDegasperi\OAuth2Server\Storage\FluentStorageServiceProvider::class,
LucaDegasperi\OAuth2Server\OAuth2ServerServiceProvider::class,
to the providers and add
'Authorizer' => LucaDegasperi\OAuth2Server\Facades\Authorizer::class,
to the aliases. Modify the content in the app/Http/Kernel.php file
protected $middleware = [\LucaDegasperi\OAuth2Server\Middleware\OAuthExceptionHandlerMiddleware::class,
];
protected $routeMiddleware = [
  'oauth' => \LucaDegasperi\OAuth2Server\Middleware\OAuthMiddleware::class,
  'oauth-user' => \LucaDegasperi\OAuth2Server\Middleware\OAuthUserOwnerMiddleware::class,
  'oauth-client' => \LucaDegasperi\OAuth2Server\Middleware\OAuthClientOwnerMiddleware::class,
  'check-authorization-params' => \LucaDegasperi\OAuth2Server\Middleware\CheckAuthCodeRequestMiddleware::class,
  'csrf' => \App\Http\Middleware\VerifyCsrfToken::class,
];
Then execute
php artisan vendor:publish
php artisan migrate
to add these configurations in the .env file
API_STANDARDS_TREE=x
API_SUBTYPE=rest
API_NAME=REST
API_PREFIX =api
API_VERSION=v1
API_CONDITIONAL_REQUEST=true
API_STRICT=false
API_DEBUG=true
API_DEFAULT_FORMAT=json
Modify the app\config\oauth2.php file
'grant_types' => [
  'password' => [
    'class' => 'League\OAuth2\Server\Grant\PasswordGrant',
    'access_token_ttl' => 604800,
    'callback' => '\App\Http\Controllers\Auth\PasswordGrantVerifier@verify',
  ],
],Create a new service provider, create a new OAuthServiceProvider.php file under app/Providers with the following contents
namespace App\Providers;

use Dingo\Api\Auth\Auth;
use Dingo\Api\Auth\Provider\OAuth2;
use Illuminate\Support\ServiceProvider;

class OAuthServiceProvider extends ServiceProvider
{
  public function boot()
  {
    $this->app[Auth::class]->extend('oauth', function ($app) {
      $provider = new OAuth2($app['oauth2-server.authorizer']->getChecker());

      $provider->setUserResolver(function ($id) {
        // Logic to return a user by their ID.
      });

      $provider->setClientResolver(function ($id) {
        // Logic to return a client by their ID.
      });

      return $provider;
    });
  }

  public function register()
  {
    //
  }
}Then open routes.php and add relevant routes
//Get access_token
Route::post('oauth/access_token', function() {
   return Response::json(Authorizer::issueAccessToken());
});

//Create a test user, you don't need this if you already have.
Route::get('/register',function(){
  $user = new App\User();
   $user->name="tester";
   $user->email="test@test.com";
   $user->password = \Illuminate\Support\Facades\Hash::make("password");
   $user->save();
});
$api = app('Dingo\Api\Routing\Router');

//Show user info via restful service.
$api->version('v1', ['namespace' => 'App\Http\Controllers'], function ($api) {
  $api->get('users', 'UsersController@index');
  $api->get('users/{id}', 'UsersController@show');
});

//Just a test with auth check.
$api->version('v1', ['middleware' => 'api.auth'] , function ($api) {
  $api->get('time', function () {
    return ['now' => microtime(), 'date' => date('Y-M-D',time())];
  });
});Create BaseController respectively The contents of .php and UsersController.php are as follows
//BaseController
namespace App\Http\Controllers;

use Dingo\Api\Routing\Helpers;
use Illuminate\Routing\Controller;

class BaseController extends Controller
{
  use Helpers;
}

//UsersController
namespace App\Http\Controllers;

use App\User;
use App\Http\Controllers\Controller;

class UsersController extends BaseController
{

  public function index()
  {
    return User::all();
  }

  public function show($id)
  {
    $user = User::findOrFail($id);
    // 数组形式
    return $this->response->array($user->toArray());
  }
}Then create PasswordGrantVerifier.php under app/Http/Controllers/Auth/ and the contents are as follows
namespace App\Http\Controllers\Auth;
use Illuminate\Support\Facades\Auth;

class PasswordGrantVerifier
{
  public function verify($username, $password)
  {
     $credentials = [
      'email'  => $username,
      'password' => $password,
     ];

     if (Auth::once($credentials)) {
       return Auth::user()->id;
     }

     return false;
  }
}Open the oauth_client table of the database and add a new client data
INSERT INTO 'oauth_clients' ('id', 'secret', 'name', 'created_at', 'updated_at') VALUES ('1', '2', 'Main website', '2016–03–13 23:00:00', '0000–00–00 00:00:00');
The next step is to have fun testing. The APIs to be tested here are
Add a new user
http://localhost/register
Read all user information
http://localhost/api/users
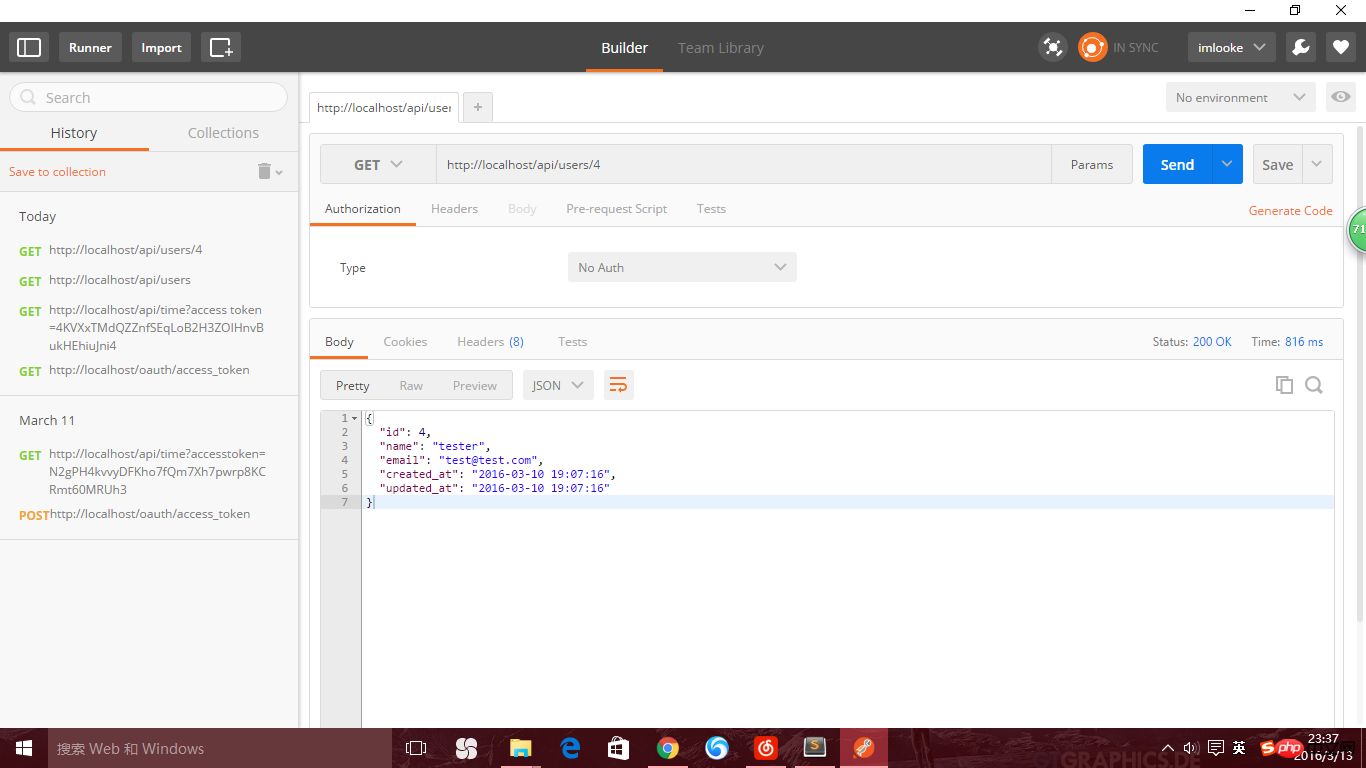
Only return information with user id 4
http ://localhost/api/users/4
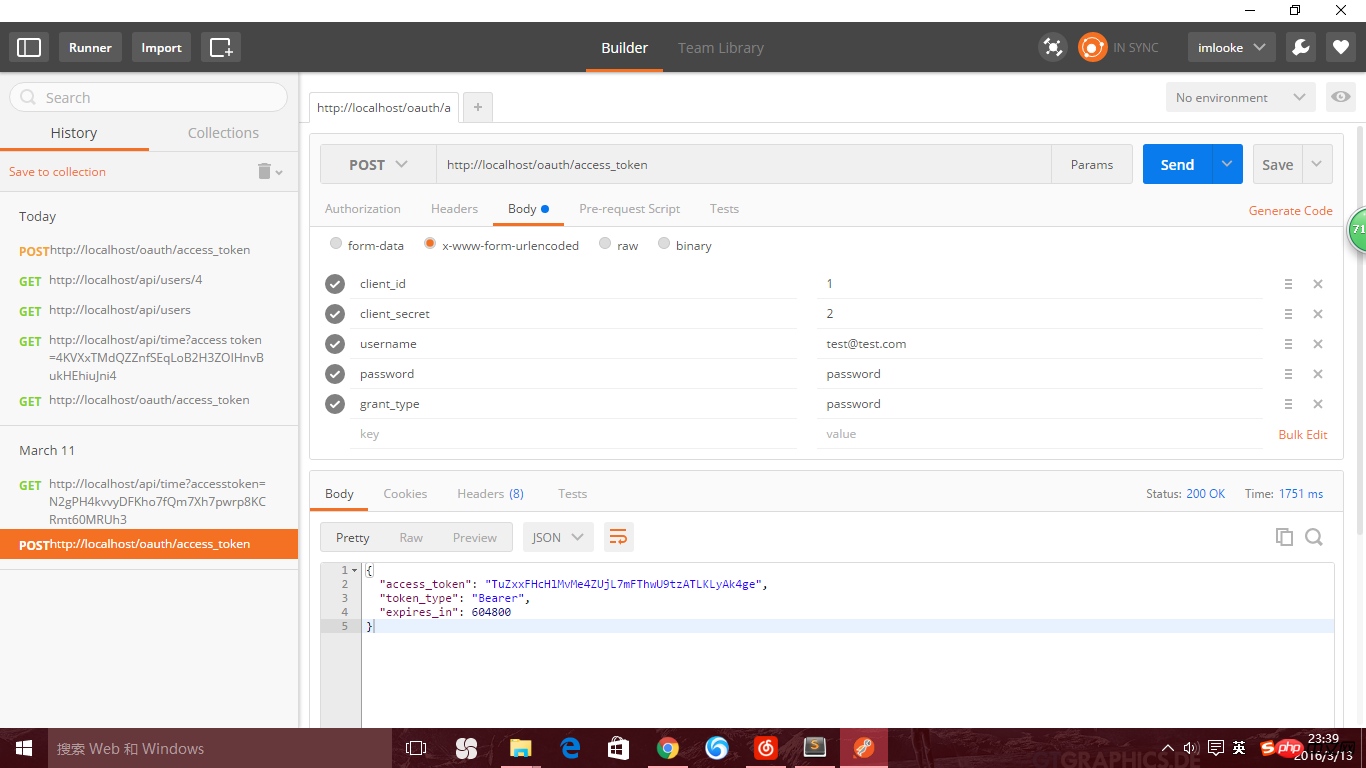
Get access_token
http://localhost/oauth/access_token
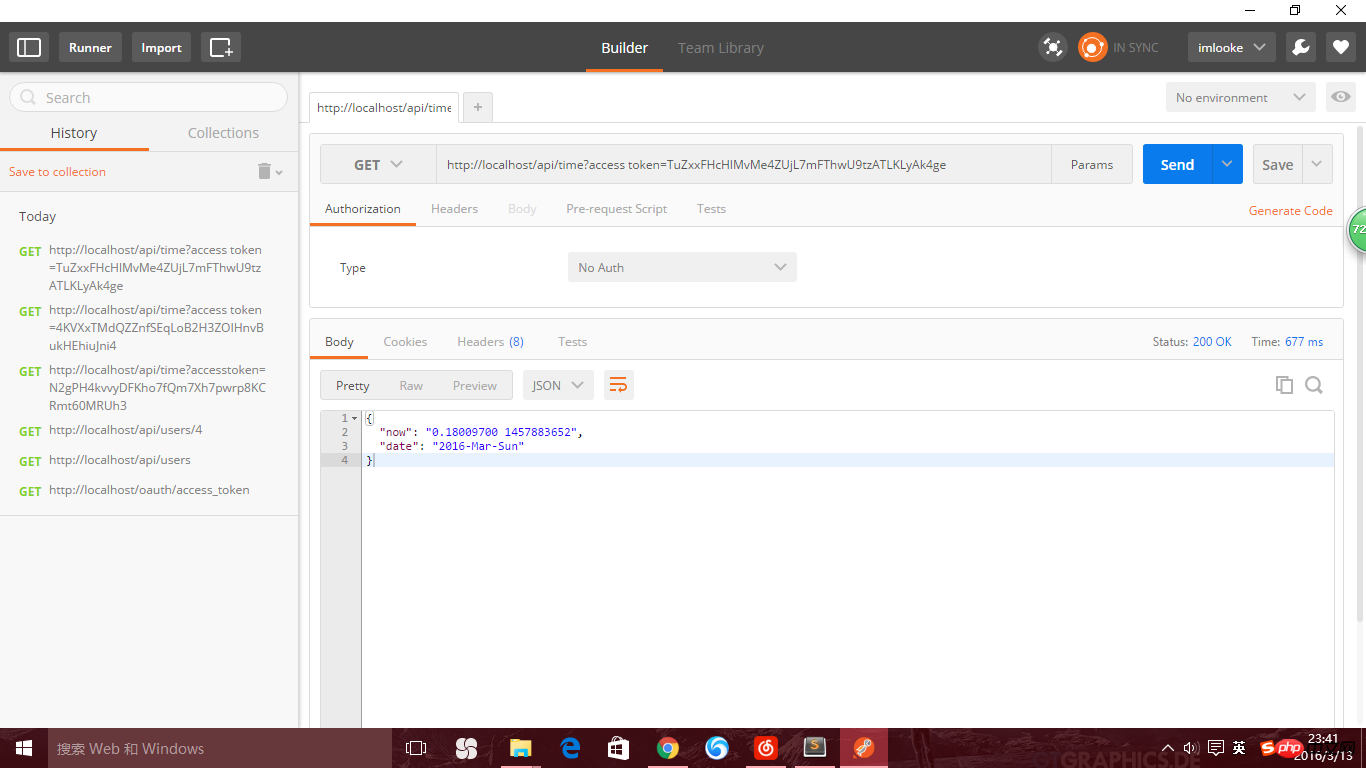
Use the token value to get the time , the correct value can be returned only if the token value is correct
http://localhost/api/time
Open PostMan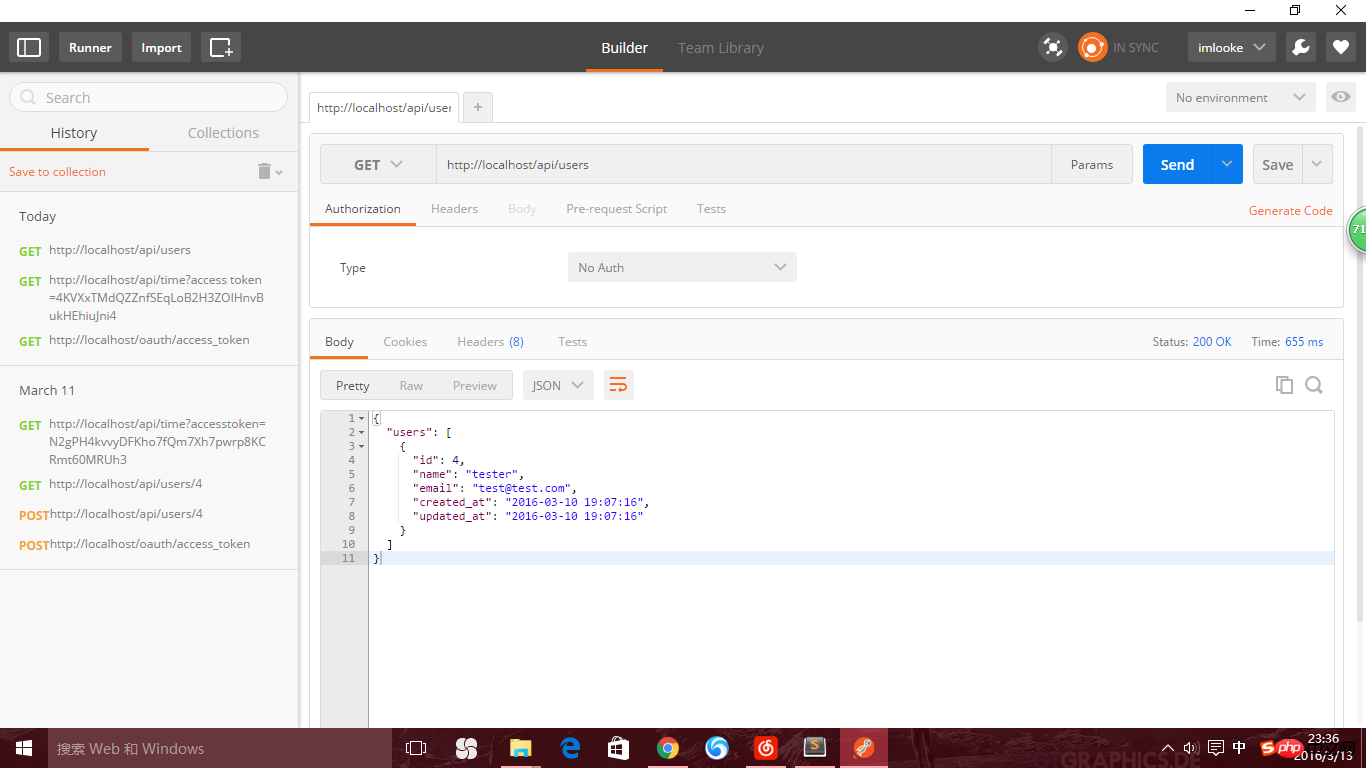
Related recommendations:
How to access paypal payment in larvel5
Learn Laravel5’s Eloquent relationship
The above is the detailed content of Writing APP interface (API) in laravel. For more information, please follow other related articles on the PHP Chinese website!

Hot AI Tools

Undresser.AI Undress
AI-powered app for creating realistic nude photos

AI Clothes Remover
Online AI tool for removing clothes from photos.

Undress AI Tool
Undress images for free

Clothoff.io
AI clothes remover

Video Face Swap
Swap faces in any video effortlessly with our completely free AI face swap tool!

Hot Article
Hot Tools

Notepad++7.3.1
Easy-to-use and free code editor

SublimeText3 Chinese version
Chinese version, very easy to use

Zend Studio 13.0.1
Powerful PHP integrated development environment

Dreamweaver CS6
Visual web development tools

SublimeText3 Mac version
God-level code editing software (SublimeText3)
Hot Topics
 1664
1664
 14
1423
52
1321
25
1269
29
1249
24
14
1423
52
1321
25
1269
29
1249
24

 Laravel Introduction Example
Apr 18, 2025 pm 12:45 PM
Laravel Introduction Example
Apr 18, 2025 pm 12:45 PM
Laravel is a PHP framework for easy building of web applications. It provides a range of powerful features including: Installation: Install the Laravel CLI globally with Composer and create applications in the project directory. Routing: Define the relationship between the URL and the handler in routes/web.php. View: Create a view in resources/views to render the application's interface. Database Integration: Provides out-of-the-box integration with databases such as MySQL and uses migration to create and modify tables. Model and Controller: The model represents the database entity and the controller processes HTTP requests.
 Solve caching issues in Craft CMS: Using wiejeben/craft-laravel-mix plug-in
Apr 18, 2025 am 09:24 AM
Solve caching issues in Craft CMS: Using wiejeben/craft-laravel-mix plug-in
Apr 18, 2025 am 09:24 AM
When developing websites using CraftCMS, you often encounter resource file caching problems, especially when you frequently update CSS and JavaScript files, old versions of files may still be cached by the browser, causing users to not see the latest changes in time. This problem not only affects the user experience, but also increases the difficulty of development and debugging. Recently, I encountered similar troubles in my project, and after some exploration, I found the plugin wiejeben/craft-laravel-mix, which perfectly solved my caching problem.
 How to learn Laravel How to learn Laravel for free
Apr 18, 2025 pm 12:51 PM
How to learn Laravel How to learn Laravel for free
Apr 18, 2025 pm 12:51 PM
Want to learn the Laravel framework, but suffer from no resources or economic pressure? This article provides you with free learning of Laravel, teaching you how to use resources such as online platforms, documents and community forums to lay a solid foundation for your PHP development journey from getting started to master.
 Laravel user login function
Apr 18, 2025 pm 12:48 PM
Laravel user login function
Apr 18, 2025 pm 12:48 PM
Laravel provides a comprehensive Auth framework for implementing user login functions, including: Defining user models (Eloquent model), creating login forms (Blade template engine), writing login controllers (inheriting Auth\LoginController), verifying login requests (Auth::attempt) Redirecting after login is successful (redirect) considering security factors: hash passwords, anti-CSRF protection, rate limiting and security headers. In addition, the Auth framework also provides functions such as resetting passwords, registering and verifying emails. For details, please refer to the Laravel documentation: https://laravel.com/doc
 Laravel framework installation method
Apr 18, 2025 pm 12:54 PM
Laravel framework installation method
Apr 18, 2025 pm 12:54 PM
Article summary: This article provides detailed step-by-step instructions to guide readers on how to easily install the Laravel framework. Laravel is a powerful PHP framework that speeds up the development process of web applications. This tutorial covers the installation process from system requirements to configuring databases and setting up routing. By following these steps, readers can quickly and efficiently lay a solid foundation for their Laravel project.
 How to view the version number of laravel? How to view the version number of laravel
Apr 18, 2025 pm 01:00 PM
How to view the version number of laravel? How to view the version number of laravel
Apr 18, 2025 pm 01:00 PM
The Laravel framework has built-in methods to easily view its version number to meet the different needs of developers. This article will explore these methods, including using the Composer command line tool, accessing .env files, or obtaining version information through PHP code. These methods are essential for maintaining and managing versioning of Laravel applications.
 What versions of laravel are there? How to choose the version of laravel for beginners
Apr 18, 2025 pm 01:03 PM
What versions of laravel are there? How to choose the version of laravel for beginners
Apr 18, 2025 pm 01:03 PM
In the Laravel framework version selection guide for beginners, this article dives into the version differences of Laravel, designed to assist beginners in making informed choices among many versions. We will focus on the key features of each release, compare their pros and cons, and provide useful advice to help beginners choose the most suitable version of Laravel based on their skill level and project requirements. For beginners, choosing a suitable version of Laravel is crucial because it can significantly impact their learning curve and overall development experience.
 The difference between laravel and thinkphp
Apr 18, 2025 pm 01:09 PM
The difference between laravel and thinkphp
Apr 18, 2025 pm 01:09 PM
Laravel and ThinkPHP are both popular PHP frameworks and have their own advantages and disadvantages in development. This article will compare the two in depth, highlighting their architecture, features, and performance differences to help developers make informed choices based on their specific project needs.
