Let me share with you the advanced usage of anyproxy, and share with you the analysis of how to improve the efficiency of collecting articles from public accounts. Friends who need it can refer to it.
The main influencing factors are the following:
1. Poor network environment;
2. The WeChat client crashes in the mobile phone or simulator;
3. Some other network transmission errors;
Because I pay more attention to the operating cost of the collection system, which includes hardware investment, computing power investment and occupied manual energy. Therefore, the stability of operation must be improved. Therefore, if the collection is interrupted, the cost of manual effort will inevitably increase. So for this point, I made some advanced modifications to anyproxy, and used other tools to improve operating efficiency. The following are the specific solutions:
1. Code upgrade
1) WeChat browser white screen
Solution : Modify the file requestHandler.js, still in the same directory as rule_default.js (mac system/usr/local/lib/node_modules/anyproxy/lib/; netizen cnbattle in the win system comment area provides C:\Users\Administrator\AppData\ Roaming\npm\node_modules\anyproxy\lib)
Find proxyReq.on("error",function(e){this function in the code and modify the content
//userRes.end();//把这一行注释掉
userRes.end('<script>setTimeout(function(){window.location.reload();},2000);</script>');//插入这一行In this way, when an error occurs, a js that refreshes the current page will be returned; so that the program can continue
2) Replace all images to reduce the burden on the browser
First you need to make a very small picture. I made a 1x1 pixel, png transparent picture; put it in any folder. Then modify the code of the file rule_default.js:
Add the following code where there are many vars at the beginning of the file
var fs = require("fs"),
img = fs.readFileSync("/Library/WebServer/Documents/space.png");//代码绝对路径替换成自己的In the following code Find shouldUseLocalResponse: function(req,reqBody){function, insert the code inside the function:
if(/mmbiz\.qpic\.cn/i.test(req.url)){
 req.replaceLocalFile = true;
 return true;
}else{
 return false;
}Continue to find dealLocalResponse: function(req, reqBody,callback){function, insert the code inside the function:
if(req.replaceLocalFile){
 callback(200, {"content-type":"image/png"},img );
}These three pieces of code will replace all the pictures in the official account with local pictures. Reduce network transmission pressure and the memory occupied by the browser, and effectively improve operating efficiency;
3) Prohibit mobile phones or simulators from accessing some useless and error-causing URLs
Also in rule_default. Find the code replaceRequestOption: function(req,option){function in js, insert the code inside the function:
var newOption = option;
if(/google|btrace/i.test(newOption.headers.host)){//这里面的正则可以替换成自己不希望访问的网址特征字符串,这里面的btrace是一个腾讯视频的域名,经过实践发现特别容易导致浏览器崩溃,所以加在里面了,继续添加可以使用|分割。
 newOption.hostname = "127.0.0.1";//这个ip也可以替换成其他的
 newOption.port  = "80";
}
return newOption;This modification was also mentioned in the article before , let’s introduce it in detail again here. It has many uses. Different mobile phones and simulators may access some useless addresses, causing the device to slow down. Access can be blocked through this code.
2. Use pm2 to manage anyproxy process
pm2 is a process manager for Node applications with load balancing function.
PM2 is perfect when you want your standalone code to utilize all CPUs on all servers and ensure that the process is always alive with 0 second reloads. It is very suitable for IaaS structures, but do not use it for PaaS solutions (Paas solutions will be developed later).
Main features:
Built-in load balancing (using the Node cluster cluster module)
Background running
0 seconds to stop and reload, I understand it generally means that there is no need to stop during maintenance and upgrades.
With Ubuntu and CentOS startup script
Stop unstable processes (avoid infinite loops)
Console detection
Provide HTTP API
Remote control and real-time interface API (Nodejs module, allows interaction with PM2 process manager)
Tested Nodejs v0.11 v0.10 v0.8 version, compatible with CoffeeScript, based on Linux and MacOS.
First install pm2
sudo npm install -g pm2
Run anyproxy in the pm2 environment
sudo pm2 start anyproxy -x -- -i
Now anyproxy is running in the pm2 environment

There are several pm2 commands that can help manage and monitor anyproxy
//查看运行日志
sudo pm2 logs anyproxy [--lines 10]
//关闭anyproxy
sudo pm2 delete anyproxy
//重启anyproxy
sudo pm2 restart anyproxy
//监控内存占用
sudo pm2 monit
//监控运行状态
sudo pm2 list
Special tip: After pm2 is running, the terminal window can be closed.
The most important purpose of using pm2 to manage the anyproxy process is: after anyproxy exits the program due to an error, pm2 can automatically restart anyproxy.
3. Cancel the sudo password and enable pm2 to start automatically after booting
The following content is the method in the mac environment, and windows should also have it. If you know similar methods, you can send me a private message.
1) First cancel the sudo password
Run the command:
sudo visudo
Find the code:
%admin ALL = (ALL) ALL
Change to:
%admin ALL = (ALL) NOPASSWD: ALL
In this way, the sudo password will be cancelled, and then you can add pm2 It’s auto-starting at boot
2) Set up auto-starting at boot
Enter the command in the terminal:
cd
touch autoexec.sh
vim autoexec.sh
Then Enter the editing mode, press the letter i on the keyboard to start editing, and paste the code:
#!/bin/sh
sudo pm2 start anyproxy -x -- -i
sudo pm2 monit
编辑完之后,按esc,再键入命令wq保存退出编辑模式。
再执行命令:
chmod 755 autoexec.sh
这样一个可执行文件就建立好了
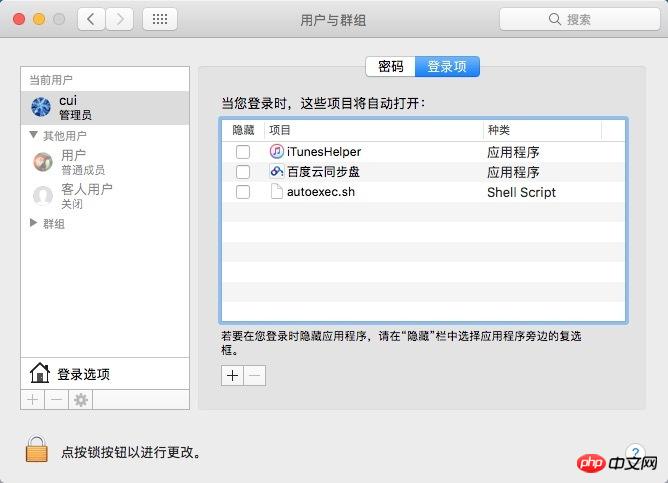
然后打开mac系统的“系统偏好设置”,找到“用户与群组”,在左侧选择当前用户,右侧选择登录项;然后点击+号,找到当前用户的根目录(可以按shift+command+h快捷键),选择autoexec.sh文件,添加到登录项中,就可以开机自启动了。

经过以上的几项设置之后,anyproxy系统就会比原来更加稳定,其实主要原因是模拟器或手机的不稳定导致的anyproxy发生的错误。经过实际测试,anyproxy目前可以长时间运行不崩溃。而微信客户端还是在运行大约6个小时之后崩溃,以2秒翻一页的速度,采集总数大约1万个页面。如果不采集阅读量,就可以是1万个公众号的历史消息页。
微信客户端的崩溃现象是退出微信浏览器,停留在查看公众号资料页面。所以如果希望再进一步提高自动化,也可以使用触动精灵之作自动化脚本,定时推出微信浏览器,再点击历史消息页。这样应该就可以实现长时间自动化采集了。
相关推荐:
The above is the detailed content of Detailed explanation of using anyproxy to improve the efficiency of public account article collection. For more information, please follow other related articles on the PHP Chinese website!


