This article mainly introduces how to use MixPHP to develop API interfaces. It has certain reference value. Now I share it with you. Friends in need can refer to it
MixPHP is a common software based on Swoole. A memory-based PHP high-performance framework, the high-performance features of the framework are very suitable for developing API interfaces, and MixPHP is very close to the traditional MVC framework, so it is very simple to develop interfaces.
The following is a simple example of developing an API interface:
Get an article from the articles table through id.
URL to access this interface:
http://www.e.com/articles/details?id=1
Copy after login
The database table structure is as follows:
CREATE TABLE `articles` (
  `id` int(10) unsigned NOT NULL AUTO_INCREMENT,
  `title` varchar(255) NOT NULL,
  `content` varchar(255) NOT NULL,
  `dateline` timestamp NOT NULL DEFAULT CURRENT_TIMESTAMP,
  PRIMARY KEY (`id`)
) ENGINE=InnoDB DEFAULT CHARSET=utf8;
Copy after login
Step 1
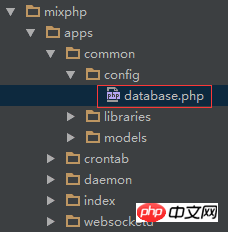
Modify the database configuration file, MixPHP In the application configuration file, information about the database refers to the common/config/database.php file.

Step 2
Modify the application configuration file:

The default 404/500 response of the framework is a web page, and the API service needs to respond to JSON data. Usually other traditional MVC frameworks need to modify many places. To meet this requirement, MixPHP itself provides this configuration, and you only need to modify the configuration.
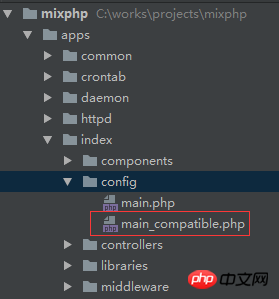
MixPHP's default web application has two configuration files, namely:
When developing API, we recommend developing it under Apache/PHP-FPM, and then deploying it to mix-httpd after going online. Anyway, it will be seamless switching.
Now we modify the defaultFormat key under the response key name to mix\http\Error::FORMAT_JSON, as follows:
// 响应
'response' => [
    // 类路径
    'class'         => 'mix\http\compatible\Response',
    // 默认输出格式
    'defaultFormat' => mix\http\Response::FORMAT_JSON,
    // json
    'json'          => [
        // 类路径
        'class' => 'mix\http\Json',
    ],
    // jsonp
    'jsonp'         => [
        // 类路径
        'class' => 'mix\http\Jsonp',
        // callback键名
        'name'  => 'callback',
    ],
    // xml
    'xml'           => [
        // 类路径
        'class' => 'mix\http\Xml',
    ],
],
Copy after login
Then modify the format key under the error key name in the main_compatible.php file to mix\http\Error::FORMAT_JSON, as follows:
// 错误
'error'    => [
    // 类路径
    'class'  => 'mix\http\Error',
    // 输出格式
    'format' => mix\http\Error::FORMAT_JSON,
],
Copy after login
Step 3
Create controller:
apps/index/controllers/ArticlesController.php
Copy after login
<?php
namespace apps\index\controllers;
use mix\facades\Request;
use mix\http\Controller;
use apps\index\messages\ErrorCode;
use apps\index\models\ArticlesForm;
class ArticlesController extends Controller
{
public function actionDetails()
{
// 使用模型
$model = new ArticlesForm();
$model->attributes = Request::get();
$model->setScenario('actionDetails');
if (!$model->validate()) {
return ['code' => ErrorCode::INVALID_PARAM];
}
// 获取数据
$data = $model->getDetails();
if (!$data) {
return ['code' => ErrorCode::ERROR_ID_UNFOUND];
}
// 响应
return ['code' => ErrorCode::SUCCESS, 'data' => $data];
}
}Copy after login
Create error code class:
apps/index/messages/ErrorCode.php
Copy after login
<?php

namespace apps\index\messages;

class ErrorCode
{

    const SUCCESS = 0;
    const INVALID_PARAM = 100001;
    const ERROR_ID_UNFOUND = 200001;

}
Copy after login
Create a form validation model:
apps/index/models/ArticlesForm.php
Copy after login
<?php
namespace apps\index\models;
use mix\validators\Validator;
use apps\common\models\ArticlesModel;
class ArticlesForm extends Validator
{
public $id;
// 规则
public function rules()
{
return [
'id' => ['integer', 'unsigned' => true, 'maxLength' => 10],
];
}
// 场景
public function scenarios()
{
return [
'actionDetails' => ['required' => ['id']],
];
}
// 获取详情
public function getDetails()
{
return (new ArticlesModel())->getRowById($this->id);
}
}Copy after login
Create a data table model:
apps/common/models/ArticlesModel.php
Copy after login
<?php
namespace apps\common\models;
use mix\facades\RDB;
class ArticlesModel
{
const TABLE = 'articles';
// 获取一行数据通过id
public function getRowById($id)
{
$sql = "SELECT * FROM `" . self::TABLE . "` WHERE id = :id";
$row = RDB::createCommand($sql)->bindParams([
'id' => $id,
])->queryOne();
return $row;
}
}Copy after login
The above is the writing of all the code.
Step 4
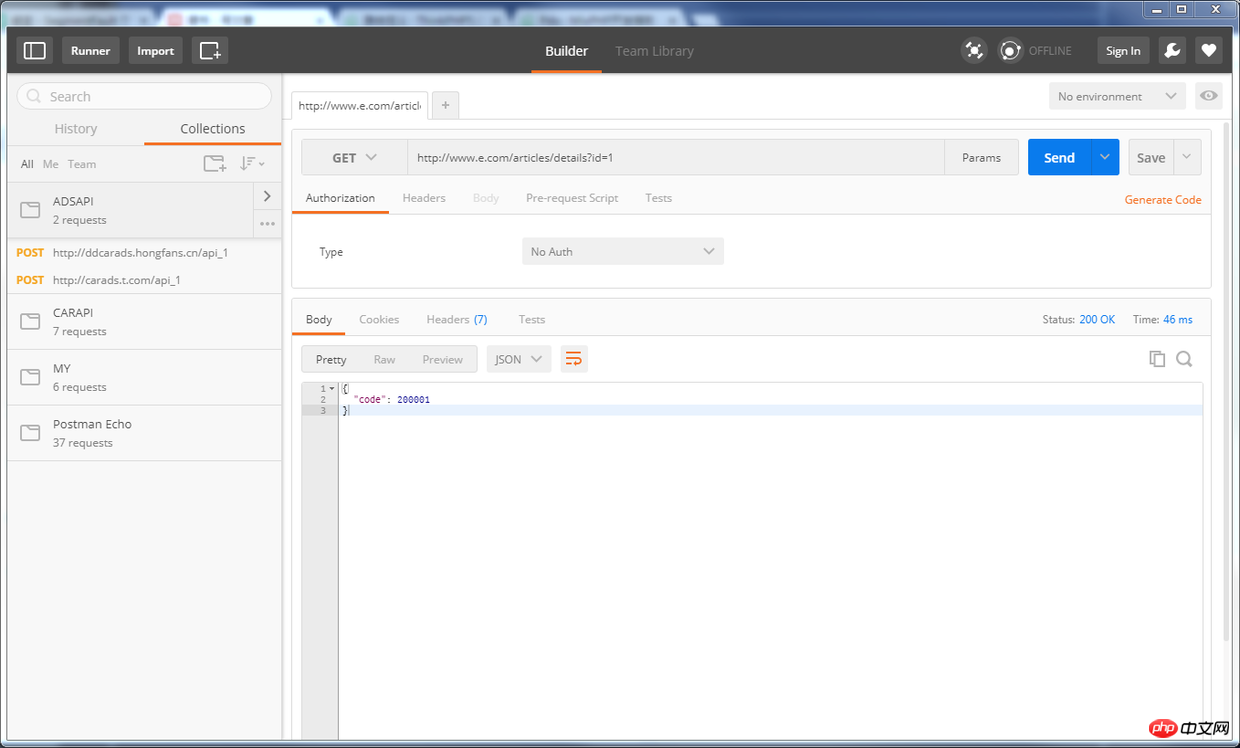
Use Postman to test, as follows:

The interface development and testing is completed, isn’t it very simple?
The above is the entire content of this article. I hope it will be helpful to everyone's study. For more related content, please pay attention to the PHP Chinese website!
Related recommendations:
The above is the detailed content of How to use MixPHP to develop API interfaces. For more information, please follow other related articles on the PHP Chinese website!


![[Web front-end] Node.js quick start](https://img.php.cn/upload/course/000/000/067/662b5d34ba7c0227.png)


