This article introduces you to the method of installing and configuring Memcached on CentOS7 system. It has a good reference value and I hope it can help friends in need.
Memcached is a distributed, high-performance memorycaching system that improves and accelerates data and objects in memory by caching them. Dynamic web application performance. It is mainly used to speed up sites that make heavy use of databases.
Memcached is also used to cache tables and queries throughout the database to improve database performance. Memcached is free and is used by many websites, such as Facebook, YouTube and Twitter.
This tutorial shows you how to install and configure Memcached on CentOS 7.
First ensure that all packages are up to date:
sudo yum -y update
Execute the following command to install Memcached:
sudo yum -y install memcached
Enable the Memcached service And add it to the automatic startup when the system starts:
sudo systemctl enable memcached
sudo systemctl start memcached
The default Memcached configuration file is located in the /etc/sysconfig directory.
To configure Memcached, please edit the /etc/sysconfig/memcached file:
sudo vi /etc/sysconfig/memcache
Set or update the following parameters to customize according to your needs:
PORT="11211"
USER="memcached"
MAXCONN="1024"
CACHESIZE="64"
OPTIONS=""
The following is a brief description of the parameters:
**PORT**:Memcached 使用的默认端口。
**USER**:Memcached 的运行用户。
**MAXCONN**:允许连接到 Memcached 的最大数目。可以根据你的需求增加任何数量。
**CACHESIZE**:内存的缓存大小。
**OPTIONS**:设置服务器的 IP 地址,使 Apache 或 Nginx web 服务器可以连接到服务器。
Save and exit the configuration file, and then restart Memcached:
sudo systemctl restart memcached
Run the following command to confirm that Memcached is running:
sudo netstat -tulpn | grep :11211
You You will see the following output:
tcp        0      0 0.0.0.0:11211           0.0.0.0:*               LISTEN      7757/memcached
tcp6       0      0 :::11211                :::*                    LISTEN      7757/memcached
udp        0      0 0.0.0.0:11211           0.0.0.0:*                           7757/memcached
udp6       0      0 :::11211                :::*                                7757/memcached
Use memcache -tool to check the server statistics.
sudo memcached-tool 127.0.0.1 stats
You can install the PHP extension to use the Memcached daemon through the following command:
sudo yum install php-pecl-memcache
extension="/usr/lib64/php/modules/memcache.so"
Now, restart the Apache or Nginx service:
sudo systemctl restart memcached
# apache
sudo systemctl restart httpd
# nginx
sudo nginx -s reload
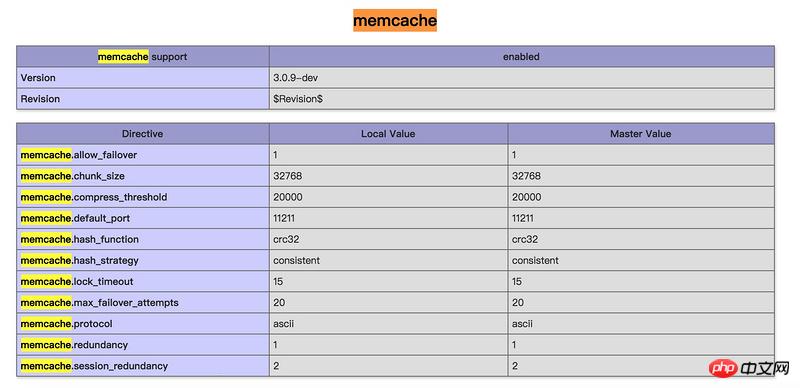
To test the Memcached PHP extension, create info.php in the web root directory of apache.
sudo vi /var/www/html/info.php
Add some content
<?php     phpinfo();
?>
Save the file and visit http://your_server_ip/info.
When the phpinfo page renders in the browser, take a look at the following sections:

Related recommendations:
What are the steps to set up IIS and install php7.2 under win10 system?
Detailed process of how to install Nginx environment under docker
The above is the detailed content of How to install and configure Memcached on CentOS7 system. For more information, please follow other related articles on the PHP Chinese website!


