PHP data structure-graph storage structure
The storage structure of graphs
The concept of graphs has almost been introduced. You can digest it and continue to learn the following content. If there are no problems, we will continue to study the next content. Of course, this is not the most troublesome part, because today we are just introducing the storage structure of the graph.
The sequential storage structure of the graph: adjacency matrix
What is the adjacency matrix
First let’s take a look at how to use order structure to store graphs. Whether it is a stack, queue, or tree, we can use a simple array to achieve the sequential storage capabilities of these data structures. But the graph is different. From the previous article, we learned that the representation of a node is in the form
[Recommended: PHP Video Tutorial]
In graph terminology, the sequential storage structure of a graph represented by a two-dimensional array is called an adjacency matrix. Just like the form below.
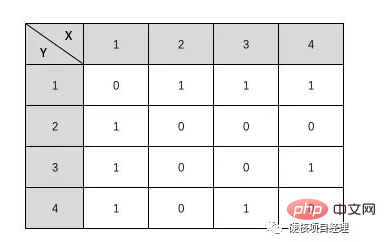
In this table, we have two horizontal and vertical coordinates. X1-4 and Y1-4 represent a total of 4 nodes in this graph. Through their corresponding relationships It can be seen as whether there is an edge between one node and another node. For example, the pair of coordinates X1 and Y2
What does the graph corresponding to the adjacency matrix above look like? You can try to draw it yourself. It doesn’t matter if you can’t draw it, because we have just started learning. In fact, it is the adjacency matrix of the graph we first showed.
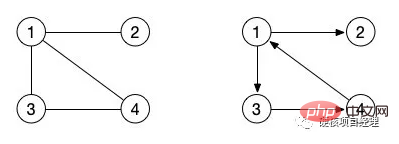
#The picture on the left corresponds to the adjacency matrix in the table above. So what does the adjacency matrix of the directed graph on the right look like? Let’s also try writing.
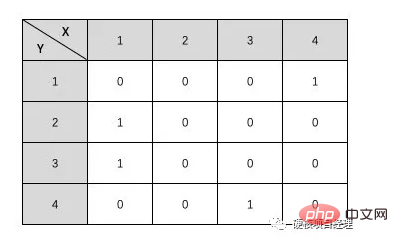
Interesting, right? So what if it is a powerful plot? In fact, it is very simple. We can directly replace the 1 in the graph with the weight of the corresponding edge. However, it is possible that the weight of some edges is 0, so in a weighted graph, we can define a very large number, Or define a very small negative number as an infinite number to indicate that these two nodes have no edges.
Constructing the adjacency matrix
Next, we will construct the storage structure of such an adjacency matrix through code. We still use the example of undirected graph to implement. Because an undirected graph requires the reverse node to be assigned a value, it has one more step than a directed graph, and the rest are basically similar.
// 邻接矩阵
$graphArr = [];
function CreateGraph($Nv, &$graphArr)
{
$graphArr = [];
for ($i = 1; $i <= $Nv; $i++) {
for ($j = 1; $j <= $Nv; $j++) {
$graphArr[$i][$j] = 0;
}
}
}
// 邻接矩阵
function BuildGraph(&$graphArr)
{
echo '请输入结点数:';
fscanf(STDIN, "%d", $Nv);
CreateGraph($Nv, $graphArr);
if ($graphArr) {
echo '请输入边数:';
fscanf(STDIN, "%d", $Ne);
if ($Ne > 0) {
for ($i = 1; $i <= $Ne; $i++) {
echo '请输入边,格式为 出 入 权:';
fscanf(STDIN, "%d %d %d", $v1, $v2, $weight);
$graphArr[$v1][$v2] = $weight;
// 如果是无向图,还需要插入逆向的边
$graphArr[$v2][$v1] = $weight;
}
}
}
}In this code, first we initialize a two-dimensional matrix through the CreateGraph() method. That is, based on the number of nodes we input, a two-dimensional array structure of X * Y is implemented, and all its values are defined to be 0. In other words, this graph currently has no edges.
Then, after the BuildGraph() method calls CreateGraph(), we continue to enter the edge information. First enter the number of edges. We have several edges. If the number of edges is less than or equal to 0, do not continue to create them. In fact, we can be more rigorous and make sure that the edges cannot exceed the maximum limit based on the definitions of undirected complete graphs and directed complete graphs.
Next, we will continue to input the edge information in a loop. The input format I need here is the edge's outgoing node, incoming node, and weight. Since our example is an undirected graph, in addition to creating edges for
Explaining the code may still be relatively abstract. Just run it and try it.
BuildGraph($graphArr);
// 请输入结点数:4
// 请输入边数:4
// 请输入边,格式为 出 入 权:1 2 1
// 请输入边,格式为 出 入 权:1 3 1
// 请输入边,格式为 出 入 权:1 4 1
// 请输入边,格式为 出 入 权:3 4 1
print_r($graphArr);
// Array
// (
//     [1] => Array
//         (
//             [1] => 0
//             [2] => 1
//             [3] => 1
//             [4] => 1
//         )
//     [2] => Array
//         (
//             [1] => 1
//             [2] => 0
//             [3] => 0
//             [4] => 0
//         )
//     [3] => Array
//         (
//             [1] => 1
//             [2] => 0
//             [3] => 0
//             [4] => 1
//         )
//     [4] => Array
//         (
//             [1] => 1
//             [2] => 0
//             [3] => 1
//             [4] => 0
//         )
// )
//  x
//y 0 1 1 1
//  1 0 0 0
//  1 0 0 1
//  1 0 1 0
Call our PHP file in the command line environment, and then enter the relevant information in sequence according to the prompts. Is the finally printed array content exactly the same as our table above? With a simple piece of code, we realize the sequential storage of graphs.
可能有的同学会一时懵圈。因为我第一眼看到的时候也是完全懵了,不过仔细的对比画出来的图和上面的表格其实马上就能想明白了。这次我们真的是进入二维的世界了。是不是感觉图瞬间就把树甩到十万八千里之外了。完全二叉树的时候,我们的思想是二维的,但结构还是一维的,而到邻接矩阵的时候,不管是思想还是代码结构,全部都进化到了二维空间,高大上真不是吹的。
图的链式存储结构:邻接表
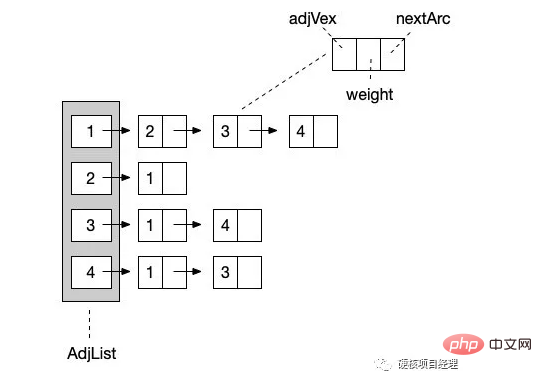
说完顺序存储结构,自然不能忽视另一种形式的存储结构,那就是图的链式存储结构。其实对于图来说,链式结构非常简单和清晰,因为我们只需要知道一个结点和那些结点有边就行了。那么我们就让这个结点形成一个单链表,一路往后链接就好了,就像下图这样。(同样以上图无向图为例)
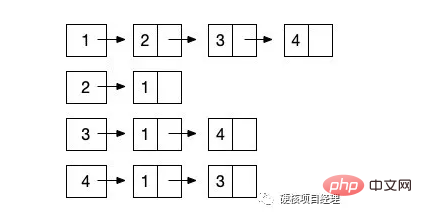
从 结点1 开始,它指向一个后继是 结点2 ,然后继续向后链接 结点3 和 结点4 。这样,与 结点1 相关的边就都描述完成了。由于我们展示的依然是无向图的邻接表表示,所以 结点2 的链表结点指向了 结点 1 。也就是完成了
对于代码实现来说,我们可以将头结点,也就是正式的 1-4 结点保存在一个顺序表中。然后让每个数组元素的值为第一个结点的内容。这样,我们就可以让链表结点只保存结点名称、权重和下一个结点对象的指向信息就可以了。
// 头结点
class AdjList
{
    public $adjList = []; // 顶点列表
    public $Nv = 0; // 结点数
    public $Ne = 0; // 边数
}
// 边结点
class ArcNode
{
    public $adjVex = 0; // 结点
    public $nextArc = null; // 链接指向
    public $weight = 0; // 权重
}
接下来,我们来看看如何使用邻接表这种结构来建立图。
function BuildLinkGraph()
{
fscanf(STDIN, "请输入 结点数 边数:%d %d", $Nv, $Ne);
if ($Nv > 1) {
// 初始化头结点
$adj = new AdjList();
$adj->Nv = $Nv; // 保存下来方便使用
$adj->Ne = $Ne; // 保存下来方便使用
// 头结点列表
for ($i = 1; $i <= $Nv; $i++) {
$adj->adjList[$i] = null; // 全部置为 NULL ,一个无边空图
}
if ($Ne > 0) {
//
for ($i = 1; $i <= $Ne; $i++) {
echo '请输入边,格式为 出 入 权:';
fscanf(STDIN, "%d %d %d", $v1, $v2, $weight);
// 建立一个结点
$p1 = new ArcNode;
$p1->adjVex = $v2; // 结点名称为 入结点
$p1->nextArc = $adj->adjList[$v1]; // 下一跳指向 出结点 的头结点
$p1->weight = $weight; // 设置权重
$adj->adjList[$v1] = $p1; // 让头结点的值等于当前新创建的这个结点
// 无向图需要下面的操作,也就是反向的链表也要建立
$p2 = new ArcNode;
// 注意下面两行与上面代码的区别
$p2->adjVex = $v1; // 这里是入结点
$p2->nextArc = $adj->adjList[$v2]; // 这里是出结点
$p2->weight = $weight;
$adj->adjList[$v2] = $p2;
}
return $adj;
}
}
return null;
}代码中的注释已经写得很清楚了。可以看出,在邻接表的操作中,无向图也是一样的比有向图多一步操作的,如果只是建立有向图的话,可以不需要 p2 结点的操作。特别需要注意的就是,在这段代码中,我们使用的是链表操作中的 头插法 。也就是最后一条数据会插入到 头结点 上,而最早的那个边会在链表的最后。大家看一下最后建立完成的数据结构的输出就明白了。
print_r(BuildLinkGraph());
// AdjList Object
// (
//     [adjList] => Array
//         (
//             [1] => ArcNode Object
//                 (
//                     [adjVex] => 4
//                     [nextArc] => ArcNode Object
//                         (
//                             [adjVex] => 3
//                             [nextArc] => ArcNode Object
//                                 (
//                                     [adjVex] => 2
//                                     [nextArc] =>
//                                     [weight] => 1
//                                 )
//                             [weight] => 1
//                         )
//                     [weight] => 1
//                 )
//             [2] => ArcNode Object
//                 (
//                     [adjVex] => 1
//                     [nextArc] =>
//                     [weight] => 1
//                 )
//             [3] => ArcNode Object
//                 (
//                     [adjVex] => 4
//                     [nextArc] => ArcNode Object
//                         (
//                             [adjVex] => 1
//                             [nextArc] =>
//                             [weight] => 1
//                         )
//                     [weight] => 1
//                 )
//             [4] => ArcNode Object
//                 (
//                     [adjVex] => 3
//                     [nextArc] => ArcNode Object
//                         (
//                             [adjVex] => 1
//                             [nextArc] =>
//                             [weight] => 1
//                         )
//                     [weight] => 1
//                 )
//         )
//     [Nv] => 4
//     [Ne] => 4
// )
使用邻接表来建立的图的链式存储结构是不是反而比邻接矩阵更加的清晰明了一些。就像树的链式和顺序结构一样,在图中它们的优缺点也是类似的。邻接矩阵占用的物理空间更多,因为它需要两层一样多元素的数组,就像上面的表格一样,需要占据 4 * 4 的物理格子。而邻接表我们可以直接数它的结点数,只需要 12 个格子就完成了。而且,更主要的是,链式的邻接表可以随时扩展边结点和边数,不需要重新地初始化,我们只需要简单地修改上面的测试代码就能够实现,而邻接矩阵如果要修改结点数的话,就得要重新初始化整个二维数组了。
总结
对于图来说,除了邻接矩阵和邻接表之外,还有其它的一些存储形式,不过都是链式的邻接表的一些优化和变形而已。大家有兴趣的可以自己去了解一下 十字链表 、邻接多重表 这两种存储结构。
好了,基础的存储结构已经铺垫完了,关于图的概念也都熟悉掌握了,接下来,我们就要准备去做最重要的操作了,那就是如何来对图进行遍历。
测试代码:
https://github.com/zhangyue0503/Data-structure-and-algorithm/blob/master/5.图/source/5.2图的存储结构.php
The above is the detailed content of PHP data structure-graph storage structure. For more information, please follow other related articles on the PHP Chinese website!

Hot AI Tools

Undresser.AI Undress
AI-powered app for creating realistic nude photos

AI Clothes Remover
Online AI tool for removing clothes from photos.

Undress AI Tool
Undress images for free

Clothoff.io
AI clothes remover

Video Face Swap
Swap faces in any video effortlessly with our completely free AI face swap tool!

Hot Article

Hot Tools

Notepad++7.3.1
Easy-to-use and free code editor

SublimeText3 Chinese version
Chinese version, very easy to use

Zend Studio 13.0.1
Powerful PHP integrated development environment

Dreamweaver CS6
Visual web development tools

SublimeText3 Mac version
God-level code editing software (SublimeText3)

Hot Topics
 1664
1664
 14
14
 1423
1423
 52
52
 1317
1317
 25
25
 1268
1268
 29
29
 1246
1246
 24
24
 Explain JSON Web Tokens (JWT) and their use case in PHP APIs.
Apr 05, 2025 am 12:04 AM
JWT is an open standard based on JSON, used to securely transmit information between parties, mainly for identity authentication and information exchange. 1. JWT consists of three parts: Header, Payload and Signature. 2. The working principle of JWT includes three steps: generating JWT, verifying JWT and parsing Payload. 3. When using JWT for authentication in PHP, JWT can be generated and verified, and user role and permission information can be included in advanced usage. 4. Common errors include signature verification failure, token expiration, and payload oversized. Debugging skills include using debugging tools and logging. 5. Performance optimization and best practices include using appropriate signature algorithms, setting validity periods reasonably,
 PHP Program to Count Vowels in a String
Feb 07, 2025 pm 12:12 PM
A string is a sequence of characters, including letters, numbers, and symbols. This tutorial will learn how to calculate the number of vowels in a given string in PHP using different methods. The vowels in English are a, e, i, o, u, and they can be uppercase or lowercase. What is a vowel? Vowels are alphabetic characters that represent a specific pronunciation. There are five vowels in English, including uppercase and lowercase: a, e, i, o, u Example 1 Input: String = "Tutorialspoint" Output: 6 explain The vowels in the string "Tutorialspoint" are u, o, i, a, o, i. There are 6 yuan in total
 Explain late static binding in PHP (static::).
Apr 03, 2025 am 12:04 AM
Static binding (static::) implements late static binding (LSB) in PHP, allowing calling classes to be referenced in static contexts rather than defining classes. 1) The parsing process is performed at runtime, 2) Look up the call class in the inheritance relationship, 3) It may bring performance overhead.
 What are PHP magic methods (__construct, __destruct, __call, __get, __set, etc.) and provide use cases?
Apr 03, 2025 am 12:03 AM
What are the magic methods of PHP? PHP's magic methods include: 1.\_\_construct, used to initialize objects; 2.\_\_destruct, used to clean up resources; 3.\_\_call, handle non-existent method calls; 4.\_\_get, implement dynamic attribute access; 5.\_\_set, implement dynamic attribute settings. These methods are automatically called in certain situations, improving code flexibility and efficiency.
 PHP and Python: Comparing Two Popular Programming Languages
Apr 14, 2025 am 12:13 AM
PHP and Python each have their own advantages, and choose according to project requirements. 1.PHP is suitable for web development, especially for rapid development and maintenance of websites. 2. Python is suitable for data science, machine learning and artificial intelligence, with concise syntax and suitable for beginners.
 PHP in Action: Real-World Examples and Applications
Apr 14, 2025 am 12:19 AM
PHP is widely used in e-commerce, content management systems and API development. 1) E-commerce: used for shopping cart function and payment processing. 2) Content management system: used for dynamic content generation and user management. 3) API development: used for RESTful API development and API security. Through performance optimization and best practices, the efficiency and maintainability of PHP applications are improved.
 PHP: A Key Language for Web Development
Apr 13, 2025 am 12:08 AM
PHP is a scripting language widely used on the server side, especially suitable for web development. 1.PHP can embed HTML, process HTTP requests and responses, and supports a variety of databases. 2.PHP is used to generate dynamic web content, process form data, access databases, etc., with strong community support and open source resources. 3. PHP is an interpreted language, and the execution process includes lexical analysis, grammatical analysis, compilation and execution. 4.PHP can be combined with MySQL for advanced applications such as user registration systems. 5. When debugging PHP, you can use functions such as error_reporting() and var_dump(). 6. Optimize PHP code to use caching mechanisms, optimize database queries and use built-in functions. 7
 The Enduring Relevance of PHP: Is It Still Alive?
Apr 14, 2025 am 12:12 AM
PHP is still dynamic and still occupies an important position in the field of modern programming. 1) PHP's simplicity and powerful community support make it widely used in web development; 2) Its flexibility and stability make it outstanding in handling web forms, database operations and file processing; 3) PHP is constantly evolving and optimizing, suitable for beginners and experienced developers.


