Recently, I encountered a project when I was working on a project. When sharing an article through WeChat, I needed to display the sharing title, sharing summary, and sharing pictures according to his own requirements. I found many ways on the Internet, and finally used WeChat. The public platform has its own sharing interface function.
To make the WeChat interface sharing function, you need to register a public account in the early stage and pass the certification. Only in this way can the interface production be realized. I won’t give detailed instructions on WeChat registration here. You can directly search it on the official website of WeChat public platform: mp.weixin.qq.com
I will give you a step-by-step introduction
1. Public account development information configuration
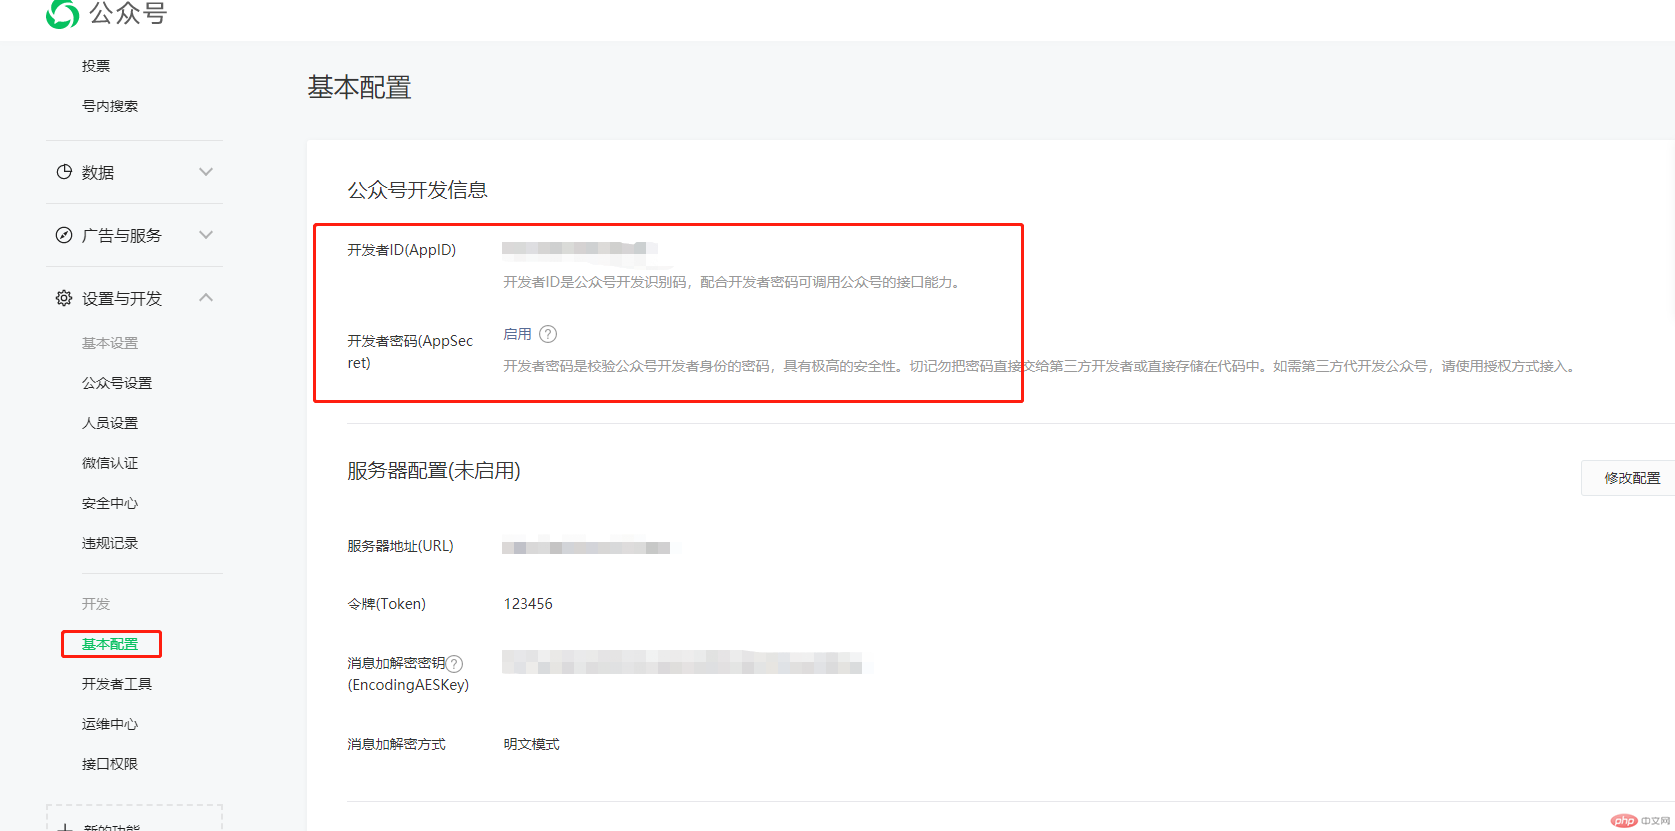
Before developing the sharing interface, you need to configure the public platform configuration information, as shown in the figure below: click "Develop-Basic Information", you can When you see the official account development information, click "Open" under the developer key and configure your own key information. After successful configuration, save the developer ID (AppID) and developer password (AppSecret)

2. Configure the JS interface security domain name
Click "Settings and Development--Official Account Settings", click the settings behind the JS interface security domain name, and follow the requirements Add js secure domain name, as shown in the figure
3. PHP sharing interface class
I won’t say much here, just go to the code
class wechatClass
{
public $AppID;
public $AppSecret;
public $redirect_uri;
public $DbSy;
public $dump_url;
public $scope;
public function __construct()
{
parent::__construct();
$this->AppID = "开发者密码(AppSecret)";
$this->AppSecret = "开发者密码(AppSecret)";
}
public function getSignPackage() {
$jsapiTicket = $this->getJsApiTicket();
// 注意 URL 一定要动态获取,不能 hardcode.
$protocol = (!empty($_SERVER['HTTPS']) && $_SERVER['HTTPS'] !== 'off' || $_SERVER['SERVER_PORT'] == 443) ? "https://" : "http://";
$url = "{$protocol}{$_SERVER['HTTP_HOST']}{$_SERVER['REQUEST_URI']}";
$timestamp = time();
$nonceStr = $this->createNonceStr();
// 这里参数的顺序要按照 key 值 ASCII 码升序排序
$string = "jsapi_ticket={$jsapiTicket}&noncestr={$nonceStr}×tamp={$timestamp}&url={$url}";
$signature = sha1($string);
// var_dump($signature);die;
$signPackage = array(
"appId" => $this->AppID,
"nonceStr" => $nonceStr,
"timestamp" => $timestamp,
"url" => $url,
"signature" => $signature,
"rawString" => $string
);
return $signPackage;
}
public function createNonceStr($length = 16) {
$chars = "abcdefghijklmnopqrstuvwxyzABCDEFGHIJKLMNOPQRSTUVWXYZ0123456789";
$str = "";
for ($i = 0; $i < $length; $i++) {
$str .= substr($chars, mt_rand(0, strlen($chars) - 1), 1);
}
return $str;
}
public function getJsApiTicket() {
// jsapi_ticket 应该全局存储与更新,以下代码以写入到文件中做示例
//echo $_SERVER['DOCUMENT_ROOT'];
$data = json_decode(file_get_contents($_SERVER['DOCUMENT_ROOT']."/static/yejuzhi/js/access_token.json"));
// var_dump($data->expire_time);die;
if ($data->expire_time < time()) {
$accessToken = $this->getAccessToken();
// 如果是企业号用以下 URL 获取 ticket
// $url = "https://qyapi.weixin.qq.com/cgi-bin/get_jsapi_ticket?access_token=$accessToken";
$url = "https://api.weixin.qq.com/cgi-bin/ticket/getticket?type=jsapi&access_token={$accessToken}";
$res = json_decode($this->httpGet($url));
$ticket = $res->ticket;
if ($ticket) {
$data->expire_time = time() + 7000;
$data->jsapi_ticket = $ticket;
$fp = fopen($_SERVER['DOCUMENT_ROOT']."/static/yejuzhi/js/access_token.json", "w");
fwrite($fp, json_encode($data));
fclose($fp);
}
} else {
$ticket = $data->jsapi_ticket;
}
return $ticket;
}
public function getAccessToken() {
// access_token 应该全局存储与更新,以下代码以写入到文件中做示例
$data = json_decode(file_get_contents($_SERVER['DOCUMENT_ROOT']."/static/yejuzhi/js/access_token.json"));
if ($data->expire_time < time()) {
// 如果是企业号用以下URL获取access_token
// $url = "https://qyapi.weixin.qq.com/cgi-bin/gettoken?corpid=$this->appId&corpsecret=$this->appSecret";
$url = "https://api.weixin.qq.com/cgi-bin/token?grant_type=client_credential&appid={$this->AppID}&secret={$this->AppSecret}";
$res = json_decode($this->httpGet($url));
$access_token = $res->access_token;
if ($access_token) {
$data->expire_time = time() + 7000;
$data->access_token = $access_token;
$fp = fopen($_SERVER['DOCUMENT_ROOT']."/static/yejuzhi/js/access_token.json", "w");
fwrite($fp, json_encode($data));
fclose($fp);
}
} else {
$access_token = $data->access_token;
}
return $access_token;
}
public function httpGet($url){
$curl = curl_init();
curl_setopt($curl, CURLOPT_RETURNTRANSFER, true);
curl_setopt($curl, CURLOPT_TIMEOUT, 500);
curl_setopt($curl, CURLOPT_SSL_VERIFYPEER, false);
curl_setopt($curl, CURLOPT_SSL_VERIFYHOST, false);
curl_setopt($curl, CURLOPT_URL, $url);
$res = curl_exec($curl);
curl_close($curl);
return $res;
}
}4. PHP file configuration
I wrote it based on the TP5.1 framework. You can set it yourself
$wx = new WeChatClass();
$sign = $wx->getSignPackage();
$this->assign('sign',$sign);
5. Front-end HTML code
Please refer to the development documentation for the front-end HTML code: https://developers.weixin.qq.com/doc/offiaccount/OA_Web_Apps/JS-SDK.html#111
here I take the customized "Share with friends" and "Share to QQ" button sharing content (1.4.0) interface as an example
<!DOCTYPE html>
<html lang="en">
<head>
<meta charset="UTF-8">
<title>微信分享接口制作</title>
</head>
<body>
<script src="http://res2.wx.qq.com/open/js/jweixin-1.6.0.js"></script>
<script>
wx.config({
debug: false, // 开启调试模式,调用的所有api的返回值会在客户端alert出来,若要查看传入的参数,可以在pc端打开,参数信息会通过log打出,仅在pc端时才会打印。
appId: '{$sign.appId}', // 必填,公众号的唯一标识
timestamp: '{$sign.timestamp}', // 必填,生成签名的时间戳
nonceStr: '{$sign.nonceStr}', // 必填,生成签名的随机串
signature: '{$sign.signature}',// 必填,签名
jsApiList: [
"updateAppMessageShareData",] // 必填,需要使用的JS接口列表
});
wx.ready(function () {
wx.updateAppMessageShareData({
title: '您的标题', // 分享标题
desc: '您的描述', // 分享描述
link: '您的分享链接', // 分享链接,该链接域名或路径必须与当前页面对应的公众号JS安全域名一致
imgUrl: '您的分享图标', // 分享图标
success: function () {
/*alert('成功');*/
}
});
});
</script>
</body>
</html>The above is the detailed content of Create WeChat custom sharing with PHP. For more information, please follow other related articles on the PHP Chinese website!