This article mainly introduces you to the relevant knowledge about using Dockerfile files to deploy PHP projects. Environment deployment has always been a big problem, whether it is a development environment or a production environment, but Docker will develop The environment and production environment are packaged in a lightweight manner to provide a consistent environment. Let's take a look at it together. I hope it will be helpful to everyone.

(Recommended tutorial: PHP video tutorial)
/ project_name
|-- /dist -- Dockerfile #--- Dockerfile file
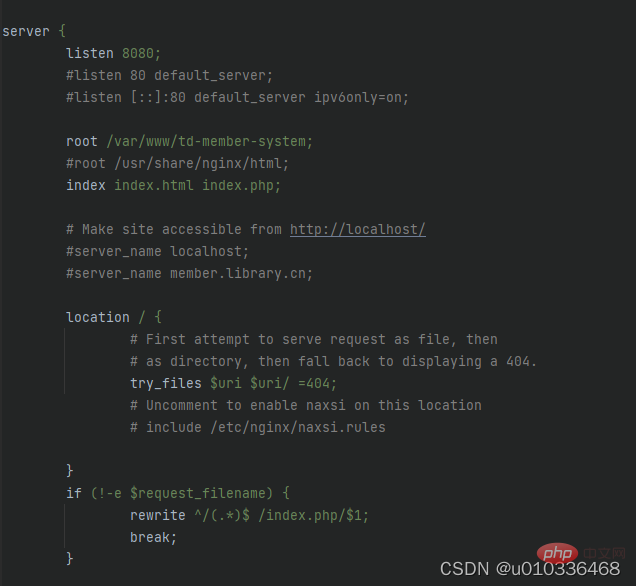
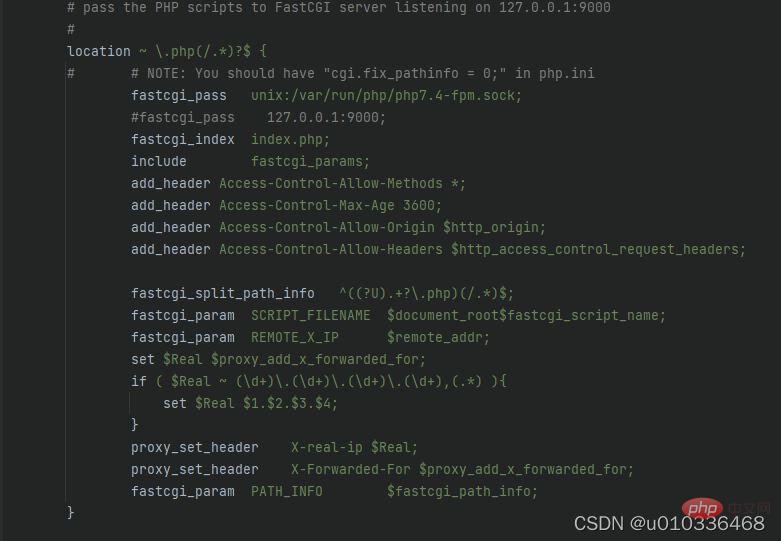
|---|-- nginx.conf #--- nginx configuration file
nginx.conf file

2. Create a Dockerfile
# 从ubuntu镜像中构建应用
FROM ubuntu:latest

# 设置镜像的制作者
MAINTAINER congjiang

# 安装nginx + php-fpm7.4

RUN apt-get update && apt-get upgrade && apt-get install -y nginx php7.4-fpm vim

# 上一条命令安装nginx和fpm
# nginx 默认安装路径 /etc/nginx/
# php-fpm 默认安装路径 /etc/php/fpm/
# nginx配置文件存放目录 /etc/nginx/conf.d/
# nginx默认项目路径 /var/www/html/

# 在上传目录之前,可以先删除旧项目代码
# RUN ["rm", "-rf", "/var/www/project_name/"]

# 项目文件上传, 把当前目录下的所有文件上传到/var/www/project_name目录下
COPY ./dist/ /var/www/project_name/

# 把当前项目的nginx.conf配置文件上传到/etc/nginx/conf.d/目录下
COPY ./config/nginx.conf /etc/nginx/conf.d/default.conf

# 容器运行时启动应用
# php-fpm7.4 -D : 启动fpm并在后台运行
# nginx -g 'daemon off;' : 启动nginx, 前台执行, 并保持进程常驻, 避免docker容器启动后就自动关闭了
CMD php-fpm7.4 -D && nginx -g 'daemon off;'
# 在项目project_name目录下执行命令

docker build -f config/Dockerfile -t myproject:latest .

# 注:  最后的参数表示路径,  . : 表示当前目录下
# -f 指定Dockerfile文件所在目录, 如果是相对路径,则从当前目录下查找
# -t 重新指定镜像的名称和标签  <name>:<tag>
# 启动镜像

docker run -itd -p 80:8080 myproject:latest

# --name <name> 为启动的容器指定名称,不指定会默认随机一个名称
# -p 访问的端口:镜像内程序的端口
# -d 表示当前容器在后台运行
# -it 指定要启动的镜像名称和标签 <name>:<tag>
# -v 本地路径:镜像内的路径   可以将本地路径和容器内的路径映射,可以即时修改文件即时生效,方便测试
# -v 命令可以有多条
# --rm 当前容器退出后将自动删除
# eg:  -v E:/logs/:/var/logs/nginx/   把nginx的日志文件映射到本地
After starting the running container, open the local browser: http://localhost/ and you can access it6. Problems that occur when building the project Every time the project is rebuilt, a new image file will be created5. Connect to the started image container
# 查看正在运行的容器

docker ps

# CONTAINER ID    IMAGE  ...
# 01f82e69c455    myproject  ...

docker exec -it 01f82e69c455 /bin/bash

# -it 需要连接的容器的CONTAINER ID
# /bin/bash 当前参数必须的
Copy after login
# 已找到相关命令解决上面两个问题, 在创建相同名称的新镜像文件时,避免旧镜像残留
# 可以先删除旧镜像文件

docker rmi -f <name>:<tag>
# 当前命令可以强制删除指定名称和tag的镜像文件
# 删除运行的容器
docker rm -f <name>
# -f 强制删除,如果容器正在运行也会被删除
# -v 删除当前容器挂载的数据卷

# 删除所有没有运行的容器
docker rm $(docker ps -a -q)

# 删除本地镜像文件
docker rmi -f <name>:<tag>
Command to pull the image:
docker pull freedomx20/nginx-fpm7.4:1.0
Docker Hub (ubuntu nginx php-fpm7.4 environment)
https://hub. docker.com/r/freedomx20/nginx-fpm7.4(Recommended tutorial:PHP video tutorial
)The above is the detailed content of How to use Dockerfile files to deploy PHP projects. For more information, please follow other related articles on the PHP Chinese website!