 Web Front-end
 PS Tutorial
 Image deformation algorithm: Implementing the forward deformation tool in the Photoshop Liquify toolbox
Image deformation algorithm: Implementing the forward deformation tool in the Photoshop Liquify toolbox
Many times, we need to adjust parts of an image, and this adjustment must be smooth and interactive. The Forward Warp tool in Photoshop’s Liquify filter is such a tool and it’s very useful. A similar tool has the face-slimming function of Meitu Xiuxiu. This article describes the principles and algorithms behind such tools.
Let’s take Meitu Xiuxiu as an example to briefly describe the forward transformation function.
First, use the mouse to control a circular selection.
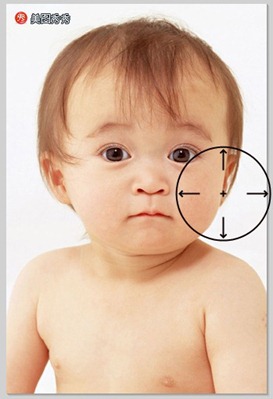
Then, click the left mouse button and drag in a certain direction to produce a smooth forward deformation picture:
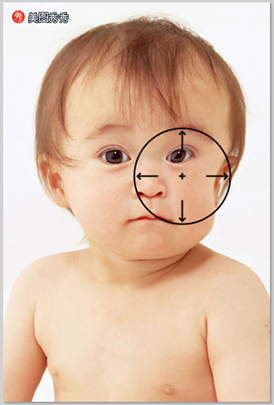
With this tool, you can adjust parts of the picture, and the degree of freedom is relatively large, so it is more practical.
The following explains the principles of this type of algorithm.
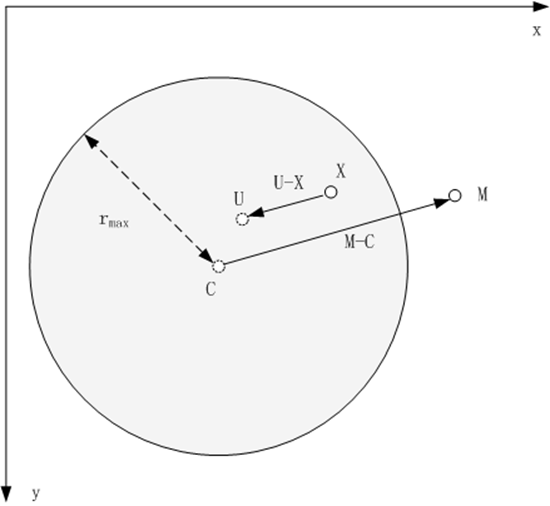
In the above figure, the shaded ring represents a circular selection with a radius of rmax. Among them, point C is the point when the mouse is clicked, which is the center of the circular selection. Drag the mouse from C to M, causing point U in the image to transform to point X. Therefore, the key issue is to find the inverse transformation of the above transformation - when a point , find the pixel value of U. In this way, each pixel in the circular selection is evaluated to obtain the transformed image.
Andreas Gustafsson's Interactive Image Warping article gives this inverse transformation formula:

The characteristics of this deformation algorithm are:
1 Only the image within the circular selection is deformed
2 The closer to the center of the circle, the greater the deformation, the closer to the edge the smaller the deformation, and there is no deformation at the boundary
3 The deformation is smooth
The specific implementation steps are as follows:
1 For each pixel in the circular selection, take out its R, G, and B components and store them in 3 Buffs (rBuff, gBuff, bBuff) (That is, the three Buffs respectively store the values of the R, G, and B channels of the original image in the selection)
2 For each pixel X in the circular selection,
2.1 According to the above formula, calculate the exact position coordinate value U
before its deformation. 2.2 Use the interpolation method to calculate R at the position of U based on the position of U and the values in rBuff, gBuff, and bBuff. G, B and other components
2.3 Synthesize R, G, B and other components into new pixels as the pixel value at , it can be easily written based on the above text - to solve this kind of problem, what is important is not the code, but the ideas and algorithms.
The following is my implementation demonstration:
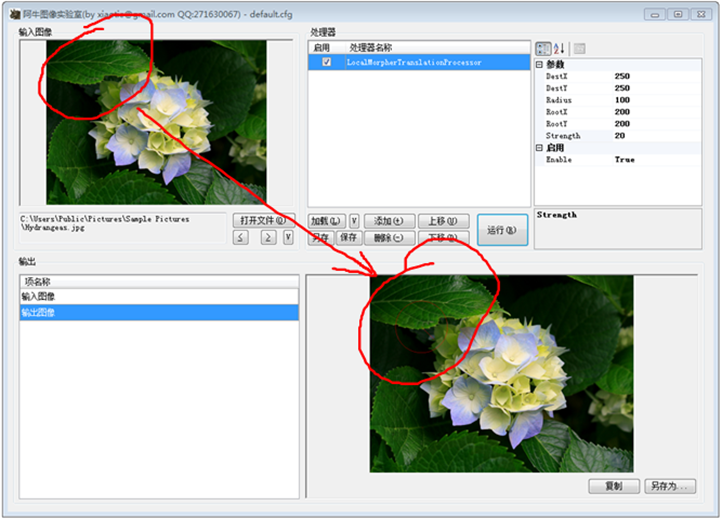 In the above picture, the upper left corner is the original image, and the lower right corner is the deformed image. The red circle encircles the deformation area. As you can see, the deformation is very smooth. I introduced the deformation strength s(strength) in the above algorithm, strength=20 in the above picture.
Introducing strength, the formula must be modified. Here is my modified version of the formula:
 Look at the result——
Original Picture:
 Deformation, strength=20:
Transformation, strength=120:
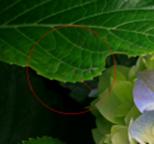
This function in photoshop and Meituxiu Xiu can continuously transform. I guess that this continuous deformation is connected in series by a series of basic deformations. That is, dragging the mouse from M0 to Mn position does not only calculate the M0->Mn transformation, but introduces a series of intermediate ones on the mouse trajectory. Point, M1, M2...Mn-1, and then perform a series of transformations on the image, such as M0->M1, M1->M2,..., Mn-1->Mn.
For more image deformation algorithms: Implementing the forward deformation tool in the Photoshop liquefaction toolbox, please pay attention to the PHP Chinese website for related articles!

Hot AI Tools

Undresser.AI Undress
AI-powered app for creating realistic nude photos

AI Clothes Remover
Online AI tool for removing clothes from photos.

Undress AI Tool
Undress images for free

Clothoff.io
AI clothes remover

Video Face Swap
Swap faces in any video effortlessly with our completely free AI face swap tool!

Hot Article

Hot Tools

Notepad++7.3.1
Easy-to-use and free code editor

SublimeText3 Chinese version
Chinese version, very easy to use

Zend Studio 13.0.1
Powerful PHP integrated development environment

Dreamweaver CS6
Visual web development tools

SublimeText3 Mac version
God-level code editing software (SublimeText3)

Hot Topics
 1677
1677
 14
14
 1431
1431
 52
52
 1334
1334
 25
25
 1279
1279
 29
29
 1257
1257
 24
24
 Advanced Photoshop Tutorial: Master Retouching & Compositing
Apr 17, 2025 am 12:10 AM
Photoshop's advanced photo editing and synthesis technologies include: 1. Use layers, masks and adjustment layers for basic operations; 2. Use image pixel values to achieve photo editing effects; 3. Use multiple layers and masks for complex synthesis; 4. Use "liquefaction" tools to adjust facial features; 5. Use "frequency separation" technology to perform delicate photo editing, these technologies can improve image processing level and achieve professional-level effects.
 Photoshop's Key Features: A Deep Dive
Apr 19, 2025 am 12:08 AM
Key features of Photoshop include layers and masks, adjustment tools, filters and effects. 1. Layers and masks allow independent editing of image parts. 2. Adjust tools such as brightness/contrast can modify image tone and brightness. 3. Filters and effects can quickly add visual effects. Mastering these features can help creative professionals achieve their creative vision.
 Using Photoshop: Creative Possibilities and Practical Uses
Apr 22, 2025 am 12:09 AM
Photoshop is very practical and creative in practical applications. 1) It provides basic editing, repairing and synthesis functions, suitable for beginners and professionals. 2) Advanced features such as content recognition fill and layer style can improve image effects. 3) Mastering shortcut keys and optimizing layer structure can improve work efficiency.
 Photoshop and Digital Art: Painting, Illustration, and Compositing
Apr 18, 2025 am 12:01 AM
Photoshop's applications in digital art include painting, illustration and image synthesis. 1) Painting: Using brushes, pencils and mixing tools, the artist can create realistic effects. 2) Illustration: With vector and shape tools, artists can accurately draw complex graphics and add effects. 3) Synthesis: Using mask and layer blending mode, artists can seamlessly blend different image elements.
 Using Photoshop for Graphic Design: Branding and More
Apr 16, 2025 am 12:02 AM
The steps to using Photoshop for brand design include: 1. Use the Pen tool to draw basic shapes, 2. Add shadows and highlights through layer styles, 3. Adjust colors and details, 4. Use smart objects and actions to automatically generate different versions of the design. Photoshop helps designers create and optimize brand elements with the flexibility of layers and masks, ensuring consistency and professionalism of designs, from simple logos to complex branding guides.
 Photoshop for Photographers: Enhancing and Retouching Images
Apr 25, 2025 am 12:01 AM
Enhance and retouching photos in Photoshop can be achieved by adjusting brightness and contrast, using the Repair Brush Tool. 1) Adjust brightness and contrast: Increase brightness and contrast to improve underexposed photos through the Image->Adjustments->Brightness/Contrast menu. 2) Use the Repair Brush Tool: Select HealingBrushTool in the toolbar and apply to remove miscellaneous points or scars in the image.
 What Photoshop Does Best: Common Tasks and Projects
Apr 23, 2025 am 12:06 AM
Photoshop is specialized in image editing, layering and masking, digital painting and a variety of design applications. 1) Image editing and repair: remove defects and adjust color and brightness. 2) Layers and masks: non-destructive editing and creation. 3) Digital paintings and illustrations: create art works. 4) Practical applications: graphic design, web design and digital art creation.
 Photoshop: A Versatile Tool for Image Manipulation
Apr 27, 2025 am 12:13 AM
Photoshop is so powerful in the field of image processing because of its versatility and intuitive operating interface. 1) It can handle various tasks from basic adjustment to complex synthesis, such as adjusting brightness and contrast. 2) Working based on layers and masks allows non-destructive editing. 3) Examples of usage include adjusting color balance and creating layer masks. 4) Common errors such as excessive editing can be avoided through the History panel. 5) Performance optimization suggestions include the use of smart objects and shortcut keys.


