

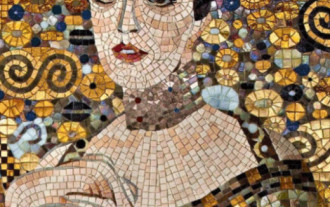
Photoshop制作时尚绚丽的五彩马赛克格子背景效果

今天就为大家详细介绍Photoshop制作时尚绚丽的五彩马赛克格子背景效果方法,教程制作出来的背景效果真的好看,非常绚丽。教程很不错,很值得学习,推荐过来,大家一起来学习吧!
原图:

临摹效果:

开整!新建一个600px*800px的文件。
底下的彩色格子要一个个画吗?我可不干这傻事,我的第六感告诉我,我以前在PS里看到过相似的东西——没错,就是色板。

将色板截图,BTW这是一个扁平化配色色板,没有的童鞋可以在这下载或者用其他色板代替:《专属扁平化设计的PS色板》

然后置入,按住shift拉伸至铺满画布。

滤镜–马赛克

色彩有点暗淡,加点饱和度(也可以最终做好之后再调色)

抄起油漆桶!往一些格子里倒白漆~

接下来开始做明暗纹理,完全用图层样式即可。
新建图层,画一个和马赛克等大的选框,填充任意颜色,(强迫症患者表示只有填充黑色才舒服(-__-)b),将填充更改为0

添加内阴影样式。

然后使用移动工具,按住Alt拖动,将其复制到多个格子。

再来制作顶部阴影样式,一个普通的渐变即可,可以在这个界面下用鼠标直接在画布上拖动渐变位置哦~做好后同样也复制多几几份到其他格子,原图上只有白色格子有这种效果,所以我也只用在了白色格子上。

再来制作三角效果,同样也是用渐变样式。

渐变的颜色滑块分别是:0%–黑色,50%–黑色,50%–白色,100%-白色。
不透明度滑块分别是:0%–100,50%–100,50%–0,100%-0。
【注:前面的x%是位置,“–”后面的是值。】

如图,做45°、-45°、135°、-135°共四个角度,分别复制多个随机分布。

接下来就是做这种效果了,方法也很简单,见下面的动图。

举个例子~就是把45°的三角复制一份叠到其他角度的三角上去啦~只要是不同角度的都可以叠出这种效果。

这里有个小技巧,切换到移动工具,把“自动选择:组”变成“自动选择:图层”。这样只要按住Ctrl键在画布上单机就可以选中相应图层,图层面板可以丢一边啦

最终效果 ↖( ̄▽ ̄”)

啊再补充一句如果需要做精确的格子需要先画参考线,我太懒就没弄这玩意了,使用GuideGuide这个插件一键就能画出复杂的参考线~


Hot AI Tools

Undresser.AI Undress
AI-powered app for creating realistic nude photos

AI Clothes Remover
Online AI tool for removing clothes from photos.

Undress AI Tool
Undress images for free

Clothoff.io
AI clothes remover

Video Face Swap
Swap faces in any video effortlessly with our completely free AI face swap tool!

Hot Article
Hot Tools

Notepad++7.3.1
Easy-to-use and free code editor

SublimeText3 Chinese version
Chinese version, very easy to use

Zend Studio 13.0.1
Powerful PHP integrated development environment

Dreamweaver CS6
Visual web development tools

SublimeText3 Mac version
God-level code editing software (SublimeText3)
Hot Topics


 What are the permanently free photoshopcs5 serial numbers?
Jul 06, 2023 am 10:00 AM
What are the permanently free photoshopcs5 serial numbers?
Jul 06, 2023 am 10:00 AM
The permanently free photoshopcs5 serial numbers are: 1. 1330-1440-1602-3671-9749-7897; 2. 1330-1191-2998-6712-2520-5424; 3. 1330-1367-4285-4928-0630-3107; 4. 1330-1570-9599-9499-8092-8237; 5. 1330-1028-1662-3206-1688-5114, etc.
 How to remove mosaics on Meitu Xiuxiu How to remove mosaics on Meitu Xiuxiu
Mar 12, 2024 pm 02:16 PM
How to remove mosaics on Meitu Xiuxiu How to remove mosaics on Meitu Xiuxiu
Mar 12, 2024 pm 02:16 PM
How to remove mosaics on Meitu Xiuxiu? Meitu Xiuxiu is a treasure trove of photo retouching software. The software provides users with a large number of high-definition materials and photo retouching recipes that are updated daily. Here, users can experience the latest and most fashionable photo retouching methods. In Meitu, no matter what part of the photo you are dissatisfied with, we can easily help you fix it. However, some novice users are not very clear about some operations of the software and do not know how to remove mosaics. For this reason, the editor has compiled the method of removing mosaics from Meitu Xiuxiu and brings it to everyone. Let’s take a look. How to remove mosaics on Meitu Xiu Xiu 1. Enter the home page of Meitu Xiu Xiu, select the option of beautify pictures and click to open; 2. Flip the page and select a picture you want to remove mosaics to open, and enter the edit picture page; 3.
 Solution: Fix keyboard shortcuts not working in Photoshop
Sep 22, 2023 pm 03:17 PM
Solution: Fix keyboard shortcuts not working in Photoshop
Sep 22, 2023 pm 03:17 PM
Adobe Photoshop is the industry standard for digital design, loved and used every day by the online community. However, when keyboard shortcuts stutter or fail entirely, it can significantly slow down any project or your overall productivity on Windows 11. Whether you're an experienced designer or just dabbling in photo editing, these glitches are more than just minor annoyances in Photoshop and Photoshop CC. First, let's look at the common reasons why custom or default shortcuts stop working. Why don't my shortcuts work in Photoshop? Customize workspace settings: Sometimes, adjusting or switching between workspace settings can reset keyboard shortcuts. Sticky Keys: This accessibility feature
 How to remove mosaic How to remove mosaic
Feb 22, 2024 pm 03:22 PM
How to remove mosaic How to remove mosaic
Feb 22, 2024 pm 03:22 PM
Use the imitation stamp to pick up the color of the picture and then apply it. Tutorial Applicable Model: Lenovo AIO520C System: Windows 10 Professional Edition: Photoshop 2020 Analysis 1 First enter PhotoShop and open the mosaic picture. 2In the toolbar on the left, find and click Clone Stamp. 3 Then press and hold the Alt key on the keyboard. 4. Move the mouse to pick the color in the picture. 5Then release the Alt key on the keyboard. 6Finally, use the mouse to smear on the mosaic area to eliminate the mosaic. Supplement: What is the principle of mosaic removal? 1. If you want to remove mosaic from a picture, it is equivalent to painting on a canvas with an outline. Although the color aspect is easier to handle, it is still very difficult to complete. because
 How to unlock mosaic
Nov 08, 2023 pm 04:36 PM
How to unlock mosaic
Nov 08, 2023 pm 04:36 PM
Mosaic unlocking refers to removing or modifying mosaics in images or videos to restore the blocked or modified content. If the mosaic exists due to technical reasons, it can be removed or modified through technical means, but it is necessary to comply with relevant laws, regulations and ethics, and it is not recommended to try.
 How to remove mosaics on MeituXiuXiu? Tutorial on how to remove mosaics and restore original pictures for Meitu Xiuxiu!
Mar 15, 2024 pm 10:37 PM
How to remove mosaics on MeituXiuXiu? Tutorial on how to remove mosaics and restore original pictures for Meitu Xiuxiu!
Mar 15, 2024 pm 10:37 PM
1. How to remove mosaics on Meitu Xiuxiu? Tutorial on how to remove mosaics and restore original pictures for Meitu Xiuxiu! 1. Open the MeituXiuXiu app and click on Picture Beautification on the homepage. 2. Select a picture in the photo album of your phone. 3. Click the Mosaic function in the bottom menu. 4. After selection, options will appear, click on the eraser option. 5. Apply to the mosaic area in the image to erase part of the mosaic and restore the original image.
 How to achieve the mosaic effect of images in Vue?
Aug 18, 2023 pm 03:41 PM
How to achieve the mosaic effect of images in Vue?
Aug 18, 2023 pm 03:41 PM
How to achieve the mosaic effect of images in Vue? The mosaic effect of pictures is a common image processing technique used to blur the details in the image, similar to the effect of a mosaic pattern. Implementing the mosaic effect of images in Vue can be accomplished using the Canvas element and some image processing algorithms. This article will introduce how to achieve this effect in a Vue project, with code examples. Preparation work: First, install the Canvas library in the Vue project. You can use npm or yarn to install it. npmin
 How to achieve mosaic and blur effects of images in Vue?
Aug 26, 2023 pm 06:14 PM
How to achieve mosaic and blur effects of images in Vue?
Aug 26, 2023 pm 06:14 PM
How to achieve mosaic and blur effects of images in Vue? Mosaic and blur effects are common image processing methods that can make images more artistic and have special effects. It is relatively simple to implement these effects in Vue. We can use the HTML5 canvas element and some third-party libraries to achieve it. This article will introduce the implementation method from two aspects: mosaic and blur, and attach corresponding code examples. 1. To achieve the mosaic effect of images, install and introduce the third-party library pixi.js in the Vue project: np
