如何使用Photoshop调出美女照片的青黄小日系色调效果
本教程主要使用Photoshop调出美女照片的青黄小日系色调效果,主要通过“可选颜色”、“自然饱和度”和“色相饱和度”这3个命令来完成,另外,在画面中添加了一些文字作为点缀,最终完成了此作品。教程推荐过来和大家一起分享学习了。
最终效果

原图

1、打开素材文件,按Ctrl+L调出“色阶”对话框,设置参数如图1,得到的图像效果如图2。
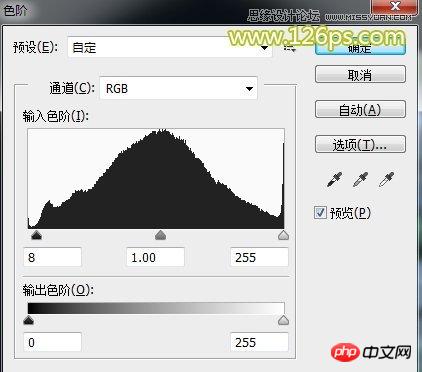
图1

图2
2、按Ctrl+M调出“曲线”对话框,向上拖动曲线如图3,增加图像的整体亮度。得到的图像效果如图4。
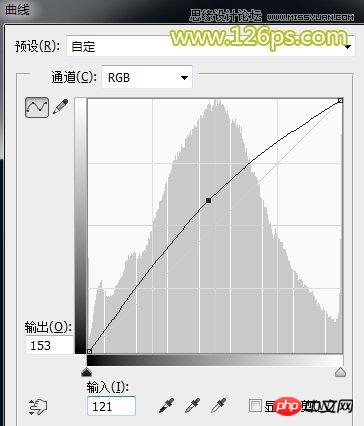
图3

图4
3、创建“自然饱和度”调整图层,设置参数如图5,使无法显示的颜色显现出来,得到的图像效果如图6。

图5
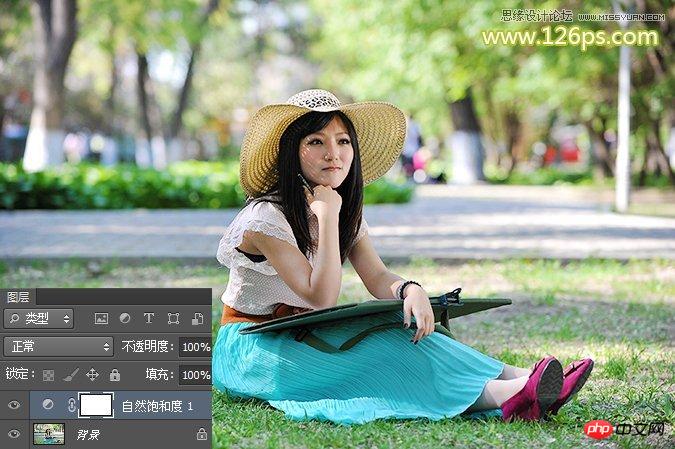
图6
4、创建“可选颜色”调整图层,设置参数如图7、8、9、10、11,得到的图像效果如图12。
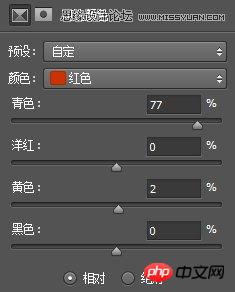
图7(这一步骤的目的是调整人肤皮肤的颜色,不让皮肤的颜色太红。)
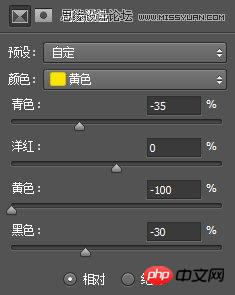
图8(这一步骤的目的是调整肤色和背景中黄色的部分)
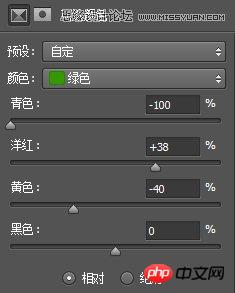
图9(这一步骤的目的是调整背景中绿色的部分,使图像偏向于暖色调。)
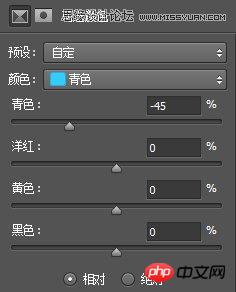
图10(这一步骤的目的是调整人物裙子的颜色)
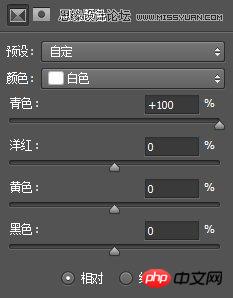
图11 (这一步骤的目的是调整图像中白色的部分,让白色偏向于青色调)
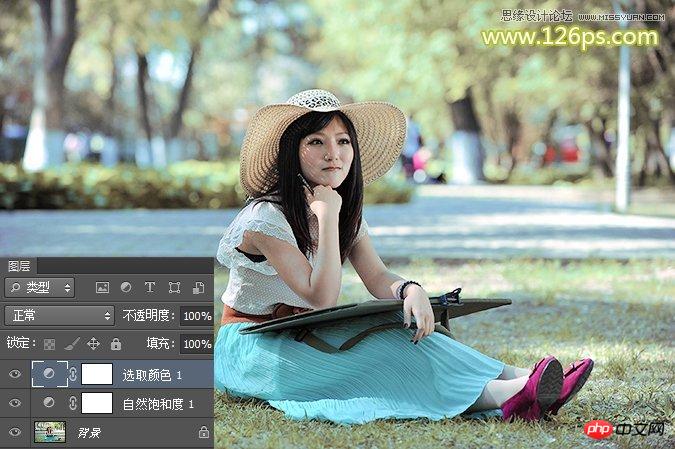
图12
4、创建“色相/饱和度”调整图层,设置参数如图13,这一步骤的目的是降低图像的整体饱和度,让片子有点淡雅的味道,得到的图像效果如图14。
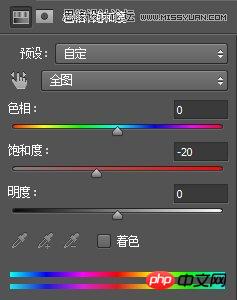
图13
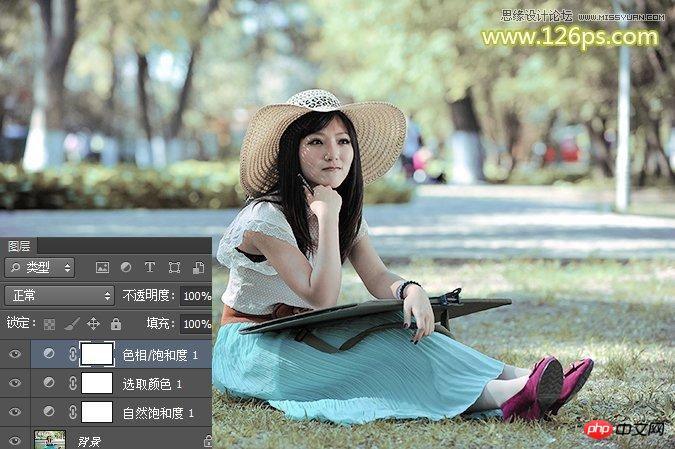
图14
5、按快捷键Ctrl+Shift+Alt+E盖印图层,得到“图层1”图层,然后按L键选择套索工具,勾选出如图15所示的区域。

图15
6、按快捷键Shift+F5调出“填充”对话框,参数保持不变,直接单击“确定”。这一步骤的目的是去除图像中的电线杆,让画面更加干净,如图16。

图16
7、选择污点修复画笔工具,设置适当的画笔大小,然后在图像的脸部单击,修除人物面部的小颗粒,如图17。
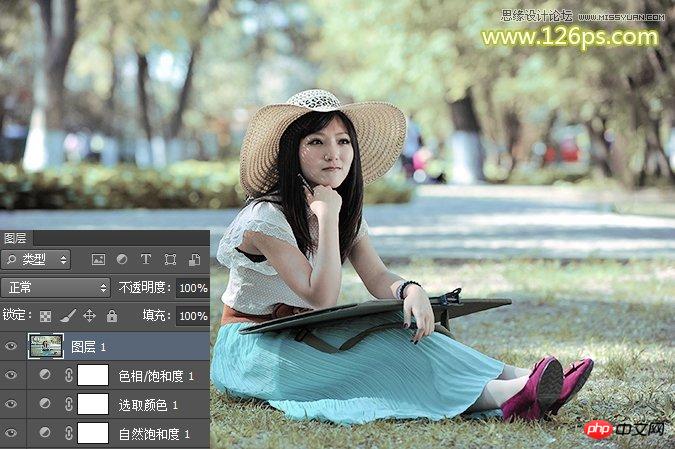
图17
8、执行“滤镜>Imagenomic>Portraiture”命令,设置参数如图18,这一步骤的目的是进行磨皮处理,得到的图像效果如图19。Portraiture滤镜下载地址
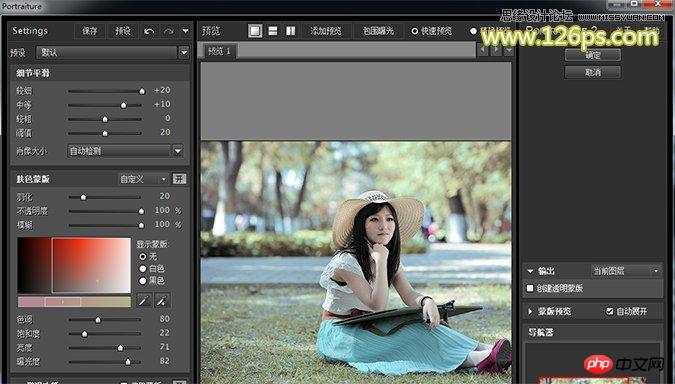
图18
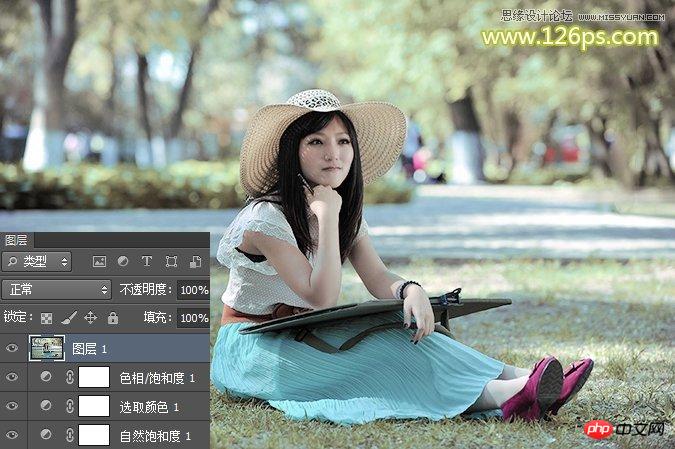
图19
9、按快捷键Ctrl+J复制图层1,得到“图层1副本”图层,执行“滤镜>模糊>场景模糊”命令,设置参数如图20,得到的图像效果如图21。

图20

图21
10、单击“图层”面板底部的“添加图层蒙版”按钮,得到白色的蒙版。将前景色设置为黑色,背景色为白色,选择画笔工具,将“不透明度”更改为50%左右,“硬度”为0,然后在人物部分单击,擦除掉人物部分,得到的图像效果如图22。

图22
11、按快捷键Ctrl+Shift+Alt+E盖印图层,得到“图层2”图层,执行“滤镜>渲染>镜头光晕”命令,设置参数如图23,得到的图像效果如图24。

图23

图24
12、将制作好的文字导入,并放置于合适位置,效果如图25。

图25
13、盖印可见图层,得到“图层4”图层,执行“滤镜>锐化>USM锐化”命令,设置参数如图26,得到的图像最终效果如下图。

图26
最终效果图

以上就是用Photoshop调出美女照片的青黄小日系色调效果过程,感兴趣的朋友可以自己尝试制作一下,希望本篇教程对大家有所帮助!

Hot AI Tools

Undresser.AI Undress
AI-powered app for creating realistic nude photos

AI Clothes Remover
Online AI tool for removing clothes from photos.

Undress AI Tool
Undress images for free

Clothoff.io
AI clothes remover

Video Face Swap
Swap faces in any video effortlessly with our completely free AI face swap tool!

Hot Article

Hot Tools

Notepad++7.3.1
Easy-to-use and free code editor

SublimeText3 Chinese version
Chinese version, very easy to use

Zend Studio 13.0.1
Powerful PHP integrated development environment

Dreamweaver CS6
Visual web development tools

SublimeText3 Mac version
God-level code editing software (SublimeText3)

Hot Topics
 1672
1672
 14
14
 1428
1428
 52
52
 1332
1332
 25
25
 1277
1277
 29
29
 1257
1257
 24
24
 Advanced Photoshop Tutorial: Master Retouching & Compositing
Apr 17, 2025 am 12:10 AM
Photoshop's advanced photo editing and synthesis technologies include: 1. Use layers, masks and adjustment layers for basic operations; 2. Use image pixel values to achieve photo editing effects; 3. Use multiple layers and masks for complex synthesis; 4. Use "liquefaction" tools to adjust facial features; 5. Use "frequency separation" technology to perform delicate photo editing, these technologies can improve image processing level and achieve professional-level effects.
 Photoshop's Key Features: A Deep Dive
Apr 19, 2025 am 12:08 AM
Key features of Photoshop include layers and masks, adjustment tools, filters and effects. 1. Layers and masks allow independent editing of image parts. 2. Adjust tools such as brightness/contrast can modify image tone and brightness. 3. Filters and effects can quickly add visual effects. Mastering these features can help creative professionals achieve their creative vision.
 Using Photoshop: Creative Possibilities and Practical Uses
Apr 22, 2025 am 12:09 AM
Photoshop is very practical and creative in practical applications. 1) It provides basic editing, repairing and synthesis functions, suitable for beginners and professionals. 2) Advanced features such as content recognition fill and layer style can improve image effects. 3) Mastering shortcut keys and optimizing layer structure can improve work efficiency.
 Photoshop and Digital Art: Painting, Illustration, and Compositing
Apr 18, 2025 am 12:01 AM
Photoshop's applications in digital art include painting, illustration and image synthesis. 1) Painting: Using brushes, pencils and mixing tools, the artist can create realistic effects. 2) Illustration: With vector and shape tools, artists can accurately draw complex graphics and add effects. 3) Synthesis: Using mask and layer blending mode, artists can seamlessly blend different image elements.
 Using Photoshop for Graphic Design: Branding and More
Apr 16, 2025 am 12:02 AM
The steps to using Photoshop for brand design include: 1. Use the Pen tool to draw basic shapes, 2. Add shadows and highlights through layer styles, 3. Adjust colors and details, 4. Use smart objects and actions to automatically generate different versions of the design. Photoshop helps designers create and optimize brand elements with the flexibility of layers and masks, ensuring consistency and professionalism of designs, from simple logos to complex branding guides.
 Photoshop for Photographers: Enhancing and Retouching Images
Apr 25, 2025 am 12:01 AM
Enhance and retouching photos in Photoshop can be achieved by adjusting brightness and contrast, using the Repair Brush Tool. 1) Adjust brightness and contrast: Increase brightness and contrast to improve underexposed photos through the Image->Adjustments->Brightness/Contrast menu. 2) Use the Repair Brush Tool: Select HealingBrushTool in the toolbar and apply to remove miscellaneous points or scars in the image.
 What Photoshop Does Best: Common Tasks and Projects
Apr 23, 2025 am 12:06 AM
Photoshop is specialized in image editing, layering and masking, digital painting and a variety of design applications. 1) Image editing and repair: remove defects and adjust color and brightness. 2) Layers and masks: non-destructive editing and creation. 3) Digital paintings and illustrations: create art works. 4) Practical applications: graphic design, web design and digital art creation.
 Photoshop's Subscription Model: What You Get for Your Money
Apr 15, 2025 am 12:17 AM
Photoshop's subscription model is worth buying. 1) Users can access the latest version and use across devices at any time. 2) The subscription fee is low, and continuous updates and technical support are provided. 3) Advanced functions such as neural filters can be used for complex image processing. Despite the high long-term costs, its convenience and feature updates are valuable to professional users.


