The above article talked about the work queue. Each message will only be sent to one of the receivers. If the message needs to be broadcast so that every receiver can receive it, then a switch must be used.
The working principle of the switch: The message sending end first sends the message to the switch, and the switch then sends the message to the bound message queue, and then each receiving end can Information is received in their respective message queues.

Working principle of rabbitmq switch
The following uses send.py and receive.py to simulate the function of the switch. send.py represents the sending end, and receive.py represents the receiving end.
receive.py code analysis
Compared with receive.py in the first article, it mainly does Two changes have been made:
Define the switch
Instead of using the hello queue, a temporary queue is randomly generated and bound to the switch
#!/usr/bin/env python
#coding=utf8
import pika
connection= pika.BlockingConnection(pika.ConnectionParameters(
'localhost'))
channel= connection.channel()
#定义交换机
channel.exchange_declare(exchange='messages',type='fanout')
#随机生成队列,并绑定到交换机上
result= channel.queue_declare(exclusive=True)
queue_name= result.method.queue
channel.queue_bind(exchange='messages', queue=queue_name)
def callback(ch, method, properties, body):
print " [x] Received %r" % (body,)
channel.basic_consume(callback, queue=queue_name, no_ack=True)
print ' [*] Waiting for messages. To exit press CTRL+C'
channel.start_consuming()
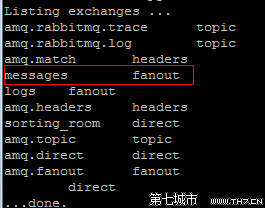
In the above example code, the parameter of queue_declare is exclusive =True means that when the receiving end exits, the temporarily generated queue is destroyed so that resources will not be occupied. Run this program, and then use the rabbitmqctl list_exchanges command to view the switch information:

rabbitmq switch information view
where red The frame is the switch defined in the above example. Then use rabbitmqctl list_queues to check the message queue situation:

rabbitmq queue information view
The red box is randomly generated message queue.
send.py code analysis
Compared with send.py in the first article, I only did Two changes:
Define the switch
Instead of sending the message to the hello queue, it is sent to the switch
#!/usr/bin/env python
#coding=utf8
import pika
connection= pika.BlockingConnection(pika.ConnectionParameters(
'localhost'))
channel= connection.channel()
#定义交换机
channel.exchange_declare(exchange='messages',type='fanout')
#将消息发送到交换机
channel.basic_publish(exchange='messages', routing_key='', body='Hello World!')
print " [x] Sent 'Hello World!'"
connection.close()
In the above example code, the parameter exchange of the basic_publish method is set to the corresponding The switch needs to broadcast and send it to all queues, so routing_key does not need to be set.
If exchange is empty, it means an anonymous switch is used. In the picture of the switch information above, you can see that there is a switch like amq.*, which is the system default switch. . Routing_key only needs to be specified when using an anonymous switch, indicating which queue it is sent to. The example in the first article demonstrates this functionality.
Open another terminal and execute send.py. You can observe that receive.py has received the message. If multiple terminals execute receive.py, each receive.py will receive the message.
The above is the content of using Python rabbitmq (3). For more related content, please pay attention to the PHP Chinese website (www.php.cn)!


