This article brings you relevant knowledge about Redis, which mainly introduces related issues about clusters, and talks about the master-slave mode in detail, including our master-slave clusters, etc. , let’s take a look at it, I hope it will be helpful to everyone.

Recommended learning: Redis video tutorial
In our actual development, It is not possible to use only one Redis in engineering projects for the following reasons:
(1) From the structure, a single Redis server will have a single point of failure, and one server needs to handle all request loads, High pressure ;
(2) In terms of capacity, the memorycapacity of a single Redis server is limited, even if it is a Redis server The memory capacity is 256G, and all memory cannot be used as Redis storage memory. Generally speaking, the maximum memory used by a single Redis should not exceed 20G.
(3) The reading and writing performance of a single Redis server is limited, and the use of clusters can improve the reading and writing capabilities.
Currently, Redis has three cluster modes, namely: Master-slave mode, sentinel mode, Cluster mode; the master-slave mode is the simplest of the three modes. In master-slave replication, refers to the data of a Redis server. Copy to other Redis servers. The former is called the master node (master/leader), and the latter is called the slave node (slave/follower).
##Note:
(1)Data replication is one-way, only from the master node to the slave node. Master is mainly for writing, and Slave is mainly for reading. (2)
By default, each Redis server is a master node; (3)
A master node can have multiple Slave node (or no slave node), but a slave node can only have one master node.

1,For example, you can find on our e-commerce website thatData redundancy: Main Hot backup of data is realized through replication, which is a data redundancy method in addition to persistence. 2.
Failure recovery: When the master node has a problem, the slave node can provide services to achieve rapid failure recovery; it is actually a kind of service redundancy. 3.
The cornerstone of high availability (cluster): Master-slave replication is still the basis for the implementation of sentinels and clusters. Therefore, master-slave replication is the basis of Redis high availability. 4.
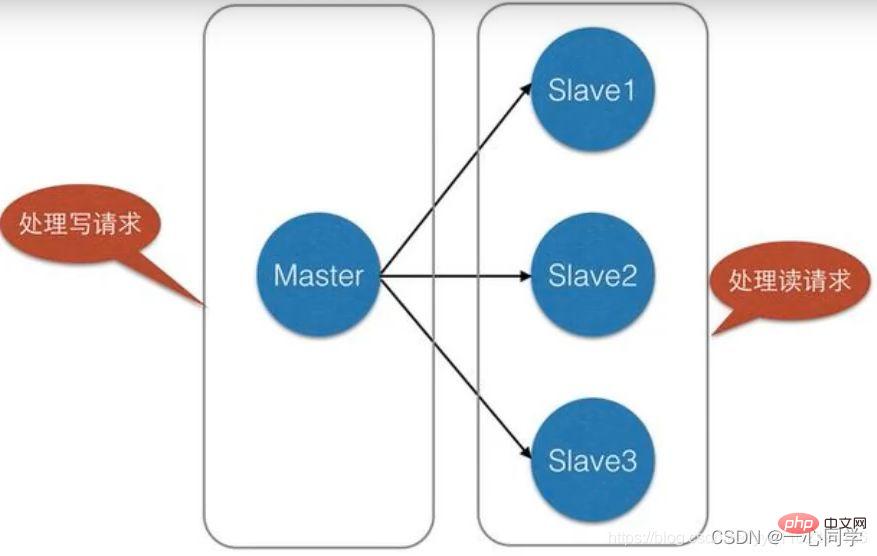
Load balancing: On the basis of master-slave replication, combined with read-write separation, the master node can provide write services, and the slave nodes can provide read services (i.e. write Redis data should be connected to the master node, and Redis data should be read from the slave node) to share the server load; especially in scenarios where there is less writing and more reading, sharing the reading load through multiple slave nodes can greatly increase the concurrency of the Redis server. .
a product only needs to be uploaded once, but it can be viewed multiple times by the user, that is, "Write less and read more" In this case, we can use master-slave replication to separate reading and writing,Reduce the pressure on the server:

1. Copy the three configuration files (original name: redis.conf), and renamed to: redis79.conf, redis80.conf,redis81.conf.

2. Modify the configuration file
(1) Modify redis79. conf
Modify the port number
port 6379
Set to run in the background
daemonize:yes
Set the name of the log file
logfile “6379.log"
Set the name of the db file
dbfilename dump6379.rdb
(2) Modify redis80.conf
Modify the port number
port 6380
Set to run in the background
daemonize:yes
Set the recording process Id file name
pidfile /var/run/redis_6380.pid
Set the name of the log file
logfile “6380.log"
Set the name of the db file
dbfilename dump6380.rdb
(3) Modify redis81.conf
Modify the port number
port 6381
Set to run in the background
daemonize:yes
Set the recording process Id file name
pidfile /var/run/redis_6381.pid
Set the name of the log file
logfile “6381.log"
Set the name of the db file
dbfilename dump6381.rdb
The functions of these attributes are as follows:
pid(port ID): records the ID of the process and the file band locked. Prevents the program from being started multiple times.
logfile: Clear the location of the log file
dbfilename: dumpxxx.file #Persistent file location
port: The port occupied by the process No.
Note: By default, each Reids server is the master node, and if we want to build a master-slave node, we only need to build it on the slave machine.
Now start respectively redis79, redis80, redis81Server.
redis-server redis79.conf
redis-server redis80.conf
redis-server redis81.conf
Use the following command to check whether the startup is successful:
ps -ef|grep redis

Open three client windows , corresponding to the operation of three Redis servers.
Enter the command:
Note that you need to specify the port to know which Redis we want to open.
Window one:
redis-cli -p 6379
Window two:
redis-cli -p 6380
Window three:
redis-cli -p 6381
We set redis79 as the primary node , and redis80 and redis81 as From node .
Configuring the IP address and port number of the host is equivalent to wanting to recognize it as your boss.
redis80:
#SLAVEOF IP地址  端口
127.0.0.1:6380> slaveof 127.0.0.1 6379
OK
redis81:
#SLAVEOF IP地址  端口
127.0.0.1:6381> slaveof 127.0.0.1 6379
OK
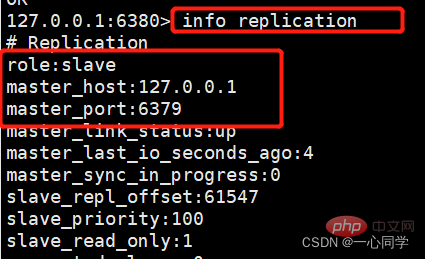
这个时候,我们在从机使用INFO命令就可以查看主从关系了:
info replication

而此时我们去主机redis79中使用同样的命令进行查看:

现在我们的一主二从的关系就成功搭建好了!
提示:如果要将从机变成主机,我们只需要在从机执行以下命令,即可让自己变为主机。
SLAVEOF no one
主机可以进行读写操作,而从机只能读操作。
注意:主机中的所有信息和数据,都会自动被从机保存。
主机:
127.0.0.1:6379> set key1 v1
OK
127.0.0.1:6379> get key1
"v1"
从机:
127.0.0.1:6380> get key1
"v1"
127.0.0.1:6380> set key2 v2    #进行写操作就会报错,提示从机只能进行读操作
(error) READONLY You can't write against a read only replica.
主机如果宕机了,从机依旧可以读取到主机宕机前的数据,但仍然没有写操作,如果主机恢复过来了,从机依旧可以获取到主机写的数据。
(1)停止主机进程(演示主机宕机了)
停止进程的命令:
kill -9 pid #pid为redis进程号

(2)从机获取宕机前主机写入的数据
可以发现,能够顺利拿到,但仍然是无法进行写操作的。

(3)恢复主机
redis-server redis79.conf
(4)主机重新写入数据,从机获取最新数据。
主机写入数据:
127.0.0.1:6379> set k2 yixin
OK
从机读取最新数据:
127.0.0.1:6380> get k2
"yixin"
两种配置方式下的从机断开情况
从机断开了,其重新连接后变为主机,能拿到断开之前的数据,但拿不到主机新写入的值,如果重新设置主从关系,就可以拿到主机全部的数据了。
(1)停止从机进程。

(2)主机写入新数据。
127.0.0.1:6379> set k3 new
OK
(3)重新启动从机服务器。
redis-server redis80.conf
(4)尝试获取从机宕机前主机写入的数据,发现可以拿到。
127.0.0.1:6380> get k1
"v1"
(5)尝试获取从机宕机期间主机写入的数据,发现无法拿到了。
127.0.0.1:6380> get k3
(nil)
此次我们可以进行查看主从关系,由于是命令行配置的,所以重启之后又变回主机了。
127.0.0.1:6380> info replication
# Replication
role:master
connected_slaves:0
(6)如果要拿到主机的所有数据,只要执行以下命令重新配置主从关系就可以了。
slaveof 127.0.0.1 6379
从机断开后,重新连接,也是可以拿到主机的全部数据的。
(1)修改配置文件redis80.conf,添加主从关系。
#指定主机的ip与port
slaveof 127.0.0.1 6379
(2)主机添加新数据
127.0.0.1:6379> set k5 hello
OK
(3)重新启动redis80服务器。
redis-server redis80.conf
(4)获取从机宕机期间主机新写入的数据,发现现在可以顺利拿到了。
127.0.0.1:6380> get k5
"hello"
我们来查看6380的主从关系,可以发现在重启的时候就已经设置好主从关系了。

(1)Slave 启动成功连接到 Master 后会发送一个sync同步命令
(2)Master 接到命令,启动后台的存盘进程,同时收集所有接收到的用于修改数据集命令,在后台进程执行完毕之后,master将传送整个数据文件到slave,并完成一次完全同步。
(3)全量复制:而slave服务在接收到数据库文件数据后,将其存盘并加载到内存中。
(4)增量复制:Master 继续将新的所有收集到的修改命令依次传给slave,完成同步。
注意:只要是重新连接master,一次完全同步(全量复制)将被自动执行! 我们的数据一定可以在从机中看到。
(1)同一个Master可以同步多个Slaves。
(2)Slave同样可以接受其它Slaves的连接和同步请求,这样可以有效的分载Master的同步压力。因此我们可以将Redis的Replication架构视为图结构。
(3)Master Server是以非阻塞的方式为Slaves提供服务。所以在Master-Slave同步期间,客户端仍然可以提交查询或修改请求。
(4)Slave Server同样是以非阻塞的方式完成数据同步。在同步期间,如果有客户端提交查询请求,Redis则返回同步之前的数据。
(5)为了分载Master的读操作压力,Slave服务器可以为客户端提供只读操作的服务,写服务仍然必须由Master来完成。即便如此,系统的伸缩性还是得到了很大的提高。
(6)Master可以将数据保存操作交给Slaves完成,从而避免了在Master中要有独立的进程来完成此操作。
(7)支持主从复制,主机会自动将数据同步到从机,可以进行读写分离。
(1) Redis 主从模式不具备自动容错和恢复功能,如果主节点宕机,Redis 集群将无法工作,此时需要人为干预,将从节点提升为主节点。
(2) 如果主机宕机前有一部分数据未能及时同步到从机,即使切换主机后也会造成数据不一致的问题,从而降低了系统的可用性。
(3) 因为只有一个主节点,所以其写入能力和存储能力都受到一定程度地限制。
(4) 在进行数据全量同步时,若同步的数据量较大可能会造卡顿的现象。
推荐学习:Redis视频教程
The above is the detailed content of Detailed explanation of Redis cluster master-slave mode. For more information, please follow other related articles on the PHP Chinese website!
 Commonly used database software
 What are the in-memory databases?
 Which one has faster reading speed, mongodb or redis?
 How to use redis as a cache server
 How redis solves data consistency
 How do mysql and redis ensure double-write consistency?
 What data does redis cache generally store?
 What are the 8 data types of redis