

This article brings you a summary and sharing of the new features of vue3.0. Vue3.0 has been updating and optimizing since the first One Piece version was released in September 2020; the official documents of the Chinese version have also been released. ;So as end users, let’s take a look at what new functions and features Vue3 has added. I hope everyone has to help.

You Dada shared several highlights of Vue3.0 during the live broadcast at Station B:
Performance: Performance Optimization
Tree-shaking support:Support tree shaking optimization
Composition API:Composition API
Fragment, Teleport, Suspense: New components
Better TypeScript support: Better TypeScript support
Custom Renderer API: Customization Renderer
In terms of performance, compared to Vue2. 13.5kb; including all runtime features, it is only 22.5kb.
So as end users, what is the difference between us and Vue2.x during development? Talk is cheap, let’s look at the code.
One of the most important changes in Vue3 is the introduction of Tree-Shaking. It is obvious that the bundle size brought by Tree-Shaking is smaller. In version 2.x, many functions are mounted on the global Vue object, such as nextTick, nextTick, nextTick, set and other functions. Therefore, although we may not use it, as long as vue is introduced during packaging, these global functions will still be packaged. into the bundle.
In Vue3, all APIs are introduced through ES6 modularization, which allows packaging tools such as webpack or rollup to eliminate unused APIs during packaging and minimize the bundle size; we Such changes can be found in main.js:
//src/main.js
import { createApp } from "vue";
import App from "./App.vue";
import router from "./router";

const app = createApp(App);
app.use(router).mount("#app");The way to create an app instance has changed from the original new Vue() to creating it through the createApp function; however, some core functions such as The virtualDOM update algorithm and responsive system will be packaged anyway; the changes brought about by this are the previously globally configured components (Vue.component), directives (Vue.directive), mixins (Vue.mixin) and plug-ins ( Vue.use) etc. become methods directly mounted on the instance; we call them through the created instance. The advantage is that an application can have multiple Vue instances, and the configurations between different instances will not affect each other:
const app = createApp(App)
app.use(/* ... */)
app.mixin(/* ... */)
app.component(/* ... */)
app.directive(/* ... */)
Therefore, the following global APIs of Vue2.x also need to be changed to ES6 modular introduction:
Vue.nextTick
Vue.observable is no longer supported, changed to reactive
Vue.version
Vue.compile (only full Build)
Vue.set (Compatible build only)
Vue.delete (Compatible build only)
In addition, both vuex and vue-router have also been improved using Tree-Shaking, but the syntax of the API has not changed much:
//src/store/index.js
import { createStore } from "vuex";

export default createStore({
  state: {},
  mutations: {},
  actions: {},
  modules: {},
});
//src/router/index.js
import { createRouter, createWebHistory } from "vue-router";

const router = createRouter({
  history: createWebHistory(process.env.BASE_URL),
  routes,
});us As we all know, there are 8 life cycle functions in Vue2.x:
beforeCreate
created
beforeMount
mounted
beforeUpdate
updated
beforeDestroy
destroyed
In vue3, a new setup life cycle function is added, The timing of setup execution is before the beforeCreate life function, so the instance cannot be obtained through this in this function; at the same time, for the sake of naming unification, beforeDestroy was renamed to beforeUnmount, destroyed was renamed to unmounted, so vue3 has the following life cycle functions:
before the life cycle function. onTo access the life cycle of the component, we can use the following life cycle hook:
import { onBeforeMount, onMounted } from "vue";
export default {
  setup() {
    console.log("----setup----");
    onBeforeMount(() => {
      // beforeMount代码执行
    });
    onMounted(() => {
      // mounted代码执行
    });
  },
}reactive to create responsive state for JS objects:
import { reactive, toRefs } from "vue";
const user = reactive({
  name: 'Vue2',
  age: 18,
});
user.name = 'Vue3'.
对于一些基本数据类型,比如字符串和数值等,我们想要让它变成响应式,我们当然也可以通过reactive函数创建对象的方式,但是Vue3提供了另一个函数ref:
import { ref } from "vue";
const num = ref(0);
const str = ref("");
const male = ref(true);

num.value++;
console.log(num.value);

str.value = "new val";
console.log(str.value);

male.value = false;
console.log(male.value);ref返回的响应式对象是只包含一个名为value参数的RefImpl对象,在js中获取和修改都是通过它的value属性;但是在模板中被渲染时,自动展开内部的值,因此不需要在模板中追加.value。
<template>
<p>
<span>{{ count }}</span>
<button>Increment count</button>
</p>
</template>
<script>
import { ref } from 'vue'
export default {
setup() {
const count = ref(0)
return {
count
}
}
}
</script>reactive主要负责复杂数据结构,而ref主要处理基本数据结构;但是很多童鞋就会误解ref只能处理基本数据,ref本身也是能处理对象和数组的:
import { ref } from "vue";

const obj = ref({
  name: "qwe",
  age: 1,
});
setTimeout(() => {
  obj.value.name = "asd";
}, 1000);

const list = ref([1, 2, 3, 4, 6]);
setTimeout(() => {
  list.value.push(7);
}, 2000);当我们处理一些大型响应式对象的property时,我们很希望使用ES6的解构来获取我们想要的值:
let book = reactive({
  name: 'Learn Vue',
  year: 2020,
  title: 'Chapter one'
})
let {
  name,
} = book

name = 'new Learn'
// Learn Vue
console.log(book.name);但是很遗憾,这样会消除它的响应式;对于这种情况,我们可以将响应式对象转换为一组ref,这些ref将保留与源对象的响应式关联:
let book = reactive({
  name: 'Learn Vue',
  year: 2020,
  title: 'Chapter one'
})
let {
  name,
} = toRefs(book)

// 注意这里解构出来的name是ref对象
// 需要通过value来取值赋值
name.value = 'new Learn'
// new Learn
console.log(book.name);对于一些只读数据,我们希望防止它发生任何改变,可以通过readonly来创建一个只读的对象:
import { reactive, readonly } from "vue";
let book = reactive({
  name: 'Learn Vue',
  year: 2020,
  title: 'Chapter one'
})

const copy = readonly(book);
//Set operation on key "name" failed: target is readonly.
copy.name = "new copy";有时我们需要的值依赖于其他值的状态,在vue2.x中我们使用computed函数来进行计算属性,在vue3中将computed功能进行了抽离,它接受一个getter函数,并为getter返回的值创建了一个不可变的响应式ref对象:
const num = ref(0);
const double = computed(() => num.value * 2);
num.value++;
// 2
console.log(double.value);
// Warning: computed value is readonly
double.value = 4
或者我们也可以使用get和set函数创建一个可读写的ref对象:
const num = ref(0);
const double = computed({
  get: () => num.value * 2,
  set: (val) => (num.value = val / 2),
});

num.value++;
// 2
console.log(double.value);

double.value = 8
// 4
console.log(num.value);和computed相对应的就是watch,computed是多对一的关系,而watch则是一对多的关系;vue3也提供了两个函数来侦听数据源的变化:watch和watchEffect。
我们先来看下watch,它的用法和组件的watch选项用法完全相同,它需要监听某个数据源,然后执行具体的回调函数,我们首先看下它监听单个数据源的用法:
import { reactive, ref, watch } from "vue";

const state = reactive({
  count: 0,
});

//侦听时返回值得getter函数
watch(
  () => state.count,
  (count, prevCount) => {
    // 1 0
    console.log(count, prevCount);
  }
);
state.count++;

const count = ref(0);
//直接侦听ref
watch(count, (count, prevCount) => {
  // 2 0
  console.log(count, prevCount, "watch");
});
count.value = 2;我们也可以把多个值放在一个数组中进行侦听,最后的值也以数组形式返回:
const state = reactive({
  count: 1,
});
const count = ref(2);
watch([() => state.count, count], (newVal, oldVal) => {
  //[3, 2]  [1, 2]
  //[3, 4]  [3, 2]
  console.log(newVal, oldVal);
});
state.count = 3;

count.value = 4;如果我们来侦听一个深度嵌套的对象属性变化时,需要设置deep:true:
const deepObj = reactive({
  a: {
    b: {
      c: "hello",
    },
  },
});

watch(
  () => deepObj,
  (val, old) => {
    // new hello new hello
    console.log(val.a.b.c, old.a.b.c);
  },
  { deep: true }
);

deepObj.a.b.c = "new hello";最后的打印结果可以发现都是改变后的值,这是因为侦听一个响应式对象始终返回该对象的引用,因此我们需要对值进行深拷贝:
import _ from "lodash";
const deepObj = reactive({
  a: {
    b: {
      c: "hello",
    },
  },
});

watch(
  () => _.cloneDeep(deepObj),
  (val, old) => {
    // new hello hello
    console.log(val.a.b.c, old.a.b.c);
  },
  { deep: true }
);

deepObj.a.b.c = "new hello";一般侦听都会在组件销毁时自动停止,但是有时候我们想在组件销毁前手动的方式进行停止,可以调用watch返回的stop函数进行停止:
const count = ref(0);

const stop = watch(count, (count, prevCount) => {
  // 不执行
  console.log(count, prevCount);
});

setTimeout(()=>{
  count.value = 2;
}, 1000);
// 停止watch
stop();还有一个函数watchEffect也可以用来进行侦听,但是都已经有watch了,这个watchEffect和watch有什么区别呢?他们的用法主要有以下几点不同:
watchEffect不需要手动传入依赖
每次初始化时watchEffect都会执行一次回调函数来自动获取依赖
watchEffect无法获取到原值,只能得到变化后的值
import { reactive, ref, watch, watchEffect } from "vue";

const count = ref(0);
const state = reactive({
  year: 2021,
});

watchEffect(() => {
  console.log(count.value);
  console.log(state.year);
});
setInterval(() => {
  count.value++;
  state.year++;
}, 1000);watchEffect会在页面加载时自动执行一次,追踪响应式依赖;在加载后定时器每隔1s执行时,watchEffect都会监听到数据的变化自动执行,每次执行都是获取到变化后的值。
Composition API(组合API)也是Vue3中最重要的一个功能了,之前的2.x版本采用的是Options API(选项API),即官方定义好了写法:data、computed、methods,需要在哪里写就在哪里写,这样带来的问题就是随着功能增加,代码也越来复杂,我们看代码需要上下反复横跳:
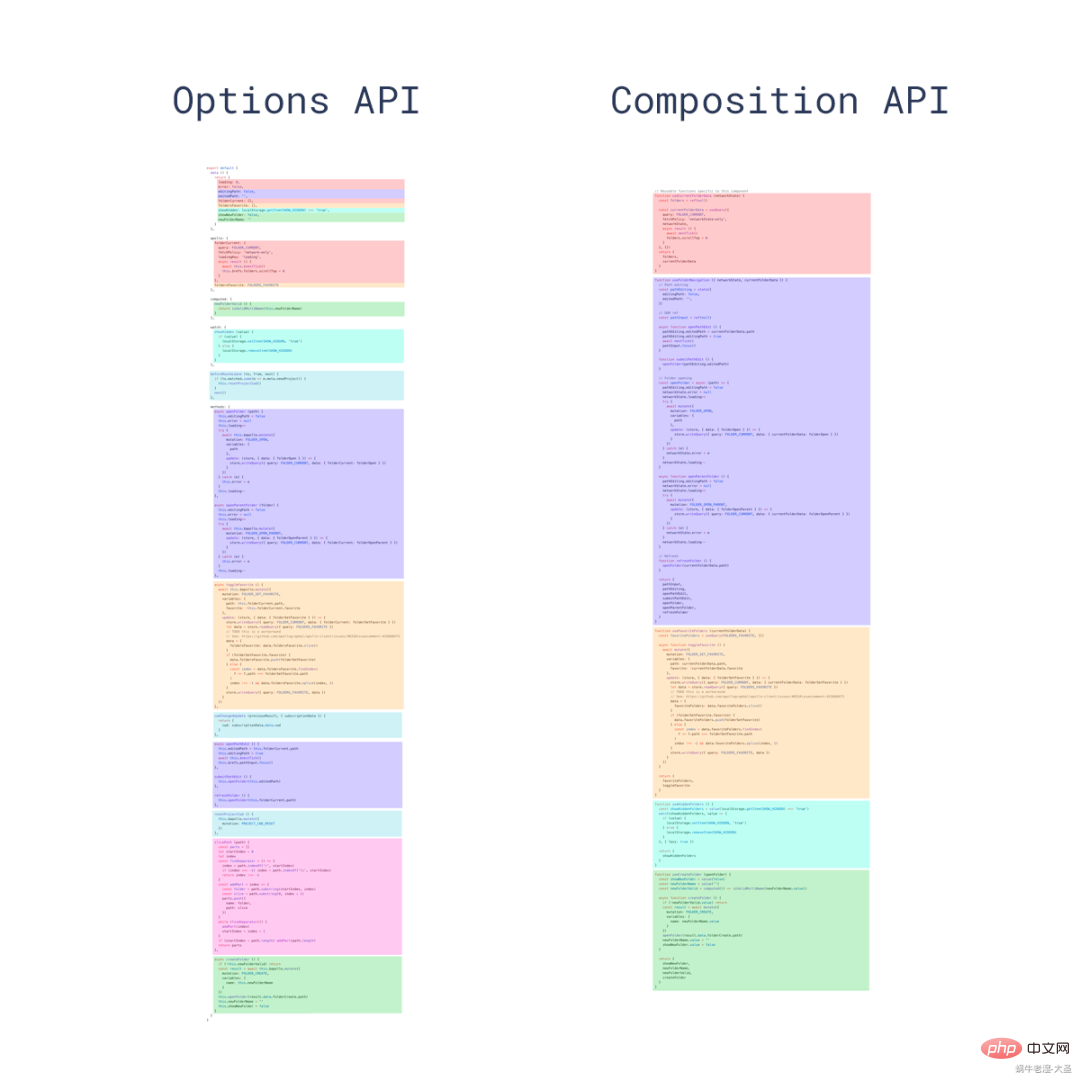
Composition API对比
上图中,一种颜色代表一个功能,我们可以看到
Options API的功能代码比较分散;Composition API则可以将同一个功能的逻辑,组织在一个函数内部,利于维护。
我们首先来看下之前Options API的写法:
export default {
  components: {},
  data() {},
  computed: {},
  watch: {},
  mounted() {},
}Options API就是将同一类型的东西放在同一个选项中,当我们的数据比较少的时候,这样的组织方式是比较清晰的;但是随着数据增多,我们维护的功能点会涉及到多个data和methods,但是我们无法感知哪些data和methods是需要涉及到的,经常需要来回切换查找,甚至是需要理解其他功能的逻辑,这也导致了组件难以理解和阅读。
而Composition API做的就是把同一功能的代码放到一起维护,这样我们需要维护一个功能点的时候,不用去关心其他的逻辑,只关注当前的功能;Composition API通过setup选项来组织代码:
export default {
  setup(props, context) {}
};我们看到这里它接收了两个参数props和context,props就是父组件传入的一些数据,context是一个上下文对象,是从2.x暴露出来的一些属性:
attrs
slots
emit
注:props的数据也需要通过toRefs解构,否则响应式数据会失效。
我们通过一个Button按钮来看下setup具体的用法:

举个栗子
<template>
  <p>{{ state.count }} * 2 = {{ double }}</p>
  <p>{{ num }}</p>
  <p>Add</p>
</template>
<script>
import { reactive, computed, ref } from "vue";
export default {
  name: "Button",
  setup() {
    const state = reactive({
      count: 1,
    });
    const num = ref(2);
    function add() {
      state.count++;
      num.value += 10;
    }
    const double = computed(() => state.count * 2);
    return {
      state,
      double,
      num,
      add,
    };
  },
};
</script>很多童鞋可能就有疑惑了,这跟我在data和methods中写没什么区别么,不就是把他们放到一起么?我们可以将setup中的功能进行提取分割成一个一个独立函数,每个函数还可以在不同的组件中进行逻辑复用:
export default {
  setup() {
    const { networkState } = useNetworkState();
    const { user } = userDeatil();
    const { list } = tableData();
    return {
      networkState,
      user,
      list,
    };
  },
};
function useNetworkState() {}
function userDeatil() {}
function tableData() {}所谓的Fragment,就是片段;在vue2.x中,要求每个模板必须有一个根节点,所以我们代码要这样写:
<template>
  <p>
    <span></span>
    <span></span>
  </p>
</template>
或者在Vue2.x中还可以引入vue-fragments库,用一个虚拟的fragment代替p;在React中,解决方法是通过的一个React.Fragment标签创建一个虚拟元素;在Vue3中我们可以直接不需要根节点:
<template>
    <span>hello</span>
    <span>world</span>
</template>
这样就少了很多没有意义的p元素。
Teleport翻译过来就是传送、远距离传送的意思;顾名思义,它可以将插槽中的元素或者组件传送到页面的其他位置:

传送门游戏
在React中可以通过createPortal函数来创建需要传送的节点;本来尤大大想起名叫Portal,但是H5原生的Portal标签也在计划中,虽然有一些安全问题,但是为了避免重名,因此改成Teleport。
Teleport一个常见的使用场景,就是在一些嵌套比较深的组件来转移模态框的位置。虽然在逻辑上模态框是属于该组件的,但是在样式和DOM结构上,嵌套层级后较深后不利于进行维护(z-index等问题);因此我们需要将其进行剥离出来:
<template>
  <button>打开模态框</button>

  <teleport>
    <p>
      我是一个模态框
      <button>关闭</button>
      <child-component></child-component>
    </p>
  </teleport>
</template>
<script>
export default {
  data() {
    return {
      showDialog: false,
      msg: "hello"
    };
  },
};
</script>这里的Teleport中的modal p就被传送到了body的底部;虽然在不同的地方进行渲染,但是Teleport中的元素和组件还是属于父组件的逻辑子组件,还是可以和父组件进行数据通信。Teleport接收两个参数to和disabled:
to - string:必须是有效的查询选择器或 HTMLElement,可以id或者class选择器等。
disabled - boolean:如果是true表示禁用teleport的功能,其插槽内容将不会移动到任何位置,默认false不禁用。
Suspense是Vue3推出的一个内置组件,它允许我们的程序在等待异步组件时渲染一些后备的内容,可以让我们创建一个平滑的用户体验;Vue中加载异步组件其实在Vue2.x中已经有了,我们用的vue-router中加载的路由组件其实也是一个异步组件:
export default {
  name: "Home",
  components: {
    AsyncButton: () => import("../components/AsyncButton"),
  },
}在Vue3中重新定义,异步组件需要通过defineAsyncComponent来进行显示的定义:
// 全局定义异步组件
//src/main.js
import { defineAsyncComponent } from "vue";
const AsyncButton = defineAsyncComponent(() =>
  import("./components/AsyncButton.vue")
);
app.component("AsyncButton", AsyncButton);


// 组件内定义异步组件
// src/views/Home.vue
import { defineAsyncComponent } from "vue";
export default {
  components: {
    AsyncButton: defineAsyncComponent(() =>
      import("../components/AsyncButton")
    ),
  },
};同时对异步组件的可以进行更精细的管理:
export default {
  components: {
    AsyncButton: defineAsyncComponent({
      delay: 100,
      timeout: 3000,
      loader: () => import("../components/AsyncButton"),
      errorComponent: ErrorComponent,
      onError(error, retry, fail, attempts) {
        if (attempts <p>这样我们对异步组件加载情况就能掌控,在加载失败也能重新加载或者展示异常的状态:</p><p><img alt="Comprehensive and detailed summary of the new features of Vue3.0 (summary sharing)" src="https://img.php.cn/upload/article/000/000/067/3aaccb2c886ee085f60bb7028146df4c-3.png"></p><p>异步组件加载失败</p><p>我们回到Suspense,上面说到它主要是在组件加载时渲染一些后备的内容,它提供了两个slot插槽,一个<code>default</code>默认,一个<code>fallback</code>加载中的状态:</p><pre class="brush:php;toolbar:false"><template>
  <p>
    <button>展示异步组件</button>
    <template>
      <suspense>
        <template>
          <asyncbutton></asyncbutton>
        </template>
        <template>
          <p>组件加载中...</p>
        </template>
      </suspense>
    </template>
  </p>
</template>
<script>
export default {
  setup() {
    const isShowButton = ref(false);
    function showButton() {
      isShowButton.value = true;
    }
    return {
      isShowButton,
      showButton,
    };
  },
}
</script>
异步组件加载显示占位
非兼容的功能主要是一些和Vue2.x版本改动较大的语法,已经在Vue3上可能存在兼容问题了。
在Vue2.x中,我们可以定义data为object或者function,但是我们知道在组件中如果data是object的话会出现数据互相影响,因为object是引用数据类型;
在Vue3中,data只接受function类型,通过function返回对象;同时Mixin的合并行为也发生了改变,当mixin和基类中data合并时,会执行浅拷贝合并:
const Mixin = {
  data() {
    return {
      user: {
        name: 'Jack',
        id: 1,
        address: {
          prov: 2,
          city: 3,
        },
      }
    }
  }
}
const Component = {
  mixins: [Mixin],
  data() {
    return {
      user: {
        id: 2,
        address: {
          prov: 4,
        },
      }
    }
  }
}

// vue2结果:
{
  id: 2,
  name: 'Jack',
  address: {
    prov: 4,
    city: 3
  }
}

// vue3结果:
user: {
  id: 2,
  address: {
    prov: 4,
  },
}我们看到最后合并的结果,vue2.x会进行深拷贝,对data中的数据向下深入合并拷贝;而vue3只进行浅层拷贝,对data中数据发现已存在就不合并拷贝。
在vue2.x中,我们还可以通过过滤器filter来处理一些文本内容的展示:
<template>
<p>{{ status | statusText }}</p>
</template>
<script>
export default {
props: {
status: {
type: Number,
default: 1
}
},
filters: {
statusText(value){
if(value === 1){
return '订单未下单'
} else if(value === 2){
return '订单待支付'
} else if(value === 3){
return '订单已完成'
}
}
}
}
</script>最常见的就是处理一些订单的文案展示等;然而在vue3中,过滤器filter已经删除,不再支持了,官方建议使用方法调用或者计算属性computed来进行代替。
在Vue2.x中,v-model相当于绑定value属性和input事件,它本质也是一个语法糖:
<child-component></child-component>
<!-- 相当于 -->
<child-component></child-component>
在某些情况下我们需要对多个值进行双向绑定,其他的值就需要显示的使用回调函数来改变了:
<child-component>
</child-component>
在vue2.3.0+版本引入了.sync修饰符,其本质也是语法糖,是在组件上绑定@update:propName回调,语法更简洁:
<child-component>
</child-component>


<child-component>
</child-component>
Vue3中将v-model和.sync进行了功能的整合,抛弃了.sync,表示:多个双向绑定value值直接用多个v-model传就好了;同时也将v-model默认传的prop名称由value改成了modelValue:
<child-component>
</child-component>


<child-component>
</child-component>
如果我们想通过v-model传递多个值,可以将一个argument传递给v-model:
<child-component>
</child-component>


<child-component>
</child-component>
在Vue2.x中,我们都知道v-for每次循环都需要给每个子节点一个唯一的key,还不能绑定在template标签上,
<template>
  <p>...</p>
  <span>...</span>
</template>
而在Vue3中,key值应该被放置在template标签上,这样我们就不用为每个子节点设一遍:
<template>
  <p>...</p>
  <span>...</span>
</template>
在vue2.x中,如果一个元素同时定义了v-bind="object"和一个相同的单独的属性,那么这个单独的属性会覆盖object中的绑定:
<p></p>
<p></p>

<!-- 最后结果都相同 -->
<p></p>
然而在vue3中,如果一个元素同时定义了v-bind="object"和一个相同的单独的属性,那么声明绑定的顺序决定了最后的结果(后者覆盖前者):
<!-- template -->
<p></p>
<!-- result -->
<p></p>

<!-- template -->
<p></p>
<!-- result -->
<p></p>
vue2.x中,在v-for上使用ref属性,通过this.$refs会得到一个数组:
<template>
</template>
<script>
export default {
  data(){
    list: [1, 2]
  },
  mounted () {
    // [p, p]
    console.log(this.$refs.setItemRef)
  }
}
</script>但是这样可能不是我们想要的结果;因此vue3不再自动创建数组,而是将ref的处理方式变为了函数,该函数默认传入该节点:
<template>
</template>
<script>
import { reactive, onUpdated } from 'vue'
export default {
setup() {
let itemRefs = reactive([])
const setItemRef = el => {
itemRefs.push(el)
}
onUpdated(() => {
console.log(itemRefs)
})
return {
itemRefs,
setItemRef
}
}
}
</script>在vue2.x中,在一个元素上同时使用v-for和v-if,v-for有更高的优先级,因此在vue2.x中做性能优化,有一个重要的点就是v-for和v-if不能放在同一个元素上。
而在vue3中,v-if比v-for有更高的优先级。因此下面的代码,在vue2.x中能正常运行,但是在vue3中v-if生效时并没有item变量,因此会报错:
<template>
  <p>{{ item }}</p>
</template>

<script>
export default {
  data() {
    return {
      list: [1, 2, 3, 4, 5],
    };
  },
};
</script>以上就是Vue3.0作为终端用的我们可能会涉及到的一些新特性和新功能,其实Vue3.0还有很多的改动,这里由于篇幅原因就不一一展开了,大家可以自行查阅官方文档,期待Vue3能带给我们更便利更友好的开发体验。
更多编程相关知识,请访问:编程入门!!
The above is the detailed content of Comprehensive and detailed summary of the new features of Vue3.0 (summary sharing). For more information, please follow other related articles on the PHP Chinese website!


![[Web front-end] Node.js quick start](https://img.php.cn/upload/course/000/000/067/662b5d34ba7c0227.png)


