Android development manual
/ 其他几种常用对话框基本使用
其他几种常用对话框基本使用
本节引言:
上节我们对Dialog的父类:AlertDialog进行了学习,而本节我们来学习下几个常用的 Dialog的基本使用,他们分别是:ProgressDialog(进度条对话框),DatePickerDialog (日期选择对话框)和TimePickerDialog(时间选择对话框)~,话不多说,开始本节内容~
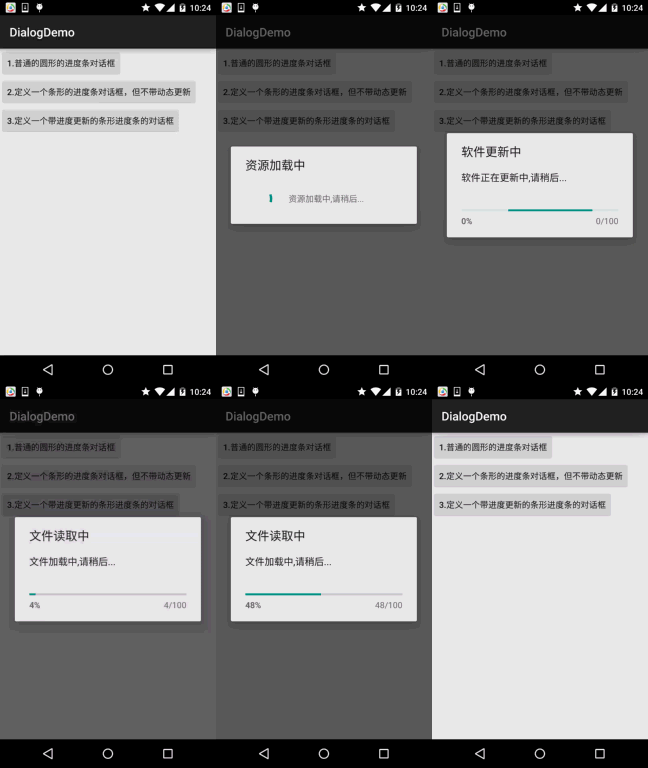
1.ProgressDialog(进度条对话框)的基本使用
我们创建进度条对话框的方式有两种:
- 1.直接调用ProgressDialog提供的静态方法show()显示
- 2.创建ProgressDialog,再设置对话框的参数,最后show()出来
代码示例:
运行效果图:

关键实现代码:
MainActivity.java:
public class MainActivity extends AppCompatActivity implements View.OnClickListener{
private Button btn_one;
private Button btn_two;
private Button btn_three;
private ProgressDialog pd1 = null;
private ProgressDialog pd2 = null;
private final static int MAXVALUE = 100;
private int progressStart = 0;
private int add = 0;
private Context mContext = null;
//定义一个用于更新进度的Handler,因为只能由主线程更新界面,所以要用Handler传递信息
final Handler hand = new Handler()
{
@Override
public void handleMessage(Message msg) {
//这里的话如果接受到信息码是123
if(msg.what == 123)
{
//设置进度条的当前值
pd2.setProgress(progressStart);
}
//如果当前大于或等于进度条的最大值,调用dismiss()方法关闭对话框
if(progressStart >= MAXVALUE)
{
pd2.dismiss();
}
}
};
@Override
protected void onCreate(Bundle savedInstanceState) {
super.onCreate(savedInstanceState);
setContentView(R.layout.activity_main);
mContext = MainActivity.this;
bindViews();
}
private void bindViews() {
btn_one = (Button) findViewById(R.id.btn_one);
btn_two = (Button) findViewById(R.id.btn_two);
btn_three = (Button) findViewById(R.id.btn_three);
btn_one.setOnClickListener(this);
btn_two.setOnClickListener(this);
btn_three.setOnClickListener(this);
}
@Override
public void onClick(View v) {
switch (v.getId()){
case R.id.btn_one:
//这里的话参数依次为,上下文,标题,内容,是否显示进度,是否可以用取消按钮关闭
ProgressDialog.show(MainActivity.this, "资源加载中", "资源加载中,请稍后...",false,true);
break;
case R.id.btn_two:
pd1 = new ProgressDialog(mContext);
//依次设置标题,内容,是否用取消按钮关闭,是否显示进度
pd1.setTitle("软件更新中");
pd1.setMessage("软件正在更新中,请稍后...");
pd1.setCancelable(true);
//这里是设置进度条的风格,HORIZONTAL是水平进度条,SPINNER是圆形进度条
pd1.setProgressStyle(ProgressDialog.STYLE_HORIZONTAL);
pd1.setIndeterminate(true);
//调用show()方法将ProgressDialog显示出来
pd1.show();
break;
case R.id.btn_three:
//初始化属性
progressStart = 0;
add = 0;
//依次设置一些属性
pd2 = new ProgressDialog(MainActivity.this);
pd2.setMax(MAXVALUE);
pd2.setTitle("文件读取中");
pd2.setMessage("文件加载中,请稍后...");
//这里设置为不可以通过按取消按钮关闭进度条
pd2.setCancelable(false);
pd2.setProgressStyle(ProgressDialog.STYLE_HORIZONTAL);
//这里设置的是是否显示进度,设为false才是显示的哦!
pd2.setIndeterminate(false);
pd2.show();
//这里的话新建一个线程,重写run()方法,
new Thread()
{
public void run()
{
while(progressStart < MAXVALUE)
{
//这里的算法是决定进度条变化的,可以按需要写
progressStart = 2 * usetime() ;
//把信息码发送给handle让更新界面
hand.sendEmptyMessage(123);
}
}
}.start();
break;
}
}
//这里设置一个耗时的方法:
private int usetime() {
add++;
try{
Thread.sleep(100);
}catch (InterruptedException e) {
e.printStackTrace();
}
return add;
}
}
代码比较简单,而关于Progress的东西我们已经在前面学习过了,这里就不啰嗦了~
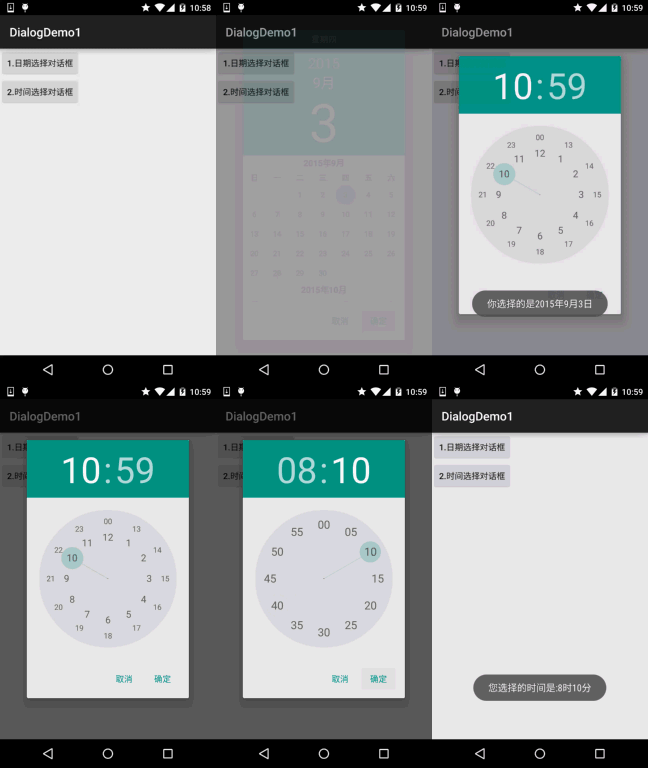
2.DatePickerDialog(日期选择对话框)与TimePickerDialog(时间选择对话框)
先要说明一点: Date/TimePickerDialog只是供用户来选择日期时间,对于android系统的系统时间, 日期没有任何影响,google暂时没有公布系统日期时间设置的API, 如果要在app中设置的话,要重新编译android的系统源码,非常麻烦!
他们两个的构造方法非常相似:DatePickerDialog(上下文;DatePickerDialog.OnDateSetListener()监听器;年;月;日)
TimePickerDialog(上下文;TimePickerDialog.OnTimeSetListener()监听器;小时,分钟,是否采用24小时制)
代码示例:
运行效果图:

关键实现代码:
MainActivity.java:
public class MainActivity extends AppCompatActivity implements View.OnClickListener{
private Button btn_date;
private Button btn_time;
private String result = "";
@Override
protected void onCreate(Bundle savedInstanceState) {
super.onCreate(savedInstanceState);
setContentView(R.layout.activity_main);
bindViews();
}
private void bindViews() {
btn_date = (Button) findViewById(R.id.btn_date);
btn_time = (Button) findViewById(R.id.btn_time);
btn_date.setOnClickListener(this);
btn_time.setOnClickListener(this);
}
@Override
public void onClick(View v) {
result = "";
switch (v.getId()){
case R.id.btn_date:
Calendar cale1 = Calendar.getInstance();
new DatePickerDialog(MainActivity.this,new DatePickerDialog.OnDateSetListener() {
@Override
public void onDateSet(DatePicker view, int year, int monthOfYear,
int dayOfMonth) {
//这里获取到的月份需要加上1哦~
result += "你选择的是"+year+"年"+(monthOfYear+1)+"月"+dayOfMonth+"日";
Toast.makeText(getApplicationContext(), result, Toast.LENGTH_SHORT).show();
}
}
,cale1.get(Calendar.YEAR)
,cale1.get(Calendar.MONTH)
,cale1.get(Calendar.DAY_OF_MONTH)).show();
break;
case R.id.btn_time:
Calendar cale2 = Calendar.getInstance();
new TimePickerDialog(MainActivity.this, new TimePickerDialog.OnTimeSetListener() {
@Override
public void onTimeSet(TimePicker view, int hourOfDay, int minute) {
result = "";
result += "您选择的时间是:"+hourOfDay+"时"+minute+"分";
Toast.makeText(getApplicationContext(), result, Toast.LENGTH_SHORT).show();
}
}, cale2.get(Calendar.HOUR_OF_DAY), cale2.get(Calendar.MINUTE), true).show();
break;
}
}
}
代码同样很简单,就不解释了~
3.代码下载:
DialogDemo.zip
DialogDemo1.zip
本节小结:
好的,本节介绍了三个常用的Dialog,相比起以前的4.x的版本,5.0的这些原生控件, 显然要好看得多~就说这么多,谢谢~


