
 Operation and Maintenance
Windows Operation and Maintenance
Add security group rules to Alibaba Cloud ECS server
Operation and Maintenance
Windows Operation and Maintenance
Add security group rules to Alibaba Cloud ECS server
Add security group rules to Alibaba Cloud ECS server

Add security group rules
You can allow or prohibit security groups by adding security group rules ECS instances within the system access the public network or private network.
Prerequisites
Before adding security group rules, please confirm the following information:
1. You have created a security group. For specific operations, see Creating a Security Group.
2. You already know which public or intranet access to the ECS instance needs to be allowed or prohibited. For more application cases on security group rule settings, see Security Group Application Cases.
Background Information
The security group is responsible for managing whether to allow access requests from the public network or the intranet. For security reasons, most security group inbound directions adopt a deny access policy. If you are using the default security group, or you selected the Web Server Linux template or Web Server Windows template when creating the security group, the system will automatically add security group rules to some communication ports. For more details, see Security Group Overview. The contents of this article apply to the following scenarios:
1. When your application needs to communicate with a network outside the security group where the ECS instance is located, but the request enters a long waiting state after being initiated, you need to set the security group rules first. .
2. When you find that some request sources have malicious attacks during the operation of your application, you can add security group rules that deny access to implement isolation policies.
Before adding security group rules, please understand the following:
1. Security group rules will differ in network card settings.
#Classic network type security group rules distinguish between internal network cards and public network cards.
# Private network VPC type security group rules do not distinguish between intranet network cards and public network cards.
Public network access to private network VPC type ECS instances is forwarded through intranet network card mapping. Therefore, you cannot see the public network card inside the ECS instance, and you can only set intranet security group rules. However, the security group rules take effect on both the intranet and the public network.
2. Before adding any security group rules to the security group you created, all access is allowed in the outbound direction and all access is denied in the inbound direction.
3. Security group rules support IPv4 security group rules and IPv6 security group rules.
4. The total number of inbound and outbound rules for each security group cannot exceed 200.
5. Enterprise security groups do not support setting priorities, authorization to security groups, and setting security group rules that deny access. For more details, see Enterprise Security Groups Overview.
Operation steps
1. Log in to the ECS management console.
2. In the left navigation bar, select Network and Security > Security Group.
3. On the top status bar, select the region.
4. Find the security group for which you want to configure authorization rules. In the operation column, click Configure Rules.
5. On the security group rules page, you can choose any of the following methods to complete the operation.
Method 1:
Quickly create rules, suitable for no need to set ICMP and GRE protocol rules. And the operation scenario can be completed by checking multiple ports. The quick creation rule provides application port settings for SSH 22, telnet 23, HTTP 80, HTTPS 443, MS SQL 1433, Oracle 1521, MySQL 3306, RDP 3389, PostgreSQL 5432 and Redis 6379. You can check one or more ports at the same time, or customize TCP/UDP ports.
Click Quick Create Rule. For detailed guidance on setting parameters such as network card type, rule direction, and port range in the Quick Create Rule dialog box, see Method 2 to add security group rules.
Method 2:
Add security group rules, suitable for scenarios where multiple communication protocols need to be set, such as ICMP and GRE protocols.
a. Click Add Security Group Rule.
b. (Classic network type security group only) Select the network card type.
Intranet: Your ECS instance cannot access the public network/Internet, or does not need to access the public network.
Public network: Your ECS instance can access the public network and provides Internet access to applications.
c. Select the rule direction.
Outbound direction: Refers to the ECS instance accessing other ECS instances in the intranet or resources on the public network.
Inbound direction: refers to other ECS instances in the intranet or resources on the public network accessing the ECS instance.
d. Select the authorization policy.
Allow: Allow access requests corresponding to this port.
Reject: Drop the data packet directly without returning any response information. If the rules of the two security groups are the same except for the authorization policy, the denial of authorization will take effect and the allow policy will not take effect.
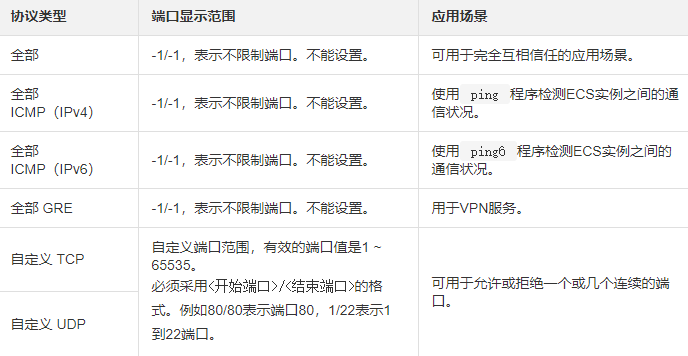
e.Select the protocol type and port range.
The setting of the port range is affected by the protocol type. The following table shows the relationship between the protocol types and port ranges involved in the creation page. For more information about commonly used ports, see Typical Applications of Common Ports.

#Note: STMP port 25 in the public network outbound direction is restricted by default and cannot be opened through security group rules. If you need to use STMP port 25, please avoid security risks by yourself, and then apply to unblock port 25. For specific operations, see Applying to Unblock Port 25.
f. Select the authorization type and authorization object.
The setting of the authorization object is affected by the authorization type. The following is the relationship between the two.

#Note: For security reasons, for the intranet inbound rules of the classic network, security group access is preferred as the authorization type. If you choose address segment access, you can only authorize a single IP address. The format of the authorization object can only be a.b.c.d/32, only IPv4 is supported, and the subnet mask must be /32.
g. Priority: The value range is 1~100.
Note: The smaller the priority value, the higher the priority. Only common security groups can set priorities. Enterprise security groups do not support setting priorities. See Rule Priority for more details.
h. Click OK
Execution Result
Click the refresh icon to view the added security group rules , confirm that the addition has been completed. Changes to security group rules will be automatically applied to ECS instances in the security group. It is recommended that you test whether they take effect immediately.

##Next Steps
Each ECS instance belongs to at least one security group. You can add ECS instances to one or more security groups based on business needs. For specific operations, see Adding an ECS instance to a security group.
Related Documents
# AuthorizeSecurityGroup
# AuthorizeSecurityGroupEgress
Recommended tutorial:
windows tutorialThe above is the detailed content of Add security group rules to Alibaba Cloud ECS server. For more information, please follow other related articles on the PHP Chinese website!

Hot AI Tools

Undresser.AI Undress
AI-powered app for creating realistic nude photos

AI Clothes Remover
Online AI tool for removing clothes from photos.

Undress AI Tool
Undress images for free

Clothoff.io
AI clothes remover

AI Hentai Generator
Generate AI Hentai for free.

Hot Article
Hot Tools

Notepad++7.3.1
Easy-to-use and free code editor

SublimeText3 Chinese version
Chinese version, very easy to use

Zend Studio 13.0.1
Powerful PHP integrated development environment

Dreamweaver CS6
Visual web development tools

SublimeText3 Mac version
God-level code editing software (SublimeText3)
Hot Topics
 1384
1384
 52
52

 How to solve the problem that eMule search cannot connect to the server
Jan 25, 2024 pm 02:45 PM
How to solve the problem that eMule search cannot connect to the server
Jan 25, 2024 pm 02:45 PM
Solution: 1. Check the eMule settings to make sure you have entered the correct server address and port number; 2. Check the network connection, make sure the computer is connected to the Internet, and reset the router; 3. Check whether the server is online. If your settings are If there is no problem with the network connection, you need to check whether the server is online; 4. Update the eMule version, visit the eMule official website, and download the latest version of the eMule software; 5. Seek help.
 Solution to the inability to connect to the RPC server and the inability to enter the desktop
Feb 18, 2024 am 10:34 AM
Solution to the inability to connect to the RPC server and the inability to enter the desktop
Feb 18, 2024 am 10:34 AM
What should I do if the RPC server is unavailable and cannot be accessed on the desktop? In recent years, computers and the Internet have penetrated into every corner of our lives. As a technology for centralized computing and resource sharing, Remote Procedure Call (RPC) plays a vital role in network communication. However, sometimes we may encounter a situation where the RPC server is unavailable, resulting in the inability to enter the desktop. This article will describe some of the possible causes of this problem and provide solutions. First, we need to understand why the RPC server is unavailable. RPC server is a
 Detailed explanation of CentOS installation fuse and CentOS installation server
Feb 13, 2024 pm 08:40 PM
Detailed explanation of CentOS installation fuse and CentOS installation server
Feb 13, 2024 pm 08:40 PM
As a LINUX user, we often need to install various software and servers on CentOS. This article will introduce in detail how to install fuse and set up a server on CentOS to help you complete the related operations smoothly. CentOS installation fuseFuse is a user space file system framework that allows unprivileged users to access and operate the file system through a customized file system. Installing fuse on CentOS is very simple, just follow the following steps: 1. Open the terminal and Log in as root user. 2. Use the following command to install the fuse package: ```yuminstallfuse3. Confirm the prompts during the installation process and enter `y` to continue. 4. Installation completed
 How to add a TV to Mijia
Mar 25, 2024 pm 05:00 PM
How to add a TV to Mijia
Mar 25, 2024 pm 05:00 PM
Many users are increasingly favoring the electronic ecosystem of Xiaomi smart home interconnection in modern life. After connecting to the Mijia APP, you can easily control the connected devices with your mobile phone. However, many users still don’t know how to add Mijia to their homes. app, then this tutorial guide will bring you the specific connection methods and steps, hoping to help everyone in need. 1. After downloading Mijia APP, create or log in to Xiaomi account. 2. Adding method: After the new device is powered on, bring the phone close to the device and turn on the Xiaomi TV. Under normal circumstances, a connection prompt will pop up. Select "OK" to enter the device connection process. If no prompt pops up, you can also add the device manually. The method is: after entering the smart home APP, click the 1st button on the lower left
 Tutorial on adding a new hard drive in win11
Jan 05, 2024 am 09:39 AM
Tutorial on adding a new hard drive in win11
Jan 05, 2024 am 09:39 AM
When buying a computer, we may not necessarily choose a large hard drive. At this time, if we want to add a new hard drive to win11, we can first install the new hard drive we purchased, and then add partitions to the computer. Tutorial on adding a new hard drive in win11: 1. First, we disassemble the host and find the slot of the hard drive. 2. After finding it, we first connect the "data cable", which usually has a fool-proof design. If it cannot be inserted, just reverse the direction. 3. Then insert the new hard drive into the hard drive slot. 4. After inserting, connect the other end of the data cable to the computer's motherboard. 5. After the installation is completed, you can put it back into the host and turn it on. 6. After booting, we right-click "This Computer" and open "Computer Management" 7. After opening, click "Disk Management" in the lower left corner 8. Then on the right you can
 How to configure Dnsmasq as a DHCP relay server
Mar 21, 2024 am 08:50 AM
How to configure Dnsmasq as a DHCP relay server
Mar 21, 2024 am 08:50 AM
The role of a DHCP relay is to forward received DHCP packets to another DHCP server on the network, even if the two servers are on different subnets. By using a DHCP relay, you can deploy a centralized DHCP server in the network center and use it to dynamically assign IP addresses to all network subnets/VLANs. Dnsmasq is a commonly used DNS and DHCP protocol server that can be configured as a DHCP relay server to help manage dynamic host configurations in the network. In this article, we will show you how to configure dnsmasq as a DHCP relay server. Content Topics: Network Topology Configuring Static IP Addresses on a DHCP Relay D on a Centralized DHCP Server
 Best Practice Guide for Building IP Proxy Servers with PHP
Mar 11, 2024 am 08:36 AM
Best Practice Guide for Building IP Proxy Servers with PHP
Mar 11, 2024 am 08:36 AM
In network data transmission, IP proxy servers play an important role, helping users hide their real IP addresses, protect privacy, and improve access speeds. In this article, we will introduce the best practice guide on how to build an IP proxy server with PHP and provide specific code examples. What is an IP proxy server? An IP proxy server is an intermediate server located between the user and the target server. It acts as a transfer station between the user and the target server, forwarding the user's requests and responses. By using an IP proxy server
 How to add a new script in Tampermonkey-How to delete a script in Tampermonkey
Mar 18, 2024 pm 12:10 PM
How to add a new script in Tampermonkey-How to delete a script in Tampermonkey
Mar 18, 2024 pm 12:10 PM
Tampermonkey Chrome extension is a user script management plug-in that improves user efficiency and browsing experience through scripts. So how does Tampermonkey add new scripts? How to delete the script? Let the editor give you the answer below! How to add a new script to Tampermonkey: 1. Take GreasyFork as an example. Open the GreasyFork web page and enter the script you want to follow. The editor here chooses one-click offline download. 2. Select a script. , after entering the script page, you can see the button to install this script. 3. Click to install this script to come to the installation interface. Just click here to install. 4. We can see the installed one-click in the installation script.
