This article mainly introduces the example of a small program for sending text messages during development in Android. The article also comes with an example of an upgraded version of sending text messages that monitors broadcast receivers. Friends who need it can refer to it

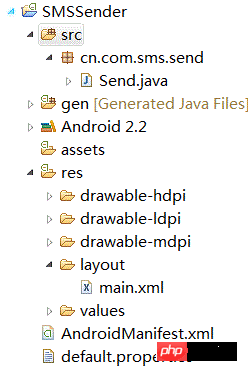
The above picture is the code structure diagram.
Now let’s look at the specific code.
Send.java
package cn.com.sms.send;

import java.util.ArrayList;
import java.util.Iterator;

import android.app.Activity;
import android.app.PendingIntent;
import android.content.Intent;
import android.os.Bundle;
import android.telephony.SmsManager;
import android.util.Log;
import android.view.View;
import android.widget.Button;
import android.widget.EditText;
import android.widget.Toast;

public class Send extends Activity {
  private String message;
  private String number ;
  private EditText editText;
  private EditText editText2;
  @Override
  public void onCreate(Bundle savedInstanceState) {
    super.onCreate(savedInstanceState);
    setContentView(R.layout.main);
     editText = (EditText) this.findViewById(R.id.number);
     editText2 = (EditText)this.findViewById(R.id.message);

    Button button = (Button)this.findViewById(R.id.button);
    button.setOnClickListener(new View.OnClickListener() {

      public void onClick(View v) {
         number = editText.getText().toString();
         message = editText2.getText().toString();
         // 在LogCat中可以查看到number和message的相关信息
         Log.i("number", number);
         Log.i("message", message);
         /*获取系统默认的信息管理器,一定要注意的是SmsManager是android.telephony.SmsManager;这和
         *我们使用的版本有关,在 Android 2.0 以前 应该使用 android.telephony.gsm.SmsManager
         *Android 2.0 之后的版本应该用 android.telephony.SmsManager。
         */
        SmsManager smsManager = SmsManager.getDefault();
        /*PendingIntent.getBroadcast返回一个用于广播的PendingIntent对象,类似于调用Content.sendBroadcast();
         */
        PendingIntent paIntent = PendingIntent.getBroadcast(Send.this, 0, new Intent("SMS_SENT"), 0);
        PendingIntent deliveryIntent = PendingIntent.getBroadcast(Send.this, 0, new Intent("SMS_DELIVERED"), 0);
        // smsManager.pideMessage有些时候短信如果超过了字数,我们就需要这个方法来帮我们拆分短信内容。
        ArrayList<String> smses = smsManager.pideMessage(message);
        Iterator<String> iterator = smses.iterator();
        while(iterator.hasNext()){
          String temp = iterator.next();
          //发送短信
          smsManager.sendTextMessage(number, null, temp, paIntent, deliveryIntent);
        }
        // 弹出一个浮动框显示提示内容,Toast.LENGTH_LONG代表浮动框显示时间的长短
        Toast.makeText(Send.this, "短信发送完成", Toast.LENGTH_LONG).show();


      }
    });

  }
}
main.xml
<?xml version="1.0" encoding="utf-8"?>
<LinearLayout xmlns:android="http://schemas.android.com/apk/res/android"
  android:orientation="vertical"
  android:layout_width="fill_parent"
  android:layout_height="fill_parent"
  >
<TextView
  android:layout_width="fill_parent"
  android:layout_height="wrap_content"
  android:text="欢迎使用短信发送器,请输入电话号码"
  />
 <EditText
  android:id="@+id/number"
  android:layout_width="fill_parent"
  android:layout_height="wrap_content"
  android:hint="这里输入电话号码"
 />
 <TextView
 android:layout_width="fill_parent"
  android:layout_height="wrap_content"
  android:text="欢迎使用短信发送器,请输入短信内容"
 />
 <EditText
  android:id="@+id/message"
  android:layout_width="fill_parent"
  android:layout_height="wrap_content"
  android:minLines="3"
  android:hint="这里输入短信内容"
 />
 <Button
  android:id="@+id/button"
  android:layout_width="wrap_content"
  android:layout_height="wrap_content"
  android:text="send"
 />
</LinearLayout>
AndroidManifest.xml
<?xml version="1.0" encoding="utf-8"?>
<manifest xmlns:android="http://schemas.android.com/apk/res/android"
   package="cn.com.sms.send"
   android:versionCode="1"
   android:versionName="1.0">
  <uses-sdk android:minSdkVersion="8" />
  <uses-permission android:name="android.permission.SEND_SMS"></uses-permission>

  <application android:icon="@drawable/icon" android:label="@string/app_name">
    <activity android:name=".Send"
         android:label="@string/app_name">
      <intent-filter>
        <action android:name="android.intent.action.MAIN" />
        <category android:name="android.intent.category.LAUNCHER" />
      </intent-filter>
    </activity>

  </application>
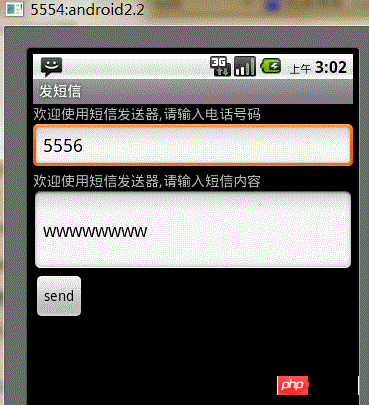
</manifest>The final rendering is:

Like the phone call applet, two AVDs need to be opened here to perform functional testing.
Thinking:
The main class of text messaging application is SmsManager. Before Android 2.0, you should use android.telephony.gsm.SmsManager
, and later you should use android.telephony.SmsManager;
SmsManager smsManager = SmsManager.getDefault();
, which means to get the system default Information Manager
Series. SCADDDRESS, Text, DELIVERYINTENT) :: target phone number #ACADDRESS: SS: SMS of the service provider The center number (such as China Mobile’s SMS center number) can be left blank for testing.
status
意
-DeliveryIntent: Send-& gt; China Mobile-& gt successful sending; --> Follow-up processing: This intention packages the status information of whether the SMS has been received by the other party (the supplier has sent it successfully, but the other party has not received it).
static
PendingIntent getBroadcast (Context context, int requestCode, Intent intent, int flags)Returns a PendingIntent for broadcast, similar to calling Context.sendBroadcast( )
FunctionrequestCode is not used for the time being
intent is the intent used for broadcastflags include: FLAG_ONE_SHOT, FLAG_NO_CREATE, FLAG_CANCEL_CURRENT
, FLAG_UP
DATE
_CURRENT is used to set the newly created PendingIntent to be used once, if not, do not create, cancel the current, updatecurrent, etc.properties. In addition, we also need to declare the SMS sending permission in AndroidManifest.xml.
Sometimes, when our two AVDs simulate sending text messages, we will find that sometimes the The program cannot be used normally. The system will prompt us NO DNS servers found, and the DNS service cannot be found. This situation is usually caused by your computer not being connected to the network.
Send text message:
##
SmsManager smsMgr = SmsManager.getDefault();
smsMgr.sendTextMessage(address, null, message, null, null);
Uri smsToUri = Uri.parse("smsto://10086");
Intent mIntent = new Intent( android.content.Intent.ACTION_SENDTO, smsToUri );
startActivity( mIntent );Intent i = new Intent(Intent.ACTION_SEND);
i.putExtra(Intent.EXTRA_EMAIL, address);
i.putExtra(Intent.EXTRA_SUBJECT, filename);
i.putExtra(Intent.EXTRA_STREAM, Uri.parse("file://" + filename)); ;
i.setType("text/csv");
startActivity(Intent.createChooser(i, "EMail File"));
This code adds a broadcast to it Receiver monitoring. The detailed code is as follows
package cn.com.sms.send;

import java.util.ArrayList;
import java.util.Iterator;

import android.app.Activity;
import android.app.PendingIntent;
import android.content.BroadcastReceiver;
import android.content.Context;
import android.content.Intent;
import android.content.IntentFilter;
import android.os.Bundle;
import android.telephony.SmsManager;
import android.util.Log;
import android.view.View;
import android.widget.Button;
import android.widget.EditText;
import android.widget.Toast;

public class Send extends Activity {
  private String message;
  private String number ;
  private EditText editText;
  private EditText editText2;
  @Override
  public void onCreate(Bundle savedInstanceState) {
    super.onCreate(savedInstanceState);
    setContentView(R.layout.main);
     editText = (EditText) this.findViewById(R.id.number);
     editText2 = (EditText)this.findViewById(R.id.message);

    Button button = (Button)this.findViewById(R.id.button);
    button.setOnClickListener(new View.OnClickListener() {

      public void onClick(View v) {
         number = editText.getText().toString();
         message = editText2.getText().toString();
         // 在LogCat中可以查看到number和message的相关信息
         Log.i("number", number);
         Log.i("message", message);
         /*获取系统默认的信息管理器,一定要注意的是SmsManager是android.telephony.SmsManager;这和
         *我们使用的版本有关,在 Android 2.0 以前 应该使用 android.telephony.gsm.SmsManager
         *Android 2.0 之后的版本应该用 android.telephony.SmsManager。
         */
        SmsManager smsManager = SmsManager.getDefault();
        /*PendingIntent.getBroadcast返回一个用于广播的PendingIntent对象,类似于调用Content.sendBroadcast();
         */
        PendingIntent paIntent = PendingIntent.getBroadcast(Send.this, 0, new Intent("SMS_SENT2"), 0);
        PendingIntent deliveryIntent = PendingIntent.getBroadcast(Send.this, 0, new Intent("SMS_DELIVERED2"), 0);

        // 注册一个BroadcastReceiver,当有匹配它的IntentFilter的Intent出现时,该方法会被触发
        registerReceiver(new BroadcastReceiver(){

          @Override
          public void onReceive(Context context, Intent intent) {
            int resultCode = getResultCode();
            switch(resultCode){
            case Activity.RESULT_OK:
              Toast.makeText(getBaseContext(), "信息发送成功了哦、", Toast.LENGTH_LONG).show();
              break;
            default:
              Toast.makeText(getBaseContext(), "信息发送失败了哦、", Toast.LENGTH_LONG).show();

            }
          }


        }, new IntentFilter("SMS_SENT2"));


        registerReceiver(new BroadcastReceiver() {

          @Override
          public void onReceive(Context context, Intent intent) {
            Toast.makeText(getBaseContext(), "deliveryIntent", Toast.LENGTH_LONG).show();
            Log.i("短信接收人是否查看信息", "看了");
          }
        }, new IntentFilter("SMS_DELIVERED2"));


        // smsManager.pideMessage有些时候短信如果超过了字数,我们就需要这个方法来帮我们拆分短信内容。
        ArrayList<String> smses = smsManager.pideMessage(message);
        Iterator<String> iterator = smses.iterator();
        while(iterator.hasNext()){
          String temp = iterator.next();
          //发送短信
          smsManager.sendTextMessage(number, null, temp, paIntent, deliveryIntent);
        }
        // 弹出一个浮动框显示提示内容,Toast.LENGTH_LONG代表浮动框显示时间的长短
        Toast.makeText(Send.this, "短信发送完成", Toast.LENGTH_LONG).show();


      }
    });

  }
}registerReceiver() is used to register broadcast receivers. This method is defined in Content.
queries
to find a broadcast that satisfies the filter, it will teach it to the receiver and let it process it. Generally it is handled in its onReceive() method.如果不是在代码中主动通过registerReceiver()进行注册,那么就要从AndroidManifest.xml进行配置,代码如下
<receiver android:name="类名">
<intent-filter>
<action android:name="接收者中Intent参数的action属性" />
</intent-filter>
</receiver>
这里需要注意,在配置文件中activity标签和receiver标签是平级的。
在模拟器中发送中文会接收方出现乱码的问题,但是在真机中,就不会出现乱码的情况了。所以开发者只需要正常开发短信功能,不需要编码转换。
The above is the detailed content of Android small program sample code for sending text messages. For more information, please follow other related articles on the PHP Chinese website!
 Mini program path acquisition
 Three major frameworks for android development
 What system is android
 How to unlock android permission restrictions
 What are the methods for restarting applications in Android?
 Android voice playback function implementation method
 html set font color size
 What data does redis cache generally store?


