This article mainly introduces the detailed explanation and simple examples of the label component of the WeChat applet. Friends in need can refer to the
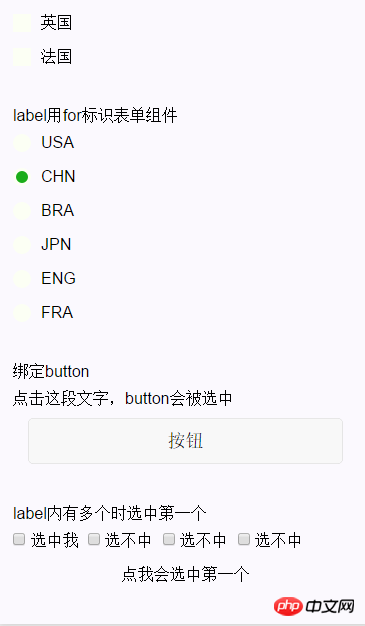
implementation renderings:

is used to improve the usability of form components. Use the for attribute to find the corresponding id, or place the control under the label. When clicked, the corresponding control will be triggered. .
forThe priority is higher than the internal control. When there are multiple controls inside, the first control is triggered by default.
Currently the controls that can be bound are: button, checkbox, radio, switch.
| Attribute name | Type | Description |
|---|---|---|
| for | String | The id of the bound control |
Sample code:
<view class="section section_gap">
<view class="section__title">表单组件在label内</view>
<checkbox-group class="group" bindchange="checkboxChange">
 <view class="label-1" wx:for-items="{{checkboxItems}}">
 <label>
  <checkbox hidden value="{{item.name}}" checked="{{item.checked}}"></checkbox>
  <view class="label-1__icon">
  <view class="label-1__icon-checked" style="opacity:{{item.checked ? 1: 0}}"></view>
  </view>
  <text class="label-1__text">{{item.value}}</text>
 </label>
 </view>
</checkbox-group>
</view>

<view class="section section_gap">
<view class="section__title">label用for标识表单组件</view>
<radio-group class="group" bindchange="radioChange">
 <view class="label-2" wx:for-items="{{radioItems}}">
 <radio id="{{item.name}}" hidden value="{{item.name}}" checked="{{item.checked}}"></radio>
 <view class="label-2__icon">
  <view class="label-2__icon-checked" style="opacity:{{item.checked ? 1: 0}}"></view>
 </view>
 <label class="label-2__text" for="{{item.name}}"><text>{{item.name}}</text></label>
 </view>
</radio-group>
</view>


<view class="section section_gap">
<view class="section__title">绑定button</view>
<label class="label-3">
 <text>点击这段文字,button会被选中</text>
</label>
<view class="btn-area">
 <button type="default" name="1" bindtap="tapEvent">按钮</button>
</view>
</view>

<view class="section section_gap">
<view class="section__title">label内有多个时选中第一个</view>
<label class="label-4">
 <checkbox> 选中我 </checkbox>
 <checkbox> 选不中 </checkbox>
 <checkbox> 选不中 </checkbox>
 <checkbox> 选不中 </checkbox>
 <view class="label-4_text">点我会选中第一个</view>
</label>
</view>Page({
data: {
checkboxItems: [
{name: 'USA', value: '美国'},
{name: 'CHN', value: '中国', checked: 'true'},
{name: 'BRA', value: '巴西'},
{name: 'JPN', value: '日本', checked: 'true'},
{name: 'ENG', value: '英国'},
{name: 'TUR', value: '法国'},
],
radioItems: [
{name: 'USA', value: '美国'},
{name: 'CHN', value: '中国', checked: 'true'},
{name: 'BRA', value: '巴西'},
{name: 'JPN', value: '日本'},
{name: 'ENG', value: '英国'},
{name: 'TUR', value: '法国'},
],
hidden: false
},
checkboxChange: function(e) {
var checked = e.detail.value
var changed = {}
for (var i = 0; i < this.data.checkboxItems.length; i ++) {
if (checked.indexOf(this.data.checkboxItems[i].name) !== -1) {
changed['checkboxItems['+i+'].checked'] = true
} else {
changed['checkboxItems['+i+'].checked'] = false
}
}
this.setData(changed)
},
radioChange: function(e) {
var checked = e.detail.value
var changed = {}
for (var i = 0; i < this.data.radioItems.length; i ++) {
if (checked.indexOf(this.data.radioItems[i].name) !== -1) {
changed['radioItems['+i+'].checked'] = true
} else {
changed['radioItems['+i+'].checked'] = false
}
}
this.setData(changed)
}
}).label-1, .label-2{
margin-bottom: 15px;
}
.label-1__text, .label-2__text {
display: inline-block;
vertical-align: middle;
}
.label-1__icon {
position: relative;
margin-right: 10px;
display: inline-block;
vertical-align: middle;
width: 18px;
height: 18px;
background: #fcfff4;
}
.label-1__icon-checked {
position: absolute;
top: 3px;
left: 3px;
width: 12px;
height: 12px;
background: #1aad19;
}
.label-2__icon {
position: relative;
display: inline-block;
vertical-align: middle;
margin-right: 10px;
width: 18px;
height: 18px;
background: #fcfff4;
border-radius: 50px;
}
.label-2__icon-checked {
position: absolute;
left: 3px;
top: 3px;
width: 12px;
height: 12px;
background: #1aad19;
border-radius: 50%;
}
.label-4_text{
text-align: center;
margin-top: 15px;
}Related articles:
Detailed explanation of WeChat applet data access examples
Detailed explanation of the steps of WeChat Mini Program Development Tutorial
Illustration of WeChat Mini Program Development Mini Program Architecture
The above is the detailed content of WeChat applet label component detailed example code. For more information, please follow other related articles on the PHP Chinese website!


