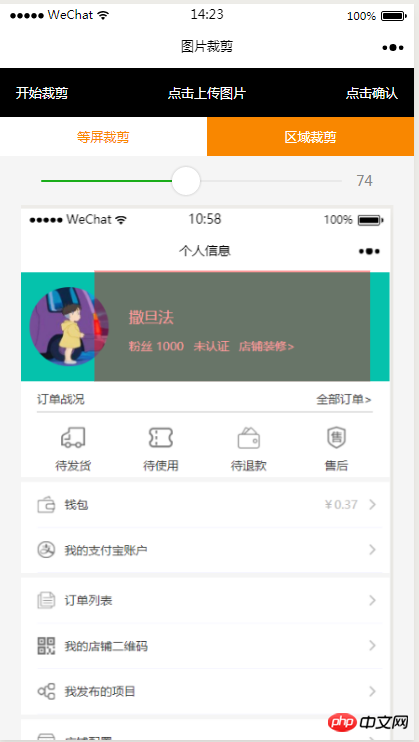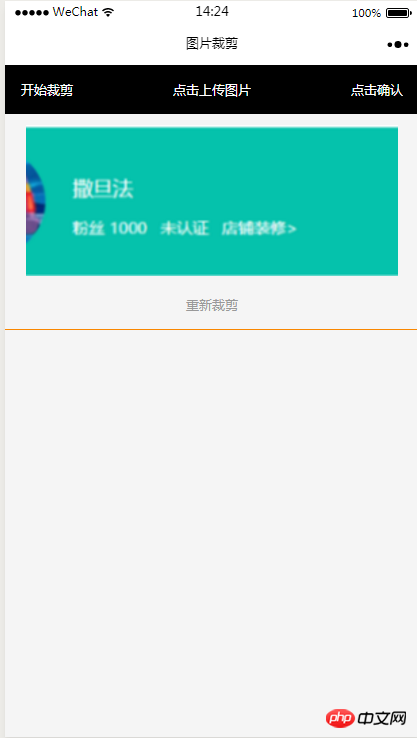
This article mainly introduces the method of screen cropping in the WeChat applet image selection area. The editor thinks it is quite good, so I will share it with you now and give it as a reference. Let’s follow the editor to take a look, I hope it can help everyone.
Rendering


<view class="index_all_box">
<view class="imgCut_header">
<view class="imgCut_header_l" bindtap='okCutImg'>开始裁剪</view>
<view class="imgCut_header_m" bindtap='clickUpImg'>点击上传图片</view>
<view class="imgCut_header_r" bindtap='okBtn'>点击确认</view>
</view>
<!-- 选择裁剪模式 -->
<view class="selectCutMode" wx:if='{{alreay}}'>
<view class="selectCutMode_in {{cutType?'selectCutMode_in_act':''}}" bindtap='etcType'>
等屏裁剪
</view>
<view class="selectCutMode_in {{!cutType?'selectCutMode_in_act':''}}" bindtap='areaType'>
区域裁剪
</view>
</view>
<view class="areaSelct_box" wx:if='{{!cutType && alreay}}'>
<slider bindchange="areaChange" min="50" max="100" show-value value='{{propor}}'/>
</view>
<view class="cutImg_box" wx:if='{{!prienFlag}}'>
<view class="cutImg_box_t">
<image src="{{cutImgUrl}}" mode='widthFix'></image>
</view>
<view class="clickCutImg_txt" bindtap='againBtn'>重新裁剪</view>
</view>
<view class="allCavans" wx:if='{{prienFlag}}' style='width: {{canvasW}}px;height: {{canvasH}}px' >
<canvas class='canvasSty' style='width: {{canvasW}}px;height: {{canvasH}}px' canvas-id='cutImg' disable-scroll='true' bindtouchmove='canvasMove'></canvas>
<view class="allCavans_inbg" style='width: {{canvasW}}px;height:{{canvasH}}px; background: url({{img}});background-size: 100% 100%'></view>
</view>
</view>.imgCut_header{
padding: 30rpx;
display: flex;
justify-content: space-between;
align-items: center;
background: #000;
color: #fff;
font-size: 24rpx;
}
.allCavans{
margin: 20rpx auto;
position: relative;
}
.canvasSty{
position: absolute;
}
.cutImg_box{
width: 100%;
border-bottom: 2rpx #f98700 solid;
padding-bottom: 20rpx;
}
.cutImg_box .cutImg_box_t{
width: 90%;
margin: 20rpx auto;
}
.cutImg_box image{
width: 100%;
}
.cutImg_box .cutImg_box_b{
margin-top: 20rpx;
width: 80%;
height: 80rpx;
line-height: 80rpx;
background: #f98700;
color: #fff;
border-radius: 10rpx;
text-align: center;
margin:0rpx auto;
}
.selectCutMode{
background: #fff;
display: flex;
justify-content: space-between;
align-items: center;
}
.selectCutMode .selectCutMode_in{
width: 100%;
text-align: center;
background: #fff;
color: #f98700;
font-size: 24rpx;
padding: 20rpx;
}
.selectCutMode .selectCutMode_in_act{
background: #f98700;
color: #fff;
padding: 20rpx;
}
.areaSelct_box{
width: 100%;
display: flex;
align-items: center;
height: 50rpx;
justify-content: center;
margin-top: 20rpx;
}
.areaSelct_box slider{
width: 80%;
}
.cutImg_box .clickCutImg_txt{
width: 100%;
text-align: center;
height: 50rpx;
font-size: 24rpx;
line-height: 50rpx;
color: #999;
}onLoad: function (options) {
var that = this;
const ctx = wx.createCanvasContext('cutImg');
ctx.setGlobalAlpha(0.4)
var aa = 'https://pintuanqu.oss-cn-hangzhou.aliyuncs.com/Uploads/Picture/goodsShow/20171201/5a2125fc86566.png'<br /> //获取当前屏幕宽度
var phoneW = Number(util.nowPhoneWH()[0]*90)/100;
var cutH = 150;
wx.getImageInfo({
src: aa,
success: function (res) {
var w = phoneW;
var h = (phoneW/Number(res.width))*Number(res.height)
ctx.save()
ctx.drawImage(aa, 0, 0, w, h)
ctx.restore()
ctx.setFillStyle('red')
ctx.fillRect(0, 0, phoneW, cutH)
ctx.draw()
that.setData({
canvasW:w,
canvasH:h,
img:aa,
cutH:cutH
})
}
})
},// 点击确认裁剪图片
okCutImg:function(){
var that = this;
var canvasW = that.data.canvasW;
var canvasH = that.data.canvasH;
var nowCutW = that.data.cutType?canvasW:that.data.nowCutW;
var nowCutH = that.data.cutType?that.data.cutH:that.data.nowCutH;
var cutX = that.data.cutX;
var cutY = that.data.cutY;
const ctx = wx.createCanvasContext('cutImg');
ctx.setGlobalAlpha(1)
ctx.drawImage(that.data.img, 0, 0, canvasW, canvasH)
ctx.draw()
wx.canvasToTempFilePath({
x: cutX,
y: cutY,
width: nowCutW,
height: nowCutH,
destWidth: nowCutW,
destHeight: nowCutH,
canvasId: 'cutImg',
success: function(res) {
var aa = res.tempFilePath
that.setData({
cutImgUrl:aa,
prienFlag:false,
alreay:false
})
}
})
},// 点击红框开始移动
canvasMove:function(e){
var that = this;
var canvasW = that.data.canvasW;
var canvasH = that.data.canvasH;
var nowCutW = that.data.cutType?canvasW:that.data.nowCutW;
var nowCutH = that.data.cutType?that.data.cutH:that.data.nowCutH
var touches = e.touches[0];
var x = touches.x;
var y = touches.y-(Number(nowCutH)/2);
that.data.cutType?x=0:x=x-(Number(nowCutW)/2);
that.setData({
cutX:x,
cutY:y
})
const ctx = wx.createCanvasContext('cutImg');
ctx.setGlobalAlpha(0.4)
ctx.drawImage(that.data.img, 0, 0, canvasW, canvasH)
ctx.setFillStyle('red')
ctx.fillRect(x, y, nowCutW, nowCutH)
ctx.draw()
},//等屏裁剪
etcType:function(){
var that = this;
var propor = 100;
var canvasW = that.data.canvasW;
var canvasH = that.data.canvasH;
var cutH = that.data.cutH;
var nowCutW = (Number(canvasW)*propor)/100
var nowCutH = (Number(cutH)*propor)/100
const ctx = wx.createCanvasContext('cutImg');
ctx.setGlobalAlpha(0.4)
ctx.drawImage(that.data.img, 0, 0, canvasW, canvasH)
ctx.setFillStyle('red')
ctx.fillRect(0, 0, nowCutW, nowCutH)
ctx.draw()
that.setData({
nowCutW:nowCutW,
nowCutH:nowCutH,
cutType:true
})
},areaType:function(){
var that = this;
var propor = that.data.propor;
var canvasW = that.data.canvasW;
var canvasH = that.data.canvasH;
var cutH = that.data.cutH;
var nowCutW = (Number(canvasW)*propor)/100
var nowCutH = (Number(cutH)*propor)/100
const ctx = wx.createCanvasContext('cutImg');
ctx.setGlobalAlpha(0.4)
ctx.drawImage(that.data.img, 0, 0, canvasW, canvasH)
ctx.setFillStyle('red')
ctx.fillRect(0,0, nowCutW, nowCutH)
ctx.draw()
that.setData({
nowCutW:nowCutW,
nowCutH:nowCutH,
cutType:false
})
},areaChange:function(e){
var that = this;
var propor = e.detail.value;
var canvasW = that.data.canvasW;
var canvasH = that.data.canvasH;
var cutH = that.data.cutH;
var nowCutW = (Number(canvasW)*propor)/100
var nowCutH = (Number(cutH)*propor)/100
const ctx = wx.createCanvasContext('cutImg');
ctx.setGlobalAlpha(0.4)
ctx.drawImage(that.data.img, 0, 0, canvasW, canvasH)
ctx.setFillStyle('red')
ctx.fillRect(that.data.cutX||0, that.data.cutY||0,nowCutW, nowCutH)
ctx.draw()
that.setData({
nowCutW:nowCutW,
nowCutH:nowCutH,
propor:propor
})
},// 重新裁剪
againBtn:function(){
var that = this;
var data = that.data
this.setData({
prienFlag:true,
alreay:true
})
const ctx = wx.createCanvasContext('cutImg');
ctx.setGlobalAlpha(0.4)
ctx.drawImage(data.img, 0, 0, data.canvasW, data.canvasH)
ctx.setFillStyle('red')
ctx.fillRect(that.data.cutX||0, that.data.cutY||0, data.nowCutW||data.canvasW, data.nowCutH||data.cutH)
ctx.draw()
},
##Now IOS There is still a pitfall that it cannot be cropped, and the official is currently repairing it.
Related recommendations:
Summary of WeChat mini program functionsWeChat mini program page jump functionHow to implement the image enlargement preview function in WeChat appletThe above is the detailed content of Tutorial on how to implement the cropping function by selecting an area in a WeChat applet image. For more information, please follow other related articles on the PHP Chinese website!
 Mini program path acquisition
 How to copy an Excel table to make it the same size as the original
 What are the short video platforms?
 What is a browser plug-in
 What should I do if my QQ account is stolen?
 The difference between export and export default
 Where is the audio interface located on the motherboard?
 Introduction to strings


