

xml learning (5) xml configuration gridview column

有时候我们不确定我们gridview要显示那些列,或者我们希望可以动态配置gridview那些列显示,以及宽度,这时可以通过可以把列的消息存放的数据库,通过读取数据库实现动态绑定列,也可以通过配置xml实现,当然也可以第一次通过读取xml,然后向数据库插入列消息,然后下一次判断数据库是否已经存储了列数据,如果没有存入,那么读取xml。
下面我讲解如何通过xml如何动态绑定gridview
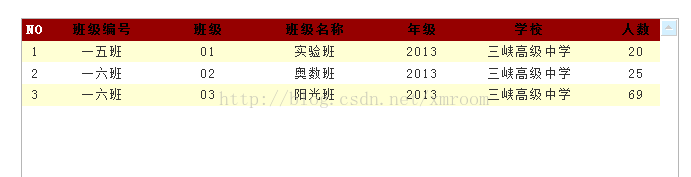
一效果:
二,核心代码:
1.读取xml文件,返回datatable
    /// <summary>
        /// 获取xmltable
        /// </summary>
        /// <param name="xmlname">xml名字</param>
        /// <returns></returns>
        public DataTable getDTXML(string xmlname)
        {
            DataTable result = new DataTable();
            string fileName = HttpContext.Current.Request.PhysicalApplicationPath + "\\Xml\\" + xmlname + ".xml";//xml的物理路径
            XmlDocument xmlDoc = new XmlDocument();
            xmlDoc.Load(fileName);
            XmlNodeList xWitsTablesList = xmlDoc.SelectNodes("/config");
            foreach (XmlNode xOracleNode in xWitsTablesList)
            {
                foreach (XmlNode node2 in xOracleNode.ChildNodes)
                {
                    if (node2.Name == "Header")
                    {
                        //   //绑定表头
                        foreach (XmlNode node3 in node2.Attributes)
                        {
                            result.Columns.Add(node3.Value);
                        }
                    }
                    else
                    {
                        //数据行
                        int i = 0;//列标志
                        DataRow dr = result.NewRow();
                        foreach (XmlNode node4 in node2.Attributes)
                        {
                            dr[i] = node4.Value.ToString();
                            i++;
                        }
                        result.Rows.Add(dr);
                    }

                }
            }
            return result;
        }
2.绑定gridview列
    /// <summary>
    /// 绑定gridview列
    /// </summary>
    /// <param name="gv"></param>
    /// <param name="dt"></param>
    /// <param name="width"></param>
    /// <param name="columnNumber"></param>
    public void HtmlGridView(GridView gv,DataTable dt,int width,int columnNumber)
    {
        try
        {
            int k=0;
            if (dt.Rows.Count > 0)
            {
                foreach (DataRow dr in dt.Rows)
                {
                    BoundField bf = new BoundField();
                    bf.HeaderText = dr["name"].ToString();
                    bf.DataField = dr["field_code"].ToString();
                    bf.HeaderStyle.Width = Convert.ToInt32(dr["width"].ToString());
                    bf.HeaderStyle.HorizontalAlign = HorizontalAlign.Center;
                    bf.HeaderStyle.ForeColor = System.Drawing.Color.Black;
                    bf.SortExpression = dr["name"].ToString();
                    gv.Columns.Add(bf);
                    k+= Convert.ToInt32(dr["width"].ToString());
                    if (dr["width"].ToString()=="0")
                    {
                        gv.Columns[columnNumber].Visible = false;
                    }
                    columnNumber++;
                }
                gv.Width = k + width;
            }

        }
        catch(Exception ex)
        {
            throw new Exception(ex.Message);
        }
    }
三,下面是全部源码:
HtmlGridView.aspx源码:
<%@ Page Language="C#" AutoEventWireup="true" CodeFile="HtmlGridView.aspx.cs" Inherits="HtmlGridView" %>
<!DOCTYPE html PUBLIC "-//W3C//DTD XHTML 1.0 Transitional//EN" "http://www.w3.org/TR/xhtml1/DTD/xhtml1-transitional.dtd">
<html xmlns="http://www.w3.org/1999/xhtml">
<head id="Head1" runat="server">
<title>读取xml</title>
<link rel="Stylesheet" type="text/css" href="Css/xmlReadOne.css" />
<link rel="Stylesheet" type="text/css" href="Css/Common/InputStyle.css" />
<script type="text/javascript" src="Scripts/jquery-1.4.1.min.js"></script>
</head>
<body>
<form id="form1" runat="server">
<p>
<p class="main">
<p class="list">
<asp:GridView runat="server" ID="gv_class" AutoGenerateColumns="False"
DataKeyNames="ID" Width="100%" CellPadding="4"
ForeColor="#333333" GridLines="None" >
<AlternatingRowStyle BackColor="White" />
<FooterStyle BackColor="#990000" Font-Bold="True" ForeColor="White" />
<HeaderStyle BackColor="#990000" Font-Bold="True" ForeColor="White" />
<PagerStyle BackColor="#FFCC66" ForeColor="#333333" HorizontalAlign="Center" />
<RowStyle BackColor="#FFFBD6" HorizontalAlign="Center" ForeColor="#333333" />
<SelectedRowStyle BackColor="#FFCC66" Font-Bold="True" ForeColor="Navy" />
<SortedAscendingCellStyle BackColor="#FDF5AC" />
<SortedAscendingHeaderStyle BackColor="#4D0000" />
<SortedDescendingCellStyle BackColor="#FCF6C0" />
<SortedDescendingHeaderStyle BackColor="#820000" />
<Columns>
<asp:TemplateField HeaderText="NO">
<ItemTemplate>
<%#Eval("NO") %>
</ItemTemplate>
</asp:TemplateField>
</Columns>
</asp:GridView>
</p>
</p>
</p>
</form>
</body>
<script type="text/javascript">
function add_clear() {
$(".button").find("input[type=text] ").each(function () {
$(this).val('');
});
}
</script>
</html>
HtmlGridView.aspx.cs源码:
using System;
using System.Collections.Generic;
using System.Linq;
using System.Web;
using System.Web.UI;
using System.Web.UI.WebControls;
using System.IO;
using System.Xml;
using System.Web.UI.HtmlControls;
using IsXMLUtility;
using System.Data;

public partial class HtmlGridView : System.Web.UI.Page
{
    XmlHelper xmlHelper = new XmlHelper();
    protected void Page_Load(object sender, EventArgs e)
    {
        if (!IsPostBack)
        {
            //gv_class绑定列
            DataTable dt = xmlHelper.getDTXML("表头");
            Functions.getInstance().HtmlGridView(gv_class, dt, 10, 1);

            InitGV();
        }
    }


    /// <summary>
    /// 绑定gridview
    /// </summary>
    private void InitGV()
    {
        DataTable dt = xmlHelper.getDTXML("内容", "NO", 1);
        this.gv_class.DataSource = dt.DefaultView;
        this.gv_class.DataBind();
    }

}
表头.xml
<?xml version="1.0" encoding="utf-8" ?>
<config>
    <Header  col1="name"      col2="field_code" col3="width" col4="dispaly"  ></Header>
    <row     col1="班级编号"  col2="ID"         col3="100"   col4="true"     ></row>
    <row     col1="班级"      col2="class"      col3="100"   col4="true"     ></row>
    <row     col1="班级名称"  col2="class_name" col3="100"   col4="true"     ></row>
    <row     col1="年级"      col2="year"       col3="100"   col4="true"     ></row>
    <row     col1="学校"      col2="school"     col3="100"   col4="true"     ></row>
    <row     col1="人数"      col2="count"     col3="100"    col4="true"     ></row>
</config>
内容.xml
<?xml version="1.0" encoding="utf-8" ?>
<config>
  <Header  col1="ID" col2="class" col3="class_name" col4="year" col5="school"  col6="count" ></Header>
  <row col1="一五班" col2="01" col3="实验班" col4="2013" col5="三峡高级中学"  col6="20" ></row>
  <row col1="一六班" col2="02" col3="奥数班" col4="2013" col5="三峡高级中学"  col6="25" ></row>
  <row col1="一六班" col2="03" col3="阳光班" col4="2013" col5="三峡高级中学"  col6="69" ></row>
</config>
xmlReadOne.css
body{
margin:0 auto;
padding:0px;
font-family:'宋体';
}
.main
{
     margin-left:20px;
     margin-top:10px;
     text-align:left;
    }

.button
{
    width:600px;
    border:#A8B7CC solid 1px;
	background-color:#FFFFFF;
    }
.content
{
    width:600px;
    border:#A8B7CC solid 1px;
	background-color:#E0EDFE;
    margin-top:20px;
 }
 .list
{
    width:600px;
    height:300px;
    overflow:auto;
    border:#A8B7CC solid 1px;
	background-color:#FFFFFF;
	overflow: scroll;
	SCROLLBAR-FACE-COLOR:#E0EDFE;
	PADDING-BOTTOM: 0px;
	SCROLLBAR-HIGHLIGHT-COLOR: #ffffff;
	SCROLLBAR-SHADOW-COLOR: #cccccc;
	SCROLLBAR-3DLIGHT-COLOR:#ffffff;
	SCROLLBAR-ARROW-COLOR:#95AFD4;
	PADDING-TOP: 0px;
	SCROLLBAR-TRACK-COLOR: #ffffff;
	SCROLLBAR-DARKSHADOW-COLOR: #ffffff;
	LETTER-SPACING: 1pt;
    margin-top:20px;
 }
.gv
{
	width:600px;
	height:400px;
	margin-top:20px;
	border:#A8B7CC solid 1px;
	background-color:#FFFFFF;
	overflow: scroll;
	SCROLLBAR-FACE-COLOR:#E0EDFE;
	PADDING-BOTTOM: 0px;
	SCROLLBAR-HIGHLIGHT-COLOR: #ffffff;
	SCROLLBAR-SHADOW-COLOR: #cccccc;
	SCROLLBAR-3DLIGHT-COLOR:#ffffff;
	SCROLLBAR-ARROW-COLOR:#95AFD4;
	PADDING-TOP: 0px;
	SCROLLBAR-TRACK-COLOR: #ffffff;
	SCROLLBAR-DARKSHADOW-COLOR: #ffffff;
	LETTER-SPACING: 1pt;
}
Functions.cs
using System; using System.Collections.Generic; using System.Linq; using System.Web; using System.Data; using System.Web.UI.WebControls; //////Server 的摘要说明 /// public class Functions { private static object _synRoot=new object(); private static Functions _instance=null; private Functions() { // //TODO: 在此处添加构造函数逻辑 // } public static Functions getInstance() { lock (_synRoot) { if (_instance == null) { _instance = new Functions(); } } return _instance; } #region 业务层 /// <summary> /// 绑定gridview列 /// </summary> /// <param name="gv"></param> /// <param name="dt"></param> /// <param name="width"></param> /// <param name="columnNumber"></param> public void HtmlGridView(GridView gv,DataTable dt,int width,int columnNumber) { try { int k=0; if (dt.Rows.Count > 0) { foreach (DataRow dr in dt.Rows) { BoundField bf = new BoundField(); bf.HeaderText = dr["name"].ToString(); bf.DataField = dr["field_code"].ToString(); bf.HeaderStyle.Width = Convert.ToInt32(dr["width"].ToString()); bf.HeaderStyle.HorizontalAlign = HorizontalAlign.Center; bf.HeaderStyle.ForeColor = System.Drawing.Color.Black; bf.SortExpression = dr["name"].ToString(); gv.Columns.Add(bf); k+= Convert.ToInt32(dr["width"].ToString()); if (dr["width"].ToString()=="0") { gv.Columns[columnNumber].Visible = false; } columnNumber++; } gv.Width = k + width; } } catch(Exception ex) { throw new Exception(ex.Message); } } #endregion }
XmlHelper.cs
using System;
using System.Collections.Generic;
using System.Linq;
using System.Web;
using System.Data;
using System.Xml;
using System.IO;
using System.Web.UI;
using System.Web.UI.WebControls;
namespace IsXMLUtility
{
///
///XmlHelper 的摘要说明
///
public class XmlHelper
{
private string rtnXml;
public XmlHelper()
{
//
//TODO: 在此处添加构造函数逻辑
//
rtnXml = string.Empty;
}
/// <summary>
/// 获取xmltable
/// </summary>
/// <param name="xmlname">xml名字</param>
/// <returns></returns>
public DataTable getDTXML(string xmlname)
{
DataTable result = new DataTable();
string fileName = HttpContext.Current.Request.PhysicalApplicationPath + "\\Xml\\" + xmlname + ".xml";//xml的物理路径
XmlDocument xmlDoc = new XmlDocument();
xmlDoc.Load(fileName);
XmlNodeList xWitsTablesList = xmlDoc.SelectNodes("/config");
foreach (XmlNode xOracleNode in xWitsTablesList)
{
foreach (XmlNode node2 in xOracleNode.ChildNodes)
{
if (node2.Name == "Header")
{
// //绑定表头
foreach (XmlNode node3 in node2.Attributes)
{
result.Columns.Add(node3.Value);
}
}
else
{
//数据行
int i = 0;//列标志
DataRow dr = result.NewRow();
foreach (XmlNode node4 in node2.Attributes)
{
dr[i] = node4.Value.ToString();
i++;
}
result.Rows.Add(dr);
}
}
}
return result;
}
///
///
///
/// xml名字
/// 序号列名字
/// 序号开始编号
/// 以上就是xml学习(5)xml配置gridview列的内容,更多相关内容请关注PHP中文网(www.php.cn)!

Hot AI Tools

Undresser.AI Undress
AI-powered app for creating realistic nude photos

AI Clothes Remover
Online AI tool for removing clothes from photos.

Undress AI Tool
Undress images for free

Clothoff.io
AI clothes remover

Video Face Swap
Swap faces in any video effortlessly with our completely free AI face swap tool!

Hot Article
Hot Tools

Notepad++7.3.1
Easy-to-use and free code editor

SublimeText3 Chinese version
Chinese version, very easy to use

Zend Studio 13.0.1
Powerful PHP integrated development environment

Dreamweaver CS6
Visual web development tools

SublimeText3 Mac version
God-level code editing software (SublimeText3)
Hot Topics
 1664
1664
 14
1422
52
1316
25
1267
29
1239
24
14
1422
52
1316
25
1267
29
1239
24

 RSS Document Tools: Building, Validating, and Publishing Feeds
Apr 09, 2025 am 12:10 AM
RSS Document Tools: Building, Validating, and Publishing Feeds
Apr 09, 2025 am 12:10 AM
How to build, validate and publish RSSfeeds? 1. Build: Use Python scripts to generate RSSfeed, including title, link, description and release date. 2. Verification: Use FeedValidator.org or Python script to check whether RSSfeed complies with RSS2.0 standards. 3. Publish: Upload RSS files to the server, or use Flask to generate and publish RSSfeed dynamically. Through these steps, you can effectively manage and share content.
 Is There an RSS Alternative Based on JSON?
Apr 10, 2025 am 09:31 AM
Is There an RSS Alternative Based on JSON?
Apr 10, 2025 am 09:31 AM
JSONFeed is a JSON-based RSS alternative that has its advantages simplicity and ease of use. 1) JSONFeed uses JSON format, which is easy to generate and parse. 2) It supports dynamic generation and is suitable for modern web development. 3) Using JSONFeed can improve content management efficiency and user experience.
 XML's Advantages in RSS: A Technical Deep Dive
Apr 23, 2025 am 12:02 AM
XML's Advantages in RSS: A Technical Deep Dive
Apr 23, 2025 am 12:02 AM
XML has the advantages of structured data, scalability, cross-platform compatibility and parsing verification in RSS. 1) Structured data ensures consistency and reliability of content; 2) Scalability allows the addition of custom tags to suit content needs; 3) Cross-platform compatibility makes it work seamlessly on different devices; 4) Analytical and verification tools ensure the quality and integrity of the feed.
 From XML to Readable Content: Demystifying RSS Feeds
Apr 11, 2025 am 12:03 AM
From XML to Readable Content: Demystifying RSS Feeds
Apr 11, 2025 am 12:03 AM
RSSfeedsareXMLdocumentsusedforcontentaggregationanddistribution.Totransformthemintoreadablecontent:1)ParsetheXMLusinglibrarieslikefeedparserinPython.2)HandledifferentRSSversionsandpotentialparsingerrors.3)Transformthedataintouser-friendlyformatsliket
 Building Feeds with XML: A Hands-On Guide to RSS
Apr 14, 2025 am 12:17 AM
Building Feeds with XML: A Hands-On Guide to RSS
Apr 14, 2025 am 12:17 AM
The steps to build an RSSfeed using XML are as follows: 1. Create the root element and set the version; 2. Add the channel element and its basic information; 3. Add the entry element, including the title, link and description; 4. Convert the XML structure to a string and output it. With these steps, you can create a valid RSSfeed from scratch and enhance its functionality by adding additional elements such as release date and author information.
 RSS Documents: How They Deliver Your Favorite Content
Apr 15, 2025 am 12:01 AM
RSS Documents: How They Deliver Your Favorite Content
Apr 15, 2025 am 12:01 AM
RSS documents work by publishing content updates through XML files, and users subscribe and receive notifications through RSS readers. 1. Content publisher creates and updates RSS documents. 2. The RSS reader regularly accesses and parses XML files. 3. Users browse and read updated content. Example of usage: Subscribe to TechCrunch's RSS feed, just copy the link to the RSS reader.
 Beyond the Basics: Advanced RSS Document Features
Apr 21, 2025 am 12:03 AM
Beyond the Basics: Advanced RSS Document Features
Apr 21, 2025 am 12:03 AM
Advanced features of RSS include content namespaces, extension modules, and conditional subscriptions. 1) Content namespace extends RSS functionality, 2) Extended modules such as DublinCore or iTunes to add metadata, 3) Conditional subscription filters entries based on specific conditions. These functions are implemented by adding XML elements and attributes to improve information acquisition efficiency.
 Creating RSS Documents: A Step-by-Step Tutorial
Apr 13, 2025 am 12:10 AM
Creating RSS Documents: A Step-by-Step Tutorial
Apr 13, 2025 am 12:10 AM
The steps to create an RSS document are as follows: 1. Write in XML format, with the root element, including the elements. 2. Add, etc. elements to describe channel information. 3. Add elements, each representing a content entry, including,,,,,,,,,,,. 4. Optionally add and elements to enrich the content. 5. Ensure the XML format is correct, use online tools to verify, optimize performance and keep content updated.
