Detailed explanation of XML Spy example code (picture)
Before reading this tutorial, you should at least make sure that you are familiar with XML, have edited XML, DTD and XSLT documents using Notepad or other tools, and are familiar with their Grammar and usage, otherwise please make up the lesson before reading this tutorial.
XML Spy is an editor developed by Icon Information System that supports XML, XSL, XSLT, DTD, Schema and other file formats. It can display XML as a perfect tree structure, and can easily use various HTML/XML/XSLT tags. Using it can greatly save our development time, and we do not have to waste a lot of time on code input. Let's learn how to use XML Spy through an example of storing movie information.
Step one: We need to design three files: saveit.xml, saveit.dtd and saveit.xslt; saveit.xml is responsible for storing specific movie content data, and saveit.dtd is responsible for verifying saveit.xml. Saveit.xslt is responsible for style transformation of saveit.xml and determines its final display effect in the browser. Let’s first look at the code of the three files we need to create:
----------saveit.xml------------------
<?xml version="1.0" encoding="GB2312"?>
<!DOCTYPE movies SYSTEM "G:\xmlspy\saveit.dtd">
<?xml-stylesheet type="text/xsl" href="G:\xmlspy\saveit.xslt"?>
<movies type="动作片">
<id>1</id>
<name>致命摇篮</name>
<brief>李连杰最新力作!</brief>
<time>2003</time>
</movies>
----------saveit.dtd------------------
<?xml version="1.0" encoding="GB2312"?>
<!ELEMENT movies (id, name, brief, time)>
<!ATTLIST movies type CDATA #REQUIRED>
<!ELEMENT id (#PCDATA)>
<!ELEMENT name (#PCDATA)>
<!ELEMENT brief (#PCDATA)>
<!ELEMENT time (#PCDATA)>
----------saveit.xslt------------------
<?xml version="1.0" encoding="UTF-8"?>
<xsl:stylesheet version="1.0" xmlns:xsl="http://www.w3.org/1999/XSL/Transform">
<xsl:output method="xml" version="1.0" encoding="GB2312" indent="yes"/>
<xsl:template match="/">
<html>
<head>
<title>
:::凌云的XML Spy教程:::
</title>
</head>
<body>
<xsl:apply-templates></xsl:apply-templates>
</body>
</html>
</xsl:template>
<xsl:template match="movies">
第<xsl:value-of select="id"></xsl:value-of>部电影
<table>
<tbody>
<tr>
<td>名称</td>
<td>简介</td>
<td>时间</td>
<td>类型</td>
</tr>
<tr>
<td><xsl:value-of select="name"></xsl:value-of></td>
<td><xsl:value-of select="brief"></xsl:value-of></td>
<td><xsl:value-of select="time"></xsl:value-of></td>
<td><xsl:value-of select="@type"></xsl:value-of></td>
</tr>
</tbody>
</table>
</xsl:template>
</xsl:stylesheet>
Step 2: Use XML Spy to create the saveit.dtd document.
1) Establish the root node movies
Select the menu File->New to pop up the Create new document dialog box, select the dtd (Document Type Definition) inside, so that an empty DTD document will is established in the editing area, as shown in Figure 1. Click the black triangle in the upper left corner and it will look like Figure 2. We set the encoding method item encoding default value to UTF-8, and we changed it to GB2312. Double-click on Elm and enter movies. After completion, as shown in Figure 3. Keep Elm movies selectedstate, double-click the sequence of in the Elements box on the right, the result is shown in Figure 4. In this way, the root node movies is established.

Picture 1

Picture 2

Picture 3
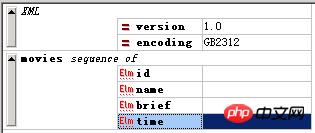
Figure 4
2) Add child node id, name, brief, time and attribute type for the root node movies.
Right-click on the movies sequence of and select Add child ->ELEMENT, add four child nodes to it. As shown in Figure 5. Right-click on the movies sequence of again, select Append->ATTLIST, and then set its name to movies, set Name to type, set Type to CDATA, and set Presence to #REQUIRED as shown in Figure 6 .
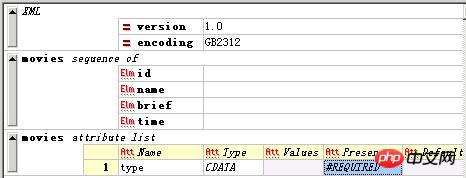
Figure 5
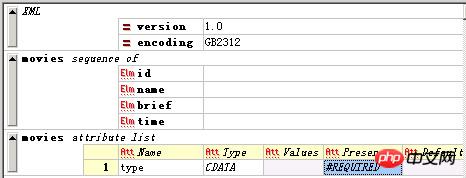
Figure 6
3) Create sub-nodes id, name, brief, time. In movies Right-click on the sequence of, select Append->ELEMENT, add four nodes, and set all data types to PCDATA. As shown in Figure 7. In this way, the DTD document is created. Name it saveit.dtd and save it to the G:////xmlspy directory. In View->Text view mode, you can view the source code obtained by editing. Selecting View->Enhanced Grid view will return to tree editing View mode.
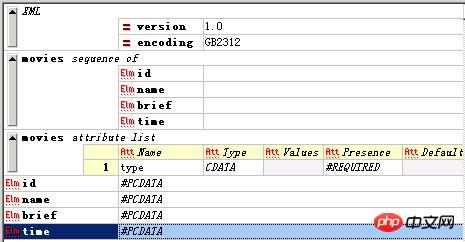
Step 3: Use XML Spy to create the saveit.xslt document.
1) Select the menu File->New to pop up the Create new document dialog box, select the last item xslt (Extensible Stylesheet Language), and create a new xslt file as shown in Figure 8 Show. At this time, XML Spy will automatically transfer the view to the code editing view, because it is more convenient to edit xslt directly. Change its encoding method to: GB2312, as shown in Figure 9.

Picture 8

Picture 9
2) The rest of the code can be easily added to the editing area through the Elements panel shown in Figure 10. After the addition is completed, set the corresponding nodes to the attribute values of each element to complete the writing of the XSLT document. The specific process will not be detailed. After completion, it will look like Figure 11. Name it saveit.xslt and save it to the G:////xmlspy directory.
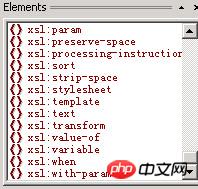
Picture 10
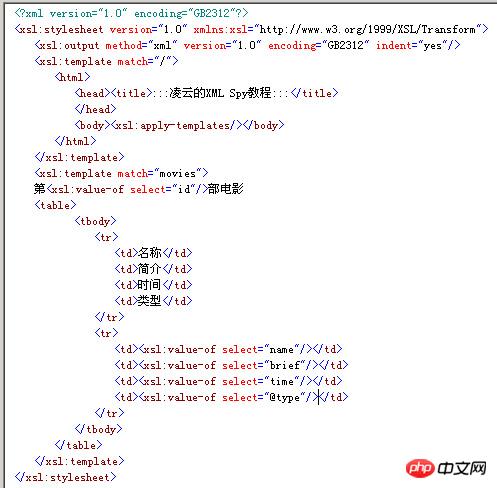
Picture 11
Step 4: Use XML Spy to create the saveit.xml document.
1) Select the menu File->New to pop up the Create new document dialog box, select xml (XML Document) inside, and a dialog box will pop up asking you to choose whether the XML document verification method is DTD or Schema. As shown in Figure 12, we select the DTD verification method and select the saveit.dtd just created as its verification document, as shown in Figure 13.
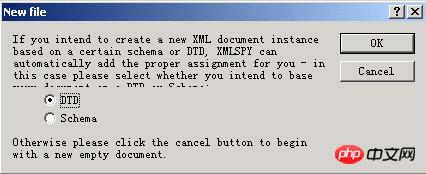
Figure 12

Figure 13
2) After clicking OK, XML Spy will automatically build a saveit for us .dtd validated XML blank document. As shown in Figure 14. Fill in the content data. Change the encoding method item encoding to GB2312. The result is shown in Figure 15.
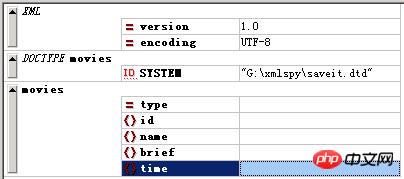
Figure 14
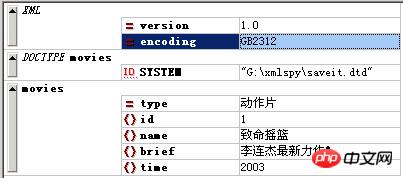
Figure 15
3) Select the XSL->Assign XSL menu, and select As shown in Figure 15), select the G:////xmlspy////saveit.xslt file and click OK.

Figure 16
4) You’re done, The XML document is finally edited. As shown in Figure 17. Name it saveit.xml and save it to the G:////xmlspy directory.
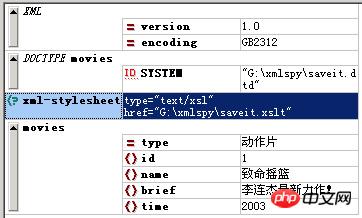
Figure 17
Step 5: You can select XSLT->XSL Transformation or click to view the final display effect of saveit.xml directly in XML Spy. You can also go to the G:////xmlspy directory and use a browser to watch it, but the browser must be IE6 or above. If you want to output the transformation result document, you can click to save the result document after transformation in XML Spy. The final display effect is shown in Figure 18. The above code passes Debugging in XML Spy5.

Picture 18
The above is the detailed content of Detailed explanation of XML Spy example code (picture). For more information, please follow other related articles on the PHP Chinese website!

Hot AI Tools

Undresser.AI Undress
AI-powered app for creating realistic nude photos

AI Clothes Remover
Online AI tool for removing clothes from photos.

Undress AI Tool
Undress images for free

Clothoff.io
AI clothes remover

Video Face Swap
Swap faces in any video effortlessly with our completely free AI face swap tool!

Hot Article

Hot Tools

Notepad++7.3.1
Easy-to-use and free code editor

SublimeText3 Chinese version
Chinese version, very easy to use

Zend Studio 13.0.1
Powerful PHP integrated development environment

Dreamweaver CS6
Visual web development tools

SublimeText3 Mac version
God-level code editing software (SublimeText3)

Hot Topics
 1662
1662
 14
14
 1419
1419
 52
52
 1311
1311
 25
25
 1261
1261
 29
29
 1234
1234
 24
24
 Can I open an XML file using PowerPoint?
Feb 19, 2024 pm 09:06 PM
Can XML files be opened with PPT? XML, Extensible Markup Language (Extensible Markup Language), is a universal markup language that is widely used in data exchange and data storage. Compared with HTML, XML is more flexible and can define its own tags and data structures, making the storage and exchange of data more convenient and unified. PPT, or PowerPoint, is a software developed by Microsoft for creating presentations. It provides a comprehensive way of
 Convert XML data to CSV format in Python
Aug 11, 2023 pm 07:41 PM
Convert XML data in Python to CSV format XML (ExtensibleMarkupLanguage) is an extensible markup language commonly used for data storage and transmission. CSV (CommaSeparatedValues) is a comma-delimited text file format commonly used for data import and export. When processing data, sometimes it is necessary to convert XML data to CSV format for easy analysis and processing. Python is a powerful
 Filtering and sorting XML data using Python
Aug 07, 2023 pm 04:17 PM
Implementing filtering and sorting of XML data using Python Introduction: XML is a commonly used data exchange format that stores data in the form of tags and attributes. When processing XML data, we often need to filter and sort the data. Python provides many useful tools and libraries to process XML data. This article will introduce how to use Python to filter and sort XML data. Reading the XML file Before we begin, we need to read the XML file. Python has many XML processing libraries,
 Handling errors and exceptions in XML using Python
Aug 08, 2023 pm 12:25 PM
Handling Errors and Exceptions in XML Using Python XML is a commonly used data format used to store and represent structured data. When we use Python to process XML, sometimes we may encounter some errors and exceptions. In this article, I will introduce how to use Python to handle errors and exceptions in XML, and provide some sample code for reference. Use try-except statement to catch XML parsing errors When we use Python to parse XML, sometimes we may encounter some
 Python implements conversion between XML and JSON
Aug 07, 2023 pm 07:10 PM
Python implements conversion between XML and JSON Introduction: In the daily development process, we often need to convert data between different formats. XML and JSON are common data exchange formats. In Python, we can use various libraries to convert between XML and JSON. This article will introduce several commonly used methods, with code examples. 1. To convert XML to JSON in Python, we can use the xml.etree.ElementTree module
 How to handle XML and JSON data formats in C# development
Oct 09, 2023 pm 06:15 PM
How to handle XML and JSON data formats in C# development requires specific code examples. In modern software development, XML and JSON are two widely used data formats. XML (Extensible Markup Language) is a markup language used to store and transmit data, while JSON (JavaScript Object Notation) is a lightweight data exchange format. In C# development, we often need to process and operate XML and JSON data. This article will focus on how to use C# to process these two data formats, and attach
 Python parsing special characters and escape sequences in XML
Aug 08, 2023 pm 12:46 PM
Python parses special characters and escape sequences in XML XML (eXtensibleMarkupLanguage) is a commonly used data exchange format used to transfer and store data between different systems. When processing XML files, you often encounter situations that contain special characters and escape sequences, which may cause parsing errors or misinterpretation of the data. Therefore, when parsing XML files using Python, we need to understand how to handle these special characters and escape sequences. 1. Special characters and
 How do you parse and process HTML/XML in PHP?
Feb 07, 2025 am 11:57 AM
This tutorial demonstrates how to efficiently process XML documents using PHP. XML (eXtensible Markup Language) is a versatile text-based markup language designed for both human readability and machine parsing. It's commonly used for data storage an


