HTML開發部落格之登入頁設計
登入頁面設計
我們先來完成登入頁面的設計
首先在網站目錄下新建資料夾,並在其中新建一個html文件,和css文件
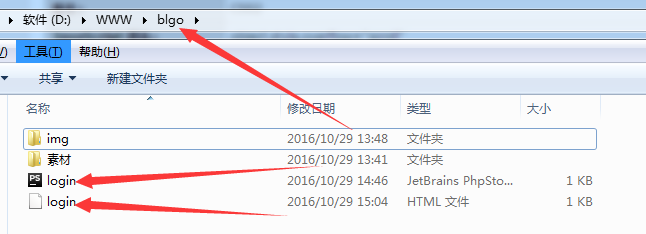
在這裡為了使大家更能清楚的看清,我們使用內部樣式表的方式來編寫css,大家在本地可以引入CSS檔案來寫,讀寫更為清楚明朗。
login.html檔案
#建立檔案
在html新建一個div,加入<p>標籤。
<!DOCTYPE html>
<html lang="en">
<head>
    <meta charset="UTF-8">
    <title>用户登录</title>

</head>
<body>
<div>
    <p></p>
    <p></p>
    <p></p>
    <p></p>
    <p></p>
    <p></p>
</div>
</body>
</html>
對內部填入內容
<!DOCTYPE html>
<html lang="en">
<head>
    <meta charset="UTF-8">
    <title>用户登录</title>
    <link href="login.css" rel="stylesheet" type="text/css">
</head>
<body>
<div>
    <p ><img src="https://img.php.cn/upload/course/000/000/004/58144f924a5da186.gif" width=50% height=50%></p>
    <p >博客,记录生活中的点点滴滴!</p>
    <p >在博客中,可以畅所欲言,可以学习IT最新的知识!</p>
    <p><input type="text" ></p>
    <p><input type="password" ></p>
    <p><input type="submit" value="确认登陆" ></p>
    <p >忘记密码</p>
    <p ><input type="button" value="注册账号"></p>
</div>
</body>
</html>
依序加入圖片,文字,帳號密碼表單,登陸註冊按鈕。
樣式美化
首先對body定義大小並調整圖片的大小,使頁面佈局合理。
<!DOCTYPE html>
<html lang="en">
<head>
    <meta charset="UTF-8">
    <title>用户登录</title>
<style>
    #login{
        width: 1000px;
        margin: 0 auto;

    }
    #login p{
        text-align:center;
    }
</style>
</head>
<body>
<div id="login">
    <p ><img src="https://img.php.cn/upload/course/000/000/004/58144f924a5da186.gif" width=50% height=50%></p>
    <p >博客,记录生活中的点点滴滴!</p>
    <p >在博客中,可以畅所欲言,可以学习IT最新的知识!</p>
    <p><input type="text" ></p>
    <p><input type="password" ></p>
    <p><input type="submit" value="确认登陆" ></p>
    <p >忘记密码</p>
    <p ><input type="button" value="注册账号"></p>
</div>
</body>
</html>
為div增加個id選擇器,對其進行調整,設定寬高,邊界設定為自動,隱藏溢出,文字居中。
調整文字樣式
#新增類別選擇器t1和t2
.t1{
    font-size: 28px;font-family:"微软雅黑";
}
.t2{
    font-size: 15px;font-family:"微软雅黑";
    color: #999999;
}
調整文字的大小和顏色
<!DOCTYPE html>
<html lang="en">
<head>
    <meta charset="UTF-8">
    <title>用户登录</title>
    <style>
        #login{
            width: 1000px;
            margin: 0 auto;
            overflow:hidden;
        }
        #login p{
            text-align:center;
        }
        .t1{
            font-size: 28px;font-family:"微软雅黑";
        }
        .t2{
            font-size: 15px;font-family:"微软雅黑";
            color: #999999;
        }
    </style>
</head>
<body>
<div id="login">
    <p ><img src="https://img.php.cn/upload/course/000/000/004/58144f924a5da186.gif" width=50% height=50%></p>
    <p class="t1">博客,记录生活中的点点滴滴!</p>
    <p class="t2">在博客中,可以畅所欲言,可以学习IT最新的知识!</p>
    <p><input type="text" ></p>
    <p><input type="password" ></p>
    <p><input type="submit" value="确认登陆" ></p>
    <p >忘记密码</p>
    <p ><input type="button" value="注册账号"></p>
</div>
</body>
</html>
對帳號密碼框進行美化
 .textbox{
           width: 350px;
           height: 40px;
           border-radius: 3px;
           border: 1px solid #e2b709;
           padding-left: 10px;
       }
       .submit{
           width: 360px;
           height: 40px;
           background-color: #F0184d;
           border-radius: 3px;
           color: white;
           border: 1px solid #666666;
       }
限定高度和寬度,設定圓角,邊框的顏色
<!DOCTYPE html>
<html lang="en">
<head>
    <meta charset="UTF-8">
    <title>用户登录</title>
    <style>
        #login{
            width: 1000px;
            margin: 0 auto;
            overflow:hidden;

        }
        #login p{
            text-align:center;
        }
        .t1{
            font-size: 28px;font-family:"微软雅黑";
        }
        .t2{
            font-size: 15px;font-family:"微软雅黑";
            color: #999999;
        }
        .textbox{
            width: 350px;
            height: 40px;
            border-radius: 3px;
            border: 1px solid #e2b709;
            padding-left: 10px;
        }

    </style>
</head>
<body>
<div id="login">
    <p ><img src="https://img.php.cn/upload/course/000/000/004/58144f924a5da186.gif" width=50% height=50%></p>
    <p class="t1">博客,记录生活中的点点滴滴!</p>
    <p class="t2">在博客中,可以畅所欲言,可以学习IT最新的知识!</p>
    <p><input type="text"  class="textbox"></p>
    <p><input type="password"  class="textbox"></p>
    <p><input type="submit" value="确认登陆" ></p>
    <p >忘记密码</p>
    <p ><input type="button" value="注册账号"></p>
</div>
</body>
</html>
確認登陸和註冊帳號進行美化
       .submit{
           width: 365px;
           height: 40px;
           background-color: #F0184d;
           color: white;
           border: 1px solid #666666;
       }
       .button{
           width: 365px;
           height: 40px;
           padding-left: 10px;
           background-color: white;
           border: 1px solid #666666;
       }
定義submit和button,調整高度色彩字體大小。
<!DOCTYPE html>
<html lang="en">
<head>
    <meta charset="UTF-8">
    <title>用户登录</title>
    <style>
        #login{
            width: 1000px;
            margin: 0 auto;
            overflow:hidden;
        }
        #login p{
            text-align:center;
        }
        .t1{
            font-size: 28px;font-family:"微软雅黑";
        }
        .t2{
            font-size: 15px;font-family:"微软雅黑";
            color: #999999;
        }
        .textbox{
            width: 350px;
            height: 40px;
            border-radius: 3px;
            border: 1px solid #e2b709;
            padding-left: 10px;
        }
        .submit{
            width: 365px;
            height: 40px;
            background-color: #F0184d;
            color: white;
            border: 1px solid #666666;
        }
        .button{
            width: 365px;
            height: 40px;
            padding-left: 10px;
            background-color: white;
            border: 1px solid #666666;
        }
    </style>
</head>
<body>
<div id="login">
    <p ><img src="https://img.php.cn/upload/course/000/000/004/58144f924a5da186.gif" width=50% height=50%></p>
    <p class="t1">博客,记录生活中的点点滴滴!</p>
    <p class="t2">在博客中,可以畅所欲言,可以学习IT最新的知识!</p>
    <p><input type="text"  class="textbox"></p>
    <p><input type="password"  class="textbox"></p>
    <p><input type="submit" value="确认登陆"  class="submit"></p>
    <p >忘记密码</p>
    <p ><input type="button" value="注册账号" class="button"></p>
</div>
</body>
</html>
介面進行最後的美化
.text{
    width: 360px;
    margin: 0 auto;
    font-size: 15px;
    color: #666666;
}
<!DOCTYPE html>
<html lang="en">
<head>
<meta charset="UTF-8">
<title>用户登录</title>
<style>
#login{
width: 1000px;
margin: 0 auto;
overflow:hidden;
}
#login p{
text-align:center;
}
.t1{
font-size: 28px;font-family:"微软雅黑";
}
.t2{
font-size: 15px;font-family:"微软雅黑";
color: #999999;
}
.textbox{
width: 350px;
height: 40px;
border-radius: 3px;
border: 1px solid #e2b709;
padding-left: 10px;
}
.submit{
width: 365px;
height: 40px;
background-color: #F0184d;
color: white;
border: 1px solid #666666;
}
.button{
width: 365px;
height: 40px;
padding-left: 10px;
background-color: white;
border: 1px solid #666666;
}
.text{
width: 360px;
margin: 0 auto;
font-size: 15px;
color: #666666;
}
</style>
</head>
<body>
<div id="login">
<p ><img src="https://img.php.cn/upload/course/000/000/004/58144f924a5da186.gif" width=50% height=50%></p>
<p class="t1">博客,记录生活中的点点滴滴!</p>
<p class="t2">在博客中,可以畅所欲言,可以学习IT最新的知识!</p>
<p><input type="text" class="textbox"></p>
<p><input type="password" class="textbox"></p>
<p><input type="submit" value="确认登陆" class="submit"></p>
<p class="text"style="text-align: right;">忘记密码</p>
<p ><input type="button" value="注册账号" class="button"></p>
</div>
</body>
</html>對文字進行細微的調整,登陸頁面就完成了。


