

squid+iptables建立internet网关

系统环境: RedHat 7.2 squid (http://squid-cache.org/) 1. 系统设置: 运行:setup 选择server 默认情况下iptables 和 ipchains都已经被选择了。请把ipchains去掉,只让iptables运行 2. 安装squid 建议从RedHat的安装光盘上安装 mount /mnt/cdrom cd /mnt/cd
系统环境:RedHat 7.2
squid (http://squid-cache.org/)
1. 系统设置:
运行:setup
选择server
默认情况下iptables 和 ipchains都已经被选择了。请把ipchains去掉,只让iptables运行
2. 安装squid
建议从RedHat的安装光盘上安装
mount /mnt/cdrom
cd /mnt/cdrom/RedHat/RPMS/
rpm -ivh squid-2.4.2.STABLE2-8.i386.rpm
启动squid:/etc/rc.d/init.d/squid start
***一般情况下默认安装的squid不用更改squid.conf文件就可以工作。
3. 为配合iptables做透明网关更改squid.conf文件
vi /etc/squid/squid.conf
更改以下行:
http_port 3128
httpd_accel_host virtual
httpd_accel_port 80
httpd_accel_with_proxy on
httpd_accel_uses_host_header on
4. iptables设置:
建议从这个脚本设置iptables规则。见附件。
./iptables
然后执行:
service iptables save
这样系统就会把刚才执行脚本的命令保存在 /etc/sysconfig/iptables里。下次系统就会
自动加载这些规则
如果你用这个脚本在你的系统上无法执行,可能是文件没有执行权限。
chmod a+x iptables使之可执行。(不要把这个文件拷贝到/etc/rc.d/init.d/下执行。)
#!/bin/sh
INET_IP="222.222.222.1" #代理服务器的internet ip地址
INET_IFACE="eth0" #代理服务的网卡设备
LAN_IP="192.168.100.4" #代理服务器的内部地址
LAN_IP_RANGE="192.168.100.0/16" #局域网的ip网段
LAN_BCAST_ADRESS="192.168.100.255" #局域网的广播地址
LAN_IFACE="eth1" 代理服务器内部网卡设备
LO_IFACE="lo"
LO_IP="127.0.0.1"
#
# IPTables Configuration.
#
IPTABLES="/sbin/iptables"
###########################################################################
#
# 2. Module loading.
#
#
# Needed to initially load modules
#
/sbin/depmod -a
#
# 2.1 Required modules
#加载需要的模块
/sbin/modprobe ip_tables
/sbin/modprobe ip_conntrack
/sbin/modprobe iptable_filter
/sbin/modprobe iptable_mangle
/sbin/modprobe iptable_nat
/sbin/modprobe ipt_LOG
/sbin/modprobe ipt_limit
/sbin/modprobe ipt_state
#
# 2.2 Non-Required modules
#
#/sbin/modprobe ipt_owner
#/sbin/modprobe ipt_REJECT
#/sbin/modprobe ipt_MASQUERADE
#/sbin/modprobe ip_conntrack_ftp
#/sbin/modprobe ip_conntrack_irc
###########################################################################
#
# 3. /proc set up.
#
#
# 3.1 Required proc configuration
#设置ip forward
echo "1" > /proc/sys/net/ipv4/ip_forward
#
# 3.2 Non-Required proc configuration
#
echo "1" > /proc/sys/net/ipv4/conf/all/rp_filter
#echo "1" > /proc/sys/net/ipv4/conf/all/proxy_arp
#echo "1" > /proc/sys/net/ipv4/ip_dynaddr
###########################################################################
#
# 4. rules set up.
#
######
# 4.1 Filter table
#
#
# 4.1.1 Set policies
#
$IPTABLES -P INPUT DROP
$IPTABLES -P OUTPUT DROP
$IPTABLES -P FORWARD DROP
#
# 4.1.2 Create userspecified chains
#
#
# Create chain for bad tcp packets
#
$IPTABLES -N bad_tcp_packets
#
# Create separate chains for ICMP, TCP and UDP to traverse
#
$IPTABLES -N allowed
$IPTABLES -N icmp_packets
$IPTABLES -N tcp_packets
$IPTABLES -N udpincoming_packets
#
# 4.1.3 Create content in userspecified chains
#
#
# bad_tcp_packets chain
#
$IPTABLES -A bad_tcp_packets -p tcp ! --syn -m state --state NEW -j LOG
--log-prefix "New not syn:"
$IPTABLES -A bad_tcp_packets -p tcp ! --syn -m state --state NEW -j DROP
#
# allowed chain
#
$IPTABLES -A allowed -p TCP --syn -j ACCEPT
$IPTABLES -A allowed -p TCP -m state --state ESTABLISHED,RELATED -j ACCEPT
$IPTABLES -A allowed -p TCP -j DROP
#
# ICMP rules
#
# Changed rules totally
$IPTABLES -A icmp_packets -p ICMP -s 0/0 --icmp-type 8 -j ACCEPT
$IPTABLES -A icmp_packets -p ICMP -s 0/0 --icmp-type 11 -j ACCEPT
#
# TCP rules
#
$IPTABLES -A tcp_packets -p TCP -s 0/0 --dport 21 -j allowed
$IPTABLES -A tcp_packets -p TCP -s 0/0 --dport 22 -j allowed
$IPTABLES -A tcp_packets -p TCP -s 0/0 --dport 80 -j allowed
$IPTABLES -A tcp_packets -p TCP -s 0/0 --dport 113 -j allowed
#
# UDP ports
#
# nondocumented commenting out of these rules
$IPTABLES -A udpincoming_packets -p UDP -s 0/0 --source-port 53 -j ACCEPT
#$IPTABLES -A udpincoming_packets -p UDP -s 0/0 --source-port 123 -j ACCEPT
$IPTABLES -A udpincoming_packets -p UDP -s 0/0 --source-port 2074 -j ACCEPT
$IPTABLES -A udpincoming_packets -p UDP -s 0/0 --source-port 4000 -j DROP #禁止客户使用OICQ
#
# 4.1.4 INPUT chain
#
#
# Bad TCP packets we don't want.
#
$IPTABLES -A INPUT -p tcp -j bad_tcp_packets
#
# Rules for incoming packets from the internet.
#
$IPTABLES -A INPUT -p ICMP -i $INET_IFACE -j icmp_packets
$IPTABLES -A INPUT -p TCP -i $INET_IFACE -j tcp_packets
$IPTABLES -A INPUT -p UDP -i $INET_IFACE -j udpincoming_packets
#
# Rules for special networks not part of the Internet
#
$IPTABLES -A INPUT -p ALL -i $LAN_IFACE -d $LAN_BCAST_ADRESS -j ACCEPT
$IPTABLES -A INPUT -p ALL -i $LO_IFACE -s $LO_IP -j ACCEPT
$IPTABLES -A INPUT -p ALL -i $LO_IFACE -s $LAN_IP -j ACCEPT
$IPTABLES -A INPUT -p ALL -i $LO_IFACE -s $INET_IP -j ACCEPT
$IPTABLES -A INPUT -p ALL -i $LAN_IFACE -s $LAN_IP_RANGE -j ACCEPT
$IPTABLES -A INPUT -p ALL -d $INET_IP -m state --state ESTABLISHED,RELATED
-j ACCEPT
#
# Log weird packets that don't match the above.
#
$IPTABLES -A INPUT -m limit --limit 3/minute --limit-burst 3 -j LOG
--log-level DEBUG --log-prefix "IPT INPUT packet died: "
#
# 4.1.5 FORWARD chain
#
#
# Bad TCP packets we don't want
#
$IPTABLES -A FORWARD -p tcp -j bad_tcp_packets
#
# Accept the packets we actually want to forward
#
$IPTABLES -A FORWARD -i $LAN_IFACE -j ACCEPT
$IPTABLES -A FORWARD -m state --state ESTABLISHED,RELATED -j ACCEPT
#
# Log weird packets that don't match the above.
#
$IPTABLES -A FORWARD -m limit --limit 3/minute --limit-burst 3 -j LOG
--log-level DEBUG --log-prefix "IPT FORWARD packet died: "
#
# 4.1.6 OUTPUT chain
#
#
# Bad TCP packets we don't want.
#
$IPTABLES -A OUTPUT -p tcp -j bad_tcp_packets
#
# Special OUTPUT rules to decide which IP's to allow.
#
$IPTABLES -A OUTPUT -p ALL -s $LO_IP -j ACCEPT
$IPTABLES -A OUTPUT -p ALL -s $LAN_IP -j ACCEPT
$IPTABLES -A OUTPUT -p ALL -s $INET_IP -j ACCEPT
#
# Log weird packets that don't match the above.
#
$IPTABLES -A OUTPUT -m limit --limit 3/minute --limit-burst 3 -j LOG
--log-level DEBUG --log-prefix "IPT OUTPUT packet died: "
######
# 4.2 nat table
#
#
# 4.2.1 Set policies
#
#
# 4.2.2 Create user specified chains
#
#
# 4.2.3 Create content in user specified chains
#
#
# 4.2.4 PREROUTING chain
#
$IPTABLES -t nat -I PREROUTING -m mac --mac-source 00:50:4c:3b:e6:fb -j DROP #禁止网卡的MAC为
#00:50:4c:3b:e6:fb访问internet
#
# 4.2.5 POSTROUTING chain
#
#$IPTABLES -t nat -A PREROUTING -i eth1 -p tcp -m tcp --dport 80 -j REDIRECT --to-ports 3128
#
$IPTABLES -t nat -A PREROUTING -s 192.168.100.0/24 -d 0/0 -p tcp --dport 80 -j DNAT --to 192.168.100.4:3128
#把客户的http的请求转发到squid的3128端口上(透明代理)
# Enable simple IP Forwarding and Network Address Translation
#
$IPTABLES -t nat -A POSTROUTING -o $INET_IFACE -j SNAT --to-source $INET_IP
#
# 4.2.6 OUTPUT chain
#
######
# 4.3 mangle table
#
#
# 4.3.1 Set policies
#
#
# 4.3.2 Create user specified chains
#
#
# 4.3.3 Create content in user specified chains
#
#
# 4.3.4 PREROUTING chain
#
$IPTABLES -t nat -A PREROUTING -s 0/0 -d 0/0 -p udp --destination-port 8000 -j DROP
#禁止客户访问OICQ服务器
文章选项: 友善列印 将这篇文章放置于备忘录中,待有空时回覆 通知板主
linux
注册会员
Reged: 11/11/02
篇文章: 17
Re: squid+iptables建立internet网关 [re: linux]
11/12/02 03:28 PM ()
编辑文章 编辑 回应这篇文章 回覆
# NETWORK OPTIONS
# -----------------------------------------------------------------------------
#http_port 3128
#icp_port 3130
#htcp_port 4827
#mcast_groups 239.128.16.128
#
#tcp_outgoing_address 0.0.0.0
#udp_incoming_address 0.0.0.0
#udp_outgoing_address 0.0.0.0
#cache_peer hostname type 3128 3130
#icp_query_timeout 0
#maximum_icp_query_timeout 2000
#mcast_icp_query_timeout 2000
#dead_peer_timeout 10 seconds
#hierarchy_stoplist cgi-bin ?
#acl QUERY urlpath_regex cgi-bin ?
#no_cache deny QUERY
cache_mem 16 MB
#cache_swap_low 90
#cache_swap_high 95
#maximum_object_size 4096 KB
#ipcache_size 1024
#ipcache_low 90
#ipcache_high 95
# TAG: fqdncache_size (number of entries)
# Maximum number of FQDN cache entries.
#fqdncache_size 1024
#
cache_dir ufs /var/spool/squid 100 16 256
cache_access_log /var/log/squid/access.log
#cache_log /var/log/squid/cache.log
#
#cache_store_log /var/log/squid/store.log
#
#cache_swap_log
#emulate_httpd_log off
#mime_table /etc/squid/mime.conf
#log_mime_hdrs off
#useragent_log none
#pid_filename /var/run/squid.pid
#debug_options ALL,1
#log_fqdn off
#client_netmask 255.255.255.255
#ftp_user Squid@
#ftp_list_width 32
#ftp_passive on
#cache_dns_program /usr/lib/squid/dnsserver
#dns_children 5
#dns_defnames off
#dns_nameservers none
#unlinkd_program /usr/lib/squid/unlinkd
#pinger_program /usr/lib/squid/pinger
#redirect_program none
#redirect_children 5
#redirect_rewrites_host_header on
#authenticate_children 5
#authenticate_ttl 3600
#authenticate_ip_ttl 0
#wais_relay_host localhost
#wais_relay_port 8000
#request_header_max_size 10 KB
#
#request_body_max_size 1 MB
#reply_body_max_size 0
#Default:
refresh_pattern ^ftp: 1440 20% 10080
refresh_pattern ^gopher: 1440 0% 1440
refresh_pattern . 0 20% 4320
#replacement_policy LFUDA
#
#reference_age 1 year
#quick_abort_min 16 KB
#quick_abort_max 16 KB
#quick_abort_pct 95
#negative_ttl 5 minutes
#positive_dns_ttl 6 hours
#negative_dns_ttl 5 minutes
#range_offset_limit 0 KB
#connect_timeout 120 seconds
#peer_connect_timeout 30 seconds
#siteselect_timeout 4 seconds
#read_timeout 15 minutes
#request_timeout 30 seconds
#client_lifetime 1 day
#half_closed_clients on
#pconn_timeout 120 seconds
#ident_timeout 10 seconds
#shutdown_lifetime 30 seconds
# ACCESS CONTROLS
# -----------------------------------------------------------------------------
#Examples:
#acl myexample dst_as 1241
#acl password proxy_auth REQUIRED
#
#Defaults:
acl all src 0.0.0.0/0.0.0.0
acl manager proto cache_object
acl localhost src 127.0.0.1/255.255.255.255
acl SSL_ports port 443 563
acl Safe_ports port 80 21 443 563 70 210 1025-65535
acl Safe_ports port 280 # http-mgmt
acl Safe_ports port 488 # gss-http
acl Safe_ports port 591 # filemaker
acl Safe_ports port 777 # multiling http
acl CONNECT method CONNECT
acl chat url_regex -i chat sex oicq
http_access deny chat
#禁止访问url里带chat,sex,oicq词的网站
# TAG: http_access
#Default configuration:
#http_access allow manager localhost
#http_access deny manager
#http_access deny !Safe_ports
#http_access deny CONNECT !SSL_ports
#
# INSERT YOUR OWN RULE(S) HERE TO ALLOW ACCESS FROM YOUR CLIENTS
#
http_access allow lan
# TAG: icp_access
# Reply to all ICP queries we receive
#
icp_access allow all
miss_access allow all
#proxy_auth_realm Squid proxy-caching web server
#ident_lookup_access deny all
#
cache_mgr master@cctk.net
cache_effective_user squid
cache_effective_group squid
#visible_hostname www-cache.foo.org
#unique_hostname www-cache1.foo.org
# TAG: hostname_aliases
# A list of other DNS names that your cache has.
#announce_period 1 day
#announce_host tracker.ircache.net
#announce_port 3131
# HTTPD-ACCELERATOR OPTIONS
# -----------------------------------------------------------------------------
httpd_accel_host 192.168.10.251
httpd_accel_port 80
httpd_accel_with_proxy on
httpd_accel_uses_host_header on
#dns_testnames netscape.com internic.net nlanr.net microsoft.com
#logfile_rotate 0
#append_domain .yourdomain.com
#tcp_recv_bufsize 0 bytes
#err_html_text
#memory_pools on
#forwarded_for on
#log_icp_queries on
#icp_hit_stale off
#minimum_direct_hops 4
#cachemgr_passwd secret shutdown
#cachemgr_passwd lesssssssecret info stats/objects
#cachemgr_passwd disable all
#store_avg_object_size 13 KB
#store_objects_per_bucket 50
#client_db on
#
#netdb_low 900
#netdb_high 1000
#netdb_ping_period 5 minutes
#query_icmp off
#test_reachability off
#buffered_logs off
#reload_into_ims off
#anonymize_headers
#fake_user_agent none
#error_directory /etc/squid/errors
#minimum_retry_timeout 5 seconds
#maximum_single_addr_tries 3
#snmp_port 3401
#Example:
#snmp_access allow snmppublic localhost
#snmp_access deny all
#snmp_incoming_address 0.0.0.0
#snmp_outgoing_address 0.0.0.0
#wccp_router 0.0.0.0
#wccp_version 4
#wccp_incoming_address 0.0.0.0
#wccp_outgoing_address 0.0.0.0
#delay_pools 0
#delay_pools 2 # 2 delay pools
#delay_class 1 2 # pool 1 is a class 2 pool
#delay_class 2 3 # pool 2 is a class 3 pool
#
#
#delay_access 1 allow some_big_clients
#delay_access 1 deny all
#delay_access 2 allow lotsa_little_clients
#delay_access 2 deny all
#delay_parameters 1 -1/-1 8000/8000
#delay_parameters 2 32000/32000 8000/8000 600/64000
#delay_initial_bucket_level 50
#incoming_icp_average 6
#incoming_http_average 4
#min_icp_poll_cnt 8
#min_http_poll_cnt 8
#uri_whitespace strip
#acl buggy_server url_regex ^http://....
#broken_posts allow buggy_server
nderstand what you are doing.
#prefer_direct on
#ignore_unknown_nameservers on
#digest_generation on
#digest_bits_per_entry 5
#digest_rewrite_period 1 hour
#digest_swapout_chunk_size 4096 bytes
#digest_rebuild_chunk_percentage 10
#client_persistent_connections on
#server_persistent_connections on

熱AI工具

Undresser.AI Undress
人工智慧驅動的應用程序,用於創建逼真的裸體照片

AI Clothes Remover
用於從照片中去除衣服的線上人工智慧工具。

Undress AI Tool
免費脫衣圖片

Clothoff.io
AI脫衣器

AI Hentai Generator
免費產生 AI 無盡。

熱門文章
熱工具

記事本++7.3.1
好用且免費的程式碼編輯器

SublimeText3漢化版
中文版,非常好用

禪工作室 13.0.1
強大的PHP整合開發環境

Dreamweaver CS6
視覺化網頁開發工具

SublimeText3 Mac版
神級程式碼編輯軟體(SublimeText3)
熱門話題


 什麼是公網ip
Sep 27, 2021 am 10:30 AM
什麼是公網ip
Sep 27, 2021 am 10:30 AM
公網ip是指用公網連接Internet上的非保留位址,可以與Internet上的其他電腦隨意互相存取。網路上的每台計算機都有一個獨立的IP位址,該IP位址唯一確定網路上的一台計算機,這個IP位址就是指的公有IP位址。
 網關和路由器哪個網路速度快
Jun 19, 2023 pm 03:06 PM
網關和路由器哪個網路速度快
Jun 19, 2023 pm 03:06 PM
網關WiFi和路由器WiFi的差異主要體現在功能、支援上網的終端數量、WiFi訊號覆蓋範圍這三個方面。網關WiFi是光貓和路由器的結合體,功能較多,但支援上網設備數量較少,WiFi訊號覆蓋範圍也不如路由器WiFi。
 網關Ping不通怎麼回事? Ping不通甚麼原因?
Mar 13, 2024 pm 03:40 PM
網關Ping不通怎麼回事? Ping不通甚麼原因?
Mar 13, 2024 pm 03:40 PM
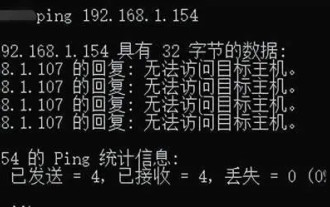
網路ping不通,是什麼回事?其實這是個很常見的問題了,主要分為兩種情況,同網段ping不通和不同網段ping不通,下面就來看看詳細內容吧。 同網段ping不通的原因ping指令無法連接的情況通常有兩種:一是在同一網段內無法ping通的IP位址,另一種是在不同網段內無法ping通的IP位址。這兩種情況有不同的解決方法。首先,我們來討論在同一網段內ping不通的情況。 一、同網段ping不通,結果是「無法存取目標主機」 目的ip和來源ip是同一網段的,ping的結果是&l
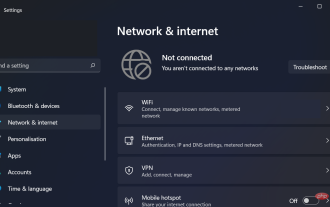
 win11無法上網的問題如何解決?處理win11電腦無法連線到internet的方法指南
Jan 29, 2024 pm 08:57 PM
win11無法上網的問題如何解決?處理win11電腦無法連線到internet的方法指南
Jan 29, 2024 pm 08:57 PM
我們在使用電腦的時候都會連接到網絡,有了網絡我們才能上網衝浪,近期也有不少的用戶們在詢問小編win11無法連接到internet怎麼解決?用戶可以直接的打開系統給出的最佳匹配服務應用來進行設置,下面就讓本站來為用戶們來仔細的介紹一下win11電腦無法訪問internet的解決方法吧。 win11電腦無法存取internet的解決方法方法一:可以按下Win+S組合鍵,或點選底部任務欄旁的搜尋圖標,開啟Windows搜尋視窗。在搜尋框中輸入"服務",然後點選開啟系統給予的最佳配對服務應用程式。方法二
 internet的通訊協定是什麼?
Dec 24, 2020 pm 02:53 PM
internet的通訊協定是什麼?
Dec 24, 2020 pm 02:53 PM
Internet採用的主要通訊協定是“TCP/IP協定”,TCP/IP傳輸協議,即傳輸控制/網路協議,也叫作網路通訊協定;它是在網路的使用中的最基本的通訊協議,TCP/ IP傳輸協定對網際網路中各部分進行通訊的標準和方法進行了規定。
 理解Linux中建立連結檔案的重要性
Feb 22, 2024 pm 07:24 PM
理解Linux中建立連結檔案的重要性
Feb 22, 2024 pm 07:24 PM
標題:深入探討Linux中建立連結檔案的重要性與範例在Linux作業系統中,連結檔案是一種非常有用的概念,它可以幫助使用者更好地組織和管理檔案系統中的數據,提高檔案的可存取性和靈活性。理解如何在Linux中建立連結文件,對於系統管理員和開發人員來說是至關重要的。本文將深入探討Linux中建立連結檔案的重要性,並透過具體的程式碼範例來示範其用法和作用。 1.什麼是
 如何在沒有 Internet 連線的情況下設定 Windows 11
Apr 15, 2023 am 10:46 AM
如何在沒有 Internet 連線的情況下設定 Windows 11
Apr 15, 2023 am 10:46 AM
從內部版本22557及更高版本開始,Windows11需要Internet連接才能完成首次設置,也稱為家庭版和專業版的開箱即用體驗(OOBE),儘管有一種方法可以繞過此要求完全。由於微軟希望用戶將他們的電腦連接到他們的微軟帳戶,該公司正在對最初的Windows11設定進行更改,這將使得幾乎不可能在沒有網路連線的情況下繼續執行全新安裝。或者,如果設定偵測到裝置沒有網路連接,您將被傳送到糟糕,您遺失了網路連線畫面。如果您按一下重試選項,您將看到再次連線到Internet
 怎麼建微信群 微信建群怎麼操作
Feb 22, 2024 pm 03:46 PM
怎麼建微信群 微信建群怎麼操作
Feb 22, 2024 pm 03:46 PM
在首頁選擇加號按鈕,接下來選擇發起群聊,勾選要建群的聯絡人後完成即可。教學適用型號:iPhone13系統:IOS15.3版本:微信8.0.20解析1先開啟微信,在首頁點選右上角的加號按鈕。 2接下來在彈出的視窗中點選發起群組聊天選項。 3最後在頁面中勾選要建群的聯絡人後點選完成即可。補充:微信群聊是什麼東西1微信聊天群就是騰訊企開發的一種多人聊天溝通交流的網路平台,我們可以藉助互聯網迅速傳送語音訊息、短視頻、高清圖片和文字內容。還可以藉助微信與朋友開展形式上更為豐富多彩的類似短訊息、手機彩信等形式的
