

Python实现将xml导入至excel

最近在使用Testlink时,发现导入的用例是xml格式,且没有合适的工具转成excel格式,xml使用excel打开显示的东西也太多,网上也有相关工具转成csv格式的,结果也不合人意。
那求人不如尔己,自己写一个吧
需要用到的模块有:xml.dom.minidom(python自带)、xlwt
使用版本:
python:2.7.5
xlwt:1.0.0
一、先分析Testlink XML格式:
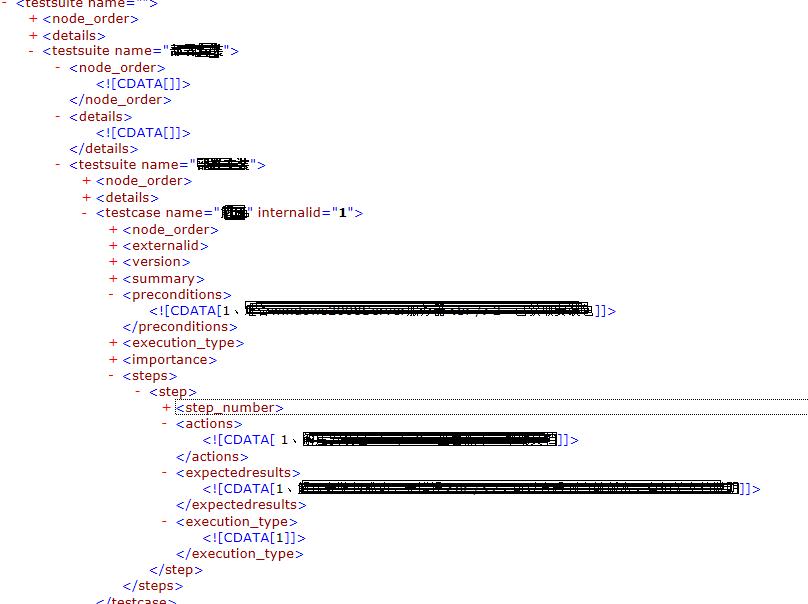
这是一个有两级testusuit的典型的testlink用例结构,我们只需要取testsuite name,testcase name,preconditions,actions,expectedresults
二、程序如下:
#coding:utf-8
'''
Created on 2015-8-20

@author: Administrator
'''
'''
'''
import xml.etree.cElementTree as ET
import xml.dom.minidom as xx
import os,xlwt,datetime

workbook=xlwt.Workbook(encoding="utf-8")
#
booksheet=workbook.add_sheet(u'sheet_1')
booksheet.col(0).width= 5120
booksheet.col(1).width= 5120
booksheet.col(2).width= 5120
booksheet.col(3).width= 5120
booksheet.col(4).width= 5120
booksheet.col(5).width= 5120

dom=xx.parse(r'D:\\Python27\test.xml')
root = dom.documentElement
row=1
col=1

borders=xlwt.Borders()
borders.left=1
borders.right=1
borders.top=1
borders.bottom=1


style = xlwt.easyxf('align: wrap on,vert centre, horiz center') #自动换行、水平居中、垂直居中
#设置标题的格式,字体方宋、加粗、背景色:菊黄
#测试项的标题

title=xlwt.easyxf(u'font:name 仿宋,height 240 ,colour_index black, bold on, italic off; align: wrap on, vert centre, horiz center;pattern: pattern solid, fore_colour light_orange;')
item='测试项'
Subitem='测试分项'
CaseTitle='测试用例标题'
Condition='预置条件'
actions='操作步骤'
Result='预期结果'
booksheet.write(0,0,item,title)
booksheet.write(0,1,Subitem,title)
booksheet.write(0,2,CaseTitle,title)
booksheet.write(0,3,Condition,title)
booksheet.write(0,4,actions,title)
booksheet.write(0,5,Result,title)
#冻结首行
booksheet.panes_frozen=True
booksheet.horz_split_pos= 1


#一级目录
for i in root.childNodes:
  testsuite=i.getAttribute('name').strip()
  #print testsuite
  #print testsuite
  '''
  写测试项
  '''
  print "row is :",row
  booksheet.write(row,col,testsuite,style)


  #二级目录
  for dd in i.childNodes:
    print "    %s" % dd.getAttribute('name')
    testsuite2=dd.getAttribute('name')
    if not dd.getElementsByTagName('testcase'):
      print "Testcase is %s" % testsuite2
      row=row+1
      booksheet.write(row,2,testsuite2,style)  #写测试分项

    row=row+1

    booksheet.write(row,1,testsuite2,style)
    itemlist=dd.getElementsByTagName('testcase')

    for subb in itemlist:
      #print "         %s" % subb.getAttribute('name')
      testcase=subb.getAttribute('name')

      row=row+1
      booksheet.write(row,2,testcase,style)

      ilist=subb.getElementsByTagName('preconditions')
      for ii in ilist:
        preconditions=ii.firstChild.data.replace("<br />"," ")
        col=col+1
        booksheet.write(row,3,preconditions,style)
      steplist=subb.getElementsByTagName('actions')
      #print steplist
      for step in steplist:
        actions=step.firstChild.data.replace("<br />"," ")
        col=col+1
        booksheet.write(row,4,actions,style)
      #print "测试步骤:",steplist[0].firstChild.data.replace("<br />"," ")
      expectlist=subb.getElementsByTagName('expectedresults')

      for expect in expectlist:
        result=expect.childNodes[0].nodeValue.replace("<br />","" )
        booksheet.write(row,5,result,style)


  row=row+1
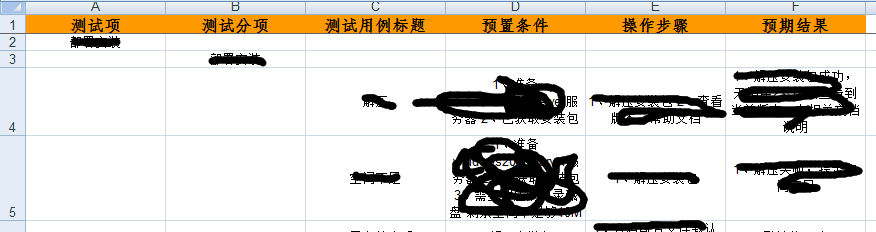
workbook.save('demo.xls')写入excel的效果如下:
我们再来看个实例:
需要下载一个module:xlwt,如下是source code
import xml.dom.minidom
import xlwt
import sys

col = 0
row = 0


def handle_xml_report(xml_report, excel):
  problems = xml_report.getElementsByTagName("problem")
  handle_problems(problems, excel)


def handle_problems(problems, excel):
  for problem in problems:
    handle_problem(problem, excel)


def handle_problem(problem, excel):
  global row
  global col
  code = problem.getElementsByTagName("code")
  file = problem.getElementsByTagName("file")
  line = problem.getElementsByTagName("line")
  message  = problem.getElementsByTagName("message")

  for node in code:
    excel.write(row, col, node.firstChild.data)
    col = col + 1
  for node in file:
    excel.write(row, col, node.firstChild.data)
    col = col + 1
  for node in line:
    excel.write(row, col, node.firstChild.data)
    col = col + 1
  for node in message:
    excel.write(row, col, node.firstChild.data)
    col = col + 1
  row = row+1
  col = 0

if __name__ == '__main__':
  if(len(sys.argv) <= 1):
    print ("usage: xml2xls src_file [dst_file]")
    exit(0)
  #the 1st argument is XML report ; the 2nd is XLS report
  if(len(sys.argv) == 2):
    xls_report = sys.argv[1][:-3] + 'xls'
  #if there are more than 2 arguments, only the 1st & 2nd make sense
  else:
    xls_report = sys.argv[2]
  xmldoc = xml.dom.minidom.parse(sys.argv[1])
  wb = xlwt.Workbook()
  ws = wb.add_sheet('MOLint')
  ws.write(row, col, 'Error Code')
  col = col + 1
  ws.write(row, col, 'file')
  col = col + 1
  ws.write(row, col, 'line')
  col = col + 1
  ws.write(row, col, 'Description')
  row = row + 1
  col = 0
  handle_xml_report(xmldoc, ws)
  wb.save(xls_report)

熱AI工具

Undresser.AI Undress
人工智慧驅動的應用程序,用於創建逼真的裸體照片

AI Clothes Remover
用於從照片中去除衣服的線上人工智慧工具。

Undress AI Tool
免費脫衣圖片

Clothoff.io
AI脫衣器

AI Hentai Generator
免費產生 AI 無盡。

熱門文章
熱工具

記事本++7.3.1
好用且免費的程式碼編輯器

SublimeText3漢化版
中文版,非常好用

禪工作室 13.0.1
強大的PHP整合開發環境

Dreamweaver CS6
視覺化網頁開發工具

SublimeText3 Mac版
神級程式碼編輯軟體(SublimeText3)
熱門話題


 PHP和Python:代碼示例和比較
Apr 15, 2025 am 12:07 AM
PHP和Python:代碼示例和比較
Apr 15, 2025 am 12:07 AM
PHP和Python各有優劣,選擇取決於項目需求和個人偏好。 1.PHP適合快速開發和維護大型Web應用。 2.Python在數據科學和機器學習領域佔據主導地位。
 CentOS上如何進行PyTorch模型訓練
Apr 14, 2025 pm 03:03 PM
CentOS上如何進行PyTorch模型訓練
Apr 14, 2025 pm 03:03 PM
在CentOS系統上高效訓練PyTorch模型,需要分步驟進行,本文將提供詳細指南。一、環境準備:Python及依賴項安裝:CentOS系統通常預裝Python,但版本可能較舊。建議使用yum或dnf安裝Python3併升級pip:sudoyumupdatepython3(或sudodnfupdatepython3),pip3install--upgradepip。 CUDA與cuDNN(GPU加速):如果使用NVIDIAGPU,需安裝CUDATool
 docker原理詳解
Apr 14, 2025 pm 11:57 PM
docker原理詳解
Apr 14, 2025 pm 11:57 PM
Docker利用Linux內核特性,提供高效、隔離的應用運行環境。其工作原理如下:1. 鏡像作為只讀模板,包含運行應用所需的一切;2. 聯合文件系統(UnionFS)層疊多個文件系統,只存儲差異部分,節省空間並加快速度;3. 守護進程管理鏡像和容器,客戶端用於交互;4. Namespaces和cgroups實現容器隔離和資源限制;5. 多種網絡模式支持容器互聯。理解這些核心概念,才能更好地利用Docker。
 CentOS上PyTorch的GPU支持情況如何
Apr 14, 2025 pm 06:48 PM
CentOS上PyTorch的GPU支持情況如何
Apr 14, 2025 pm 06:48 PM
在CentOS系統上啟用PyTorchGPU加速,需要安裝CUDA、cuDNN以及PyTorch的GPU版本。以下步驟將引導您完成這一過程:CUDA和cuDNN安裝確定CUDA版本兼容性:使用nvidia-smi命令查看您的NVIDIA顯卡支持的CUDA版本。例如,您的MX450顯卡可能支持CUDA11.1或更高版本。下載並安裝CUDAToolkit:訪問NVIDIACUDAToolkit官網,根據您顯卡支持的最高CUDA版本下載並安裝相應的版本。安裝cuDNN庫:前
 Python vs. JavaScript:社區,圖書館和資源
Apr 15, 2025 am 12:16 AM
Python vs. JavaScript:社區,圖書館和資源
Apr 15, 2025 am 12:16 AM
Python和JavaScript在社區、庫和資源方面的對比各有優劣。 1)Python社區友好,適合初學者,但前端開發資源不如JavaScript豐富。 2)Python在數據科學和機器學習庫方面強大,JavaScript則在前端開發庫和框架上更勝一籌。 3)兩者的學習資源都豐富,但Python適合從官方文檔開始,JavaScript則以MDNWebDocs為佳。選擇應基於項目需求和個人興趣。
 CentOS下PyTorch版本怎麼選
Apr 14, 2025 pm 02:51 PM
CentOS下PyTorch版本怎麼選
Apr 14, 2025 pm 02:51 PM
在CentOS下選擇PyTorch版本時,需要考慮以下幾個關鍵因素:1.CUDA版本兼容性GPU支持:如果你有NVIDIAGPU並且希望利用GPU加速,需要選擇支持相應CUDA版本的PyTorch。可以通過運行nvidia-smi命令查看你的顯卡支持的CUDA版本。 CPU版本:如果沒有GPU或不想使用GPU,可以選擇CPU版本的PyTorch。 2.Python版本PyTorch
 minio安裝centos兼容性
Apr 14, 2025 pm 05:45 PM
minio安裝centos兼容性
Apr 14, 2025 pm 05:45 PM
MinIO對象存儲:CentOS系統下的高性能部署MinIO是一款基於Go語言開發的高性能、分佈式對象存儲系統,與AmazonS3兼容。它支持多種客戶端語言,包括Java、Python、JavaScript和Go。本文將簡要介紹MinIO在CentOS系統上的安裝和兼容性。 CentOS版本兼容性MinIO已在多個CentOS版本上得到驗證,包括但不限於:CentOS7.9:提供完整的安裝指南,涵蓋集群配置、環境準備、配置文件設置、磁盤分區以及MinI
 centos如何安裝nginx
Apr 14, 2025 pm 08:06 PM
centos如何安裝nginx
Apr 14, 2025 pm 08:06 PM
CentOS 安裝 Nginx 需要遵循以下步驟:安裝依賴包,如開發工具、pcre-devel 和 openssl-devel。下載 Nginx 源碼包,解壓後編譯安裝,並指定安裝路徑為 /usr/local/nginx。創建 Nginx 用戶和用戶組,並設置權限。修改配置文件 nginx.conf,配置監聽端口和域名/IP 地址。啟動 Nginx 服務。需要注意常見的錯誤,如依賴問題、端口衝突和配置文件錯誤。性能優化需要根據具體情況調整,如開啟緩存和調整 worker 進程數量。
