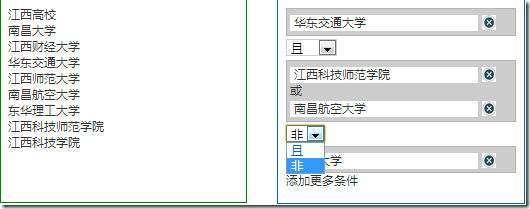
在以前的文章中我已經介紹了web開發中基本拖放原理,現在給出需要完成的功能。最後運行的效果如下圖:

主要功能需求說明:
1.伺服器的資料來生成,能支援多層元素。父節點可以折起來
2.使用者可以透過拖放的操作,將元素從左側拖曳到右側。如果是拖曳的父節點元素,那麼需要把它子節點的元素一併拖曳到右邊
3.元素放到右側,右側可以接受元素的區域有2種可能。一種新建一個區域,就類似「華東交通大學」所示。另外一種就是拖放到已經有元素的區域。兩者的關係是「或」。單一元素區域有「非」和「且」的關係。點選右邊刪除按鈕可以刪除節點元素。
第一步:左側元素可以拖曳
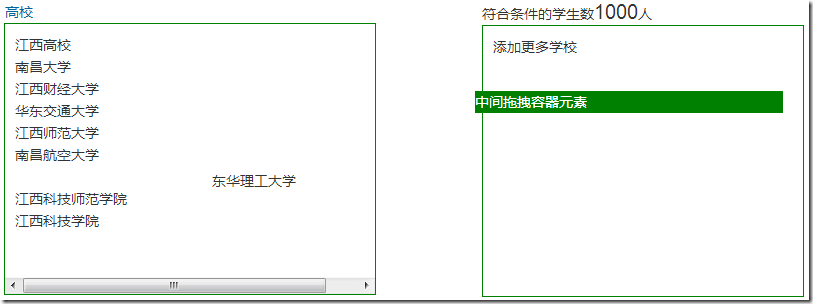
官方給的實例是直接在要拖曳的元素上加上class="ui-widget-content"。最初我是在所有要拖曳的元素都加入了「ui-widget-content」類別。但測試拖曳結果,發現元素只能在它所在的container裡面拖曳,再往右拖曳,div會出現水平或垂直捲軸。不知道是不是自己在參數設定上不對。 container設定了overflow:auto。
效果如下圖所示:
因為最終的左側元素節點是透過Ajax存取後台返回json數據,然後透過Javascript動態生成這種結構,而已不能為動態生成的元素綁定drag事件,也就不能調用draggable方法,所以我使用了一個稱之“中間拖拽容易元素”,這div一直在頁面上。只是預設不顯示,只要用戶開始拖曳左側的元素時,它就出現了。當然這裡需要自己手動添加很多程式碼。
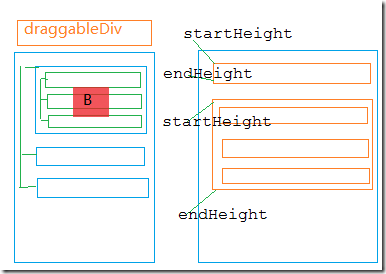
Step 2: Copy the content of the element to be dragged to the draggableDiv. When dragging the parent node, the child node elements below it must also be dragged and dropped to the right. If it is a dragged child node element, the child node element will be displayed directly on the right. The parent node and the child node are relative, because the nodes in the tree structure on the left can be infinite, so an element may be both a child node element and a parent node element. By listening to the mousedown and mouseup events, you can determine that the user is dragging the element. The principle of this step is shown in the figure below:

When the user drags the B node, first copy the content on the B element to draggableDiv element, when the user drags the B element, it actually drags the draggableDiv element. So we need to calculate the position of the B element we clicked, and then let the draggableDiv display the correct position when dragging. Then the dragging is the draggableDiv element, and the user looks like the dragged B node element.
var clickElement = null; $(".threepanels .ptreelist ").bind("mousedown",function (event) {
//Get the content of the current mousedown element
var itemContent = $(this).html(); var draggableDiv = $("#draggableDiv") ;
$(draggableDiv).css({ "display": "block", "height": 0 });
//Copy the content of the clicked element
clickElement = $(this).clone ();
var currentdiv = $(this).offset(); $(draggableDiv).css({ "top": currentdiv.top, "left": currentdiv.left }); draggableDiv.trigger(event) ;
//Cancel the default behavior return false; });
$("#draggableDiv").mouseup(function (event) { $(this).css({ "height": "0" }) ; });
//The position of the mouse when dragging the element
var dragDivLeft = 0;
var dragDivTop = 0;
$("#draggableDiv").draggable({ containment: "parent ", drag: function (event, ui) { $("#draggableDiv").css({ "width": "260px", "height": "22px" });
$("#draggableDiv") .append(clickElement);
var closeTop = $(".closeBar").offset().top;
dragDivLeft = event.target.offsetLeft;
dragDivTop = event.target.offsetTop; },
stop: function () {
//Empty the contents of the drag container after dragging is completed
$("#draggableDiv").html("");
$("#draggableDiv" ).css({"height":"0"}); }
});
Step 3: The element on the right can be placed at the specified position
You need to drag the element into the specified area and then release the operation. Complete the "put" operation. As you can see from the picture above, I store the upper left edge and the lower left edge of the element into an array. Then during the "drag" process, the left side of the drag is always recorded. When it is placed on the right side, it can be judged where the current element will be placed. You can download the code to view the details.
The
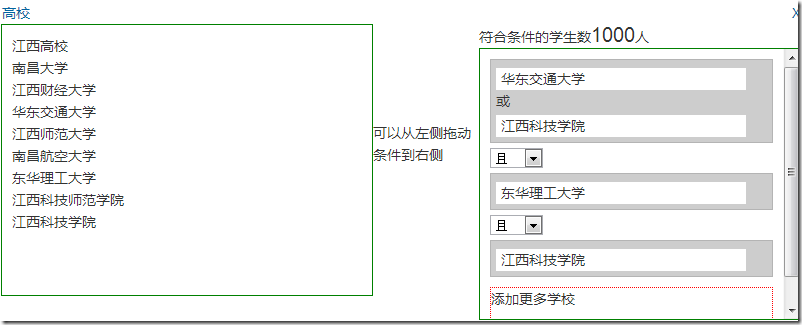
rendering after completing the code is as follows:

Code download: DragandDrop.rar


