
在我的網路筆記中查看這篇文章!
最後,有趣的事情,在我們完成 UI 後,我們可以開始實作主要功能。因此,在本文中,我們將討論從伺服器獲取資料並將其儲存在 Pinia 儲存中,我們還將動態渲染我們的商店清單和產品頁面。像往常一樣,我們將首先定義需要完成的工作計劃:
現在我們已經有了明確的計劃,是時候捲起袖子開始工作了。我們將從配置 Axios 模組開始,它將作為從伺服器獲取資料的支柱。
我們已經在之前的一篇文章中安裝了 axios:“使用 Nuxt.js 建立您的電子商務商店:專案設定逐步指南”,所以現在我們可以配置它並準備好使用。
讓我們在根目錄中建立「http」資料夾,並在 http 資料夾中建立 http-client.js 檔案。如果我們需要的話,它將是我們主要 Axios 設定和攔截器的文件,但目前,我們只會使用基本 URL 註冊 Axios。
import axios from "axios";

export const HTTP = axios.create({
    baseURL: "http://localhost:3005",
});
在「http」資料夾中,我們將建立一個「services」資料夾,用於儲存我們的 axios 服務以實現單獨的應用程式功能。在「services」目錄中建立第一個服務 products.service.js 它將儲存我們的產品 REST API 服務。
我們可以使用 axios 新增前兩個 get 函數,因為我們只需要匯入 HTTP 並建立一個將從請求傳回資料的箭頭函數。
import { HTTP } from '../http-client';

export const getAllProducts = () =>
    HTTP.get('/products').then(({data}) => data )

export const getProductById = (id) =>
    HTTP.get(`/products/${id}`).then(({data}) => data )
你還記得我們還安裝了「json-server」來模仿後端伺服器,並用產品數組預先填充它,我們可以更新產品資料並創建更多產品,如下所示:
{
    "id": "1",
    "name": "Product 1",
    "instagram": "https://instagram.com",
    "pinterest": "https://pinterest.com",
    "image": "https://images.pexels.com/photos/2081332/pexels-photo-2081332.jpeg?auto=compress&cs=tinysrgb&w=600",
    "description": "Lorem ipsum dolor sit amet, consectetur adipiscing elit, sed do eiusmod tempor incididunt ut labore et dolore magna aliqua. Ut enim ad minim veniam, quis nostrud exercitation ullamco laboris nisi ut aliquip ex ea commodo consequat. Duis aute irure dolor in reprehenderit in voluptate velit esse cillum dolore eu fugiat nulla pariatur. Excepteur sint occaecat cupidatat non proident, sunt in culpa qui officia deserunt mollit anim id est laborum.",
    "price": 100
},
現在,我們有了一個隨時可用的開發伺服器,其中包含將呼叫該伺服器 API 的產品資料和函數。我們的下一步將是將資料提取到產品頁面中。
建立一個新的 products.js 商店,並新增一個「productsList」變數來儲存從伺服器接收的產品列表,以及一個「product」變數來儲存產品頁面的單獨產品。然後我們將添加兩個操作,它們將使用 Axios 服務從伺服器獲取資料並將其設定為狀態。並且不要忘記添加吸氣劑。
import { defineStore } from 'pinia';
import {
    getAllProducts,
    getProductById
} from '@/http/services/products.services';

export const useProductsStore = defineStore({
    id: 'products',
    state: () => ({
        productsList: [],
        product: null
    }),
    actions: {
        async aGetAllProducts() {
            await getAllProducts()
            .then((data) => {
                this.productsList = data;
            })
            .catch((error) => {
                console.log(error);
            })
        },
        async aGetProductById(id) {
            await getProductById(id)
            .then((data) => {
                this.product = JSON.parse(JSON.stringify(data));
            })
            .catch((error) => {
                console.log(error);
            })
        }
    },
    getters: {
        gProductsList: (state) => state.productsList,
        gProduct: (state) => state.product
    }
})
看起來很棒。我們可以開始在元件內使用這個儲存。
打開我們的商店頁面,導入產品商店,並在創建的生命週期掛鉤內(它將在渲染整個頁面之前獲取數據)調用我們的“aGetAllProducts”操作。
created() {
    const productsStore = useProductsStore();
    productsStore.aGetAllProducts();
}
之後,我們可以使用 getter 來取得並渲染產品清單。我們需要將產品清單資料傳送到我們的產品卡清單。
<div class="products__content">
    <ProductCard v-for="product in productsStore.gProductsList" :key="product.name" :product="product" />
</div>
現在我們需要使用以下指令啟動 json-server:「json-server --watch db/db.json --port 3005」。並使用以下命令在單獨的 PowerShell 中啟動我們的 Nuxt 開發伺服器:「npm run dev」。
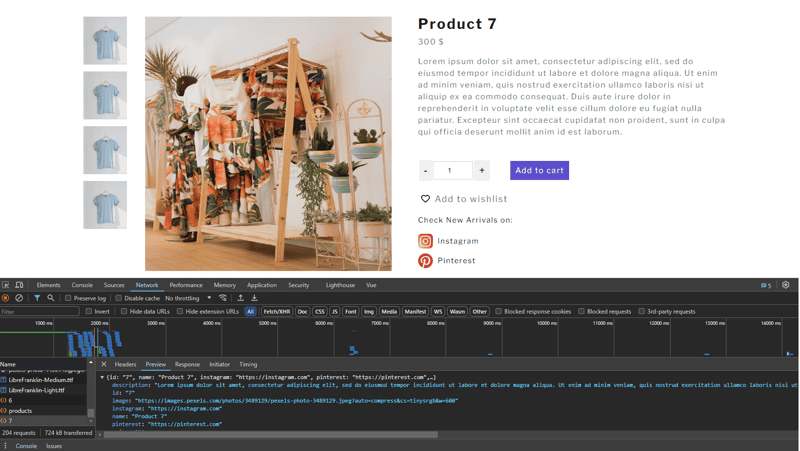
現在,在訪問或刷新我們的商店頁面後,我們將向 json 伺服器發送產品資料請求,並將該資料呈現到我們的頁面中。

太棒了。但問題是,當我們點擊產品卡時,我們將被重新導向到包含靜態資料的產品頁面。每個頁面都會顯示相同的資訊和圖像,為了解決這個問題,讓我們進入下一步。
當我們建立產品頁面時,我們用括號命名資料夾以使該頁面動態。現在,當我們單擊產品卡時,我們將被重定向到URL 中包含產品ID 的商店頁面,這是因為Nuxt 正在用其ID 替換資料夾名稱中的“產品”,但我們的頁面仍然是靜態的。要更改這一點,我們需要從 URL 取得產品 ID,然後使用該 ID 從伺服器取得產品資料。
我們已經建立了從伺服器取得資料的功能,現在我們需要更新我們的產品頁面。為此,請打開[product] 資料夾內的index.vue 檔案並導入我們的產品存儲,然後在我們的組件中添加創建的掛鉤,我們將在其中獲取路由器參數並將其作為另一個參數發送到“aGetProductById”操作中。
created() {
    const productId = this.$route.params.product;
    this.productsStore.aGetProductById(productId);
}
此外,我們需要更新我們的模板(標題、價格、描述、圖像...)以呈現從伺服器接收的資料。
圖:
<div class="product-info__image--main">
    <img :src="productsStore.gProduct?.image" alt="product image">
</div>
Product Description:
<h1 class="product-info__content--title">{{ productsStore.gProduct?.name }}</h1>
<p class="product-info__content--price">{{ productsStore.gProduct?.price }} $</p>
<p class="product-info__content--description">{{ productsStore.gProduct?.description }}</p>
Now, let's restart the Nuxt dev server and check the result by clicking on different product cards. We should see another product each time.
In this article, we explored the process of fetching and presenting products in a Nuxt.js e-commerce application. We started by configuring the Axios module, which served as the backbone for making API requests to our server.
Keep in mind that these code examples are only the top of the iceberg. Feel free to experiment with advanced approaches, add new features, and optimize your codebase as you improve your e-commerce application to better suit the demands of your customers and company.
If you would need a source code for this tutorial you can get it here.
以上是在 Nuxt.js 中為您的電子商務商店取得和展示產品的詳細內容。更多資訊請關注PHP中文網其他相關文章!


