

如何在 Windows 11 中將 C 碟轉移到新的 SSD?

"My C drive, the system drive, is out of space and I want to upgrade my laptop to a larger SSD instead of reinstalling my operating system. How can I transfer my C drive to a new SSD in Windows 11?"
Patience, this article will show you step-by-step tutorials to resolve this problem.

- Method 1: Migrate C drive with Shadow Copy (free)
- Method 2: Migrate C drive with disk cloning tool
Method 1: Transfer C Drive to a New SSD with Shadow Copy
This method is based on the command prompt and you may take some time to complete. If you would like a simple and effective way, you can try Method 2.
Step 1: After installing a new SSD to your computer, reboot your computer, then click on Start icon and select Disk Management.

Step 2: A dialog box will pop up once you access Disk Management and the new SSD is labeled as Disk 1. Check Disk 1, select GPT and then click OK.

Step 3: Back to the desktop, click Start on the dock, then select Windows Terminal (Admin).
Step 4: Enter Yes.
Step 5: Type diskpart and press Enter.

Step 6: Type list disk and press Enter to list the information of all the disks.

Step 7: Type select disk 1 and press Enter.

Step 8: Type clean and press Enter, which will erase all the data on the selected drive.

Step 9: Type convert gpt and hit Enter.

Step 10: Type create partition efi size=100 and hit Enter.

Step 11: Type assign letter="S" and press Enter.

Step 12: Type format quick fs=fat32 label="System" and press Enter to format disk 1.

Step 13: Type create partition primary and press Enter.

Step 14: Type assign letter="W" and press Enter

Step 15: Type format quick fs=ntfs label="Windows 11-2" and press Enter.

Step 16: Type list volume and press Enter. As shown in the panel, two partitions have been created successfully.

Step 17: Type exit and press Enter to exit diskpart.

Step 18: Download Shadow Copy and install it on your computer.
Step 19: Launch the software. Then change the path to C: in the Copy from option and change the location to W: in the Copy to option.

Step 20: Check all the options in the Options list, then click on Copy to start copying C drive.

Step 21: Click OK on the pop-up window when finish copying.
Step 22: Run Windows PowerShell (Step 3), type bcdboot W:windows /s S: and hit Enter, which sets the W drive as the boot drive and adds boot files to the S drive.

Step 23: Click on Search, then enter "regedit" and select Registry Editor.
Step 24: Click Yes.
Step 25: Click HKEY_LOCAL_MACHINE. Then click on File and select Load Hive.

Step 27: On the pop-up window, locate the W disk > Windows > System32 > config > SYSTEM, then click Open.
Step 28: Rename it TEST, then enter OK.
Step 29: Navigate TEST > MountedDevices > DosDevicesC:, then right-click on it and select Rename to name it DosDevicesP:.
Step 30: Similarly, choose DosDevicesW: and rename it DosDevicesC:.
Step 31: Select TEST, then click on File and choose Unload Hive.
Step 32:Click Yes on the dialog box.
Step 33: Right-click on the Start and select Settings.
Step 34: Select Recovery > Restart now > Restart now, and your computer will start restarting.

Step 35: Select Troubleshoot > Advanced options > UEFI Firmware Settings > Restart.
Step 36: After rebooting, enter Change boot order and move the new added SSD to the first option using Up or Down key. Then save the setting and exit to reboot the computer. (How to change the boot order is different for each computer. You can check Hot Keys for Boot Menu and BIOS Settings.)
Step 37: Entering Disk Management, and you have successfully transferred the C drive to a new SSD.

Method 2: Transfer C Drive to a New SSD with a Disk Cloning Tool
With just a few clicks, you can transfer C drive to a new SSD with iSumsoft Cloner, which is simple and effective. Give it a try.
Step 1: Install the new SSD on your computer, then access Disk Management to check the installed drive, which is labeled as G.

Step 2: Download and install iSumsoft Cloner, then launch it.
Step 3: Select Copy on the interface.
Step 4: Check Set the target partition as the boot disk. On Select Source Partition, select "Disk C" from the drop-down menu, and on Select Destination Partition, select "Disk G" from the drop-down menu.
Step 5: Click on Start. When you are prompted the drive will be overwritten, click Yes to proceed.
Step 7: Click OK if the copy has completed successfully.

Step 8: Reboot your computer, during which you need to press ESC or Delete quickly to enter the Boot Menu or BIOS/UEFI Setup to change the boot order. And you need to use the Up or Down key to choose the new drive as the first boot option.

Step 9: Save the setting and exit the program. Then reboot your computer. Navigate the Disk management and the C drive has been transferred to the SSD successfully.
以上是如何在 Windows 11 中將 C 碟轉移到新的 SSD?的詳細內容。更多資訊請關注PHP中文網其他相關文章!

熱AI工具

Undresser.AI Undress
人工智慧驅動的應用程序,用於創建逼真的裸體照片

AI Clothes Remover
用於從照片中去除衣服的線上人工智慧工具。

Undress AI Tool
免費脫衣圖片

Clothoff.io
AI脫衣器

Video Face Swap
使用我們完全免費的人工智慧換臉工具,輕鬆在任何影片中換臉!

熱門文章
熱工具

記事本++7.3.1
好用且免費的程式碼編輯器

SublimeText3漢化版
中文版,非常好用

禪工作室 13.0.1
強大的PHP整合開發環境

Dreamweaver CS6
視覺化網頁開發工具

SublimeText3 Mac版
神級程式碼編輯軟體(SublimeText3)


 Windows KB5054979更新信息更新內容列表
Apr 15, 2025 pm 05:36 PM
Windows KB5054979更新信息更新內容列表
Apr 15, 2025 pm 05:36 PM
KB5054979是2025年3月27日發布的Windows 11版本24H2的累積安全更新。它針對.NET框架版本3.5和4.8.1,增強了安全性和整體穩定性。值得注意的是,該更新使用System.io API在UNC共享的文件和目錄操作中解決了問題。提供了兩種安裝方法:一個通過Windows設置通過Windows Update下的更新,另一個通過Microsoft Update目錄中的手冊下載。
 Nanoleaf想要改變您的技術收費
Apr 17, 2025 am 01:03 AM
Nanoleaf想要改變您的技術收費
Apr 17, 2025 am 01:03 AM
Nanoleaf的Pegboard Desk Dock:時尚且功能型的桌子組織者 厭倦了相同的舊充電設置? NanoLeaf的新Pegboard Desk Dock提供了一種時尚且功能性的替代方案。 這款多功能桌配件擁有32個全彩RGB
 使用PBO獲得了AMD CPU和AREN' t?你錯過了
Apr 12, 2025 pm 09:02 PM
使用PBO獲得了AMD CPU和AREN' t?你錯過了
Apr 12, 2025 pm 09:02 PM
解鎖Ryzen的潛力:精確提升超速驅動(PBO)的簡單指南 超頻您的新電腦似乎令人生畏。 儘管性能提高可能會感到難以捉摸,但留下潛在的啟用甚至更具吸引力。幸運的是,AMD Ryzen Processo
 華碩' Rog Zephyrus G14 OLED遊戲筆記本電腦$ 300折扣
Apr 16, 2025 am 03:01 AM
華碩' Rog Zephyrus G14 OLED遊戲筆記本電腦$ 300折扣
Apr 16, 2025 am 03:01 AM
ASUS ROG Zephyrus G14 電競筆記本電腦特惠! 現在購買ASUS ROG Zephyrus G14 電競筆記本電腦,即可享受300美元的優惠!原價1999美元,現價僅需1699美元!隨時隨地暢享沉浸式遊戲體驗,或將其作為可靠的便攜式工作站。 Best Buy目前提供這款2024款14英寸ASUS ROG Zephyrus G14電競筆記本電腦的優惠活動。其強大的配置和性能令人印象深刻。 這款ASUS ROG Zephyrus G14電競筆記本電腦在Best Buy的售價為16
 如何將Windows 11用作藍牙音頻接收器
Apr 15, 2025 am 03:01 AM
如何將Windows 11用作藍牙音頻接收器
Apr 15, 2025 am 03:01 AM
將Windows 11 PC變成藍牙揚聲器,並從手機中欣賞您喜歡的音樂!本指南向您展示瞭如何輕鬆將iPhone或Android設備連接到計算機進行音頻播放。 步驟1:配對藍牙設備 首先,PA
 您應該使用的5個隱藏窗口功能
Apr 16, 2025 am 12:57 AM
您應該使用的5個隱藏窗口功能
Apr 16, 2025 am 12:57 AM
解鎖隱藏的Windows功能,以獲得更流暢的體驗! 發現令人驚訝的有用的Windows功能,可以顯著增強您的計算體驗。甚至經驗豐富的Windows用戶也可能在這裡找到一些新技巧。 動態鎖:自動
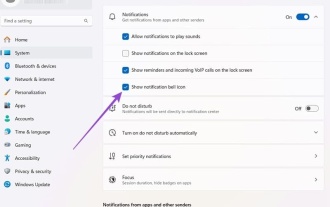 如何自定義Windows 11通知
Apr 14, 2025 am 04:05 AM
如何自定義Windows 11通知
Apr 14, 2025 am 04:05 AM
Windows 11 通知設置詳解:打造個性化通知體驗 Windows 11 將通知中心整合到日曆中,雖然需要一些時間適應,但通知的頻繁程度並未改變。如果您厭倦了不斷彈出的系統更新和無用應用通知,本文將指導您自定義 Windows 11 通知,優化工作流程。 全局通知設置 幾乎所有與通知相關的選項都位於 Windows 11 的“設置”中。 步驟 1:點擊“開始”菜單,選擇“設置”(或按“Windows I”)。 步驟 2:選擇左側邊欄中的“系統”。 步驟 3:點擊“通知”訪問所有通知選項。
 5個Windows設置要更改以改善筆記本電腦電池壽命
Apr 12, 2025 am 06:04 AM
5個Windows設置要更改以改善筆記本電腦電池壽命
Apr 12, 2025 am 06:04 AM
您的Windows筆記本電腦電池的排水速度比您想要的快嗎? 不用擔心,您可以通過對Windows的內置電源管理功能進行一些簡單的調整來顯著延長其壽命。 這是如何在單級別上最大化筆記本電腦的電池壽命
