

如何使用 SST 和 Docker 將 Next.js 應用程式部署到 Hetzner VPS

我的原創部落格文章:https://www.prudkohliad.com/articles/deploy-next-js-to-vps-using-sst-2024-08-11
SST 是一個框架,可讓您輕鬆在自己的基礎架構上建立現代全端應用程式。 SST v3 使用 Pulumi 和 Terraform
– SST 文件
在本指南中,我們將使用 SST 和 Docker 在 Hetzner VPS 上部署 Next.js 應用程式。本指南是我上一篇文章的後續內容。如果您在這裡發現一些沒有意義的內容,您很有可能會在那裡找到答案 - 如何使用 Docker 和 GitHub Actions 將 Next.js 應用程式部署到 Hetzner 上的 VPS。
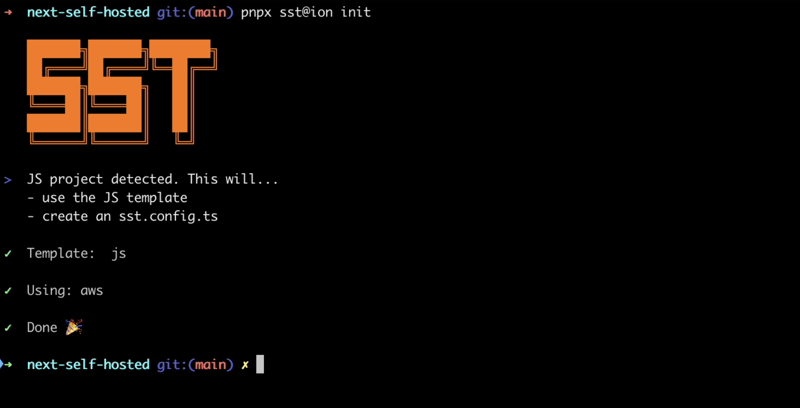
將SST加入專案中
要將 SST 加入專案中,請執行以下命令:
pnpx sst@ion init
這將顯示一個互動式提示。選擇“是”,然後選擇“aws”:
確保安裝了所有必需的軟體包:
pnpm install
這將建立 sst.config.ts 文件,我們將在其中添加所有配置。
此外,還將建立一些其他檔案/目錄。讓我們將它們添加到 .dockerignore,我們不希望它們最終成為 Docker 映像:
# sst
.sst
sst.config.ts
tsconfig.json
這就是 sst 設定檔目前的樣子:
/// <reference path="./.sst/platform/config.d.ts" />

export default $config({
  app(input) {
    return {
      name: "next-self-hosted",
      removal: input?.stage === "production" ? "retain" : "remove",
      home: "aws",
    };
  },
  async run() {},
});
我們不會使用 AWS,所以讓我們將 home 參數設定為「local」:
/// <reference path="./.sst/platform/config.d.ts" />

export default $config({
  app(input) {
    return {
      name: "next-self-hosted",
      removal: input?.stage === "production" ? "retain" : "remove",
      home: "local",
    };
  },
  async run() {},
});
現在可以開始在 run() 函數中加入內容。
在 Hetzner 上建立 API 令牌
為了使用 SST 在 Hetzner 上建立 VPS,我們需要一個 Hetzner API 令牌。讓我們產生一個新的。
在 Hetzner 控制台中開啟項目,導覽至「安全」標籤:
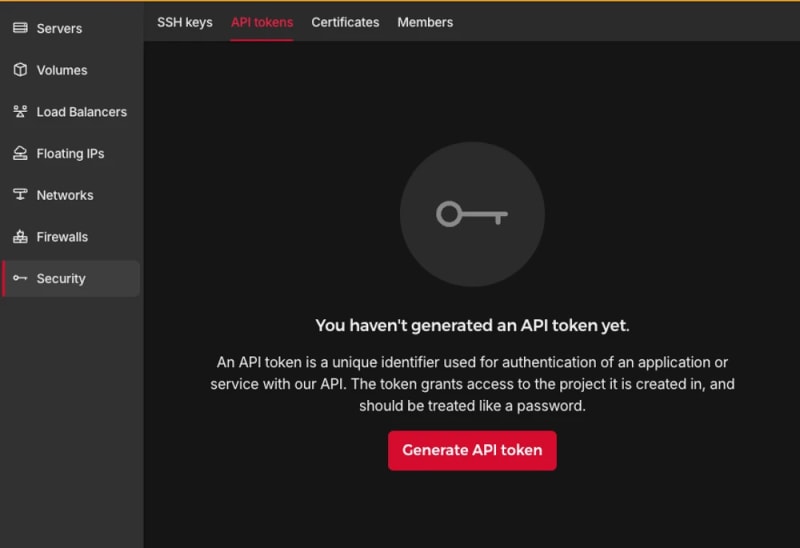
產生 API 令牌:

新的代幣將會加入您的專案:

令牌只會顯示一次,請確保不要遺失。
新增 TLS 和 Hetzner 提供者:
pnpm sst add tls
pnpm sst add hcloud
pnpm install
產生 SSH 金鑰
為了在創建 Hetzner VPS 後執行進一步的命令,我們需要確保在創建過程中新增了 SSH 金鑰。為此,我們將在本地創建一個 SSH 令牌,然後將其公共部分新增至 Hetzner。在run函數中加入以下程式碼:
// In the run() function:

// Generate an SSH key
const sshKeyLocal = new tls.PrivateKey("SSH Key - Local", {
  algorithm: "ED25519",
});

// Add the SSH key to Hetzner
const sshKeyHetzner = new hcloud.SshKey("SSH Key - Hetzner", {
  publicKey: sshKeyLocal.publicKeyOpenssh,
});
部署應用程式:
pnpm sst deploy

SST ❍ ion 0.1.90  ready!

➜  App:        next-self-hosted
   Stage:      antonprudkohliad

~  Deploy

|  Created     SSH Key - Local tls:index:PrivateKey
|  Created     SSH Key - Hetzner hcloud:index:SshKey

✓  Complete
您將看到新的 SSH 金鑰已新增至 Hetzner:

現在我們可以繼續建立 VPS。
創建伺服器
以下命令將確保在您的專案中建立新的 VPS:
// In the run() function:

// Create a Server on Hetzner
const server = new hcloud.Server("Server", {
  image: "docker-ce",
  serverType: "cx22",
  location: "nbg1",
  sshKeys: [sshKeyHetzner.id],
});
這裡我使用 docker-ce 映像,因為它已經安裝了 Docker。您可以使用 Hetzner Cloud API 列出所有可用的映像、伺服器類型和資料中心。
驗證伺服器是否已正確建立:
pnpm sst deploy
SST ❍ ion 0.1.90  ready!

➜  App:        next-self-hosted
   Stage:      antonprudkohliad

~  Deploy

|  Created     Server hcloud:index:Server (34.5s)

✓  Complete
您也應該能夠在控制台中看到新建立的伺服器:

連接到 VPS 上的 Docker 伺服器
為了在 VPS 上建立應用程式 Docker 映像並能夠建立網路、磁碟區和容器,我們需要在本機電腦和 VPS 上的 Docker 伺服器之間建立一座橋樑。為此,我們需要 Docker 提供者:
pnpm sst add docker
pnpm install
將 SSH 私鑰儲存在磁碟上,以便 SSH 用戶端可以存取它。建立與 VPS 上 Docker 伺服器的連線:
// At the top of the file:
import { resolve as pathResolve } from "node:path";
import { writeFileSync as fsWriteFileSync } from "node:fs";

// In the run() function:

// Store the private SSH Key on disk to be able to pass it to the Docker
// Provider
const sshKeyLocalPath = sshKeyLocal.privateKeyOpenssh.apply((k) => {
  const path = "id_ed25519_hetzner";
  fsWriteFileSync(path, k, { mode: 0o600 });
  return pathResolve(path);
});

// Connect to the Docker Server on the Hetzner Server
const dockerServerHetzner = new docker.Provider("Docker Server - Hetzner", {
  host: $interpolate`ssh://root@${server.ipv4Address}`,
  sshOpts: ["-i", sshKeyLocalPath, "-o", "StrictHostKeyChecking=no"],
});
確保也將 SSH 私鑰 id_ed25519_hetzner 新增至 .gitignore 和 .dockerignore,這樣它就不會進入您的 GitHub 儲存庫和 Docker 映像。
觸發部署以驗證變更:
pnpm sst deploy
SST ❍ ion 0.1.90  ready!

➜  App:        next-self-hosted
   Stage:      antonprudkohliad

~  Deploy

|  Created     Docker Server - Hetzner pulumi:providers:docker

✓  Complete
Build the Docker image
Now we can build the Docker image on the remove Docker server:
// In the run() function:

// Build the Docker image
const dockerImageHetzner = new docker.Image(
  "Docker Image - App - Hetzner",
  {
    imageName: "next-self-hosted/next-self-hosted:latest",
    build: {
      context: pathResolve("./"),
      dockerfile: pathResolve("./Dockerfile"),
      target: "production",
      platform: "linux/amd64",
    },
    skipPush: true,
  },
  {
    provider: dockerServerHetzner,
    dependsOn: [server],
  }
);
Let’s trigger the deployment to see if everything works:
pnpm sst deploy
SST ❍ ion 0.1.90  ready!

➜  App:        next-self-hosted
   Stage:      antonprudkohliad

~  Deploy

|  Log         Starting Docker build
< ... A PRETTY LONG BUILD LOG HERE ... >
|  Log         Image built successfully, local id "sha256:629a6cdfc298c74599a3056278e31c64197a87f6d11aab09573bc9171d2f3362"
|  Created     Docker Image - App - Hetzner docker:index:Image (36.0s)

✓  Complete
Now, let’s check that Docker image made it to the server:
ssh root@116.203.183.180 -i ./id_ed25519_hetzner -o StrictHostKeyChecking=no -C "docker image ls"
REPOSITORY                          TAG       IMAGE ID       CREATED              SIZE
next-self-hosted/next-self-hosted   latest    629a6cdfc298   About a minute ago   712MB
Awesome!
Docker networks
We will create two networks: Public and Internal. The Public network is for services to which NGINX is connected, i.e. for services that have to be exposed to the outside (e.g. the Next.js application or an API server). The Internal network is for services that are not meant to be exposed to the outside e.g. Postgres database, Redis cache:
// In the run() function:

// Setup Docker Networks
const dockerNetworkPublic = new docker.Network(
  "Docker Network - Public",
  { name: "app_network_public" },
  { provider: dockerServerHetzner, dependsOn: [server] }
);
const dockerNetworkInternal = new docker.Network(
  "Docker Network - Internal",
  { name: "app_network_internal" },
  { provider: dockerServerHetzner, dependsOn: [server] }
);
Trigger the deployment:
pnpm sst deploy
SST ❍ ion 0.1.90  ready!

➜  App:        next-self-hosted
   Stage:      antonprudkohliad

~  Deploy

|  Created     Docker Network - Public docker:index:Network (2.3s)
|  Created     Docker Network - Internal docker:index:Network (3.1s)

✓  Complete
Check that networks app_network_internal and app_network_public are present on the remote:
ssh root@116.203.183.180 -i ./id_ed25519_hetzner -o StrictHostKeyChecking=no -C "docker network ls"
NETWORK ID     NAME                   DRIVER    SCOPE
0590360bd4ae   app_network_internal   bridge    local
e3bd8be72506   app_network_public     bridge    local
827fa5ca5de2   bridge                 bridge    local
dc8880514199   host                   host      local
f1481867db18   none                   null      local
Docker volumes
We will create a volume to store the application build files (the .next folder):
// In the run() function:

// Setup Docker Volumes
const dockerVolumeAppBuild = new docker.Volume(
  "Docker Volume - App Build",
  { name: "app_volume_build" },
  { provider: dockerServerHetzner, dependsOn: [server] }
);
Deploy and verify that the docker volume app_volume_build is present on the VPS:
pnpm sst deploy
SST ❍ ion 0.1.90  ready!

➜  App:        next-self-hosted
   Stage:      antonprudkohliad

~  Deploy

|  Created     Docker Volume - App Build docker:index:Volume

✓  Complete

ssh root@116.203.183.180 -i ./id_ed25519_hetzner -o StrictHostKeyChecking=no -C "docker volume ls"
DRIVER    VOLUME NAME
local     app_volume_build
The Build container
We are going to run a one-off container (a.k.a. Init Container) to build the Next.js application and store the result in the .next folder, that will be shared with the main application container through the volume that we have created above:
// In the run() function:

// Run a one-off container to build the app
const dockerAppBuildContainer = new docker.Container(
  "Docker Container - App Build",
  {
    name: "app_container_build",
    image: dockerImageHetzner.imageName,
    volumes: [
      {
        volumeName: dockerVolumeAppBuild.name,
        containerPath: "/app/.next",
      },
    ],
    command: ["pnpm", "build"],
    mustRun: true,
  },
  {
    provider: dockerServerHetzner,
  }
);
Deploy and verify via logs that the build has been successful:
pnpm sst deploy
SST ❍ ion 0.1.90  ready!

➜  App:        next-self-hosted
   Stage:      antonprudkohliad

~  Deploy

|  Created     Docker Container - App Build docker:index:Container (1.1s)

✓  Complete

ssh root@116.203.183.180 -i ./id_ed25519_hetzner -o StrictHostKeyChecking=no -C "docker logs -f app_container_build"

> next-self-hosted@ build /app
> next build

  ▲ Next.js 14.2.5

   Creating an optimized production build ...
 ✓ Compiled successfully
   Linting and checking validity of types ...
   Collecting page data ...
   Generating static pages (0/4) ...
   Generating static pages (1/4)
   Generating static pages (2/4)
   Generating static pages (3/4)
 ✓ Generating static pages (4/4)
   Finalizing page optimization ...
   Collecting build traces ...

Route (app)                              Size     First Load JS
┌ ○ /                                    142 B          87.2 kB
└ ○ /_not-found                          871 B          87.9 kB
+ First Load JS shared by all            87 kB
  ├ chunks/52d5e6ad-40eff88d15e66edb.js  53.6 kB
  ├ chunks/539-e1fa9689ed3badf0.js       31.5 kB
  └ other shared chunks (total)          1.84 kB

○  (Static)  prerendered as static content
The App container
Now we will add a “runner” container, that will use the build output from the Build container, and run next start:
// In the run() function:

const dockerAppContainer = new docker.Container(
  "Docker Container - App",
  {
    name: "app",
    image: dockerImageHetzner.imageName,
    volumes: [
      {
        volumeName: dockerVolumeAppBuild.name,
        containerPath: "/app/.next",
      },
    ],
    networksAdvanced: [
      { name: dockerNetworkPublic.id },
      { name: dockerNetworkInternal.id },
    ],
    command: ["pnpm", "start"],
    restart: "always",
  },
  { provider: dockerServerHetzner, dependsOn: [dockerAppBuildContainer] }
);
Deploy and verify that the app has started successfully:
pnpm sst deploy
SST ❍ ion 0.1.90  ready!

➜  App:        next-self-hosted
   Stage:      antonprudkohliad

~  Deploy

|  Created     Docker Container - App docker:index:Container (1.1s)

✓  Complete

ssh root@116.203.183.180 -i ./id_ed25519_hetzner -o StrictHostKeyChecking=no -C "docker logs -f app"

> next-self-hosted@ start /app
> next start

  ▲ Next.js 14.2.5
  - Local:        http://localhost:3000

 ✓ Starting...
 ✓ Ready in 497ms
The app container might fail, because the build container has not finished building yet, but it will soon recover and function normally.
Add Cloudflare certificates
In order to upload files to the VPS, we need to install the Command provider and the Polumi package:
pnpm sst add @pulumi/command
pnpm add -D @pulumi/pulumi
pnpm install
Make sure that the /root/app and /root/app/certs directories exist on the VPS and upload Cloudflare Origin Server certificates:
// At the top of the file
import { asset as pulumiAsset } from "@pulumi/pulumi";

// In the run() function:

// Make sure that app directory exists
new command.remote.Command("Command - Ensure app directory", {
  create: "mkdir -p /root/app",
  connection: {
    host: server.ipv4Address,
    user: "root",
    privateKey: sshKeyLocal.privateKeyOpenssh,
  },
});

// Make sure that app/certs directory exists
new command.remote.Command("Command - Ensure app/certs directory", {
  create: "mkdir -p /root/app/certs",
  connection: {
    host: server.ipv4Address,
    user: "root",
    privateKey: sshKeyLocal.privateKeyOpenssh,
  },
});

// Copy Certificates to the VPS
new command.remote.CopyToRemote(
  "Copy - Certificates - Key",
  {
    source: new pulumiAsset.FileAsset(
      pathResolve("./certs/cloudflare.key.pem")
    ),
    remotePath: "/root/app/certs/cloudflare.key.pem",
    connection: {
      host: server.ipv4Address,
      user: "root",
      privateKey: sshKeyLocal.privateKeyOpenssh,
    },
  }
);
new command.remote.CopyToRemote(
  "Copy - Certificates - Cert",
  {
    source: new pulumiAsset.FileAsset(
      pathResolve("./certs/cloudflare.cert.pem")
    ),
    remotePath: "/root/app/certs/cloudflare.cert.pem",
    connection: {
      host: server.ipv4Address,
      user: "root",
      privateKey: sshKeyLocal.privateKeyOpenssh,
    },
  }
);
new command.remote.CopyToRemote(
  "Copy - Certificates - Authenticated Origin Pull",
  {
    source: new pulumiAsset.FileAsset(
      pathResolve("./certs/authenticated_origin_pull_ca.pem")
    ),
    remotePath: "/root/app/certs/authenticated_origin_pull_ca.pem",
    connection: {
      host: server.ipv4Address,
      user: "root",
      privateKey: sshKeyLocal.privateKeyOpenssh,
    },
  }
);
Start Nginx
Copy Nginx configuration file to the VPS and start the Nginx container:
// In the run() function:

// Copy Nginx config to the VPS
const commandCopyNginxConfig = new command.remote.CopyToRemote(
  "Copy - Nginx Config",
  {
    source: new pulumiAsset.FileAsset(
      pathResolve("./nginx/production.conf")
    ),
    remotePath: "/root/app/nginx.conf",
    connection: {
      host: server.ipv4Address,
      user: "root",
      privateKey: sshKeyLocal.privateKeyOpenssh,
    },
  }
);

// Run the Nginx container
const dockerNginxContainer = new docker.Container(
  "Docker Container - Nginx",
  {
    name: "app_container_nginx",
    image: "nginx:1.27.0-bookworm",
    volumes: [
      {
        hostPath: "/root/app/nginx.conf",
        containerPath: "/etc/nginx/nginx.conf",
      },
      {
        hostPath: "/root/app/certs",
        containerPath: "/certs",
      },
    ],
    command: ["nginx", "-g", "daemon off;"],
    networksAdvanced: [{ name: dockerNetworkPublic.id }],
    restart: "always",
    ports: [
      {
        external: 443,
        internal: 443,
      },
    ],
    healthcheck: {
      tests: ["CMD", "service", "nginx", "status"],
      interval: "30s",
      timeout: "5s",
      retries: 5,
      startPeriod: "10s",
    },
  },
  { provider: dockerServerHetzner, dependsOn: [dockerAppContainer] }
);

return { ip: server.ipv4Address };
Deploy and verify that the Nginx container is running:
pnpm sst deploy
SST ❍ ion 0.1.90  ready!

➜  App:        next-self-hosted
   Stage:      antonprudkohliad

~  Deploy

|  Deleted     Docker Container - App Build docker:index:Container
|  Created     Command - Ensure app/certs directory command:remote:Command
|  Created     Command - Ensure app directory command:remote:Command
|  Created     Docker Container - App Build docker:index:Container
|  Created     Copy - Certificates - Cert command:remote:CopyToRemote (1.2s)
|  Created     Copy - Nginx Config command:remote:CopyToRemote (1.2s)
|  Created     Copy - Certificates - Key command:remote:CopyToRemote (1.2s)
|  Created     Copy - Certificates - Authenticated Origin Pull command:remote:CopyToRemote (1.2s)
|  Deleted     Docker Container - App docker:index:Container
|  Created     Docker Container - App docker:index:Container (1.2s)
|  Created     Docker Container - Nginx docker:index:Container (7.1s)

✓  Complete
   ip: 116.203.183.180

ssh root@116.203.183.180 -i ./id_ed25519_hetzner -o StrictHostKeyChecking=no -C "docker ps -a"

CONTAINER ID   IMAGE                                      COMMAND                  CREATED         STATUS                     PORTS                          NAMES
9c2cb18db304   nginx:1.27.0-bookworm                      "/docker-entrypoint.…"   3 minutes ago   Up 3 minutes (healthy)     80/tcp, 0.0.0.0:443->443/tcp   app_container_nginx
32e6a4cee8bc   next-self-hosted/next-self-hosted:latest   "docker-entrypoint.s…"   4 minutes ago   Up 3 minutes               3000/tcp                       app
f0c50aa32493   next-self-hosted/next-self-hosted:latest   "docker-entrypoint.s…"   4 minutes ago   Exited (0) 3 minutes ago                                  app_container_build
As you can see, Nginx and the application are running smoothly.
The final check
It’s time to make sure that the DNS record is pointing to the right IP address (yes, it is possible to add this to the SST config too, via the Cloudflare provider):

Then, we can open the application and verify that it works:

Congratulations! We have now completed out SST dive and can enjoy the freshly deployed application ?
Cleaning up
SST makes it very easy to clean up – just run pnpm sst remove and the whole setup will go away:
pnpm sst remove
SST ❍ ion 0.1.90  ready!

➜  App:        next-self-hosted
   Stage:      antonprudkohliad

~  Remove

|  Deleted     Docker Container - Nginx docker:index:Container (1.9s)
|  Deleted     Docker Container - App docker:index:Container
|  Deleted     Docker Container - App Build docker:index:Container
|  Deleted     Docker Image - App - Hetzner docker:index:Image
|  Deleted     Docker Volume - App Build docker:index:Volume (2.1s)
|  Deleted     Docker Network - Public docker:index:Network (3.1s)
|  Deleted     Docker Network - Internal docker:index:Network (3.2s)
|  Deleted     Copy - Nginx Config command:remote:CopyToRemote
|  Deleted     Docker Server - Hetzner pulumi:providers:docker
|  Deleted     Copy - Certificates - Authenticated Origin Pull command:remote:CopyToRemote
|  Deleted     Command - Ensure app/certs directory command:remote:Command
|  Deleted     Copy - Certificates - Key command:remote:CopyToRemote
|  Deleted     Command - Ensure app directory command:remote:Command
|  Deleted     Copy - Certificates - Cert command:remote:CopyToRemote
|  Deleted     Server hcloud:index:Server (16.8s)
|  Deleted     SSH Key - Hetzner hcloud:index:SshKey
|  Deleted     SSH Key - Local tls:index:PrivateKey

✓  Removed
以上是如何使用 SST 和 Docker 將 Next.js 應用程式部署到 Hetzner VPS的詳細內容。更多資訊請關注PHP中文網其他相關文章!

熱AI工具

Undresser.AI Undress
人工智慧驅動的應用程序,用於創建逼真的裸體照片

AI Clothes Remover
用於從照片中去除衣服的線上人工智慧工具。

Undress AI Tool
免費脫衣圖片

Clothoff.io
AI脫衣器

Video Face Swap
使用我們完全免費的人工智慧換臉工具,輕鬆在任何影片中換臉!

熱門文章
熱工具

記事本++7.3.1
好用且免費的程式碼編輯器

SublimeText3漢化版
中文版,非常好用

禪工作室 13.0.1
強大的PHP整合開發環境

Dreamweaver CS6
視覺化網頁開發工具

SublimeText3 Mac版
神級程式碼編輯軟體(SublimeText3)


 Python vs. JavaScript:學習曲線和易用性
Apr 16, 2025 am 12:12 AM
Python vs. JavaScript:學習曲線和易用性
Apr 16, 2025 am 12:12 AM
Python更適合初學者,學習曲線平緩,語法簡潔;JavaScript適合前端開發,學習曲線較陡,語法靈活。 1.Python語法直觀,適用於數據科學和後端開發。 2.JavaScript靈活,廣泛用於前端和服務器端編程。
 JavaScript和Web:核心功能和用例
Apr 18, 2025 am 12:19 AM
JavaScript和Web:核心功能和用例
Apr 18, 2025 am 12:19 AM
JavaScript在Web開發中的主要用途包括客戶端交互、表單驗證和異步通信。 1)通過DOM操作實現動態內容更新和用戶交互;2)在用戶提交數據前進行客戶端驗證,提高用戶體驗;3)通過AJAX技術實現與服務器的無刷新通信。
 JavaScript在行動中:現實世界中的示例和項目
Apr 19, 2025 am 12:13 AM
JavaScript在行動中:現實世界中的示例和項目
Apr 19, 2025 am 12:13 AM
JavaScript在現實世界中的應用包括前端和後端開發。 1)通過構建TODO列表應用展示前端應用,涉及DOM操作和事件處理。 2)通過Node.js和Express構建RESTfulAPI展示後端應用。
 了解JavaScript引擎:實施詳細信息
Apr 17, 2025 am 12:05 AM
了解JavaScript引擎:實施詳細信息
Apr 17, 2025 am 12:05 AM
理解JavaScript引擎內部工作原理對開發者重要,因為它能幫助編寫更高效的代碼並理解性能瓶頸和優化策略。 1)引擎的工作流程包括解析、編譯和執行三個階段;2)執行過程中,引擎會進行動態優化,如內聯緩存和隱藏類;3)最佳實踐包括避免全局變量、優化循環、使用const和let,以及避免過度使用閉包。
 Python vs. JavaScript:開發環境和工具
Apr 26, 2025 am 12:09 AM
Python vs. JavaScript:開發環境和工具
Apr 26, 2025 am 12:09 AM
Python和JavaScript在開發環境上的選擇都很重要。 1)Python的開發環境包括PyCharm、JupyterNotebook和Anaconda,適合數據科學和快速原型開發。 2)JavaScript的開發環境包括Node.js、VSCode和Webpack,適用於前端和後端開發。根據項目需求選擇合適的工具可以提高開發效率和項目成功率。
 C/C在JavaScript口譯員和編譯器中的作用
Apr 20, 2025 am 12:01 AM
C/C在JavaScript口譯員和編譯器中的作用
Apr 20, 2025 am 12:01 AM
C和C 在JavaScript引擎中扮演了至关重要的角色,主要用于实现解释器和JIT编译器。1)C 用于解析JavaScript源码并生成抽象语法树。2)C 负责生成和执行字节码。3)C 实现JIT编译器,在运行时优化和编译热点代码,显著提高JavaScript的执行效率。
 Python vs. JavaScript:比較用例和應用程序
Apr 21, 2025 am 12:01 AM
Python vs. JavaScript:比較用例和應用程序
Apr 21, 2025 am 12:01 AM
Python更適合數據科學和自動化,JavaScript更適合前端和全棧開發。 1.Python在數據科學和機器學習中表現出色,使用NumPy、Pandas等庫進行數據處理和建模。 2.Python在自動化和腳本編寫方面簡潔高效。 3.JavaScript在前端開發中不可或缺,用於構建動態網頁和單頁面應用。 4.JavaScript通過Node.js在後端開發中發揮作用,支持全棧開發。
 從網站到應用程序:JavaScript的不同應用
Apr 22, 2025 am 12:02 AM
從網站到應用程序:JavaScript的不同應用
Apr 22, 2025 am 12:02 AM
JavaScript在網站、移動應用、桌面應用和服務器端編程中均有廣泛應用。 1)在網站開發中,JavaScript與HTML、CSS一起操作DOM,實現動態效果,並支持如jQuery、React等框架。 2)通過ReactNative和Ionic,JavaScript用於開發跨平台移動應用。 3)Electron框架使JavaScript能構建桌面應用。 4)Node.js讓JavaScript在服務器端運行,支持高並發請求。
