

與 Svelte 快速同步

您準備好建立反應式即時 Web 應用程式了嗎?
tl;dr 沒有時間閱讀和完成整個教學?你很幸運!您可以在 GitHub 上找到完整的範例。請隨意前往那裡,克隆存儲庫並開始探索。
在本教學中,我們將探索 Svelte 和 Couchbase Capella 的組合來建立動態互動式聊天應用程式。根據 2024 年 Stack Overflow 開發者調查,Svelte 的讚賞率達到了令人印象深刻的 72.8%,它之所以受到讚譽有幾個原因。它透過將元件編譯為直接操作 DOM 的高效命令式程式碼,消除了對虛擬 DOM 的需求,從而實現更快的更新和更小的套件大小,從而有效地從瀏覽器中完成大部分工作。
Svelte 的內建反應性自動追蹤狀態變化,確保快速且有效率的更新,而無需複雜的狀態管理函式庫。這種反應性簡化了開發過程並提高了效能。此外,Svelte 基於組件的架構可以更輕鬆地建立和維護複雜的使用者介面,從而提供更簡單、更愉快的開發體驗。而且,當您的應用程式需要響應式、自適應資料時,Couchbase Capella 提供了一個簡單的實作解決方案。
Couchbase Capella 不只是一個 NoSQL 雲端資料庫平台;它是一個一體化資料平台,提供全文搜尋、向量搜尋、資料快取、分析等。這種全面的功能使您能夠建立具有不同數據需求的強大應用程式。 Svelte 和 Couchbase Capella 共同打造了速度極快、效能卓越的即時應用程式。
好了,說得夠多了。讓我們開始吧!
設定開發環境
建立一個新的 SvelteKit 項目
在深入了解設定之前,讓我們先澄清一下 Svelte 和 SvelteKit 之間的差異。 Svelte 是一個前端框架,可將您的程式碼編譯為直接操作 DOM 的高效命令式程式碼。這會帶來更快的更新和更小的捆綁包大小。另一方面,SvelteKit 是一個建立在 Svelte 之上的框架,旨在建立全端 Web 應用程式。 SvelteKit 提供了路由、伺服器端渲染和靜態網站生成等附加功能,使其成為開發現代 Web 應用程式的強大工具。
在您的專案中,SvelteKit 將處理應用程式結構、路由和伺服器端渲染,而 Svelte 將管理 UI 元件的高效渲染。
要啟動新項目,您可以在命令列上初始化它:
> npm create svelte@latest svelte-couchbase-real-time-chat
> cd svelte-couchbase-real-time-chat
CLI 工具將提示您幾個選擇。請回答以下問題:
- - 骨架項目:選擇是 從基本項目結構開始。
- Typescript:現在選擇 否 以保持簡單。
- ESLint:選擇 yes 以包含 linting,這有助於維護程式碼品質。
- Prettier:選擇 yes 進行程式碼格式化。
- 編劇:選擇否,除非您打算從一開始就編寫端到端測試。
然後,透過從命令列執行 npm install 來安裝相依性。運行這些命令後,您將設定一個新的 SvelteKit 專案並準備就緒!
安裝依賴項
接下來,我們將安裝專案所需的其他依賴項,包括用於樣式設定的 Tailwind CSS、用於資料庫互動的 Couchbase SDK 以及用於即時通訊的 WebSocket 支援。
> npm install -D tailwindcss postcss autoprefixer couchbase ws dotenv
> npx tailwindcss init -p
這些依賴項在您的應用程式中執行什麼操作?
- TailwindCSS is a utility-first CSS framework that makes it more straightforward to style your application with predefined classes.
- The Couchbase Node.js SDK introduces functionality to interact with your data on Couchbase Capella using methods that abstract away a lot of the work.
- ws is a small Websocket library for Node.js. You will be enabling the real-time chat functionality in the application with Websockets.
- Lastly, dotenv loads environment variables from a .env file into process.env making it easier to manage configuration.
Configuring TailwindCSS
As mentioned above, TailwindCSS introduces classes that you can use to define the styling for your application. This is helpful if you are not a frontend expert, or even if you are, if you wish to shortcut the process of building elegantly designed applications. To use TailwindCSS in your Svelte project, follow these steps:
Configure tailwind.config.js
Update the tailwind.config.cjs file to specify the content sources. This ensures that Tailwind CSS can remove unused styles from your production build, making it more efficient.
/** @type {import('tailwindcss').Config} */
module.exports = {
  content: ['./src/**/*.{html,js,svelte,ts}'],
  theme: {
    extend: {},
  },
  plugins: [],
}
Add Tailwind CSS directives
Create or update the src/app.css file to include Tailwind CSS directives. These directives load Tailwind’s base, components, and utility styles.
@tailwind base;
@tailwind components;
@tailwind utilities;
Include the CSS in your Svelte project
Open or create the src/routes/+layout.svelte file and import the CSS file. This ensures that Tailwind’s styles are available throughout your application.
<script>
  import "../app.css";
</script>

<slot />
Now that you’ve completed these steps, TailwindCSS has been successfully initialized in your application! You’re ready to move on to setting up Couchbase Capella and building the backend for your chat application.
Setting Up Couchbase Capella
Creating a Cluster
It is free to sign up and try Couchbase Capella, and if you have not done so yet, you can do so by navigating to cloud.couchbase.com and creating an account using your GitHub or Google credentials, or by making a new account with an email address and password combination.
Once you have done so, from within your Capella dashboard, you will create your first cluster. For the purposes of this walkthrough, let’s name it SvelteChatApp.
The summary of your new cluster will be presented on the left-hand side of the dashboard. Capella is multi-cloud and can work with AWS, Google Cloud or Azure. For this example, you will deploy to AWS.
After you have created your cluster, you need to create a bucket. A bucket in Couchbase is the container where the data is stored. Each item of data, known as a document, is kept in JSON making its syntax familiar to most developers. You can name your bucket whatever you want. However, for the purposes of this walkthrough, let’s name this bucket svelte_chat_app_messages.
Now that you have created both your database and your bucket, you are ready to create your database access credentials and to fetch your connection URL that you will be using in your Lambda function.
Obtaining Connection Details
The connection details are essential as you will be using them in your application to establish a connection to your Couchbase data and to interact with the data. Navigate to the Connect section in the Capella dashboard and take note of the Connection String.
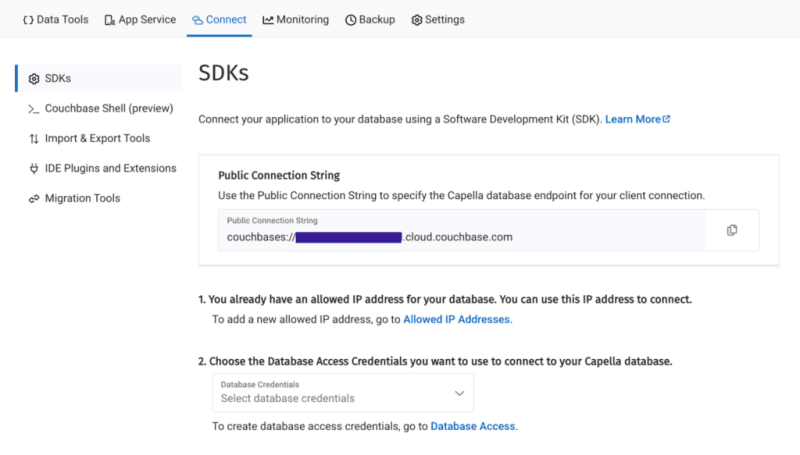
Then, click on the Database Access link under section two. In that section, you will create credentials – a username and password – that your application will use to authenticate with the database. You can scope the credentials to the specific bucket you created or give it permission for all buckets and databases in your account. You need to make sure it has both read and write access, regardless.
Once you have finished, the last step in this part of the process is to add your new connection string and connection credentials to your application as environment variables.
Setting Up Environment Variables
In a production environment, you will store your credentials and other confidential information for your application in a secure format. Different cloud providers have different paths to store sensitive information, and you should follow the procedure defined by the cloud provider you are using, whether it is AWS, Google Cloud, Azure, Netlify, Vercel or any other. For our purposes, you are adding your credentials to a .env file in the root folder of your application. The dotenv package reads those credentials from there and loads them into your application.
# .env
COUCHBASE_BUCKET=your_bucket_name
COUCHBASE_CONNECTION_STRING=your_connection_string
COUCHBASE_USER=your_username
COUCHBASE_PASSWORD=your_password
That’s it! Your Couchbase cluster is all set up and ready to be used. At this point, you are ready to build the application. Let’s start with the backend server with Nodejs and then move on to the frontend with Svelte.
Building the Backend with Node.js
With our development environment set up, it’s time to build the backend for our real-time chat application. We’ll use Node.js to create the server, connect to Couchbase Capella for data storage, and set up a WebSocket server for real-time communication.
Creating server.cjs
First, we’ll create a file named server.cjs which will serve as the entry point for our backend.
-
- Create server.cjs: In the root directory of your project, create a new file named server.cjs.
- Setup Express and Dependencies: We’ll use Express for our server framework, the Couchbase SDK for database operations, WebSocket for real-time communication, and dotenv for environment variables management. Add the following code to server.cjs:
const express = require('express');
const couchbase = require('couchbase');
const { createServer } = require('http');
const { WebSocketServer } = require('ws');
const dotenv = require('dotenv');

dotenv.config();

const app = express();
const server = createServer(app);
const wss = new WebSocketServer({ server });
Connecting to Couchbase
Next, we’ll set up the connection to Couchbase Capella. Ensure your .env file contains the correct connection details. Add the following code to server.cjs to connect to Couchbase:
let cluster, bucket, collection;

async function connectToCouchbase() {
    try {
        console.log('Connecting to Couchbase...');
        const clusterConnStr = process.env.COUCHBASE_CONNECTION_STRING;
        const username = process.env.COUCHBASE_USER;
        const password = process.env.COUCHBASE_PASSWORD;
        const bucketName = process.env.COUCHBASE_BUCKET;

        cluster = await couchbase.connect(clusterConnStr, {
          username: username,
          password: password,
          configProfile: 'wanDevelopment',
        });
        bucket = cluster.bucket(bucketName);
        collection = bucket.defaultCollection();

        console.log('Connected to Couchbase successfully.');
    } catch (error) {
        console.error('Error connecting to Couchbase:', error);
        process.exit(1);
    }
}

connectToCouchbase();
This function handles the connection to Couchbase, ensuring that all necessary parameters are properly configured. All that is left for our backend is to create the websocket server to handle the sending and receiving of new chat messages.
Setting up the Websocket Server
The Websocket server functionality is also added to the server.cjs file. The server will broadcast all new messages for the frontend of the application to receive, and send all newly created messages to Couchbase for saving in the bucket you created.
wss.on('connection', (ws) => {
    console.log('New WebSocket connection established.');
    ws.on('message', async (message) => {
        try {
            const messageString = message.toString();
            console.log('Received message:', messageString);
            // Save message to Couchbase
            const id = `message::${Date.now()}`;
            await collection.upsert(id, { text: messageString });
            console.log('Message saved to Couchbase:', id);

            // Broadcast message
            wss.clients.forEach((client) => {
                if (client.readyState === WebSocket.OPEN) {
                    client.send(messageString);
                    console.log('Broadcasted message to client:', messageString);
                }
            });
        } catch (error) {
            console.error('Error handling message:', error);
        }
    });
});

server.listen(3000, () => {
    console.log('Server started on http://localhost:3000');
});
Note that before sending the message to Couchbase, you first convert the message into a String as it is received as binary data buffers by default. The conversion to String format is achieved by calling the toString() function on the message. The newly defined messageString variable now contains the data in readable format for both sending to Couchbase and rendering in the application.
That is the entire backend of your new real-time chat application. However, as good as any backend for a web application is, it needs a frontend to render it for the user. Svelte offers us the performance and reactivity to do so with speed and with an excellent developer experience.
Creating the Frontend with Svelte
With your backend set up, it’s time to build the frontend of our real-time chat application using Svelte. You’ll leverage Svelte’s strengths to create a responsive and dynamic chat interface.
Building the Chat Interface
- Create the Svelte Component In your SvelteKit project, create a new file named +page.svelte in the src/routes directory. This file will serve as the main component for our chat interface.
touch src/routes/+page.svelte
- Set Up the Basic Structure Open +page.svelte and set up the basic HTML structure with TailwindCSS classes for styling:
<script>
import { onMount } from 'svelte';
let messages = [];
let newMessage = '';
let ws;
onMount(() => {
ws = new WebSocket('ws://localhost:3000');
ws.onmessage = (event) => {
messages = [...messages, event.data];
};
ws.onopen = () => {
console.log('WebSocket connection opened');
};
ws.onclose = () => {
console.log('WebSocket connection closed');
};
});
function sendMessage() {
ws.send(newMessage);
newMessage = '';
}
</script>
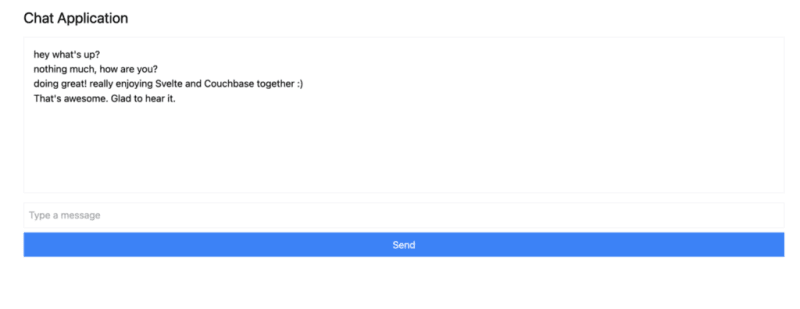
<div class="container mx-auto p-4">
<h1 class="text-2xl mb-4">Chat Application</h1>
<div class="border p-4 mb-4 h-64 overflow-y-scroll">
{#each messages as message}
<div>{message}</div>
{/each}
</div>
<input
type="text"
bind:value={newMessage}
class="border p-2 w-full mb-2"
placeholder="Type a message"
/>
<button on:click={sendMessage} class="bg-blue-500 text-white p-2 w-full">Send</button>
</div>
The section of the above code example initializes Websocket and handles the messages, both sending and receiving. The onMount function ensures that the Websocket connection is established when the component is initialized. Svelte’s reactivity automatically updates the DOM whenever the messages array changes, ensuring new messages are displayed in real-time. With that your frontend is now complete.
You did it! You have built an entire chat application enabling real-time communication utilizing the performance, flexibility and adaptability of both Svelte and Couchbase to deliver an optimal experience for your users. Yes, this is a fairly simple implementation, however, it provides the skeleton for you to build even more expansive and complex real-time applications. The potential is only limited by your imagination.
想嘗試嗎?讓我們啟動您的應用程式並開始聊天。
運行應用程式
要運行您的應用程序,您將初始化後端 Node.js 伺服器和 SvelteKit 前端。首先,讓我們從終端啟動後端:
然後,在新的終端機視窗中啟動前端:
現在,在瀏覽器中導航到 http://localhost:5173 並開始聊天!
您可以開啟多個瀏覽器標籤來模擬多個用戶,或使用 ngrok 等服務與您的朋友分享應用程式並與他們即時聊天。
總結
在本教程中,您了解如何快速建立可處理即時資料的完全響應式應用程式。 Svelte 可以輕鬆更新 DOM,而 Couchbase 可以讓您在幾秒鐘內開始建立和儲存訊息。
Svelte 在競爭激烈的 Web 框架領域迅速受到讚賞和歡迎的原因有很多。 Couchbase 作為資料後端,與 Svelte 結合,大大提高了您建置和實現的潛力。無需定義複雜的模式,如果您希望實現資料快取或搜尋功能,也無需在以後添加更多依賴項,這一切都與 Couchbase 一起內置,並且開箱即用。
剩下的唯一問題是:接下來你要建造什麼?
免費開始使用 Couchbase Capella。
以上是與 Svelte 快速同步的詳細內容。更多資訊請關注PHP中文網其他相關文章!

熱AI工具

Undresser.AI Undress
人工智慧驅動的應用程序,用於創建逼真的裸體照片

AI Clothes Remover
用於從照片中去除衣服的線上人工智慧工具。

Undress AI Tool
免費脫衣圖片

Clothoff.io
AI脫衣器

Video Face Swap
使用我們完全免費的人工智慧換臉工具,輕鬆在任何影片中換臉!

熱門文章
熱工具

記事本++7.3.1
好用且免費的程式碼編輯器

SublimeText3漢化版
中文版,非常好用

禪工作室 13.0.1
強大的PHP整合開發環境

Dreamweaver CS6
視覺化網頁開發工具

SublimeText3 Mac版
神級程式碼編輯軟體(SublimeText3)


 神秘的JavaScript:它的作用以及為什麼重要
Apr 09, 2025 am 12:07 AM
神秘的JavaScript:它的作用以及為什麼重要
Apr 09, 2025 am 12:07 AM
JavaScript是現代Web開發的基石,它的主要功能包括事件驅動編程、動態內容生成和異步編程。 1)事件驅動編程允許網頁根據用戶操作動態變化。 2)動態內容生成使得頁面內容可以根據條件調整。 3)異步編程確保用戶界面不被阻塞。 JavaScript廣泛應用於網頁交互、單頁面應用和服務器端開發,極大地提升了用戶體驗和跨平台開發的靈活性。
 誰得到更多的Python或JavaScript?
Apr 04, 2025 am 12:09 AM
誰得到更多的Python或JavaScript?
Apr 04, 2025 am 12:09 AM
Python和JavaScript開發者的薪資沒有絕對的高低,具體取決於技能和行業需求。 1.Python在數據科學和機器學習領域可能薪資更高。 2.JavaScript在前端和全棧開發中需求大,薪資也可觀。 3.影響因素包括經驗、地理位置、公司規模和特定技能。
 如何實現視差滾動和元素動畫效果,像資生堂官網那樣?
或者:
怎樣才能像資生堂官網一樣,實現頁面滾動伴隨的動畫效果?
Apr 04, 2025 pm 05:36 PM
如何實現視差滾動和元素動畫效果,像資生堂官網那樣?
或者:
怎樣才能像資生堂官網一樣,實現頁面滾動伴隨的動畫效果?
Apr 04, 2025 pm 05:36 PM
實現視差滾動和元素動畫效果的探討本文將探討如何實現類似資生堂官網(https://www.shiseido.co.jp/sb/wonderland/)中�...
 JavaScript的演變:當前的趨勢和未來前景
Apr 10, 2025 am 09:33 AM
JavaScript的演變:當前的趨勢和未來前景
Apr 10, 2025 am 09:33 AM
JavaScript的最新趨勢包括TypeScript的崛起、現代框架和庫的流行以及WebAssembly的應用。未來前景涵蓋更強大的類型系統、服務器端JavaScript的發展、人工智能和機器學習的擴展以及物聯網和邊緣計算的潛力。
 如何使用JavaScript將具有相同ID的數組元素合併到一個對像中?
Apr 04, 2025 pm 05:09 PM
如何使用JavaScript將具有相同ID的數組元素合併到一個對像中?
Apr 04, 2025 pm 05:09 PM
如何在JavaScript中將具有相同ID的數組元素合併到一個對像中?在處理數據時,我們常常會遇到需要將具有相同ID�...
 前端開發中如何實現類似 VSCode 的面板拖拽調整功能?
Apr 04, 2025 pm 02:06 PM
前端開發中如何實現類似 VSCode 的面板拖拽調整功能?
Apr 04, 2025 pm 02:06 PM
探索前端中類似VSCode的面板拖拽調整功能的實現在前端開發中,如何實現類似於VSCode...
 JavaScript引擎:比較實施
Apr 13, 2025 am 12:05 AM
JavaScript引擎:比較實施
Apr 13, 2025 am 12:05 AM
不同JavaScript引擎在解析和執行JavaScript代碼時,效果會有所不同,因為每個引擎的實現原理和優化策略各有差異。 1.詞法分析:將源碼轉換為詞法單元。 2.語法分析:生成抽象語法樹。 3.優化和編譯:通過JIT編譯器生成機器碼。 4.執行:運行機器碼。 V8引擎通過即時編譯和隱藏類優化,SpiderMonkey使用類型推斷系統,導致在相同代碼上的性能表現不同。
