
JWT(JSON Web Token)是一種以 JSON 物件的形式在兩方(例如客戶端和伺服器)之間安全地傳輸資訊的方法。它的設計緊湊且 URL 安全,可以輕鬆地在 URL、標頭中傳遞。
標題
標頭通常由兩部分組成:令牌的類型 (JWT) 和所使用的簽章演算法,例如 HMAC SHA256 或 RSA。
{
"alg":"HS256",
"typ":"JWT"
}
有效負載
這是實際資料儲存的地方。它可以包含使用者 ID、角色、過期時間和其他聲明(有關使用者或會話的資料)等資訊。
{
"電子郵件":"ayushstwt@gmail.com",
"name":"阿尤什"
}
簽名
確保令牌的完整性。這是一項安全功能,可確保令牌不被更改。它是透過使用指定演算法將編碼的標頭和有效負載與密鑰組合起來創建的。簽章幫助伺服器驗證令牌是否合法且未被竄改。
無需重複發送憑證:使用 JWT,您不必在每次請求時都發送使用者名稱和密碼。相反,您登入一次,伺服器就會給您一個令牌。然後,您可以在每個請求中發送此令牌來證明您的身份,從而使該過程更加安全和高效。
內建過期時間:每個 JWT 都有一個過期時間,這意味著它僅在特定期限內有效。如果令牌以某種方式被攔截,這可以降低長期濫用的風險。過期後,使用者需要重新登入才能取得新的令牌,增加了額外的安全層。
JWT 與 Spring Boot 透過在登入後頒發令牌來安全地管理使用者身份驗證。這些令牌隨每個請求一起發送,確保安全、無狀態的通信,而無需重複發送憑證。
無狀態通訊意味著伺服器不記得過去的請求。每個請求都攜帶所需的一切(如 JWT),因此伺服器不會儲存會話資訊。
在 Java Spring Boot 應用程式中實作 JWT 涉及幾個步驟。以下是幫助您入門的簡化大綱:
1。新增依賴項
在 pom.xml 檔案中包含必要的依賴項
                <dependency>
            <groupId>io.jsonwebtoken</groupId>
            <artifactId>jjwt-api</artifactId>
            <version>0.12.5</version>
        </dependency>
        <dependency>
            <groupId>io.jsonwebtoken</groupId>
            <artifactId>jjwt-impl</artifactId>
            <version>0.12.5</version>
            <scope>runtime</scope>
        </dependency>
        <dependency>
            <groupId>io.jsonwebtoken</groupId>
            <artifactId>jjwt-jackson</artifactId>
            <version>0.12.5</version>
            <scope>runtime</scope>
        </dependency>
我們使用 JWT 創建 spring-boot 應用程式所需的所有相依性
<?xml version="1.0" encoding="UTF-8"?>
<project xmlns="http://maven.apache.org/POM/4.0.0" xmlns:xsi="http://www.w3.org/2001/XMLSchema-instance"
    xsi:schemaLocation="http://maven.apache.org/POM/4.0.0 https://maven.apache.org/xsd/maven-4.0.0.xsd">
    <modelVersion>4.0.0</modelVersion>
    <parent>
        <groupId>org.springframework.boot</groupId>
        <artifactId>spring-boot-starter-parent</artifactId>
        <version>3.3.3</version>
        <relativePath/> <!-- lookup parent from repository -->
    </parent>
    <groupId>com.tier3Hub</groupId>
    <artifactId>user-auth-service</artifactId>
    <version>0.0.1-SNAPSHOT</version>
    <name>user-auth-service</name>
    <description>The user-auth-service is a microservice responsible for handling user authentication and authorization within a distributed system. It is designed to manage user login, registration, and secure access to various services using robust security practices. This service implements authentication mechanisms like JSON Web Tokens (JWT) and integrates with OAuth 2.0 for third-party authentication. Built with Spring Boot, it ensures scalability, reliability, and easy integration with other microservices in the system.</description>
    <url/>
    <licenses>
        <license/>
    </licenses>
    <developers>
        <developer/>
    </developers>
    <scm>
        <connection/>
        <developerConnection/>
        <tag/>
        <url/>
    </scm>
    <properties>
        <java.version>21</java.version>
    </properties>
    <dependencies>
        <dependency>
            <groupId>org.springframework.boot</groupId>
            <artifactId>spring-boot-starter-actuator</artifactId>
        </dependency>
        <dependency>
            <groupId>org.springframework.boot</groupId>
            <artifactId>spring-boot-starter-data-jpa</artifactId>
        </dependency>
        <dependency>
            <groupId>org.springframework.boot</groupId>
            <artifactId>spring-boot-starter-security</artifactId>
        </dependency>
        <dependency>
            <groupId>org.springframework.boot</groupId>
            <artifactId>spring-boot-starter-web</artifactId>
        </dependency>
        <dependency>
            <groupId>io.jsonwebtoken</groupId>
            <artifactId>jjwt-api</artifactId>
            <version>0.12.5</version>
        </dependency>
        <dependency>
            <groupId>io.jsonwebtoken</groupId>
            <artifactId>jjwt-impl</artifactId>
            <version>0.12.5</version>
            <scope>runtime</scope>
        </dependency>
        <dependency>
            <groupId>io.jsonwebtoken</groupId>
            <artifactId>jjwt-jackson</artifactId>
            <version>0.12.5</version>
            <scope>runtime</scope>
        </dependency>
        <dependency>
            <groupId>com.mysql</groupId>
            <artifactId>mysql-connector-j</artifactId>
            <scope>runtime</scope>
        </dependency>
        <dependency>
            <groupId>org.projectlombok</groupId>
            <artifactId>lombok</artifactId>
            <optional>true</optional>
        </dependency>
        <dependency>
            <groupId>org.springframework.boot</groupId>
            <artifactId>spring-boot-starter-test</artifactId>
            <scope>test</scope>
        </dependency>
        <dependency>
            <groupId>org.springframework.security</groupId>
            <artifactId>spring-security-test</artifactId>
            <scope>test</scope>
        </dependency>
        <dependency>
            <groupId>org.springframework.boot</groupId>
            <artifactId>spring-boot-starter-validation</artifactId>
        </dependency>
        <dependency>
            <groupId>org.springdoc</groupId>
            <artifactId>springdoc-openapi-starter-webmvc-ui</artifactId>
            <version>2.5.0</version>
        </dependency>
        <dependency>
            <groupId>org.modelmapper</groupId>
            <artifactId>modelmapper</artifactId>
            <version>3.1.1</version>
        </dependency>
    </dependencies>

    <build>
        <plugins>
            <plugin>
                <groupId>org.springframework.boot</groupId>
                <artifactId>spring-boot-maven-plugin</artifactId>
                <configuration>
                    <excludes>
                        <exclude>
                            <groupId>org.projectlombok</groupId>
                            <artifactId>lombok</artifactId>
                        </exclude>
                    </excludes>
                </configuration>
            </plugin>
        </plugins>
    </build>

</project>
我們正在使用不同類型的依賴項,例如
*2。專案結構*

3。在application.properties檔案中新增配置
spring.application.name=user-auth-service

server.port=8000

spring.datasource.url=jdbc:mysql://localhost:3306/auth_services
spring.datasource.username=root
spring.datasource.password=ayush@123

spring.jpa.hibernate.ddl-auto=update
spring.jpa.show-sql=true

#debug logs
logging.level.org.springframework.security=debug

spring.main.allow-circular-references=true
4。建立 USER 實體
package com.tier3Hub.user_auth_service.entity;

import jakarta.persistence.*;
import lombok.AllArgsConstructor;
import lombok.Builder;
import lombok.Data;
import lombok.NoArgsConstructor;

import java.time.LocalDateTime;
import java.util.List;

@AllArgsConstructor
@NoArgsConstructor
@Data
@Builder
@Table
@Entity(name = "User")
public class User {
    @Id
    @GeneratedValue(strategy = GenerationType.IDENTITY)
    private Long id;
    private String username;
    private String password;
    private String email;
    private String phoneNumber;
    private List<String> roles;
    private LocalDateTime createdAt;
    private LocalDateTime updatedAt;
}
** 5. 建立服務和儲存庫類別和介面**
Repository.java
package com.tier3Hub.user_auth_service.Repository;

import com.tier3Hub.user_auth_service.entity.User;
import org.springframework.data.jpa.repository.JpaRepository;

public interface AuthRepository extends JpaRepository<User, Long> {

    User findByUsername(String username);
}
service.java
package com.tier3Hub.user_auth_service.service;

import com.tier3Hub.user_auth_service.dto.LoginResponse;
import com.tier3Hub.user_auth_service.dto.RegisterDTO;
import com.tier3Hub.user_auth_service.dto.RegisterResponse;

public interface AuthService {
    RegisterResponse register(RegisterDTO registerDTO);
}
6。建立用於登入、登入請求和回應的 DTO
CreateloginDTO.java
package com.tier3Hub.user_auth_service.dto;

import jakarta.validation.constraints.NotBlank;
import jakarta.validation.constraints.Size;
import lombok.AllArgsConstructor;
import lombok.Data;
import lombok.NoArgsConstructor;

@AllArgsConstructor
@NoArgsConstructor
@Data
public class LoginDTO {
    @NotBlank(message = "Username is required")
    @Size(min = 3, max = 20, message = "Username must be between 3 and 20 characters")
    private String username;

    @NotBlank(message = "Password is required")
    private String password;
}
loginResponse.java
package com.tier3Hub.user_auth_service.dto;

import lombok.AllArgsConstructor;
import lombok.Builder;
import lombok.Data;
import lombok.NoArgsConstructor;

@Data
@AllArgsConstructor
@NoArgsConstructor
@Builder
public class LoginResponse {
    private String accessToken;
    private String tokenType = "Bearer";
}
註冊DTO.java
package com.tier3Hub.user_auth_service.dto;

import jakarta.validation.constraints.Email;
import jakarta.validation.constraints.NotBlank;
import jakarta.validation.constraints.Size;
import lombok.AllArgsConstructor;
import lombok.Data;
import lombok.NoArgsConstructor;

@AllArgsConstructor
@NoArgsConstructor
@Data
public class RegisterDTO {
    @NotBlank(message = "Username is required")
    @Size(min = 3, max = 20, message = "Username must be between 3 and 20 characters")
    private String username;

    @NotBlank(message = "Password is required")
    @Size(min = 8, message = "Password must be at least 8 characters")
    private String password;

    @NotBlank(message = "Email is required")
    @Email(message = "Email should be valid")
    private String email;
}
RegisterResponse.java
package com.tier3Hub.user_auth_service.dto;

import lombok.AllArgsConstructor;
import lombok.Data;
import lombok.NoArgsConstructor;

import java.time.LocalDateTime;

@AllArgsConstructor
@NoArgsConstructor
@Data
public class RegisterResponse {
    private Long id;
    private String username;
    private String email;
    private LocalDateTime createdAt;
    private LocalDateTime updatedAt;
}
*7。為了從 API 發送自訂回應,我們使用 ResponseHandler.java *
package com.tier3Hub.user_auth_service.utils;

import org.springframework.http.HttpStatus;
import org.springframework.http.ResponseEntity;

import java.util.HashMap;
import java.util.Map;

public class ResponseHandler {
    public static ResponseEntity<Object> generateResponse(String message, HttpStatus status, Object responseObj) {
        Map<String, Object> map = new HashMap<String, Object>();
        map.put("message", message);
        map.put("status", status.value());
        map.put("data", responseObj);
        return new ResponseEntity<Object>(map, status);
    }

}
8. for storing some constants we create the class inside the utils package that is ApplicationConstants.java
package com.tier3Hub.user_auth_service.utils;

public class AppConstants {
    public static final String[] PUBLIC_URLS = { "/v3/api-docs/**", "/swagger-ui/**", "/api/auth/register/**", "/api/auth/login/**","/api/auth/registerAdmin/**" };
}
9. for converting the object one to another we use the dependency that is model mapper for configuration that we create the class inside the config package that is ApplicationConfigs.java
package com.tier3Hub.user_auth_service.config;

import org.modelmapper.ModelMapper;
import org.springframework.context.annotation.Bean;
import org.springframework.context.annotation.Configuration;

@Configuration
public class ApplicationConfigs {
    @Bean
    public ModelMapper modelMapper()
    {
        return new ModelMapper();
    }
}
**
This is the basic setup that we do for every spring-boot application we create now securing the rest endpoint with JWT we started.
**
now inside the security package we create the class called JWTFilter.java
The JWTFilter is a custom Spring Security filter that intercepts HTTP requests to validate JWTs. It checks for the "Authorization" header, extracts the token, and retrieves the username. If the token is valid, it creates an authentication token with user details and sets it in the security context, allowing the application to recognize the authenticated user for further processing.
package com.tier3Hub.user_auth_service.security;

import jakarta.servlet.FilterChain;
import jakarta.servlet.ServletException;
import jakarta.servlet.http.HttpServletRequest;
import jakarta.servlet.http.HttpServletResponse;
import org.springframework.beans.factory.annotation.Autowired;
import org.springframework.security.authentication.UsernamePasswordAuthenticationToken;
import org.springframework.security.core.context.SecurityContextHolder;
import org.springframework.security.core.userdetails.UserDetails;
import org.springframework.security.core.userdetails.UserDetailsService;
import org.springframework.security.web.authentication.WebAuthenticationDetailsSource;
import org.springframework.stereotype.Service;
import org.springframework.web.filter.OncePerRequestFilter;

import java.io.IOException;

@Service
public class JWTFilter extends OncePerRequestFilter {
    @Autowired
    private UserDetailsService userDetailsService;

    @Autowired
    private JWTUtil jwtUtil;

    @Override
    protected void doFilterInternal(HttpServletRequest request, HttpServletResponse response, FilterChain chain) throws ServletException, IOException {
        String authorizationHeader = request.getHeader("Authorization");
        String username = null;
        String jwt = null;
        if (authorizationHeader != null && authorizationHeader.startsWith("Bearer ")) {
            jwt = authorizationHeader.substring(7);
            username = jwtUtil.extractUsername(jwt);
        }
        if (username != null) {
            UserDetails userDetails = userDetailsService.loadUserByUsername(username);
            if (jwtUtil.validateToken(jwt)) {
                UsernamePasswordAuthenticationToken auth = new UsernamePasswordAuthenticationToken(userDetails, null, userDetails.getAuthorities());
                auth.setDetails(new WebAuthenticationDetailsSource().buildDetails(request));
                SecurityContextHolder.getContext().setAuthentication(auth);
            }
        }
        chain.doFilter(request, response);
    }
}
create the class JWTUtil.java
The JWTUtil class manages JWT operations, including extracting usernames and expiration dates from tokens. It generates new tokens using a secret key and validates existing tokens by checking their expiration. The class uses HMAC for signing and includes methods to parse claims and determine if tokens are expired, ensuring secure authentication and authorization in the application.
package com.tier3Hub.user_auth_service.security;

import io.jsonwebtoken.Claims;
import io.jsonwebtoken.Jwts;
import io.jsonwebtoken.security.Keys;
import org.springframework.stereotype.Service;

import javax.crypto.SecretKey;
import java.util.Date;
import java.util.HashMap;
import java.util.Map;

@Service
public class JWTUtil {

    private String SECRET_KEY = "TaK+HaV^uvCHEFsEVfypW#7g9^k*Z8$V";

    private SecretKey getSigningKey() {
        return Keys.hmacShaKeyFor(SECRET_KEY.getBytes());
    }

    public String extractUsername(String token) {
        Claims claims = extractAllClaims(token);
        return claims.getSubject();
    }

    public Date extractExpiration(String token) {
        return extractAllClaims(token).getExpiration();
    }

    private Claims extractAllClaims(String token) {
        return Jwts.parser()
                .verifyWith(getSigningKey())
                .build()
                .parseSignedClaims(token)
                .getPayload();
    }

    private Boolean isTokenExpired(String token) {
        return extractExpiration(token).before(new Date());
    }

    public String generateToken(String username) {
        Map<String, Object> claims = new HashMap<>();
        return createToken(claims, username);
    }

    private String createToken(Map<String, Object> claims, String subject) {
        return Jwts.builder()
                .claims(claims)
                .subject(subject)
                .header().empty().add("typ","JWT")
                .and()
                .issuedAt(new Date(System.currentTimeMillis()))
                .expiration(new Date(System.currentTimeMillis() + 1000 * 60 * 50)) // 5 minutes expiration time
                .signWith(getSigningKey())
                .compact();
    }

    public Boolean validateToken(String token) {
        return !isTokenExpired(token);
    }
}
*configure the Spring security and add some modifictaion we create the class SecurityConfig.java *
The SecurityConfig class sets up security for the application using Spring Security. It defines access rules, allowing public endpoints while restricting others based on user roles. The class incorporates a JWT filter to validate tokens and uses BCrypt for password encoding. It also configures an authentication manager with a custom user details service for secure user authentication.
package com.tier3Hub.user_auth_service.config;

import com.tier3Hub.user_auth_service.security.JWTFilter;
import com.tier3Hub.user_auth_service.service.UserInfoConfigManager;
import com.tier3Hub.user_auth_service.utils.AppConstants;
import org.springframework.beans.factory.annotation.Autowired;
import org.springframework.context.annotation.Bean;
import org.springframework.context.annotation.Configuration;
import org.springframework.security.authentication.AuthenticationManager;
import org.springframework.security.config.annotation.authentication.builders.AuthenticationManagerBuilder;
import org.springframework.security.config.annotation.authentication.configuration.AuthenticationConfiguration;
import org.springframework.security.config.annotation.web.builders.HttpSecurity;
import org.springframework.security.config.annotation.web.configuration.EnableWebSecurity;
import org.springframework.security.config.annotation.web.configurers.AbstractHttpConfigurer;
import org.springframework.security.crypto.bcrypt.BCryptPasswordEncoder;
import org.springframework.security.crypto.password.PasswordEncoder;
import org.springframework.security.web.SecurityFilterChain;
import org.springframework.security.web.authentication.UsernamePasswordAuthenticationFilter;

@Configuration
@EnableWebSecurity
public class SecurityConfig {
    @Autowired
    private JWTFilter jwtFilter;

    @Autowired
    private UserInfoConfigManager userInfoConfigManager;

    @Bean
    public SecurityFilterChain securityFilterChain(HttpSecurity http) throws Exception {
        return http.authorizeHttpRequests(request -> request
                        .requestMatchers(AppConstants.PUBLIC_URLS).permitAll()
                        .requestMatchers("/api/test/public/hello/**").hasAnyRole("USER","ADMIN")
                        .requestMatchers("/api/test/private/**").hasRole("ADMIN")
                        .anyRequest()
                        .authenticated())
                .csrf(AbstractHttpConfigurer::disable)
                .addFilterBefore(jwtFilter, UsernamePasswordAuthenticationFilter.class)
                .build();
    }

    @Autowired
    public void configureGlobal(AuthenticationManagerBuilder auth) throws Exception {
        auth.userDetailsService(userInfoConfigManager).passwordEncoder(passwordEncoder());
    }

    @Bean
    public PasswordEncoder passwordEncoder() {
        return new BCryptPasswordEncoder();
    }

    @Bean
    public AuthenticationManager authenticationManager(AuthenticationConfiguration auth) throws Exception {
        return auth.getAuthenticationManager();
    }
}
The securityFilterChain method configures access rules for different API endpoints in the Spring application. It permits public URLs and applies role-based access control for user and admin roles. Role-based authentication restricts resource access based on user roles (e.g., USER, ADMIN). In Spring Boot, you define roles and configure security settings in the SecurityConfig class to specify access permissions. During user registration, assign roles, and use annotations like @PreAuthorize to enforce role checks in controllers. This approach enhances security, allows easy permission management, and simplifies user access rights as the application scales. Implementing role-based auth provides flexibility and maintainability for your user management system. CSRF protection is disabled, and a custom JWT filter is added to authenticate requests based on JSON Web Tokens, ensuring secure and controlled access to resources.
configureGlobal method handle configures global authentication settings in a Spring application. It uses a custom user details service for loading user data and a BCrypt password encoder for secure password hashing. Additionally, it provides an AuthenticationManager bean for handling authentication processes, ensuring a secure and efficient user authentication system that leverages strong password management practices.
create the endpoints for register and login
package com.tier3Hub.user_auth_service.Controller;


import com.tier3Hub.user_auth_service.dto.LoginDTO;
import com.tier3Hub.user_auth_service.dto.LoginResponse;
import com.tier3Hub.user_auth_service.dto.RegisterDTO;
import com.tier3Hub.user_auth_service.security.JWTUtil;
import com.tier3Hub.user_auth_service.service.AuthService;
import com.tier3Hub.user_auth_service.service.UserInfoConfigManager;
import com.tier3Hub.user_auth_service.utils.ResponseHandler;
import jakarta.validation.Valid;
import org.springframework.beans.factory.annotation.Autowired;
import org.springframework.http.HttpStatus;
import org.springframework.http.ResponseEntity;
import org.springframework.security.authentication.AuthenticationManager;
import org.springframework.security.authentication.UsernamePasswordAuthenticationToken;
import org.springframework.security.core.Authentication;
import org.springframework.security.core.context.SecurityContext;
import org.springframework.security.core.userdetails.UserDetails;
import org.springframework.web.bind.annotation.PostMapping;
import org.springframework.web.bind.annotation.RequestBody;
import org.springframework.web.bind.annotation.RequestMapping;
import org.springframework.web.bind.annotation.RestController;

@RestController
@RequestMapping("/api/auth")
public class AuthController {
    @Autowired
    JWTUtil jwtUtil;

    @Autowired
    AuthService authService;

    @Autowired
    AuthenticationManager authenticationManager;

    @Autowired
    private UserInfoConfigManager userInfoConfigManager;

    @PostMapping("/register")
    public ResponseEntity<Object> register(@Valid @RequestBody RegisterDTO registerDTO) {
        return ResponseHandler.generateResponse("User registered successfully", HttpStatus.OK, authService.register(registerDTO));
    }

    @PostMapping("/login")
    public ResponseEntity<Object> login(@Valid @RequestBody LoginDTO loginDTO) {
        try {
            Authentication authenticate = authenticationManager
                    .authenticate(new UsernamePasswordAuthenticationToken(loginDTO.getUsername(), loginDTO.getPassword()));
            UserDetails userDetails = userInfoConfigManager.loadUserByUsername(loginDTO.getUsername());
            String jwt = jwtUtil.generateToken(userDetails.getUsername());
            LoginResponse loginResponse = LoginResponse
                    .builder()
                    .accessToken(jwt)
                    .build();
            return ResponseHandler.generateResponse("User logged in successfully", HttpStatus.OK, loginResponse);
        }
        catch (Exception e)
        {
            return new ResponseEntity<>("Incorrect username or password", HttpStatus.BAD_REQUEST);
        }
    }
}
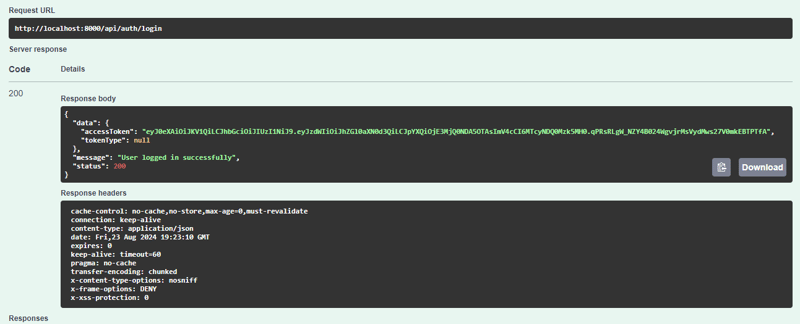
This login method in the AuthController handles user login requests. It takes a LoginDTO containing the username and password, validates them, and attempts authentication using the AuthenticationManager. Upon successful authentication, it retrieves user details and generates a JWT token using the JWTUtil class. The token is then included in a LoginResponse object and returned with a success message. If authentication fails, it catches the exception and returns a "Incorrect username or password" response with a 400 status code.
generateToken(String username): This method creates an empty claims map and calls the createToken method with the username as the subject. It serves as the entry point for token generation.
c*reateToken(Map claims, String subject):* This method builds the JWT using the Jwts.builder(). It sets the claims, subject, and token metadata, such as issue date and expiration time (set to 5 minutes). The token is then signed with a secret key and compacted into a string format for transmission.
now we run the application
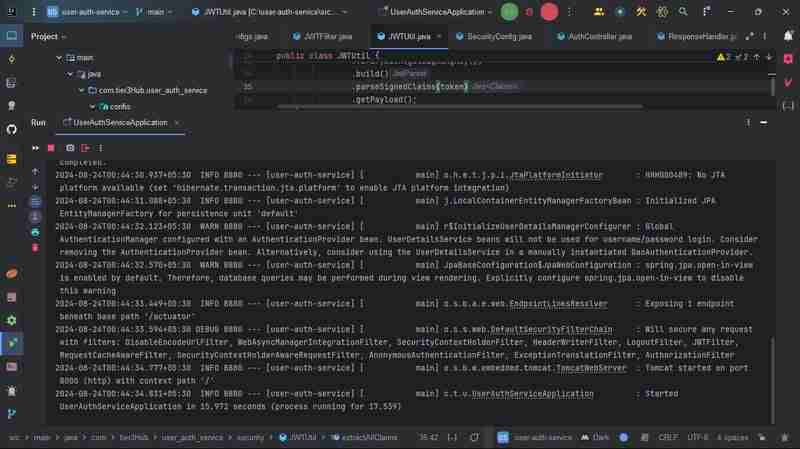
and hit the URL here our application is runing on 8000 port
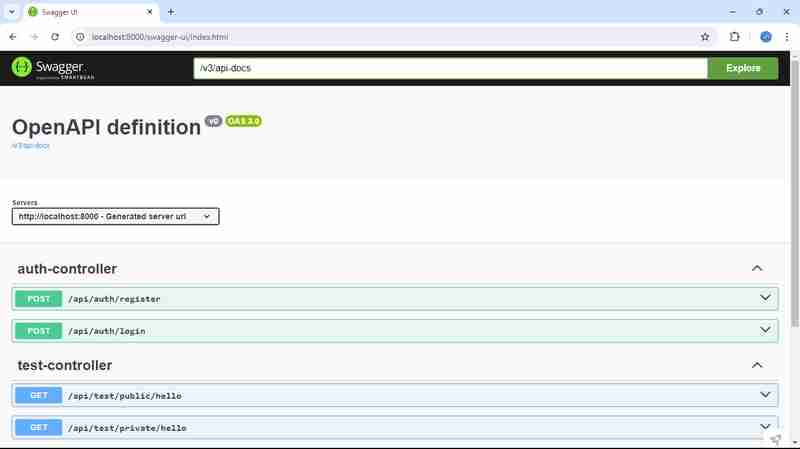
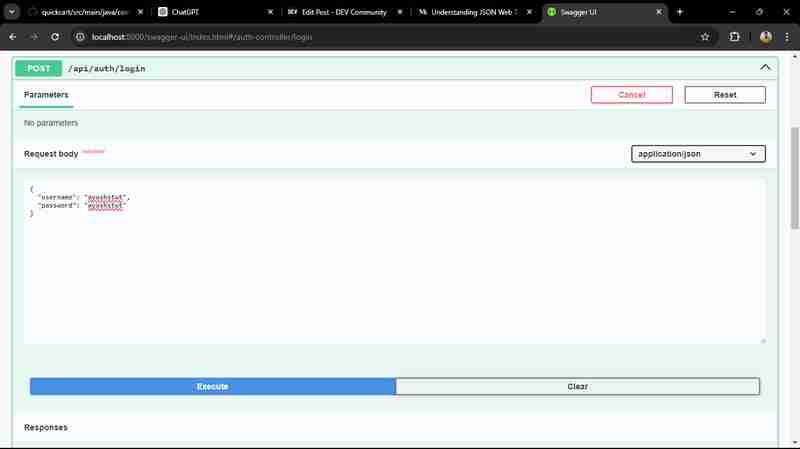
http://localhost:8000/swagger-ui/index.html
在專案中使用 Swagger 可以增強 API 文件和測試。它為開發人員提供了一個用戶友好的介面,以探索您的 API、了解請求/回應結構並直接從文件測試端點。透過整合 Swagger,您可以根據程式碼註釋自動產生 API 文檔,使前端和後端開發人員更輕鬆地高效協作。
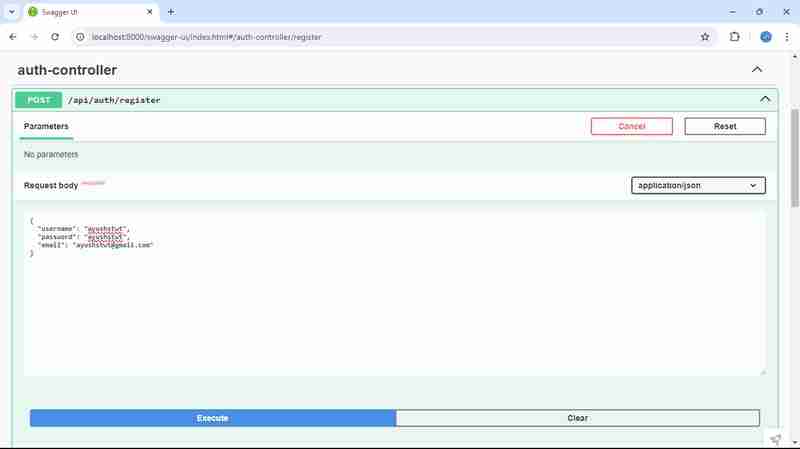
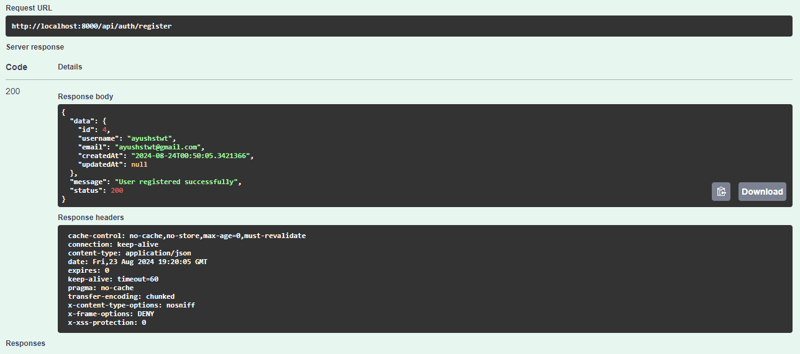
首先我們註冊用戶
我們得到這樣的回覆
之後我們登入使用者
我們得到這樣的回覆
該專案在 Spring Boot 應用程式中使用 JWT(JSON Web Tokens)實現基於角色的身份驗證。它具有安全的身份驗證機制,使用者可以註冊和登錄,接收根據分配的角色(例如 USER 或 ADMIN)授予存取權限的 JWT。 SecurityConfig 類別設定存取權限,確保每個人都可以存取公共端點,同時將敏感操作僅限於授權使用者。 JWTUtil 類別處理令牌建立、驗證和使用者提取。總體而言,此設定增強了安全性,實現了整個應用程式的無縫且強大的存取控制。
該專案採用了一個全面的安全框架,利用 Spring Security 進行使用者身份驗證和授權。 AuthController 方便用戶註冊和登錄,在身份驗證成功後產生 JWT。該應用程式使用 JWTFilter 攔截請求並驗證令牌,確保只有經過身份驗證的使用者才能存取受保護的資源。透過整合基於角色的存取控制,該專案提供了靈活且安全的使用者管理系統。這種設計不僅提高了安全性,還透過最大限度地減少重複登入的需要來增強使用者體驗。總的來說,它為建立可擴展且安全的微服務奠定了堅實的基礎。
您可以在我的 GitHub 儲存庫上探索使用者驗證服務的完整原始程式碼。該專案展示了各種功能,例如用戶註冊、登入和使用 JWT 進行身份驗證的安全存取。請隨意查看、貢獻或將其用作您自己的專案的參考!
GitHub 儲存庫:https://github.com/ishrivasayush/user-auth-service
對於有興趣深入研究 JSON Web Tokens (JWT) 的人,我建議參觀 jwt.io。該資源提供了有關 JWT 的全面信息,包括其工作原理、結構和實際示例。這是理解基於令牌的身份驗證和授權的一個很好的起點,這對於現代 Web 應用程式至關重要。無論您是初學者還是想要刷新知識,jwt.io 都提供了有關安全管理使用者會話的寶貴見解。
以上是使用 Spring Security 保護微服務:實施 JWT的詳細內容。更多資訊請關注PHP中文網其他相關文章!


