
我們在訪問各種網站時都會遇到聊天機器人,其中一些在真人互動的背後運行,另一些則由人工智慧驅動。
在本文中,我們將逐步使用 TensorFlow 和 JavaScript 建立一個簡單的 AI 驅動的聊天機器人。聊天機器人將識別用戶命令並以預先定義的答案進行回應。
設定我們的項目
首先,我們為專案建立一個新目錄並使用 npm 對其進行初始化,在開始此步驟之前確保您的系統上安裝了 Node.js。
mkdir chatbot
cd chatbot
npm init -y
安裝必要的軟體包
我們將在我們的簡單專案中使用以下 npm 套件:
npm install @tensorflow/tfjs @tensorflow-models/universal sentence-encoder
建立意圖
建立一個名為intents.js的檔案來儲存意圖/命令,這些是聊天機器人將識別的使用者輸入類別(例如問候、產品查詢、訂單狀態)。
// intents.js
const intents = {
  greeting: ["hello", "hi", "hey", "good morning", "good evening", "howdy"],
  goodbye: ["bye", "goodbye", "see you later", "farewell", "catch you later"],
  thanks: ["thank you", "thanks", "much appreciated", "thank you very much"],
  product_inquiry: ["tell me about your products", "what do you sell?", "product information", "what can I buy?", "show me your products"],
  order_status: ["where is my order?", "order status", "track my order", "order tracking", "order update"],
  shipping_info: ["shipping information", "how do you ship?", "shipping methods", "delivery options", "how long does shipping take?"],
  return_policy: ["return policy", "how to return?", "return process", "can I return?", "returns"],
  payment_methods: ["payment options", "how can I pay?", "payment methods", "available payments"],
  support_contact: ["contact support", "how to contact support?", "customer support contact", "support info", "customer service contact"],
  business_hours: ["business hours", "working hours", "when are you open?", "opening hours", "store hours"]
};

module.exports = { intents }
建立回覆
建立另一個名為response.js的檔案來儲存預先定義的回應,這些是聊天機器人根據識別的意圖給出的預定義回應。
// responses.js
const responses = {
  greeting: "Hello! How can I help you today?",
  goodbye: "Goodbye! Have a great day!",
  thanks: "You're welcome! If you have any other questions, feel free to ask.",
  product_inquiry: "We offer a variety of products including electronics, books, clothing, and more. How can I assist you further?",
  order_status: "Please provide your order ID, and I will check the status for you.",
  shipping_info: "We offer various shipping methods including standard, express, and next-day delivery. Shipping times depend on the method chosen and your location.",
  return_policy: "Our return policy allows you to return products within 30 days of purchase. Please visit our returns page for detailed instructions.",
  payment_methods: "We accept multiple payment methods including credit/debit cards, PayPal, and bank transfers. Please choose the method that suits you best at checkout.",
  support_contact: "You can contact our support team via email at support@example.com or call us at 1-800-123-4567.",
  business_hours: "Our business hours are Monday to Friday, 9 AM to 5 PM. We are closed on weekends and public holidays."
};

module.exports = { responses };
載入 TensorFlow 和句子編碼器
建立一個名為chatbot.js的主腳本檔案並載入必要的函式庫和模型,我們非同步載入通用句子編碼器模型,並在模型載入後啟動聊天機器人。
// chatbot.js
const tf = require('@tensorflow/tfjs');
const use = require('@tensorflow-models/universal-sentence-encoder');
const { intents } = require('./intents');
const { responses } = require('./responses');
const readline = require('readline');

// Load the Universal Sentence Encoder model
let model;
use.load().then((loadedModel) => {
  model = loadedModel;
  console.log("Model loaded");
  startChatbot();
});
實現意圖辨識
新增一個函數來識別使用者輸入的意圖,我們使用通用編碼器將使用者輸入嵌入到高維向量中,然後根據意圖追蹤最高相似度得分。
async function recognizeIntent(userInput) {
  const userInputEmb = await model.embed([userInput]);
  let maxScore = -1;
  let recognizedIntent = null;

  for (const [intent, examples] of Object.entries(intents)) {
    // Embedding the example phrases for each intent & Calculating similarity scores between the user input embedding and the example embeddings
    const examplesEmb = await model.embed(examples);
    const scores = await tf.matMul(userInputEmb, examplesEmb, false, true).data();
    const maxExampleScore = Math.max(...scores);
    if (maxExampleScore > maxScore) {
      maxScore = maxExampleScore;
      recognizedIntent = intent;
    }
  }
  return recognizedIntent;
}
產生回應
新增一個函數以根據識別的意圖產生回應:
async function generateResponse(userInput) {
  const intent = await recognizeIntent(userInput);
  if (intent && responses[intent]) {
    return responses[intent];
  } else {
    return "I'm sorry, I don't understand that. Can you please rephrase?";
  }
}
實作聊天機器人互動
最後,透過設定從命令列讀取使用者輸入的介面來實現與聊天機器人的互動循環,提示使用者輸入並相應地產生回應:
function startChatbot() {
  const rl = readline.createInterface({
    input: process.stdin,
    output: process.stdout
  });

  console.log("Welcome to the customer service chatbot! Type 'quit' to exit.");
  rl.prompt();

  rl.on('line', async (line) => {
    const userInput = line.trim();
    if (userInput.toLowerCase() === 'quit') {
      console.log("Chatbot: Goodbye!");
      rl.close();
      return;
    }

    const response = await generateResponse(userInput);
    console.log(`Chatbot: ${response}`);
    rl.prompt();
  });
}
這是 chatbot.js 的完整程式碼:
// chatbot.js

const tf = require('@tensorflow/tfjs');
const use = require('@tensorflow-models/universal-sentence-encoder');
const { intents } = require('./intents');
const { responses } = require('./responses');
const readline = require('readline');

// Load the Universal Sentence Encoder model
let model;
use.load().then((loadedModel) => {
  model = loadedModel;
  console.log("Model loaded");
  startChatbot();
});

async function recognizeIntent(userInput) {
  const userInputEmb = await model.embed([userInput]);
  let maxScore = -1;
  let recognizedIntent = null;

  for (const [intent, examples] of Object.entries(intents)) {
    const examplesEmb = await model.embed(examples);
    const scores = await tf.matMul(userInputEmb, examplesEmb, false, true).data();
    const maxExampleScore = Math.max(...scores);
    if (maxExampleScore > maxScore) {
      maxScore = maxExampleScore;
      recognizedIntent = intent;
    }
  }

  return recognizedIntent;
}

async function generateResponse(userInput) {
  const intent = await recognizeIntent(userInput);
  if (intent && responses[intent]) {
    return responses[intent];
  } else {
    return "I'm sorry, I don't understand that. Can you please rephrase?";
  }
}

function startChatbot() {
  const rl = readline.createInterface({
    input: process.stdin,
    output: process.stdout
  });

  console.log("Welcome to the customer service chatbot! Type 'quit' to exit.");
  rl.prompt();

  rl.on('line', async (line) => {
    const userInput = line.trim();
    if (userInput.toLowerCase() === 'quit') {
      console.log("Chatbot: Goodbye!");
      rl.close();
      return;
    }

    const response = await generateResponse(userInput);
    console.log(`Chatbot: ${response}`);
    rl.prompt();
  });
}
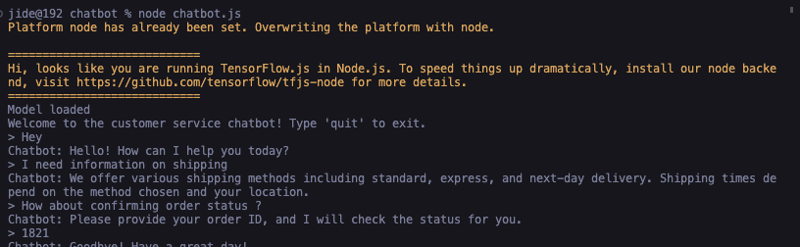
要運行聊天機器人,請執行 chatbot.js 檔案:
node chatbot.js
瞧!我們的命令輸出應該讓聊天機器人運作:
在本文中,我們使用 TensorFlow 和 JavaScript 建立了一個簡單的客戶服務聊天機器人。雖然此實現很基礎,但它為建立更複雜的聊天機器人提供了堅實的基礎。您可以透過使用 AXIOS 整合 API、新增更多意圖和回應或將其部署在 Web 平台上來擴充此專案。
編碼愉快!
?? 了解更多關於我
?? 在 LinkedIn 上聯絡
?? 訂閱我的部落格
以上是如何使用 TensorFlow 和 JavaScript 建立基本聊天機器人的詳細內容。更多資訊請關注PHP中文網其他相關文章!


