HTML 按鈕標籤允許使用 HTML 文件在網頁上建立活動按鈕控制項。這個元素在 body 標籤內宣告。為什麼我們需要一個按鈕元素?通常,當使用者造訪網頁時,他最常見的行為是點擊網站上的某個位置,從而轉到下一個 URL 頁面。為此,Button 元素無法單獨完成;它是由表單操作創建的,其中 Web 表單有一個預設的提交按鈕可以點擊。
按鈕是使用
文法:
與其他 HTML 標籤一樣,即使按鈕標籤也有開始和結束標籤,且按鈕類型是使用屬性定義的。
<button>
// some stuff like content / image
</button>
沒有使用特殊屬性,因為它們沒有任何必需的屬性;相反,它們被用作具有type=” 屬性的普通按鈕。“甚至這個元素也是使用CSS 設計的,其屬性可以改變按鈕標籤中的變化。這些屬性是 CSS 字體系列、字體粗細、文字裝飾和字體樣式。背景顏色等著色屬性和文字溢出和文字縮排等佈局屬性。
| S.no | Attribute Name | Description | Example |
| 1 | autofocus | It is considered a Boolean attribute. | |
| 2 | disabled | Making a button non-clickable. | |
| 3 | Form | It Creates a form | |
| 4 | formaction | It specifies the current location for submitting the form data. | |
| 5 | formnovalidate | It appears in gray and gives non-validation features. | |
| 6 | Formmethod | It specifies the methods while referring to the next web page(get the post of HTTP methods) | |
| 7 | formtarget | It specifies the target path for the server response when a form action is done. | |
| 8 | formenctype | It has been used when a form is submitted to the webserver for the response; it activates the type of content used. | |
| 8 | name | It specifies the button name used in the form element, which is used by form inputs. | |
| 9 | type | It specifies the type of button being used. It has three default values submit, reset, and text. | < button type “……” > |
| 10 | value | It gives an initial value when a button is used along with the form data | |
| 11 | tabindex | It specifies the tab key and the order does the preference. | |
| 12 | onclick | When a button is pressed, it runs a small javascript code behind it. |
Below are examples of implementing an HTML Button Tag:
Code:
<!DOCTYPE html>
<html lang="en">
<head>
<title> HTML button tag Example</title>
</head>
<body>
<h2>HTML button tag Example </h2>
<form action="/examples/html/action.php" method="post">
<p>
Employee Name: <input type="text" name="Employee-Name">
<button type="submit" value="Submit">Click</button>
<button type="reset" value="Reset">Reset</button>
</p>
</form>
</body>
</html>
Output:

Code:
<!DOCTYPE html>
<html>
<head>
<h3> <center> Example using CSS </center><h3>
</head>
<body>
Normal Class
<button type="button">Add to the First class</button>
<hr />
Economic Class
<button type="button" style="color: pink;"><b> Book Economic Class </b></button>
<hr />
Bussiness class
<button type="button" style="color: orange;"><b> Book Bussiness  Class </b></button>
<hr />
Departure
<button type="button" style="font: bold 12px Open Sans;">Norway </button><br />
</body>
</html>
Output:

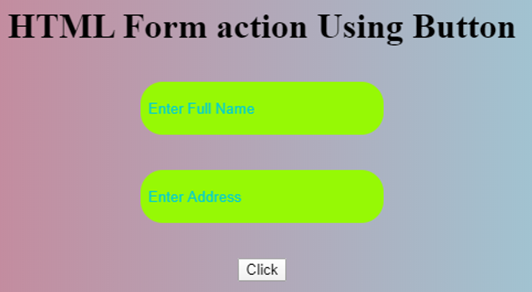
With CSS: Here, we have used padding and margin property. Here are some ways to look at the page better. To create a button with rounded corners, use border-radius.
Code:
<html>
<style>
body {
color: #000;
height: 90vh;
background: linear-gradient(-90deg, #a1c3d1 0%, #c48b9e 100%) no-repeat;
text-align: center;
}
input {
width: 280px;
display: block;
margin: 2rem auto;
border: 3px solid #fbc7ff;
padding: 7px;
background: transparent;
border-radius: 25px;
outline: none;
}
::placeholder {
color: #00ced1;
}
.btn {
background:#96f905;
border: none;
height: 3rem;
border-radius: 20px;
width: 220px;
display: block;
color: #96f905;
outline: none;
margin: 2rem auto;
}
</style>
<body>
<h1>HTML Form action Using Button</h1>
<form action="/action_page.php" method="get">
<input type="text" name=" Full Name" placeholder="Enter Full Name" class="btn">
<input type="text" name=" Address" placeholder="Enter Address" class="btn">
<button type="press" value="Press"> Click </button>
</form>
</body>
</htmlOutput:

The below example shows how to use the attribute autofocus with button element; in an example, when a page Loads, it focuses on the first HTML control.
Code:
<!DOCTYPE html>
<html>
<head>
<title>
Button Demo
<button>autofocus Attribute
</title>
</head>
<body style="text-align:center">
<h1 style="color: blue;">
EDUCBA Web Tutorial
</h1>
<h2> Button Tag
<button>autofocus Attribute
</h2>
<h2> Button Tag
<button>autofocus Attribute
</h2>
<button id="GFG"
autofocus>
Press
</button>
<br>
</body>
</html>
Output:

onclick attribute demo. In the below example, I have used JavaScript to take action in the button; meanwhile, it alerts a dialog box with a text message. We use a JavaScript function to make the critical decision by activating the button with onclick().
Code:
<!DOCTYPE html>
<html>
<head>
<title>HTML  On Click Button Demo</title>
</head>
<body>
<h3> HTML  On Click Button Demo</h3>
<button onclick="alert('Hi Welcome to EDUCBA!')"> Press me... </button>
</body>
</html>Output: Before the button press

Alert Message – After the Button click

Code:
<!DOCTYPE html>
<html>
<head>
<script type="text/javascript" src="scripts.js">
</script>
<link rel="stylesheet" href="styles.css">
<script type="text/javascript" src="scripts.js"></script>
<link rel="stylesheet" href="styles.css">
</head>
<body>
<p>The button loads to the next web page!</p>
<a href="https://www.educba.com" target="_blank">
<button>Submit!</button>
</a>
</body>
</html>
Output:

In summary, we have learned about the HTML Button tag. This tag initiates an action and submits content within an HTML document. Important aspects of the website create an easy button, CSS, and JavaScript to look colorful. You can also learn many options related to buttons.
以上是HTML 按鈕標籤的詳細內容。更多資訊請關注PHP中文網其他相關文章!


