
Angular 中的
狀態管理確保資料在應用程式的所有部分之間一致且有效率地共用。中央儲存保存狀態,而不是每個元件管理自己的資料。
這種集中化確保當資料發生變化時,所有元件都會自動反映更新後的狀態,從而實現一致的行為和更簡單的程式碼。它還使應用程式更易於維護和擴展,因為資料流是從單一事實來源進行管理的。
在本文中,我們將透過建立一個簡單的購物車應用程式來探索如何使用 NgRx 在 Angular 中實現狀態管理。我們將介紹 NgRx 的核心概念,例如 Store、Actions、Reducers、Selectors、 和 Effects,並示範這些部分如何組合在一起來管理應用程式的狀態有效。
Angular 中的狀態 是指您的應用程式需要管理和顯示的數據,例如購物車的內容。
1。一致性: 它確保所有元件中的資料是統一的。當一處資料變更時,中央儲存會自動更新所有相關元件,防止不一致。
2。簡化的資料流:狀態管理允許任何元件直接從中央儲存存取或更新數據,而不是在元件之間手動傳遞數據,從而使應用程式的資料流更易於管理和理解。
3。更輕鬆的維護和可擴展性:透過集中資料管理,狀態管理減少了程式碼重複和複雜性。這使得應用程式在成長時更容易維護、調試和擴展。
4。效能最佳化:狀態管理解決方案通常附帶最佳化效能的工具,例如選擇性地僅更新需要對狀態變更做出反應的元件,而不是重新渲染整個應用程式。
NgRx 是 Angular 的狀態管理函式庫,可協助以可預測的方式管理和維護應用程式的狀態。
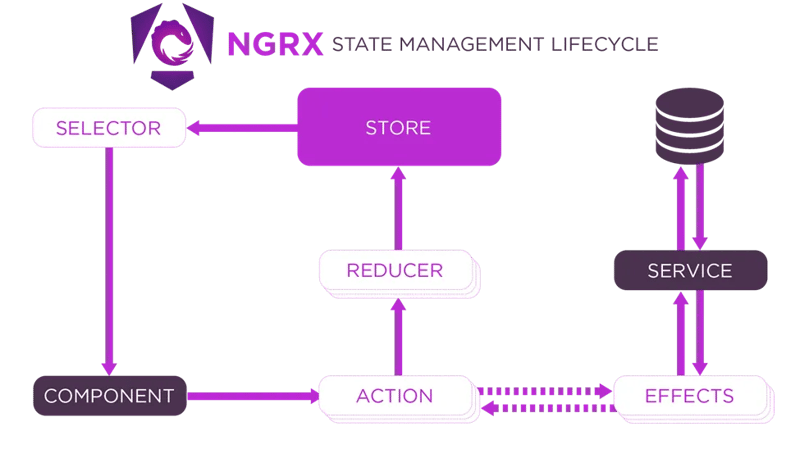
1。組件
元件是使用者與您的應用程式互動的地方。它可能是將商品添加到購物車的按鈕。
元件和服務是分開的,不直接相互通信,而是在效果中使用服務,從而創建與傳統Angular應用程式不同的應用程式結構。
2。行動
操作描述發生的事情並包含任何必要的有效負載(資料)。
3。減速機
依操作更新狀態。
4。商店
商店是一個集中的地方,保存應用程式的整個狀態。
5。選擇器
從元件儲存中擷取資料。
6。效果
效果是你處理不屬於reducer的邏輯的地方,例如API呼叫。
7。服務
服務執行實際的業務邏輯或 API 呼叫。效果通常使用服務來執行任務,例如從伺服器取得資料。
當應用程式的複雜性證明合理時,請使用 NgRx,但對於簡單的應用程序,請堅持使用更簡單的狀態管理方法。 Angular 的 services、signals 和 @Input/@Output 元件之間的綁定通常足以管理較不複雜的應用程式中的狀態。
1.建立一個新的 Angular 專案:
ng new shopping-cart
2。安裝 NGRX 和效果
若要安裝 NGRX 和 Effects,請在終端機中執行以下命令:
ng add @ngrx/store@latest

ng add @ngrx/effects
3。定義產品模型
在 src/app 目錄中,建立一個名為 product.model.ts
定義Product介面來表示產品的結構:
export interface Product {
    id: string;
    name: string;
    price: number;
    quantity: number;
}
4。設定狀態管理
第 1 步:在 src/app 目錄中建立 state 資料夾
第 2 步:定義購物車操作
在狀態資料夾中建立cart.actions.ts。
import { createActionGroup, emptyProps, props } from '@ngrx/store';
import { Product } from '../product.model';

export const CartActions = createActionGroup({
  source: 'Cart',
  events: {
    'Add Product': props<{ product: Product }>(),
    'Remove Product': props<{ productId: string }>(),
    'Update Quantity': props<{ productId: string; quantity: number }>(),
    'Load Products': emptyProps,
  },
});

export const CartApiActions = createActionGroup({
  source: 'Cart API',
  events: {
    'Load Products Success': props<{ products: Product[] }>(),
    'Load Products Failure': props<{ error: string }>(),
  },
});
第3步:建立Reducers
在 state 資料夾中建立 cart.reducer.ts。
import { createReducer, on } from '@ngrx/store';
import { Product } from '../product.model';
import { CartActions, CartApiActions } from './cart.actions';

// Initial state for products and cart
export const initialProductsState: ReadonlyArray<Product> = [];
export const initialCartState: ReadonlyArray<Product> = [];

// Reducer for products (fetched from API)
export const productsReducer = createReducer(
  initialProductsState,
  on(CartApiActions.loadProductsSuccess, (_state, { products }) => products)
);

// Reducer for cart (initially empty)
export const cartReducer = createReducer(
  initialCartState,
  on(CartActions.addProduct, (state, { product }) => {
    const existingProduct = state.find(p => p.id === product.id);
    if (existingProduct) {
      return state.map(p =>
        p.id === product.id ? { ...p, quantity: p.quantity + product.quantity } : p
      );
    }
    return [...state, product];
  }),
  on(CartActions.removeProduct, (state, { productId }) =>
    state.filter(p => p.id !== productId)
  ),
  on(CartActions.updateQuantity, (state, { productId, quantity }) =>
    state.map(p =>
      p.id === productId ? { ...p, quantity } : p
    )
  )
);
第 4 步:建立選擇器
在 state 資料夾中,建立 cart.selectors.ts
import { createSelector, createFeatureSelector } from '@ngrx/store';
import { Product } from '../product.model';

export const selectProducts = createFeatureSelector<ReadonlyArray<Product>>('products');

export const selectCart = createFeatureSelector<ReadonlyArray<Product>>('cart');

export const selectCartTotal = createSelector(selectCart, (cart) =>
  cart.reduce((total, product) => total + product.price * product.quantity, 0)
);
Step 5: Create Effects
Create a new file cart.effects.ts in the state folder that listens for the Load Products action, uses the service to fetch products, and dispatches either a success or failure action.
import { Injectable } from '@angular/core';
import { Actions, createEffect, ofType } from '@ngrx/effects';
import { ProductService } from '../product.service';
import { CartActions, CartApiActions } from './cart.actions';
import { catchError, map, mergeMap } from 'rxjs/operators';
import { of } from 'rxjs';

@Injectable()
export class CartEffects {
  loadProducts$ = createEffect(() =>
    this.actions$.pipe(
      ofType(CartActions.loadProducts),
      mergeMap(() =>
        this.productService.getProducts().pipe(
          map(products => CartApiActions.loadProductsSuccess({ products })),
          catchError(error => of(CartApiActions.loadProductsFailure({ error })))
        )
      )
    )
  );

  constructor(
    private actions$: Actions,
    private productService: ProductService
  ) {}
}
5. Connect the State Management to Your App
In a file called app.config.ts, set up configurations for providing the store and effects to the application.
import { ApplicationConfig } from '@angular/core';
import { provideStore } from '@ngrx/store';
import { provideHttpClient } from '@angular/common/http';
import { cartReducer, productsReducer } from './state/cart.reducer';
import { provideEffects } from '@ngrx/effects';
import { CartEffects } from './state/cart.effects';

export const appConfig: ApplicationConfig = {
  providers: [
    provideStore({
      products: productsReducer,
      cart: cartReducer
    }),
    provideHttpClient(),
    provideEffects([CartEffects])
],
};
6. Create a Service to Fetch Products
In the src/app directory create product.service.ts to implement the service to fetch products
import { Injectable } from '@angular/core';
import { Observable, of } from 'rxjs';
import { Product } from './product.model';

@Injectable({ providedIn: 'root' })
export class ProductService {
  getProducts(): Observable<Array<Product>> {
    return of([
      { id: '1', name: 'Product 1', price: 10, quantity: 1 },
      { id: '2', name: 'Product 2', price: 20, quantity: 1 },
    ]);
  }
}
7. Create the Product List Component
Run the following command to generate the component: ng generate component product-list
This component displays the list of products and allows adding them to the cart.
Modify the product-list.component.ts file:
import { Component, OnInit } from '@angular/core';
import { CommonModule } from '@angular/common';
import { Store } from '@ngrx/store';
import { Observable } from 'rxjs';
import { Product } from '../product.model';
import { selectProducts } from '../state/cart.selectors';
import { CartActions } from '../state/cart.actions';

@Component({
  selector: 'app-product-list',
  standalone: true,
  templateUrl: './product-list.component.html',
  styleUrls: ['./product-list.component.css'],
  imports: [CommonModule],
})
export class ProductListComponent implements OnInit {
  products$!: Observable<ReadonlyArray<Product>>;

  constructor(private store: Store) {

  }

  ngOnInit(): void {
    this.store.dispatch(CartActions.loadProducts()); // Dispatch load products action
    this.products$ = this.store.select(selectProducts); // Select products from the store
  }

  onAddToCart(product: Product) {
    this.store.dispatch(CartActions.addProduct({ product }));
  }
}
Modify the product-list.component.html file:
<div *ngIf="products$ | async as products">
  <div class="product-item" *ngFor="let product of products">
    <p>{{product.name}}</p>
    <span>{{product.price | currency}}</span>
    <button (click)="onAddToCart(product)" data-test="add-button">Add to Cart</button>
  </div>
</div>
8. Create the Shopping Cart Component
Run the following command to generate the component: ng generate component shopping-cart
This component displays the products in the cart and allows updating the quantity or removing items from the cart.
Modify the shopping-cart.component.ts file:
import { Component, OnInit } from '@angular/core';
import { CommonModule } from '@angular/common';
import { Store } from '@ngrx/store';
import { Observable } from 'rxjs';
import { Product } from '../product.model';
import { selectCart, selectCartTotal } from '../state/cart.selectors';
import { CartActions } from '../state/cart.actions';

@Component({
  selector: 'app-shopping-cart',
  standalone: true,
  imports: [CommonModule],
  templateUrl: './shopping-cart.component.html',
  styleUrls: ['./shopping-cart.component.css'],
})
export class ShoppingCartComponent implements OnInit {
  cart$: Observable<ReadonlyArray<Product>>;
  cartTotal$: Observable<number>;

  constructor(private store: Store) {
    this.cart$ = this.store.select(selectCart);
    this.cartTotal$ = this.store.select(selectCartTotal);
  }

  ngOnInit(): void {}

  onRemoveFromCart(productId: string) {
    this.store.dispatch(CartActions.removeProduct({ productId }));
  }

  onQuantityChange(event: Event, productId: string) {
    const inputElement = event.target as HTMLInputElement;
    let quantity = parseInt(inputElement.value, 10);

    this.store.dispatch(CartActions.updateQuantity({ productId, quantity }));
  }
}
Modify the shopping-cart.component.html file:
<div *ngIf="cart$ | async as cart">
  <div class="cart-item" *ngFor="let product of cart">
    <p>{{product.name}}</p><span>{{product.price | currency}}</span>
    <input type="number" [value]="product.quantity" (input)="onQuantityChange($event, product.id)" />
    <button (click)="onRemoveFromCart(product.id)" data-test="remove-button">Remove</button>
  </div>
  <div class="total">
    Total: {{cartTotal$ | async | currency}}
  </div>
</div>
Modify the shopping-cart.component.css file:
.cart-item {
  display: flex;
  justify-content: space-between;
  align-items: center;
  margin-bottom: 10px;
}

.cart-item p {
  margin: 0;
  font-size: 16px;
}

.cart-item input {
  width: 50px;
  text-align: center;
}

.total {
  font-weight: bold;
  margin-top: 20px;
}
9. Put Everything Together in the App Component
This component will display the product list and the shopping cart
Modify the app.component.ts file:
import { Component } from '@angular/core';
import { CommonModule } from '@angular/common';
import { ProductListComponent } from './product-list/product-list.component';
import { ShoppingCartComponent } from './shopping-cart/shopping-cart.component';
import { NgIf } from '@angular/common';

@Component({
  selector: 'app-root',
  standalone: true,
  templateUrl: './app.component.html',
  imports: [CommonModule, ProductListComponent, ShoppingCartComponent, NgIf],
})
export class AppComponent {}
Modify the app.component.html file:
<!-- app.component.html -->
<h2>Products</h2>
<app-product-list></app-product-list>

<h2>Shopping Cart</h2>
<app-shopping-cart></app-shopping-cart>
10. Running the Application
Finally, run your application using ng serve.
Now, you can add products to your cart, remove them, or update their quantities.
In this article, we built a simple shopping cart application to demonstrate the core concepts of NgRx, such as the Store, Actions, Reducers, Selectors, and Effects. This example serves as a foundation for understanding how NgRx works and how it can be applied to more complex applications.
As your Angular projects grow in complexity, leveraging NgRx for state management will help you maintain consistency across your application, reduce the likelihood of bugs, and make your codebase easier to maintain.
To get the code for the above project, click the link below:
https://github.com/anthony-kigotho/shopping-cart
以上是使用 NgRx 掌握 Angular 狀態管理的詳細內容。更多資訊請關注PHP中文網其他相關文章!


